配反向代理最坑的不是
proxy_pass写错,而是写了却不知道自己踩中哪条规则 :location /api/配了proxy_pass http://后端:9090/,后端收到的却是/user/list,路径前缀凭空消失;location ^~ /static/明明写了,图片请求还是被后面的正则拦走;proxy_pass后面一个/的差别,能让 404 和 200 同时出现在同一份配置里。本文从 Nginx 部署与配置文件的五层结构讲起,把虚拟主机、HTTPS、Basic Auth、动静分离与 PHP 站点补齐,最后用一整章拆透location的匹配顺序与proxy_pass的路径重构规则,再跑一遍代理本地与代理远端的三类匹配实战。全文围绕一个问题:请求进来之后,到底命中了哪条 location,转发出去的 URL 长什么样。文中命令名与选项均标注英文原意,完整清单见文末《附:命令英文全称速查表》。
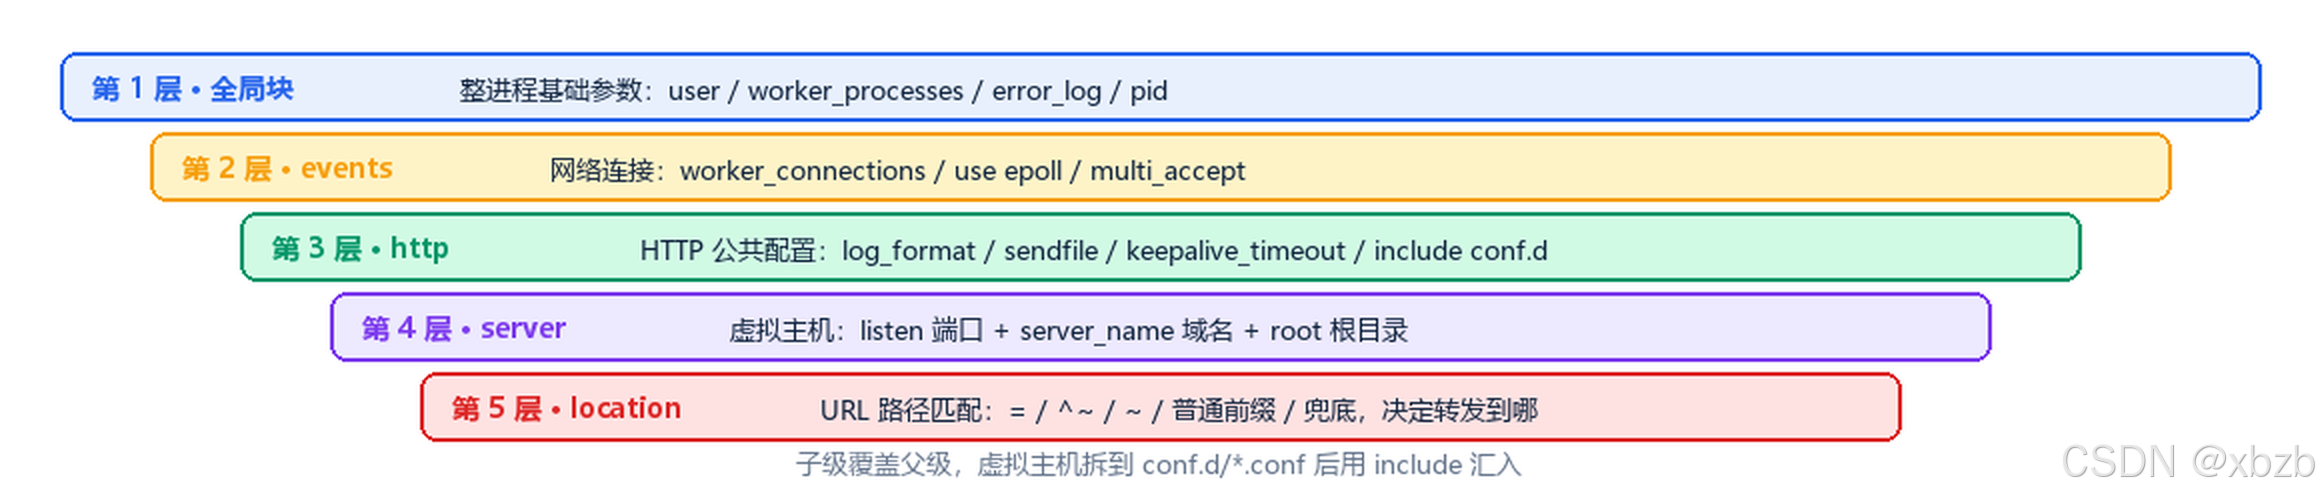
本文概要:
| 项目 | 内容 |
|---|---|
| 文章主题 | Nginx 建站主线:部署 → 配置五层结构 → 虚拟主机 / HTTPS / 认证 → 动静分离与 PHP → 反向代理与 Location 匹配 |
| 所属类别 | Linux 系统管理 → Web 服务 → Nginx |
| 知识关键字 | nginx.conf · include · server_name · listen · root · location · proxy_pass · upstream · ssl_certificate · auth_basic · php-fpm · rewrite |
概念图给出配置文件的五层嵌套关系,本文章节与它一一对应:部署在前两章;虚拟主机、HTTPS 与 Basic Auth 在第三到五章;动静分离与 PHP 在第六章;反向代理与 location 匹配在最后两章。
本文的机器与地址约定 :客户端
zhb-m2(10.1.8.12);代理服务器zhb-s2(10.1.8.102,域名www.zhb.cloud);三台后端 Web 服务器zhb-s3/zhb-s4/zhb-s5(10.1.8.103/.104/.105)。本文所有域名都靠/etc/hosts本地解析,不涉及真实备案域名。
一、部署 Nginx:四步起站
1.1 四步总览
| 步骤 | 做什么 | 用哪条命令 |
|---|---|---|
| 1 | 装包 | yum -y install nginx |
| 2 | 启用并启动服务 | systemctl enable nginx --now |
| 3 | 准备主页 | echo ... > /usr/share/nginx/html/index.html |
| 4 | 放行 HTTP 并验证 | firewall-cmd --add-service=http --permanent |
命令的写法与参数见 1.2,验证方式见 1.3。
1.2 装、起、备、放行
bash
# 安装 nginx
[root@zhb-s2 ~]# yum -y install nginx

# 启用并启动服务(--now 等价于 enable + start)
[root@zhb-s2 ~]# systemctl enable nginx --now

# 把默认主页挪走,换成自己的
[root@zhb-s2 ~]# mv /usr/share/nginx/html/index.html{,.ori}
[root@zhb-s2 ~]# echo Hello World From Nginx > /usr/share/nginx/html/index.html

# 放行 HTTP:先写永久规则,再重载让它当场生效
[root@zhb-s2 ~]# firewall-cmd --add-service=http --permanent
[root@zhb-s2 ~]# firewall-cmd --reload
1.3 客户端验证
域名解析用 hosts 文件,不改 DNS:
| 系统 | hosts 文件路径 |
|---|---|
| Windows | C:\Windows\System32\drivers\etc\hosts |
| Linux / Unix | /etc/hosts |
bash
# 在客户端 hosts 里加一条记录,把域名指到 Nginx 服务器
10.1.8.102 www.zhb.cloud

# 验证
[root@zhb-m2 ~]# curl http://www.zhb.cloud/
Hello World From Nginx
二、配置文件的五层结构
2.1 五层嵌套关系
Nginx 配置是层级化、模块化的嵌套结构,整体是「全局块 → 核心模块块 → 业务模块块」:
| 层 | 配置块 | 管什么 | 能嵌套什么 |
|---|---|---|---|
| 1 | 全局块 | 整个 Nginx 进程的基础参数,不嵌套在任何块内 | ------ |
| 2 | events 块 |
网络连接相关配置 | ------ |
| 3 | http 块 |
HTTP/HTTPS 服务的公共配置 | 多个 server |
| 4 | server 块 |
虚拟主机(域名 / 端口) | 多个 location |
| 5 | location 块 |
URL 路径匹配规则 | 更多 location |
nginx
# 第 1 层:全局配置
user nginx;                              # 运行 Nginx 的用户 / 用户组
worker_processes auto;                   # 工作进程数,auto = 按 CPU 核心数
error_log /var/log/nginx/error.log;      # 错误日志路径
pid /run/nginx.pid;                      # 主进程 PID 文件
include /usr/share/nginx/modules/*.conf; # 加载外部模块配置

# 第 2 层:核心模块
events {
    worker_connections 1024;  # 每个工作进程的最大并发连接数
    use epoll;                # 事件驱动模型,epoll 是 Linux 下的高性能选择
    multi_accept on;          # 允许一个进程一次接受多个新连接
}

# 第 3 层:业务模块
http {
    include       /etc/nginx/mime.types;         # MIME 类型映射
    default_type  application/octet-stream;      # 默认响应类型
    log_format  main  '$remote_addr - $remote_user [$time_local] "$request"';
    access_log  /var/log/nginx/access.log  main; # 访问日志
    sendfile     on;                             # 高效文件传输
    keepalive_timeout  65;                       # 长连接超时时间

    # 第 4 层:虚拟主机
    server {
        listen       80;
        server_name  localhost;
        root         /usr/share/nginx/html;

        # 第 5 层:路径匹配
        location / {
            index  index.html index.htm;
            try_files $uri $uri/ /index.html;
        }

        error_page  404              /404.html;
        error_page  500 502 503 504  /50x.html;
    }
}
2.2 配置加载机制
| 机制 | 说明 |
|---|---|
include 指令 |
引入外部配置文件,实现模块化管理。常见做法是把虚拟主机拆到 /etc/nginx/conf.d/*.conf、代理配置拆到 /etc/nginx/default.d/*.conf |
| 同层级优先级 | 后定义的覆盖先定义的 |
| 跨层级优先级 | 子级(location)覆盖父级(server / http) |
location 匹配 |
精确匹配 = > 前缀匹配 ^~ > 正则匹配 ~ / ~* > 普通前缀(详见第七章) |
2.3 nginx.conf 逐行详解
下面这份是 CentOS 7 默认安装的 /etc/nginx/nginx.conf,逐行加了注释,第一次读配置就从它入手。
ini
# 更多配置详情参考官方文档:
#   * 英文官方文档: http://nginx.org/en/docs/
#   * 俄文官方文档: http://nginx.org/ru/docs/

# 指定 Nginx 工作进程的运行用户
user nginx;

# 工作进程数,auto 表示按 CPU 核心数自动调整
worker_processes auto;

# 错误日志路径
error_log /var/log/nginx/error.log;

# 主进程 PID 文件路径
pid /run/nginx.pid;

# 加载动态模块(详见 /usr/share/doc/nginx/README.dynamic)
include /usr/share/nginx/modules/*.conf;

# 事件模块:设置网络连接相关参数
events {
    # 每个工作进程的最大并发连接数,默认 1024
    worker_connections 1024;
}

# HTTP 核心模块:HTTP 服务的主要配置
http {
    # 定义名为 main 的访问日志格式
    # 字段依次为:客户端IP - 远程用户 [访问时间] "请求信息" 状态码 发送字节数 "来源页面" "用户代理" "代理IP"
    log_format  main  '$remote_addr - $remote_user [$time_local] "$request" '
                      '$status $body_bytes_sent "$http_referer" '
                      '"$http_user_agent" "$http_x_forwarded_for"';

    # 启用访问日志
    access_log  /var/log/nginx/access.log  main;

    # 开启高效文件传输模式,减少磁盘 I/O 与 CPU 消耗
    sendfile            on;

    # 累积数据后一次性发送,提高网络效率(需配合 sendfile)
    tcp_nopush          on;

    # 禁用 Nagle 算法,减少传输延迟(适合实时性要求高的场景)
    tcp_nodelay         on;

    # 长连接超时时间,超过 65 秒无活动则关闭
    keepalive_timeout   65;

    # 文件类型哈希表容量,增大可提高查找效率
    types_hash_max_size 4096;

    # 引入 MIME 类型配置,定义后缀与响应类型的对应关系
    include             /etc/nginx/mime.types;

    # 默认 MIME 类型,识别不出时按二进制流返回
    default_type        application/octet-stream;

    # 加载 conf.d 下所有 .conf,这就是「虚拟主机拆文件」的入口
    # 更多说明参考 nginx.org/en/docs/ngx_core_module.html#include
    include /etc/nginx/conf.d/*.conf;

    # 默认虚拟主机
    server {
        # 监听 IPv4 / IPv6 的 80 端口
        listen       80;
        listen       [::]:80;

        # _ 表示匹配所有未明确指定的域名
        server_name  _;

        # 网站根目录
        root         /usr/share/nginx/html;

        # 加载默认虚拟主机的额外配置
        include /etc/nginx/default.d/*.conf;

        # 404 错误页
        error_page 404 /404.html;
        location = /404.html {
        }

        # 5xx 服务器错误页
        error_page 500 502 503 504 /50x.html;
        location = /50x.html {
        }
    }

    # HTTPS 服务配置,默认整段注释,启用时取消注释并配好证书
    # server {
    #     listen       443 ssl http2;
    #     listen       [::]:443 ssl http2;
    #     server_name  _;
    #     root         /usr/share/nginx/html;
    #
    #     ssl_certificate     "/etc/pki/nginx/server.crt";   # 公钥
    #     ssl_certificate_key "/etc/pki/nginx/private/server.key";  # 私钥
    #     ssl_session_cache   shared:SSL:1m;
    #     ssl_session_timeout 10m;
    #     ssl_ciphers HIGH:!aNULL:!MD5;
    #     ssl_prefer_server_ciphers on;
    #
    #     include /etc/nginx/default.d/*.conf;
    #     error_page 404 /404.html;
    #     error_page 500 502 503 504 /50x.html;
    # }
}
⚠️ 注意 :改完配置先
nginx -t验证语法,通过再systemctl restart nginx。配置写错会让整个站点的所有虚拟主机一起 502,而不是只影响你改的那一个。
三、虚拟主机:同一台机器跑多个站点
虚拟主机 = 同一个 Web 服务器对外提供多个站点。区分方式有三种:主机名 、端口号、IP 地址(基本不用)。
3.1 按域名区分
bash
# 参照主配置文件里的 server 块写一份独立配置
[root@zhb-s2 ~]# cp /etc/nginx/nginx.conf /etc/nginx/conf.d/vhost-name.conf
[root@zhb-s2 ~]# vim /etc/nginx/conf.d/vhost-name.conf
nginx
server {
    server_name  web1.zhb.cloud;
    root         /usr/share/nginx/web1;
}
server {
    server_name  web2.zhb.cloud;
    root         /usr/share/nginx/web2;
}
bash
# 建目录、放页面、重启
[root@zhb-s2 ~]# mkdir /usr/share/nginx/web{1,2}
[root@zhb-s2 ~]# echo web1.zhb.cloud > /usr/share/nginx/web1/index.html
[root@zhb-s2 ~]# echo web2.zhb.cloud > /usr/share/nginx/web2/index.html
[root@zhb-s2 ~]# systemctl restart nginx
bash
# 客户端加两条解析后分别访问
10.1.8.102 web1.zhb.cloud
10.1.8.102 web2.zhb.cloud

[root@zhb-m2 ~]# curl http://web1.zhb.cloud/
web1.zhb.cloud
[root@zhb-m2 ~]# curl http://web2.zhb.cloud/
web2.zhb.cloud
做完实验记得把配置文件挪走,免得干扰后续实验:
bash
[root@zhb-s2 ~]# mkdir /etc/nginx/conf.d/vhosts
[root@zhb-s2 ~]# mv /etc/nginx/conf.d/vhost-name.conf /etc/nginx/conf.d/vhosts
3.2 按端口区分
bash
[root@zhb-s2 ~]# vim /etc/nginx/conf.d/vhost-port.conf
nginx
server {
    listen       8081;
    server_name  www.zhb.cloud;
    root         /usr/share/nginx/8081;
}
server {
    listen       8082;
    server_name  www.zhb.cloud;
    root         /usr/share/nginx/8082;
}
bash
[root@zhb-s2 ~]# mkdir /usr/share/nginx/808{1,2}
[root@zhb-s2 ~]# echo 8081 > /usr/share/nginx/8081/index.html
[root@zhb-s2 ~]# echo 8082 > /usr/share/nginx/8082/index.html
[root@zhb-s2 ~]# systemctl restart nginx

# 客户端按端口访问
[root@zhb-m2 ~]# curl http://www.zhb.cloud:8081
8081
[root@zhb-m2 ~]# curl http://www.zhb.cloud:8082
8082
3.3 三种方式对比
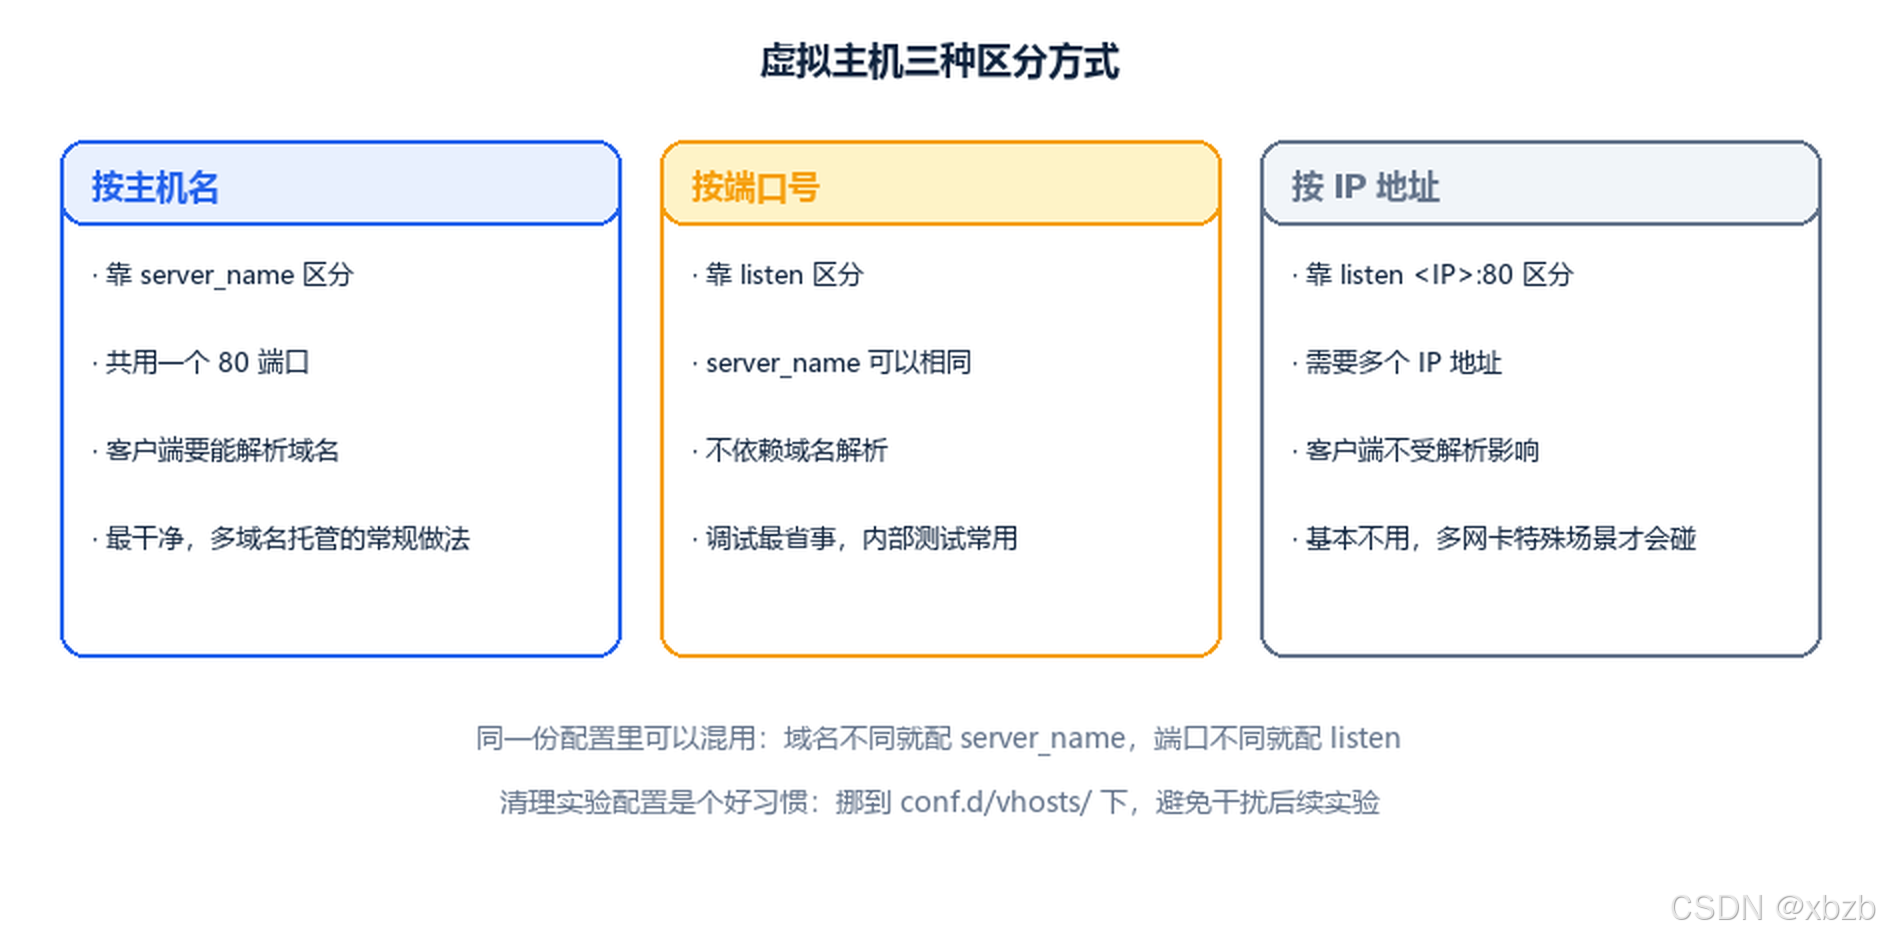
| 区分方式 | 靠哪个指令 | 优点 | 典型场景 |
|---|---|---|---|
| 主机名 | server_name |
一个 80 端口跑多个站点,对外最干净 | 多域名托管 |
| 端口号 | listen |
不依赖域名解析,调试最省事 | 内部测试、灰度发布 |
| IP 地址 | listen <IP>:80 |
------ | 多网卡且不能改域名时才会用 |
四、给站点套上 HTTPS
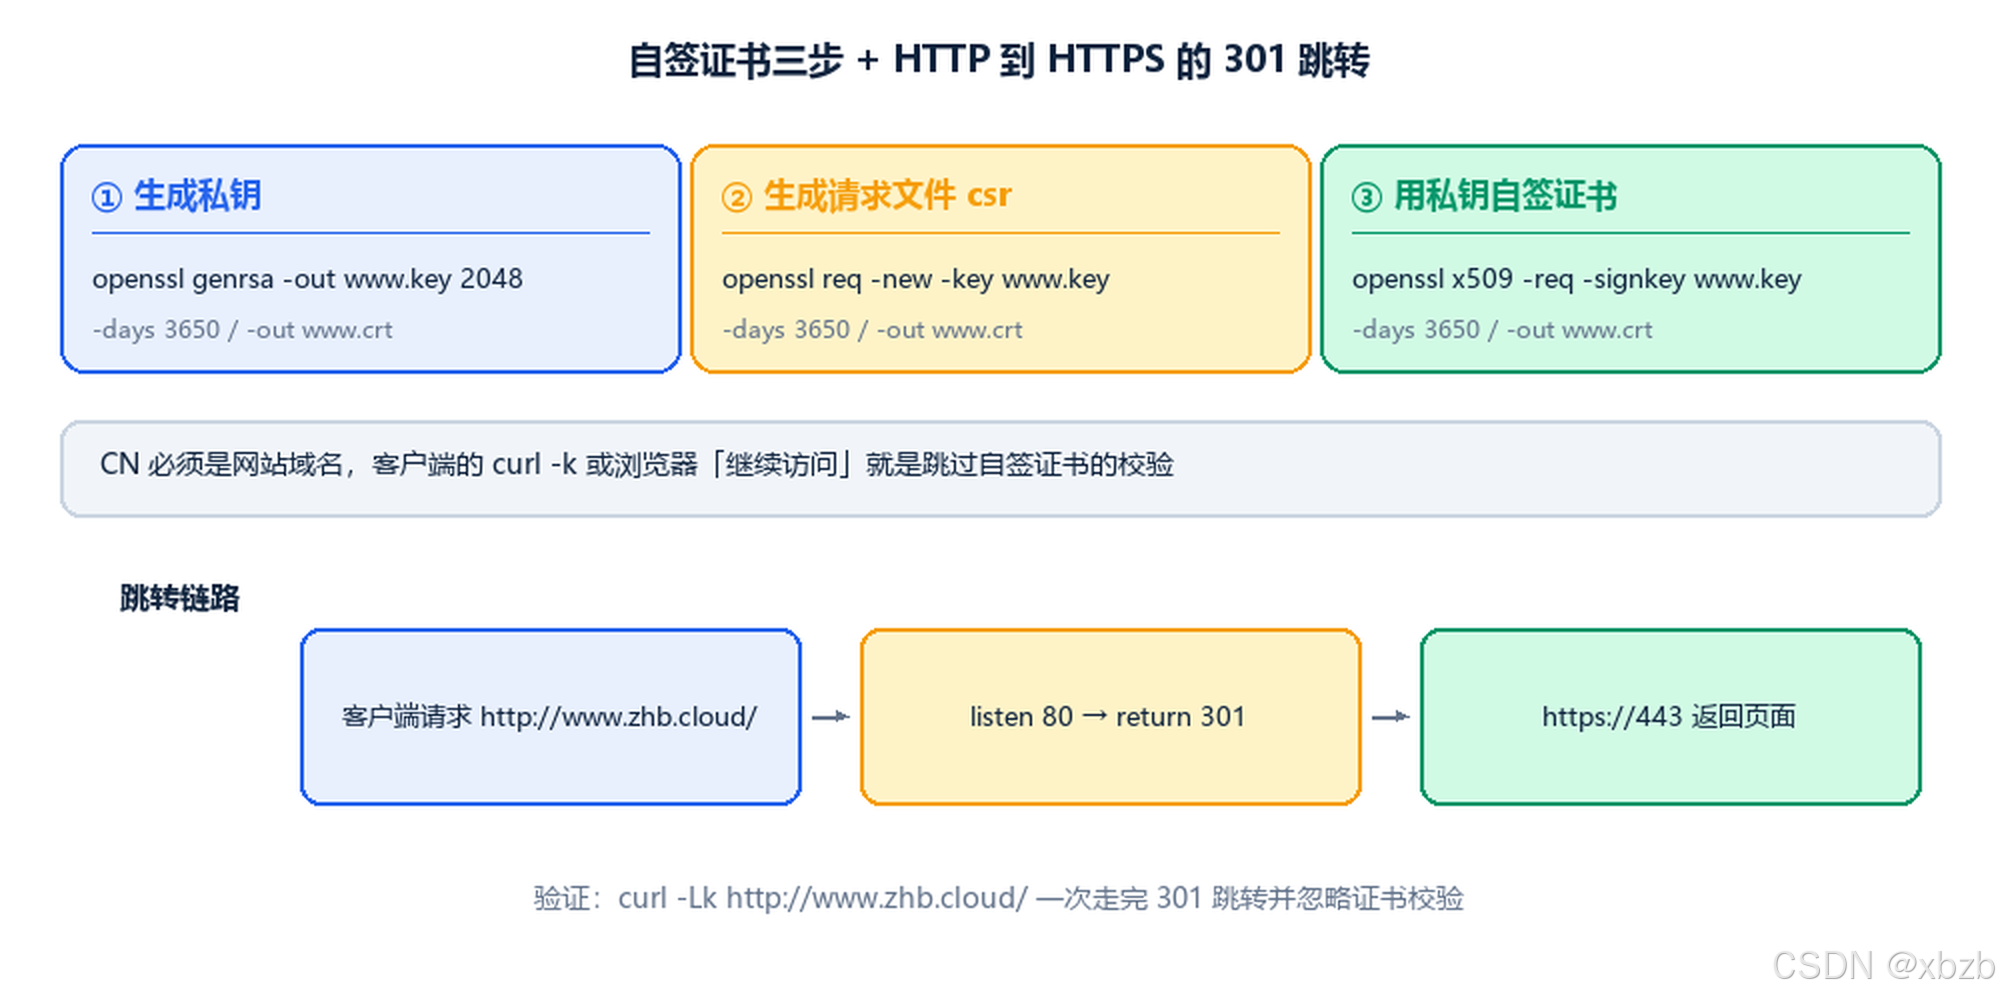
4.1 三步生成自签证书
bash
# 第一步:生成私钥
[root@zhb-s2 ~]# mkdir certs && cd certs
[root@zhb-s2 certs]# openssl genrsa -out www.key 2048

# 第二步:生成证书请求文件 csr(CN 的值必须是网站域名)
[root@zhb-s2 certs]# openssl req -new -key www.key -out www.csr \
  -subj "/C=CN/ST=JS/L=NJ/O=ZHB/OU=DEVOPS/CN=www.zhb.cloud/emailAddress=webadmin@zhb.cloud"

# 第三步:用自己的私钥给请求文件签名,生成证书 crt
[root@zhb-s2 certs]# openssl x509 -req -days 3650 -in www.csr -signkey www.key -out www.crt
4.2 配置站点与 301 跳转
bash
# 把证书挪到统一目录
[root@zhb-s2 certs]# mkdir /etc/ssl/certs/www.zhb.cloud
[root@zhb-s2 certs]# mv www* /etc/ssl/certs/www.zhb.cloud

# 参照默认配置改一份 HTTPS 站点
[root@zhb-s2 ~]# cp /etc/nginx/nginx.conf /etc/nginx/conf.d/vhost-www.zhb.cloud-ssl.conf
[root@zhb-s2 ~]# vim /etc/nginx/conf.d/vhost-www.zhb.cloud-ssl.conf
nginx
server {
    listen       443 ssl http2;
    listen       [::]:443 ssl http2;
    server_name  www.zhb.cloud;
    root         /usr/share/nginx/html;
    # 公钥
    ssl_certificate     "/etc/ssl/certs/www.zhb.cloud/www.crt";
    # 私钥
    ssl_certificate_key "/etc/ssl/certs/www.zhb.cloud/www.key";
}

# 把 80 端口的访问整体 301 到 HTTPS
server {
    listen       80;
    listen       [::]:80;
    server_name  www.zhb.cloud;
    root         /usr/share/nginx/html;
    return       301 https://$host$request_uri;
}
bash
[root@zhb-s2 ~]# systemctl restart nginx

# 防火墙放行 HTTPS
[root@zhb-s2 ~]# firewall-cmd --add-service=https --permanent
[root@zhb-s2 ~]# firewall-cmd --reload
4.3 客户端验证
bash
# HTTP 访问会拿到 301,被重定向到 HTTPS
[root@zhb-m2 ~]# curl http://www.zhb.cloud/
<html>
<head><title>301 Moved Permanently</title></head>
<body>
<center><h1>301 Moved Permanently</h1></center>
<hr><center>nginx/1.20.1</center>
</body>
</html>

# -k:忽略自签证书的校验(目标站点不是受信任的 CA 签发的)
[root@zhb-m2 ~]# curl -k https://www.zhb.cloud/

# -L:跟随 301 跳转,一条命令走完 HTTP → HTTPS
[root@zhb-m2 ~]# curl -Lk http://www.zhb.cloud/
五、Basic Auth 基本认证
Basic Auth 的用户名和密码以 base64 明文传输,必须配 SSL/TLS 才有意义。
bash
# 装生成密码文件的工具
[root@zhb-s2 ~]# yum -y install httpd-tools

# 在需要保护的 server 块里加一段 location
[root@zhb-s2 ~]# vim /etc/nginx/conf.d/vhost-www.zhb.cloud-ssl.conf
nginx
server {
    # ... 其他配置保持不变
    location /auth-basic/ {
        auth_basic            "Basic Auth";     # 弹窗上显示的提示文字
        auth_basic_user_file  "/etc/nginx/.htpasswd";  # 账号密码文件
    }
}
bash
[root@zhb-s2 ~]# systemctl restart nginx

# 建账号:-b 表示密码直接跟在命令里,-c 表示创建(会覆盖原文件)
[root@zhb-s2 ~]# htpasswd -b -c /etc/nginx/.htpasswd zhb 123456

# 准备一个测试页面
[root@zhb-s2 ~]# mkdir /usr/share/nginx/html/auth-basic
[root@zhb-s2 ~]# vim /usr/share/nginx/html/auth-basic/index.html
html
<html>
<body>
<div style="width: 100%; font-size: 40px; font-weight: bold;">
Test Page for Basic Authentication
</div>
</body>
</html>
bash
# 客户端带账号密码访问,-u 指定用户名和密码
[root@zhb-m2 ~]# curl -ku zhb:123456 https://www.zhb.cloud/auth-basic/
提示 :
htpasswd -c会新建并覆盖 整个密码文件。追加账号时要把-c去掉,否则前面建的账号会一起消失。
六、静态站点、动态站点与 PHP
6.1 概念与请求链路
静态站点:页面写死,服务器只原样返回 HTML,不做数据交互。
#mermaid-svg-jhB8de5xQZFLq868{font-family:"trebuchet ms",verdana,arial,sans-serif;font-size:16px;fill:#333;}@keyframes edge-animation-frame{from{stroke-dashoffset:0;}}@keyframes dash{to{stroke-dashoffset:0;}}#mermaid-svg-jhB8de5xQZFLq868 .edge-animation-slow{stroke-dasharray:9,5!important;stroke-dashoffset:900;animation:dash 50s linear infinite;stroke-linecap:round;}#mermaid-svg-jhB8de5xQZFLq868 .edge-animation-fast{stroke-dasharray:9,5!important;stroke-dashoffset:900;animation:dash 20s linear infinite;stroke-linecap:round;}#mermaid-svg-jhB8de5xQZFLq868 .error-icon{fill:#552222;}#mermaid-svg-jhB8de5xQZFLq868 .error-text{fill:#552222;stroke:#552222;}#mermaid-svg-jhB8de5xQZFLq868 .edge-thickness-normal{stroke-width:1px;}#mermaid-svg-jhB8de5xQZFLq868 .edge-thickness-thick{stroke-width:3.5px;}#mermaid-svg-jhB8de5xQZFLq868 .edge-pattern-solid{stroke-dasharray:0;}#mermaid-svg-jhB8de5xQZFLq868 .edge-thickness-invisible{stroke-width:0;fill:none;}#mermaid-svg-jhB8de5xQZFLq868 .edge-pattern-dashed{stroke-dasharray:3;}#mermaid-svg-jhB8de5xQZFLq868 .edge-pattern-dotted{stroke-dasharray:2;}#mermaid-svg-jhB8de5xQZFLq868 .marker{fill:#333333;stroke:#333333;}#mermaid-svg-jhB8de5xQZFLq868 .marker.cross{stroke:#333333;}#mermaid-svg-jhB8de5xQZFLq868 svg{font-family:"trebuchet ms",verdana,arial,sans-serif;font-size:16px;}#mermaid-svg-jhB8de5xQZFLq868 p{margin:0;}#mermaid-svg-jhB8de5xQZFLq868 .label{font-family:"trebuchet ms",verdana,arial,sans-serif;color:#333;}#mermaid-svg-jhB8de5xQZFLq868 .cluster-label text{fill:#333;}#mermaid-svg-jhB8de5xQZFLq868 .cluster-label span{color:#333;}#mermaid-svg-jhB8de5xQZFLq868 .cluster-label span p{background-color:transparent;}#mermaid-svg-jhB8de5xQZFLq868 .label text,#mermaid-svg-jhB8de5xQZFLq868 span{fill:#333;color:#333;}#mermaid-svg-jhB8de5xQZFLq868 .node rect,#mermaid-svg-jhB8de5xQZFLq868 .node circle,#mermaid-svg-jhB8de5xQZFLq868 .node ellipse,#mermaid-svg-jhB8de5xQZFLq868 .node polygon,#mermaid-svg-jhB8de5xQZFLq868 .node path{fill:#ECECFF;stroke:#9370DB;stroke-width:1px;}#mermaid-svg-jhB8de5xQZFLq868 .rough-node .label text,#mermaid-svg-jhB8de5xQZFLq868 .node .label text,#mermaid-svg-jhB8de5xQZFLq868 .image-shape .label,#mermaid-svg-jhB8de5xQZFLq868 .icon-shape .label{text-anchor:middle;}#mermaid-svg-jhB8de5xQZFLq868 .node .katex path{fill:#000;stroke:#000;stroke-width:1px;}#mermaid-svg-jhB8de5xQZFLq868 .rough-node .label,#mermaid-svg-jhB8de5xQZFLq868 .node .label,#mermaid-svg-jhB8de5xQZFLq868 .image-shape .label,#mermaid-svg-jhB8de5xQZFLq868 .icon-shape .label{text-align:center;}#mermaid-svg-jhB8de5xQZFLq868 .node.clickable{cursor:pointer;}#mermaid-svg-jhB8de5xQZFLq868 .root .anchor path{fill:#333333!important;stroke-width:0;stroke:#333333;}#mermaid-svg-jhB8de5xQZFLq868 .arrowheadPath{fill:#333333;}#mermaid-svg-jhB8de5xQZFLq868 .edgePath .path{stroke:#333333;stroke-width:2.0px;}#mermaid-svg-jhB8de5xQZFLq868 .flowchart-link{stroke:#333333;fill:none;}#mermaid-svg-jhB8de5xQZFLq868 .edgeLabel{background-color:rgba(232,232,232, 0.8);text-align:center;}#mermaid-svg-jhB8de5xQZFLq868 .edgeLabel p{background-color:rgba(232,232,232, 0.8);}#mermaid-svg-jhB8de5xQZFLq868 .edgeLabel rect{opacity:0.5;background-color:rgba(232,232,232, 0.8);fill:rgba(232,232,232, 0.8);}#mermaid-svg-jhB8de5xQZFLq868 .labelBkg{background-color:rgba(232, 232, 232, 0.5);}#mermaid-svg-jhB8de5xQZFLq868 .cluster rect{fill:#ffffde;stroke:#aaaa33;stroke-width:1px;}#mermaid-svg-jhB8de5xQZFLq868 .cluster text{fill:#333;}#mermaid-svg-jhB8de5xQZFLq868 .cluster span{color:#333;}#mermaid-svg-jhB8de5xQZFLq868 div.mermaidTooltip{position:absolute;text-align:center;max-width:200px;padding:2px;font-family:"trebuchet ms",verdana,arial,sans-serif;font-size:12px;background:hsl(80, 100%, 96.2745098039%);border:1px solid #aaaa33;border-radius:2px;pointer-events:none;z-index:100;}#mermaid-svg-jhB8de5xQZFLq868 .flowchartTitleText{text-anchor:middle;font-size:18px;fill:#333;}#mermaid-svg-jhB8de5xQZFLq868 rect.text{fill:none;stroke-width:0;}#mermaid-svg-jhB8de5xQZFLq868 .icon-shape,#mermaid-svg-jhB8de5xQZFLq868 .image-shape{background-color:rgba(232,232,232, 0.8);text-align:center;}#mermaid-svg-jhB8de5xQZFLq868 .icon-shape p,#mermaid-svg-jhB8de5xQZFLq868 .image-shape p{background-color:rgba(232,232,232, 0.8);padding:2px;}#mermaid-svg-jhB8de5xQZFLq868 .icon-shape .label rect,#mermaid-svg-jhB8de5xQZFLq868 .image-shape .label rect{opacity:0.5;background-color:rgba(232,232,232, 0.8);fill:rgba(232,232,232, 0.8);}#mermaid-svg-jhB8de5xQZFLq868 .label-icon{display:inline-block;height:1em;overflow:visible;vertical-align:-0.125em;}#mermaid-svg-jhB8de5xQZFLq868 .node .label-icon path{fill:currentColor;stroke:revert;stroke-width:revert;}#mermaid-svg-jhB8de5xQZFLq868 :root{--mermaid-font-family:"trebuchet ms",verdana,arial,sans-serif;} 浏览器
Web服务器
网页文件
动态站点:后端程序实时生成页面,可读写数据库、支持用户交互。
#mermaid-svg-29L5oqquOQhV1giD{font-family:"trebuchet ms",verdana,arial,sans-serif;font-size:16px;fill:#333;}@keyframes edge-animation-frame{from{stroke-dashoffset:0;}}@keyframes dash{to{stroke-dashoffset:0;}}#mermaid-svg-29L5oqquOQhV1giD .edge-animation-slow{stroke-dasharray:9,5!important;stroke-dashoffset:900;animation:dash 50s linear infinite;stroke-linecap:round;}#mermaid-svg-29L5oqquOQhV1giD .edge-animation-fast{stroke-dasharray:9,5!important;stroke-dashoffset:900;animation:dash 20s linear infinite;stroke-linecap:round;}#mermaid-svg-29L5oqquOQhV1giD .error-icon{fill:#552222;}#mermaid-svg-29L5oqquOQhV1giD .error-text{fill:#552222;stroke:#552222;}#mermaid-svg-29L5oqquOQhV1giD .edge-thickness-normal{stroke-width:1px;}#mermaid-svg-29L5oqquOQhV1giD .edge-thickness-thick{stroke-width:3.5px;}#mermaid-svg-29L5oqquOQhV1giD .edge-pattern-solid{stroke-dasharray:0;}#mermaid-svg-29L5oqquOQhV1giD .edge-thickness-invisible{stroke-width:0;fill:none;}#mermaid-svg-29L5oqquOQhV1giD .edge-pattern-dashed{stroke-dasharray:3;}#mermaid-svg-29L5oqquOQhV1giD .edge-pattern-dotted{stroke-dasharray:2;}#mermaid-svg-29L5oqquOQhV1giD .marker{fill:#333333;stroke:#333333;}#mermaid-svg-29L5oqquOQhV1giD .marker.cross{stroke:#333333;}#mermaid-svg-29L5oqquOQhV1giD svg{font-family:"trebuchet ms",verdana,arial,sans-serif;font-size:16px;}#mermaid-svg-29L5oqquOQhV1giD p{margin:0;}#mermaid-svg-29L5oqquOQhV1giD .label{font-family:"trebuchet ms",verdana,arial,sans-serif;color:#333;}#mermaid-svg-29L5oqquOQhV1giD .cluster-label text{fill:#333;}#mermaid-svg-29L5oqquOQhV1giD .cluster-label span{color:#333;}#mermaid-svg-29L5oqquOQhV1giD .cluster-label span p{background-color:transparent;}#mermaid-svg-29L5oqquOQhV1giD .label text,#mermaid-svg-29L5oqquOQhV1giD span{fill:#333;color:#333;}#mermaid-svg-29L5oqquOQhV1giD .node rect,#mermaid-svg-29L5oqquOQhV1giD .node circle,#mermaid-svg-29L5oqquOQhV1giD .node ellipse,#mermaid-svg-29L5oqquOQhV1giD .node polygon,#mermaid-svg-29L5oqquOQhV1giD .node path{fill:#ECECFF;stroke:#9370DB;stroke-width:1px;}#mermaid-svg-29L5oqquOQhV1giD .rough-node .label text,#mermaid-svg-29L5oqquOQhV1giD .node .label text,#mermaid-svg-29L5oqquOQhV1giD .image-shape .label,#mermaid-svg-29L5oqquOQhV1giD .icon-shape .label{text-anchor:middle;}#mermaid-svg-29L5oqquOQhV1giD .node .katex path{fill:#000;stroke:#000;stroke-width:1px;}#mermaid-svg-29L5oqquOQhV1giD .rough-node .label,#mermaid-svg-29L5oqquOQhV1giD .node .label,#mermaid-svg-29L5oqquOQhV1giD .image-shape .label,#mermaid-svg-29L5oqquOQhV1giD .icon-shape .label{text-align:center;}#mermaid-svg-29L5oqquOQhV1giD .node.clickable{cursor:pointer;}#mermaid-svg-29L5oqquOQhV1giD .root .anchor path{fill:#333333!important;stroke-width:0;stroke:#333333;}#mermaid-svg-29L5oqquOQhV1giD .arrowheadPath{fill:#333333;}#mermaid-svg-29L5oqquOQhV1giD .edgePath .path{stroke:#333333;stroke-width:2.0px;}#mermaid-svg-29L5oqquOQhV1giD .flowchart-link{stroke:#333333;fill:none;}#mermaid-svg-29L5oqquOQhV1giD .edgeLabel{background-color:rgba(232,232,232, 0.8);text-align:center;}#mermaid-svg-29L5oqquOQhV1giD .edgeLabel p{background-color:rgba(232,232,232, 0.8);}#mermaid-svg-29L5oqquOQhV1giD .edgeLabel rect{opacity:0.5;background-color:rgba(232,232,232, 0.8);fill:rgba(232,232,232, 0.8);}#mermaid-svg-29L5oqquOQhV1giD .labelBkg{background-color:rgba(232, 232, 232, 0.5);}#mermaid-svg-29L5oqquOQhV1giD .cluster rect{fill:#ffffde;stroke:#aaaa33;stroke-width:1px;}#mermaid-svg-29L5oqquOQhV1giD .cluster text{fill:#333;}#mermaid-svg-29L5oqquOQhV1giD .cluster span{color:#333;}#mermaid-svg-29L5oqquOQhV1giD div.mermaidTooltip{position:absolute;text-align:center;max-width:200px;padding:2px;font-family:"trebuchet ms",verdana,arial,sans-serif;font-size:12px;background:hsl(80, 100%, 96.2745098039%);border:1px solid #aaaa33;border-radius:2px;pointer-events:none;z-index:100;}#mermaid-svg-29L5oqquOQhV1giD .flowchartTitleText{text-anchor:middle;font-size:18px;fill:#333;}#mermaid-svg-29L5oqquOQhV1giD rect.text{fill:none;stroke-width:0;}#mermaid-svg-29L5oqquOQhV1giD .icon-shape,#mermaid-svg-29L5oqquOQhV1giD .image-shape{background-color:rgba(232,232,232, 0.8);text-align:center;}#mermaid-svg-29L5oqquOQhV1giD .icon-shape p,#mermaid-svg-29L5oqquOQhV1giD .image-shape p{background-color:rgba(232,232,232, 0.8);padding:2px;}#mermaid-svg-29L5oqquOQhV1giD .icon-shape .label rect,#mermaid-svg-29L5oqquOQhV1giD .image-shape .label rect{opacity:0.5;background-color:rgba(232,232,232, 0.8);fill:rgba(232,232,232, 0.8);}#mermaid-svg-29L5oqquOQhV1giD .label-icon{display:inline-block;height:1em;overflow:visible;vertical-align:-0.125em;}#mermaid-svg-29L5oqquOQhV1giD .node .label-icon path{fill:currentColor;stroke:revert;stroke-width:revert;}#mermaid-svg-29L5oqquOQhV1giD :root{--mermaid-font-family:"trebuchet ms",verdana,arial,sans-serif;} 浏览器
Web服务器
后端应用服务
后端数据:本地文件、数据库等
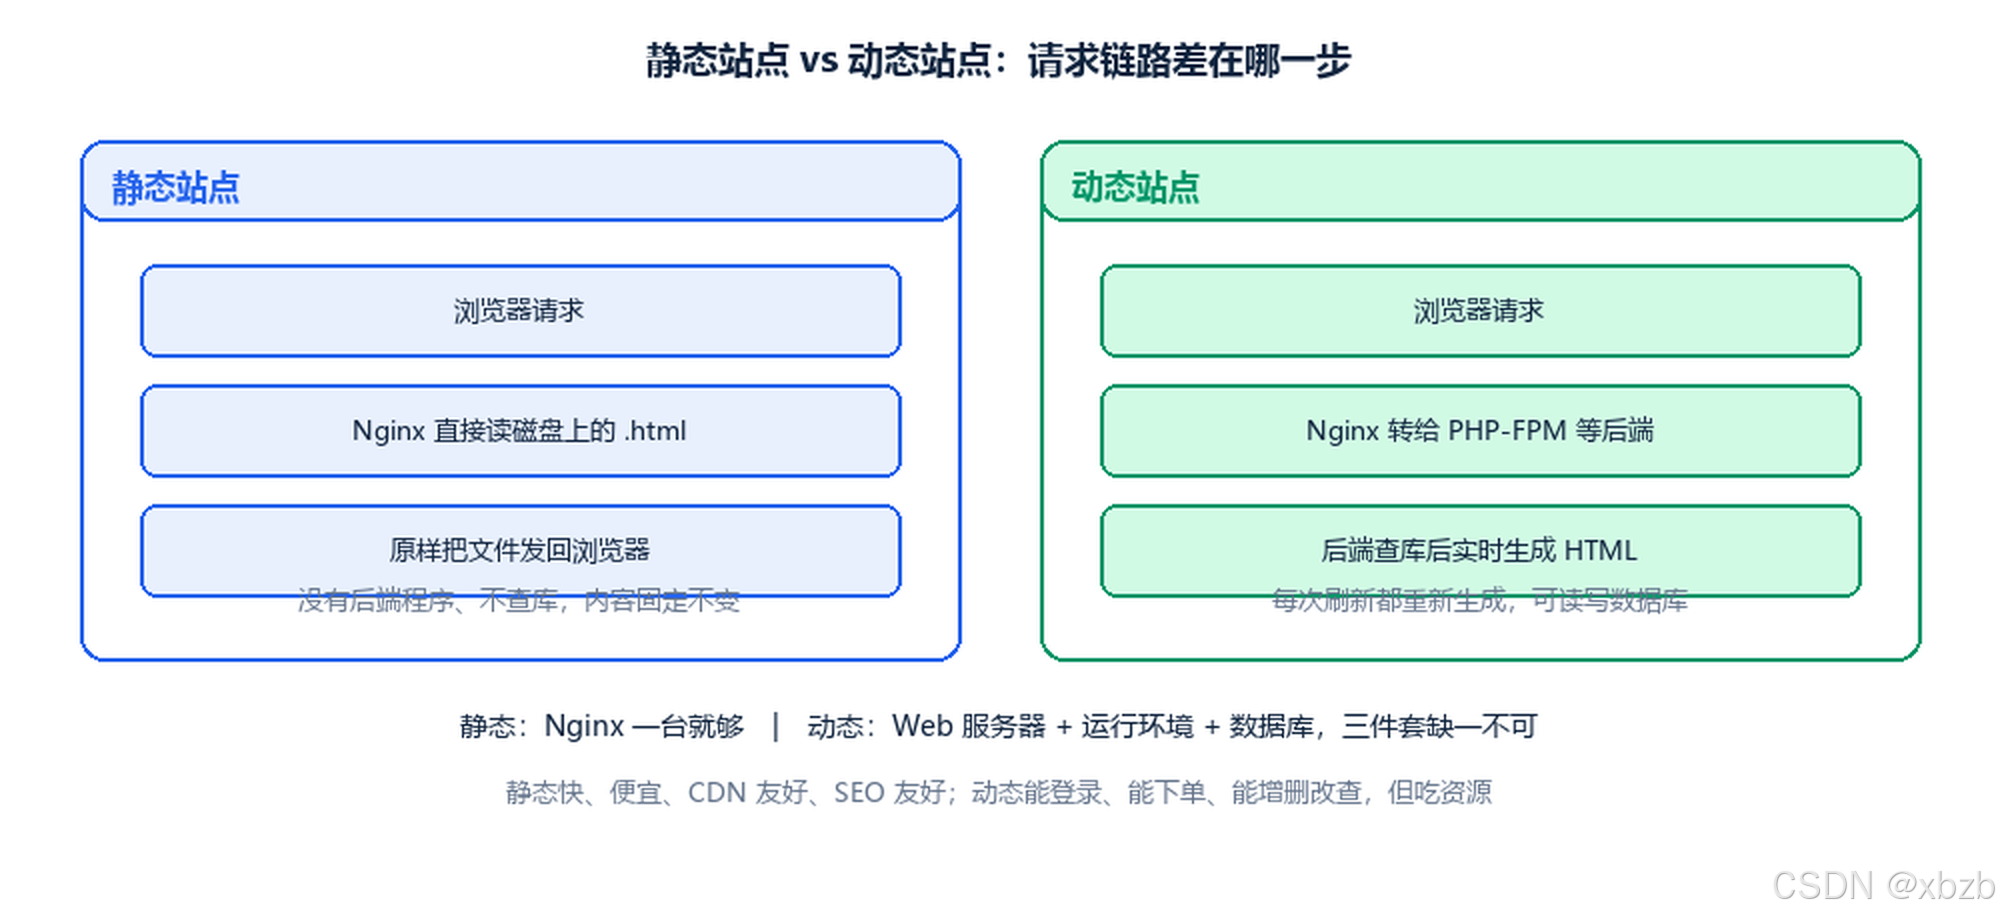
运行原理:
- 静态:提前把
.html放在服务器上,用户访问时服务器原样把文件发回浏览器,没有后端程序、不查库,内容固定不变。典型如官网介绍页、企业落地页。 - 动态:请求交给后端应用程序 ,后端从 MySQL 等数据库取数据、实时拼接生成 HTML 再返回。每次刷新都重新生成。典型如商城、博客、后台管理。
6.2 六维对照
| 对比项 | 静态站点 | 动态站点 |
|---|---|---|
| 内容 | 所有用户看到的页面一模一样,改内容必须改源码文件 | 不同用户 / 不同时间内容不同(个人中心、实时库存) |
| 修改内容 | 改源码 → 重新上传服务器 | 后台在线编辑,自动存库,不用改代码 |
| 交互能力 | 只能靠前端 JS 做简单动画,无法提交表单存数据 | 支持注册登录、留言、下单、搜索、增删改查 |
| 服务器依赖 | 只需 Nginx / Apache,不需要语言环境和数据库 | Web 服务器 + 运行环境(PHP / JDK / Python)+ 数据库,三件套缺一不可 |
| 性能与成本 | 速度快、资源占用极低、CDN 加速友好、服务器便宜、SEO 友好 | 需要运算与查库,并发高时吃资源,成本更高 |
| 常见技术栈 | HTML + CSS + JS、Hugo / VitePress / Hexo |
PHP + MySQL + Nginx(LAMP / LNMP)、SpringBoot + MySQL、Django / Flask、Express / NestJS |
6.3 PHP 站点:请求怎么走
客户端访问 PHP 网页的完整流程:
- 客户端向 Web 服务器请求 PHP 页面;
- Web 服务器把请求交给
php-fpm处理; php-fpm把 PHP 代码交给 PHP 程序解析执行,结果返回给php-fpm;php-fpm把解析结果返回给 Web 服务器;- Web 服务器把结果返回给客户端。
bash
# 装 PHP 与 php-fpm
# php-fpm:接收 web 程序发来的 PHP 代码;php:解析并执行代码
[root@zhb-s2 ~]# yum install -y php php-fpm

# 启用并启动 php-fpm
[root@zhb-s2 ~]# systemctl enable php-fpm --now

# 常见扩展包一起装
[root@zhb-s2 ~]# yum install -y php-gd php-common php-pear php-mbstring php-mcrypt

# 看版本
[root@zhb-s2 ~]# php -v

# 先在本机验证 PHP 能不能跑
[root@zhb-s2 ~]# echo "<?php echo 'PHP Test Page'.\"\n\"; ?>" > php_test.php
[root@zhb-s2 ~]# php php_test.php
PHP Test Page

# 准备一个探测页
[root@zhb-s2 ~]# echo "<?php phpinfo(); ?>" > /usr/share/nginx/html/info.php
让虚拟主机支持 PHP,核心是「所有 .php 结尾的请求转发给本机 9000 端口的 php-fpm」:
nginx
server {
    listen       80;
    listen       [::]:80;
    server_name  www.zhb.cloud;
    root         /usr/share/nginx/html;

    # 匹配所有以 .php 结尾的请求
    location ~ \.php$ {
        # 先确认文件真实存在,不存在直接 404
        # 作用:防止 /xxx.php/yyy.jpg 这类伪造路径被 php-fpm 解析,是重要的安全防护
        try_files $uri =404;

        # 把 PHP 请求转发到本机 9000 端口的 php-fpm
        fastcgi_pass 127.0.0.1:9000;

        # 目录请求默认使用 index.php
        fastcgi_index index.php;

        # 指定要执行的 PHP 文件绝对路径
        fastcgi_param SCRIPT_FILENAME $document_root$fastcgi_script_name;

        # 引入 Nginx 默认的 FastCGI 参数文件(含 QUERY_STRING、REQUEST_METHOD 等必需变量)
        include fastcgi_params;
    }
}
PHP 配置也可以从虚拟主机里拆出去,便于多个站点共用:
nginx
# /etc/nginx/conf.d/vhost-www.conf 里只留一行引用
server {
    listen       80;
    listen       [::]:80;
    server_name  www.zhb.cloud;
    root         /usr/share/nginx/html;
    include /etc/nginx/default.d/*.conf;
}
nginx
# /etc/nginx/default.d/php.conf 里放 PHP 转发规则
location ~ \.php$ {
    try_files $uri =404;
    fastcgi_pass 127.0.0.1:9000;
    fastcgi_index index.php;
    fastcgi_param SCRIPT_FILENAME $document_root$fastcgi_script_name;
    include fastcgi_params;
}
bash
# 配置改完务必重启
[root@zhb-s2 ~]# systemctl restart nginx

# 客户端测试
[root@zhb-m2 ~]# curl http://www.zhb.cloud/info.php
⚠️ 注意 :
location ~ \.php$里那行try_files $uri =404;不能省。PHP-FPM 有个历史漏洞:请求/uploads/evil.jpg/1.php这类路径时,只要路径里出现.php就可能被当成脚本执行------try_files先用文件是否存在挡一道。
七、反向代理:Location 匹配与转发
7.1 反向代理做什么
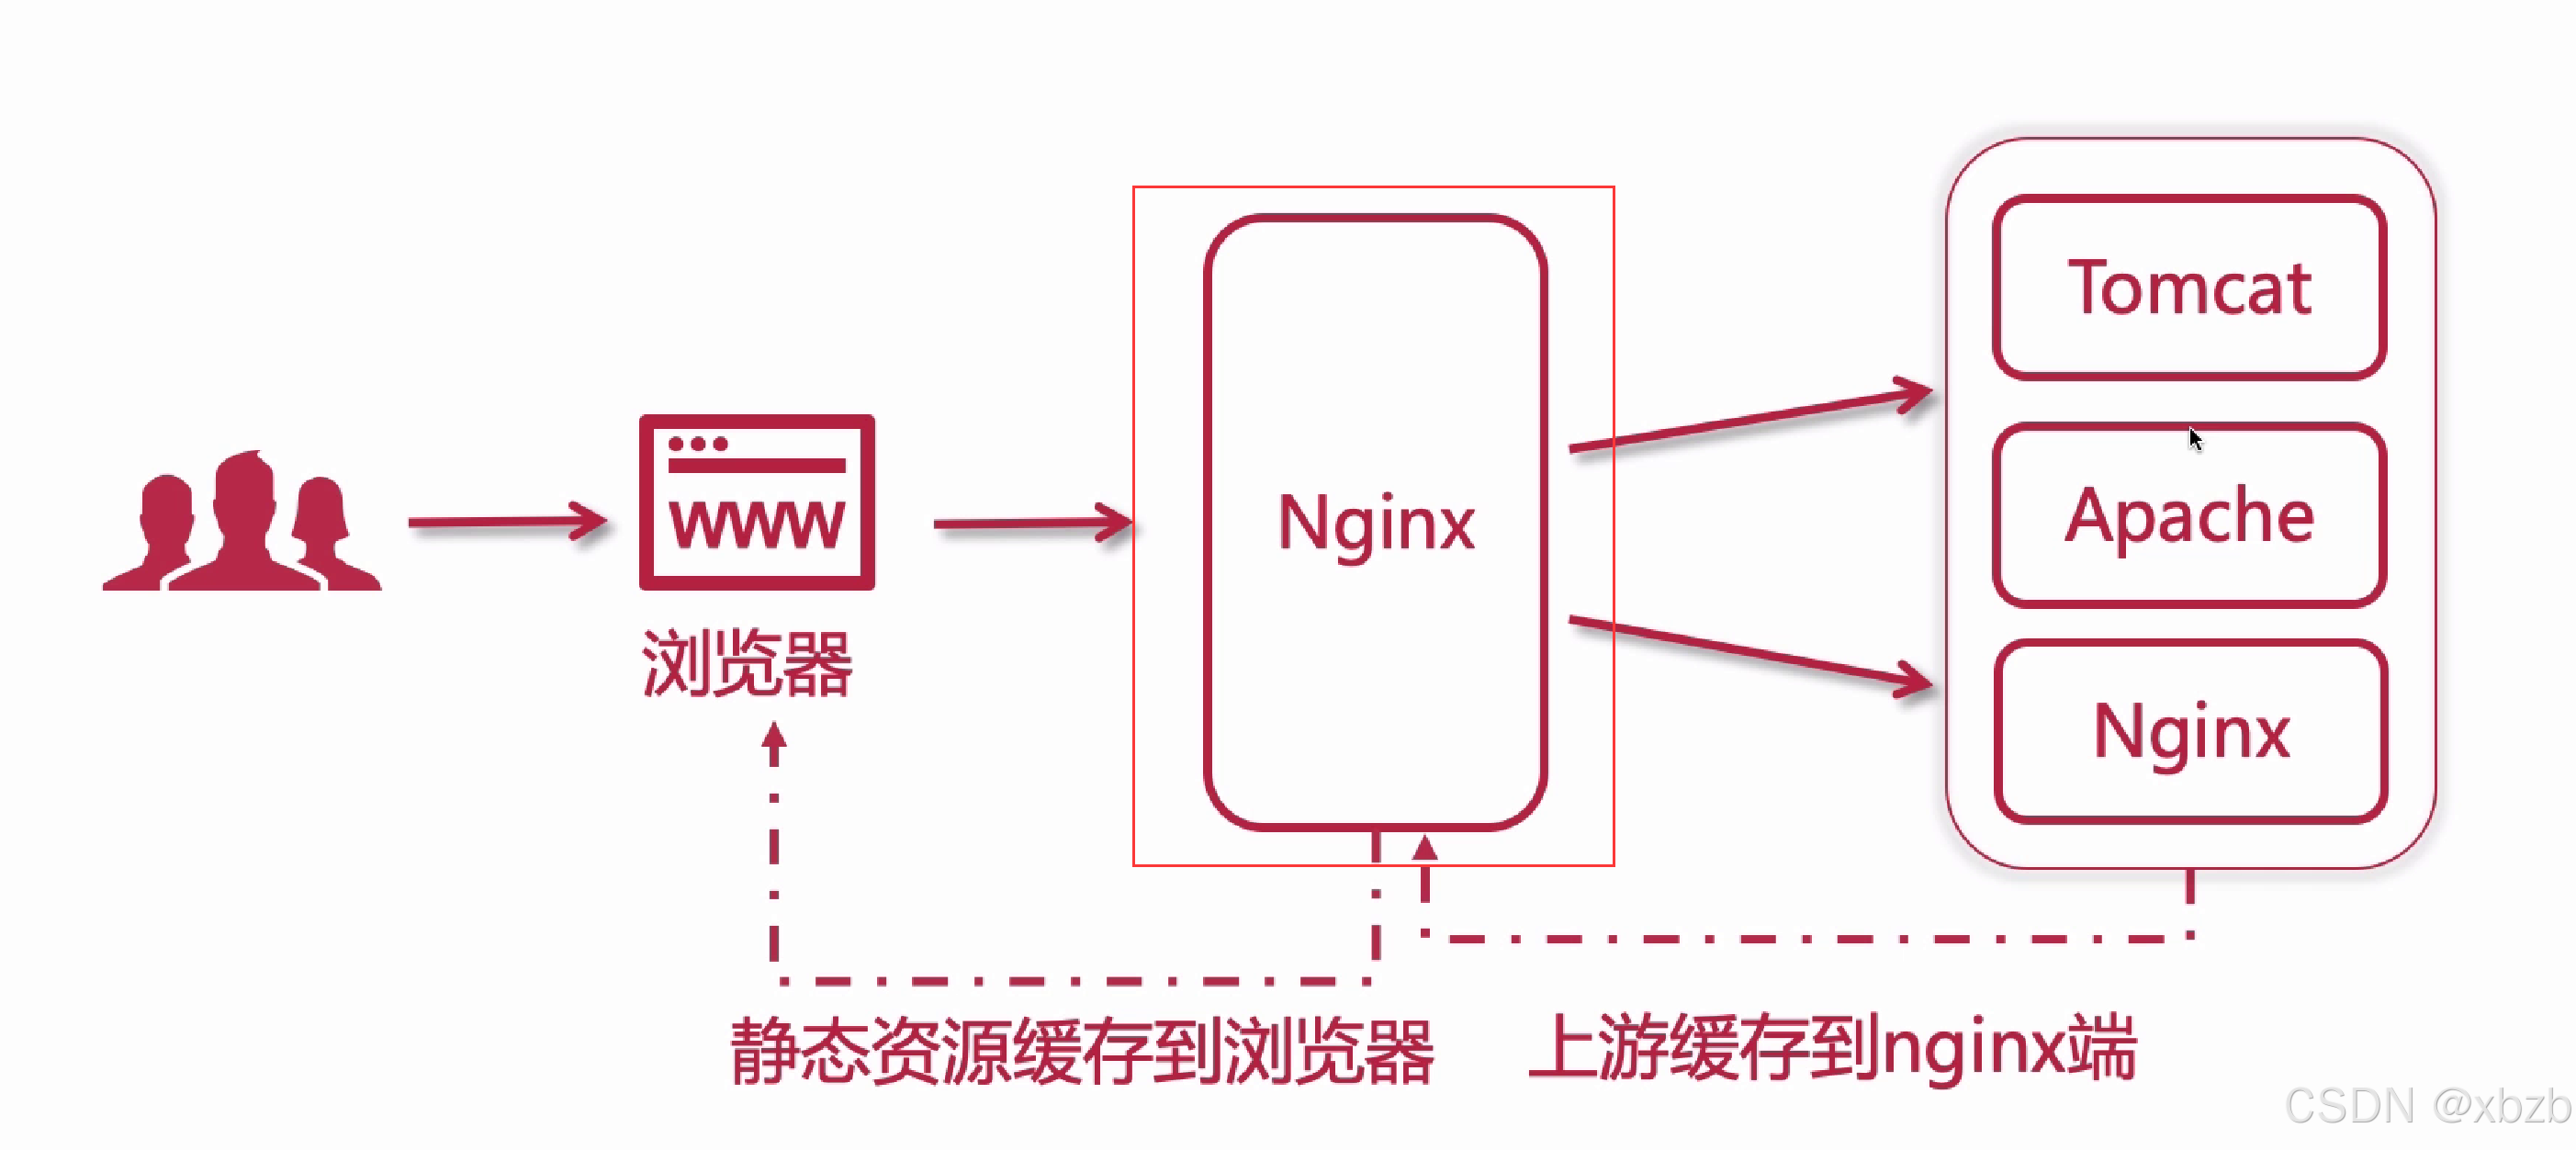
反向代理指的是代理外网用户的请求到内部指定的服务器,并把数据返回给用户。客户端不直接和后端服务器通信,而是先与反向代理服务器通信,后端 IP 因此被隐藏起来。
主要作用有四个:
| 作用 | 说明 |
|---|---|
| 负载均衡 | 把请求分发给多个后端服务器,平衡负载,提升性能与可靠性 |
| 缓存 | 缓存静态文件或动态页面,减轻后端压力,加快响应 |
| 动静分离 | 动态内容(PHP / Python / Node.js)与静态资源(HTML / CSS / JS / 图片 / 视频)分别放在不同服务器或路径 |
| 多站点代理 | 代理多个域名或虚拟主机,把不同请求转到不同后端,实现共享端口 |
7.2 四个代理模块
| 模块 | 转发的协议 | 用途 | 官方文档路径 |
|---|---|---|---|
ngx_http_proxy_module |
HTTP | 把客户端请求以 HTTP 协议转发到指定服务器 | nginx.org/en/docs/http/ngx_http_proxy_module.html |
ngx_http_upstream_module |
------ | 定义后端服务器分组,供 proxy_pass、fastcgi_pass、uwsgi_pass 引用 |
nginx.org/en/docs/http/ngx_http_upstream_module.html |
ngx_stream_proxy_module |
TCP | 把客户端请求以 TCP 协议转发到指定服务器 | nginx.org/en/docs/stream/ngx_stream_proxy_module.html |
ngx_http_fastcgi_module |
FastCGI | 把 PHP 请求转发到指定服务器(第六章的 PHP 站点就用它) | nginx.org/en/docs/http/ngx_http_fastcgi_module.html |
ngx_http_uwsgi_module |
uwsgi | 把 Python 请求转发到指定服务器 | nginx.org/en/docs/http/ngx_http_uwsgi_module.html |
7.3 Location 五种修饰符与优先级
反向代理的匹配本质是「URL 路径匹配 → 命中对应规则 → 按规则里的 proxy_pass 转发 」,其中 location 定义匹配路径、proxy_pass 指定后端地址。
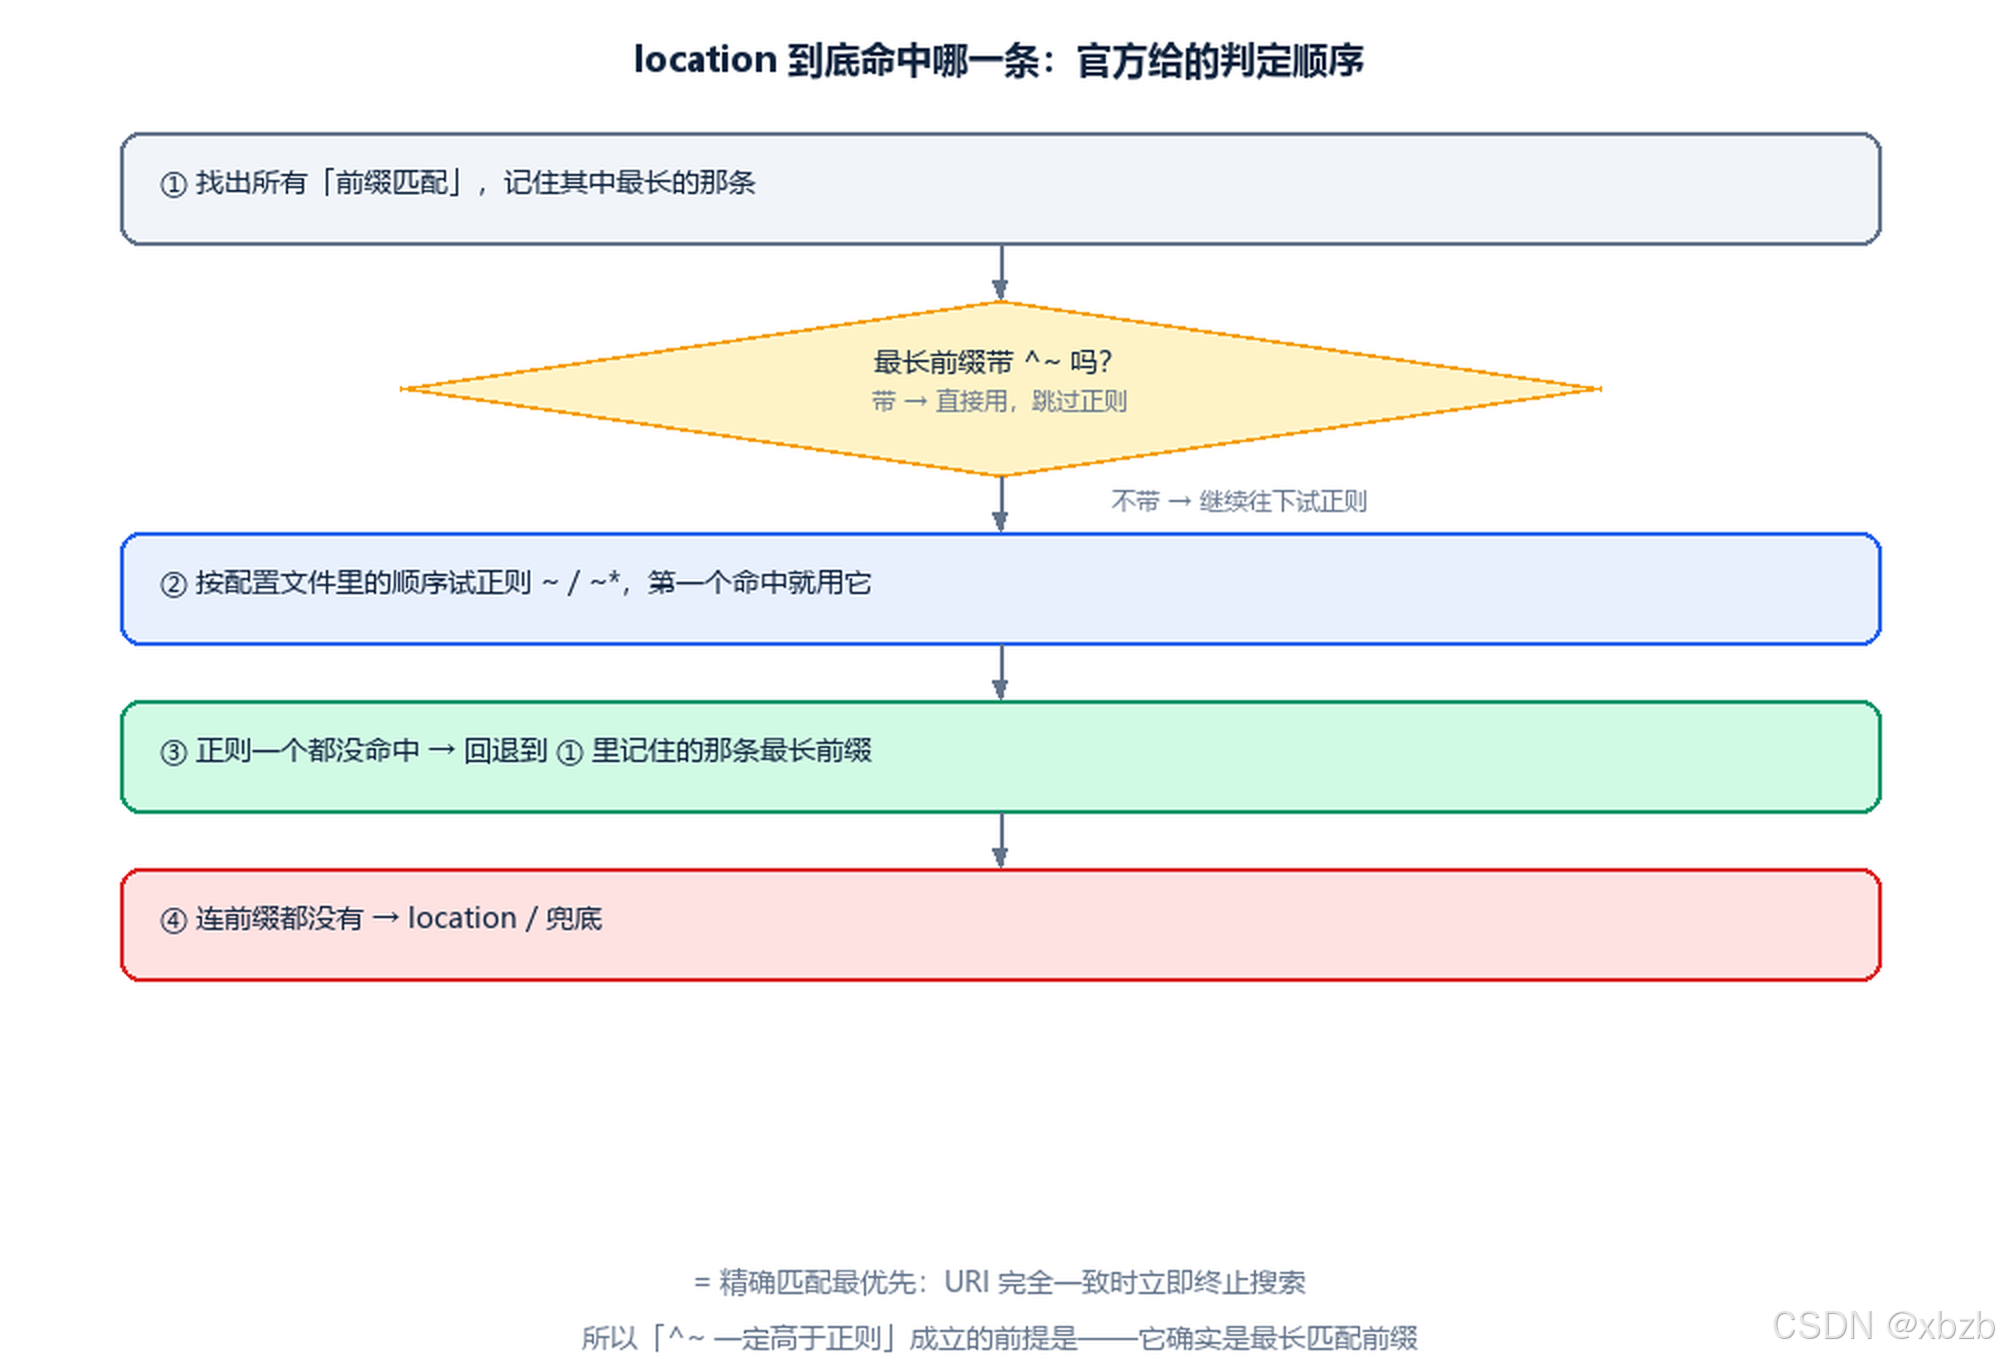
| 修饰符 | 写法 | 匹配逻辑 | 优先级 |
|---|---|---|---|
= |
location = /login {} |
URI 与该路径完全一致才命中,命中即停止搜索 | 最高 |
^~ |
location ^~ /static/ {} |
以该路径开头即命中;若它是最长前缀,跳过正则检查 | 次高 |
~ |
location ~ \.php$ {} |
按正则匹配,区分大小写;多个正则按配置顺序,第一个命中即生效 | 中 |
~* |
`location ~* .(jpg | png)$ {}` | 按正则匹配,不区分大小写 |
| 无符号 | location /api/ {} |
普通前缀匹配,多个规则按路径最长优先 | 兜底 |
/ |
location / {} |
所有未命中请求的最终归属 | 最低 |
nginx
# 1. 精确匹配:只有 /login 命中,/login?a=1 与 /login/ 都不走这里
location = /login {
    proxy_pass http://backend_login:8080;
}

# 2. 前缀匹配:/static 开头全部命中,且跳过正则
location ^~ /static/ {
    proxy_pass http://backend_static:80;
}

# 3. 正则匹配:按配置顺序匹配,第一个命中即生效
location ~* \.(jpg|png|gif)$ {
    proxy_pass http://backend_img:80;
}

# 4. 普通前缀:/api/ 开头命中,路径更长的规则优先
location /api/ {
    proxy_pass http://backend_api:9090;
}
# 规则2:路径更长,/api/user/xxx 会命中这条而不是上面那条
location /api/user/ {
    proxy_pass http://backend_user:9090;
}
⚠️ 注意 :官方文档给的顺序与传统说法略有出入,准确表述是------先记住最长的前缀匹配,再按配置顺序试正则、第一个命中就用它 ;只有正则全不命中,才回退到之前记住的那个最长前缀。
^~的作用就是「如果它是最长前缀,跳过正则检查」。所以「^~一定高于正则」成立的前提是它确实是最长前缀。
7.4 proxy_pass 末尾斜杠的差别
proxy_pass 末尾带不带 /,直接决定转发到后端的路径要不要保留 location 匹配到的那段前缀------这是 404 的最高频成因。
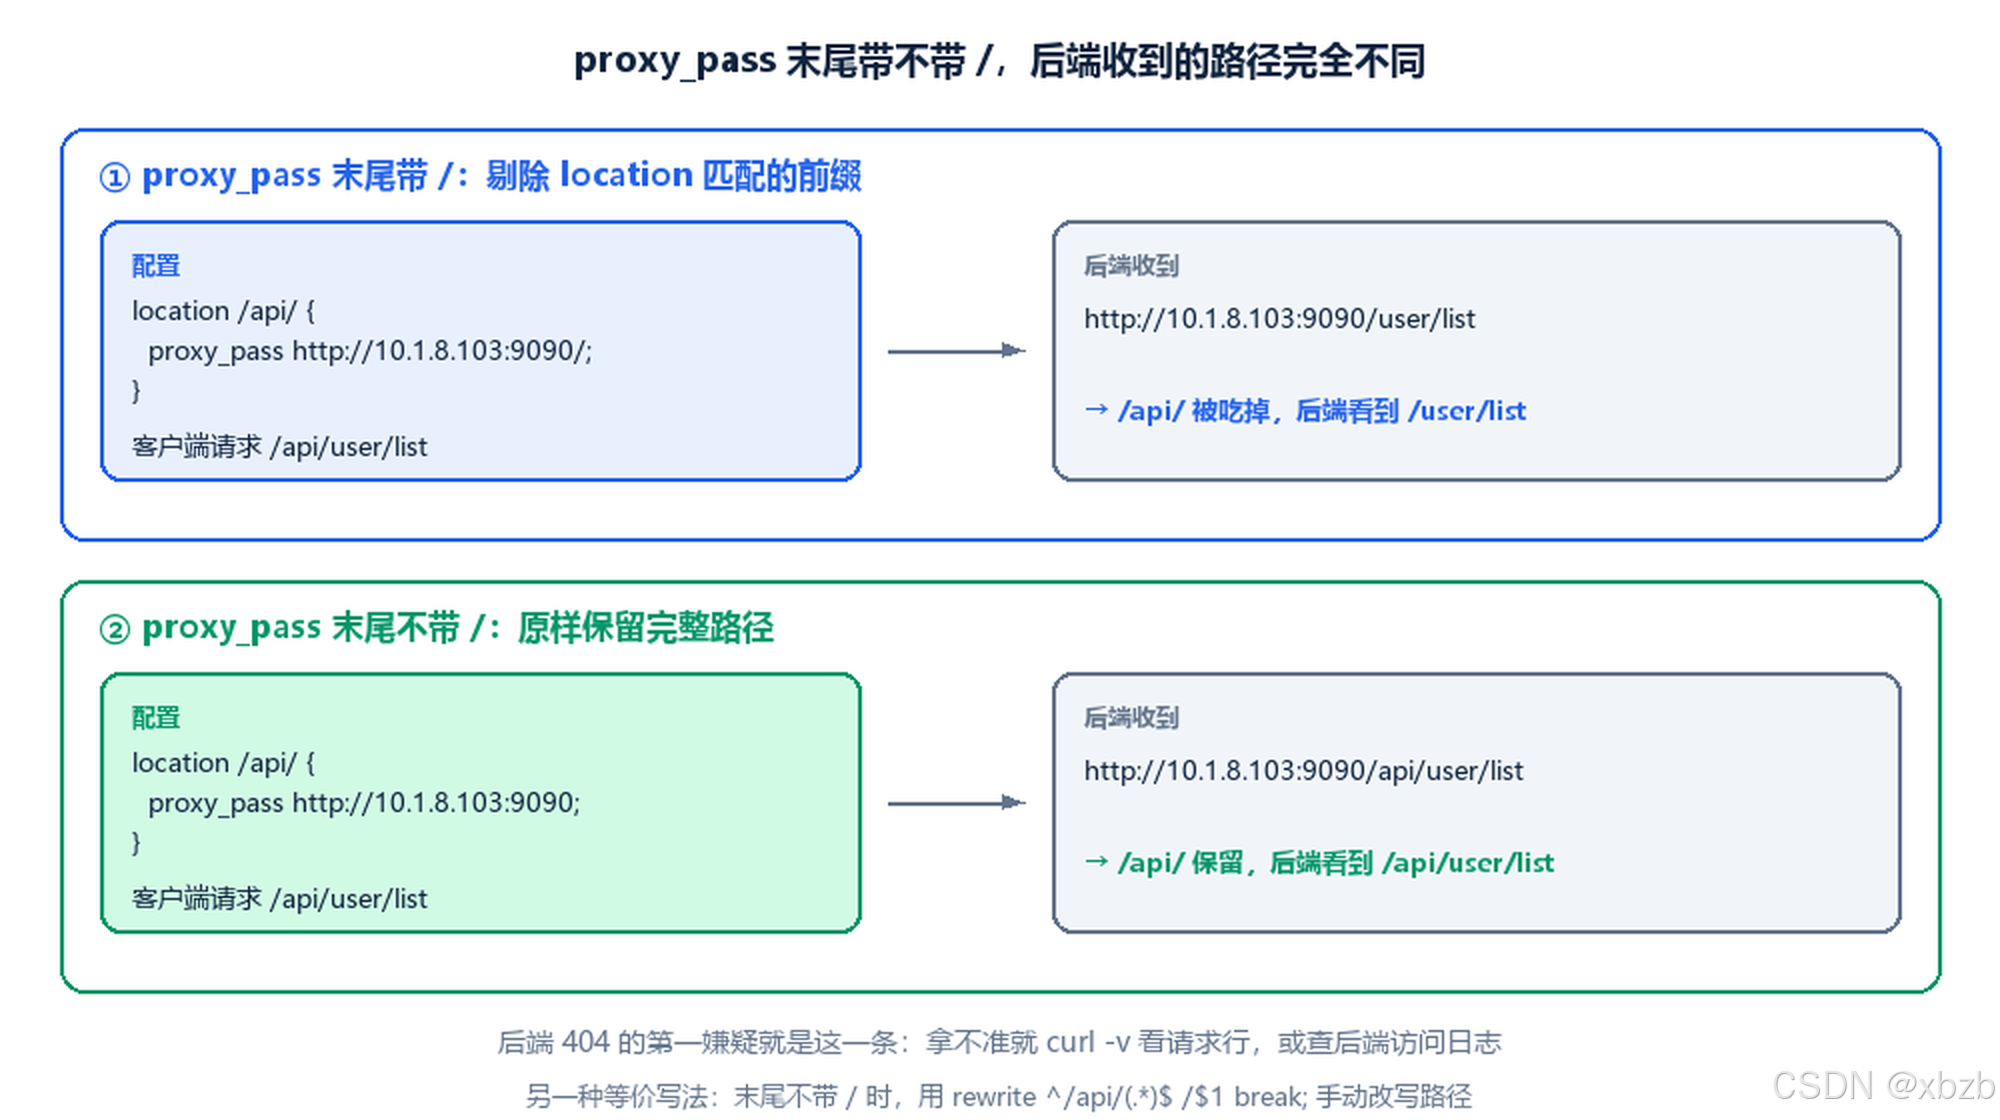
| 场景 | 配置 | 客户端请求 | 后端实际收到 |
|---|---|---|---|
末尾带 / |
location /api/ { proxy_pass http://10.1.8.103:9090/; } |
/api/user/list |
/user/list(/api/ 被剔除) |
末尾不带 / |
location /api/ { proxy_pass http://10.1.8.103:9090; } |
/api/user/list |
/api/user/list(原样保留) |
提示 :
proxy_pass指定的是「服务器地址」而不是「URL」,两者行为不同。带/时 Nginx 把location匹配到的那段路径替换掉;不带/时整段原始 URI 原样拼在后面。拿不准就用curl -v看后端访问日志里实际收到的路径。
7.5 综合示例与匹配流程
nginx
http {
    # 后端分组:多节点会自动轮询,实现负载均衡
    upstream backend_main   { server 10.1.8.103:8080; }
    upstream backend_api    { server 10.1.8.104:9090; }
    upstream backend_static { server 10.1.8.105:80; }
    upstream backend_login  { server 10.1.8.103:8080; }

    server {
        listen 80;
        server_name localhost;

        # 1. 精确匹配:仅 /login → 登录服务
        location = /login {
            proxy_pass http://backend_login;
            proxy_set_header Host $host;
        }

        # 2. 前缀匹配:/static/ 开头 → 静态服务,跳过正则
        location ^~ /static/ {
            proxy_pass http://backend_static;
            proxy_set_header Host $host;
        }

        # 3. 正则匹配:图片后缀 → 静态服务
        location ~* \.(jpg|png|gif)$ {
            proxy_pass http://backend_static;
            proxy_set_header Host $host;
        }

        # 4. 普通前缀:/api/ 开头 → API 服务(末尾带 /,剔除 /api/)
        location /api/ {
            proxy_pass http://backend_api/;
            proxy_set_header Host $host;
            proxy_set_header X-Real-IP $remote_addr;
        }

        # 5. 兜底匹配:其余全部 → 主服务
        location / {
            proxy_pass http://backend_main;
            proxy_set_header Host $host;
            proxy_set_header X-Real-IP $remote_addr;
            # 传递真实 IP 链路与请求协议
            proxy_set_header X-Forwarded-For $proxy_add_x_forwarded_for;
            proxy_set_header X-Forwarded-Proto $scheme;
        }
    }
}
配套的匹配结果一览:
| 客户端请求 URL | 命中的 location | 转发至后端的 URL | 对应后端 |
|---|---|---|---|
http://localhost/login |
= /login |
http://10.1.8.103:8080 |
backend_login |
http://localhost/static/css/main.css |
^~ /static/ |
http://10.1.8.105:80/css/main.css |
backend_static |
http://localhost/img/1.jpg |
`~* .(jpg | png | gif)$` |
http://localhost/api/user/info |
/api/ |
http://10.1.8.104:9090/user/info |
backend_api |
http://localhost/index |
/ |
http://10.1.8.103:8080/index |
backend_main |
反向代理常用请求头,转发时建议一起带上,否则后端拿不到客户端真实信息:
| 指令 | 传递什么 | 说明 |
|---|---|---|
proxy_set_header Host $host; |
客户端访问的域名 | 后端生成绝对链接时要用 |
proxy_set_header X-Real-IP $remote_addr; |
客户端真实 IP | 后端记日志 / 限流的基础 |
proxy_set_header X-Forwarded-For $proxy_add_x_forwarded_for; |
逐级 IP 链路 | 多级代理时保留完整来源链 |
proxy_set_header X-Forwarded-Proto $scheme; |
原始请求协议 | 后端判断该生成 http 还是 https 链接 |
八、反向代理三机实战
8.1 实验环境
| 主机名 | IP 地址 | 角色 |
|---|---|---|
zhb-m2 |
10.1.8.12 |
客户端(测试) |
zhb-s2 |
10.1.8.102 |
代理服务器(www.zhb.cloud) |
zhb-s3 |
10.1.8.103 |
后端 Web1 |
zhb-s4 |
10.1.8.104 |
后端 Web2 |
zhb-s5 |
10.1.8.105 |
后端 Web3 |
所有节点的 /etc/hosts 统一加一份解析:
bash
# 所有节点
[root@zhb-s2 ~]# vim /etc/hosts
127.0.0.1   localhost localhost.localdomain localhost4 localhost4.localdomain4
::1         localhost localhost.localdomain localhost6 localhost6.localdomain6

############ proxy ##################
10.1.8.12  zhb-m2.zhb.cloud zhb-m2
10.1.8.102 www.zhb.cloud www
10.1.8.102 zhb-s2.zhb.cloud zhb-s2
10.1.8.103 zhb-s3.zhb.cloud zhb-s3
10.1.8.104 zhb-s4.zhb.cloud zhb-s4
10.1.8.105 zhb-s5.zhb.cloud zhb-s5
8.2 后端与代理准备
bash
# 三台后端都装 nginx 并启动,以 zhb-s3 为例
[root@zhb-s3 ~]# yum -y install nginx
[root@zhb-s3 ~]# systemctl enable nginx --now

# 放行 HTTP
[root@zhb-s3 ~]# firewall-cmd --add-service=http --permanent
[root@zhb-s3 ~]# firewall-cmd --reload

# 三台各写自己的标识页
[root@zhb-s3 ~]# echo Welcome to $(hostname) > /usr/share/nginx/html/index.html
[root@zhb-s4 ~]# echo Welcome to $(hostname) > /usr/share/nginx/html/index.html
[root@zhb-s5 ~]# echo Welcome to $(hostname) > /usr/share/nginx/html/index.html

# 客户端先直连三台后端确认都能访问
[root@zhb-m2 ~]# curl http://zhb-s3.zhb.cloud/
Welcome to zhb-s3.zhb.cloud
[root@zhb-m2 ~]# curl http://zhb-s4.zhb.cloud/
Welcome to zhb-s4.zhb.cloud
[root@zhb-m2 ~]# curl http://zhb-s5.zhb.cloud/
Welcome to zhb-s5.zhb.cloud
bash
# 代理节点装 nginx 并准备一批素材
[root@zhb-s2 ~]# yum -y install nginx
[root@zhb-s2 ~]# echo Welcome to www.zhb.cloud > /usr/share/nginx/html/index.html

[root@zhb-s2 ~]# mkdir /var/nginx
[root@zhb-s2 ~]# echo "Hello, Nginx" > /var/nginx/index.html
[root@zhb-s2 ~]# echo "Hello, Zhb" > /var/nginx/test.txt
[root@zhb-s2 ~]# cp /usr/share/nginx/html/nginx-logo.png /var/nginx/
[root@zhb-s2 ~]# ls /var/nginx/
index.html  nginx-logo.png  test.txt
nginx
# 代理节点第一版配置:只做一个本地静态站点
server {
    listen  80;
    server_name www.zhb.cloud;

    location / {
      root /var/nginx;
      index index.html;
    }
}
bash
# 配置改动用 reload 生效,不断连接
[root@zhb-s2 ~]# nginx -s reload
bash
# 客户端验证
[root@zhb-m2 ~]# curl http://www.zhb.cloud/
Hello, Nginx
[root@zhb-m2 ~]# curl http://www.zhb.cloud/test.txt
Hello, Zhb
访问 www.zhb.cloud/nginx-logo.png 能正常返回图片:
 思考题 :如果在
 /var/nginx 里放一个 test.nn 文件,通过 www.zhb.cloud/test.nn 能取到内容吗?答案是取到的是下载而不是渲染 ------因为 nn 后缀不在 mime.types 里,Nginx 不知道它该按什么类型返回,只能按 default_type(二进制流)处理,浏览器于是弹下载框。
8.3 代理本地:三类匹配复现
先在代理机上准备多套目录,用来区分「命中的是哪条规则」:
bash
# /var/nginx 下放 nginx1、nginx2 两个子目录
[root@zhb-s2 ~]# mkdir /var/nginx/nginx{1,2}
[root@zhb-s2 ~]# echo "Hello, I'm here /var/nginx/nginx1" > /var/nginx/nginx1/index.html
[root@zhb-s2 ~]# echo "Hello, I'm here /var/nginx/nginx2" > /var/nginx/nginx2/index.html

# 平级的 /var/nginx1、/var/nginx2
[root@zhb-s2 ~]# mkdir /var/nginx{1,2}
[root@zhb-s2 ~]# echo "Hello, Nginx1" > /var/nginx1/index.html
[root@zhb-s2 ~]# echo "Hello, Nginx2" > /var/nginx2/index.html

# /var/www1、/var/www2 下各放 nginx1、nginx2,供正则与精确匹配实验用
[root@zhb-s2 ~]# for path1 in www{1..2}
do
  for path2 in nginx{1..2}
  do
    mkdir -p /var/$path1/$path2
    echo "Hello, I'm here /var/$path1/$path2" > /var/$path1/$path2/index.html
  done
done

# 核对目录结构
[root@zhb-s2 ~]# tree /var/nginx* /var/www*
/var/nginx
├── index.html
├── nginx1
│   └── index.html
├── nginx2
│   └── index.html
├── nginx-logo.png
└── test.txt
/var/nginx1
└── index.html
/var/nginx2
└── index.html
/var/www1
├── nginx1
│   └── index.html
└── nginx2
    └── index.html
/var/www2
├── nginx1
│   └── index.html
└── nginx2
    └── index.html
bash
# 基线:默认只匹配 /
[root@zhb-m2 ~]# curl http://www.zhb.cloud/
Hello, Nginx
[root@zhb-m2 ~]# curl http://www.zhb.cloud/nginx1/
Hello, I'm here /var/nginx/nginx1
[root@zhb-m2 ~]# curl http://www.zhb.cloud/nginx2/
Hello, I'm here /var/nginx/nginx2
实践 1:无符号前缀匹配 ------location /nginx1 的 root /var 会拼成 /var/nginx1:
nginx
server {
    listen  80;
    server_name www.zhb.cloud;

    location / {
        root /var/nginx;
        index index.html;
    }

    # 命中 /nginx1 时去 /var 下找 nginx1,完整路径就是 /var/nginx1
    # 等价于写 alias /var/nginx1;(alias 必须用绝对路径)
    location /nginx1 {
        root /var;
        index index.html;
    }
}
bash
[root@zhb-s2 ~]# nginx -s reload

# 注意:/nginx1 后面这个 / 不能省
[root@zhb-m2 ~]# curl http://www.zhb.cloud/nginx1/
Hello, Nginx1
[root@zhb-m2 ~]# curl http://www.zhb.cloud/nginx2/
Hello, I'm here /var/nginx/nginx2
结论 :无符号前缀匹配的优先级高于默认的 /。
实践 2:加一条正则 ------/nginx1/ 被正则抢走:
nginx
# 在实践1的配置上追加
location ~ /nginx.* {
    root /var/www1;
    index index.html;
}
bash
[root@zhb-s2 ~]# nginx -s reload

[root@zhb-m2 ~]# curl http://www.zhb.cloud/nginx1/
Hello, I'm here /var/www1/nginx1
[root@zhb-m2 ~]# curl http://www.zhb.cloud/nginx2/
Hello, I'm here /var/www1/nginx2结论:正则匹配的优先级高于无符号前缀匹配。
实践 3:再加一条精确匹配 ------/nginx2/index.html 又被抢回去:
nginx
# 在实践2的配置上追加
location = /nginx2/index.html {
    root /var/www2;
    index index.html;
}
bash
[root@zhb-s2 ~]# nginx -s reload

[root@zhb-m2 ~]# curl http://www.zhb.cloud/nginx1/
Hello, I'm here /var/www1/nginx1
[root@zhb-m2 ~]# curl http://www.zhb.cloud/nginx2/
Hello, I'm here /var/www2/nginx2
结论 :精确匹配的优先级高于正则匹配。三轮下来,优先级顺序 = > ^~ > ~ / ~* > 普通前缀 > / 被完整复现。
8.4 代理远端:路径重写
把 location 指向别的服务器,就成了真正的反向代理。
nginx
server {
    listen  80;
    server_name www.zhb.cloud;

    location / {
        root /var/nginx;
        index index.html;
    }

    # 访问 /nginx1/ 开头,等价于直接访问 http://zhb-s3.zhb.cloud/
    # proxy_pass 末尾带 /,所以 /nginx1/ 不会拼到后端
    location /nginx1/ {
        proxy_pass http://zhb-s3.zhb.cloud/;
        index index.html;
    }
}
bash
[root@zhb-s2 ~]# nginx -s reload

# /nginx1/ 转到了 zhb-s3,/nginx2/ 还是走本地目录
[root@zhb-m2 ~]# curl http://www.zhb.cloud/nginx1/
Welcome to zhb-s3.zhb.cloud
[root@zhb-m2 ~]# curl http://www.zhb.cloud/nginx2/
Hello, I'm here /var/nginx/nginx2
远端 + 正则 + 精确匹配一起上 ,并且用 rewrite 做路径替换:
nginx
server {
    listen  80;
    server_name www.zhb.cloud;

    location / {
        root /var/nginx;
        index index.html;
    }

    location /nginx1/ {
        proxy_pass http://zhb-s3.zhb.cloud/;
        index index.html;
    }

    # 正则:去掉 /nginx1、/nginx2、/nginx3 前缀,再转给 zhb-s4
    location ~ /nginx[123].* {
        # ^/nginx[123](.*)$ 匹配以 /nginx1|2|3 开头的完整路径,$1 是前缀之后的部分
        # break 表示重写后不再匹配其他 rewrite 规则
        rewrite ^/nginx[123](.*)$ $1 break;
        # proxy_pass 不带 URI(末尾无 /),配合 rewrite 完成路径替换
        proxy_pass http://zhb-s4.zhb.cloud;
        index index.html;
    }

    # 精确匹配:只有 /nginx3/ 走这台
    location = /nginx3/ {
        proxy_pass http://zhb-s5.zhb.cloud/;
        index index.html;
    }
}
bash
[root@zhb-s2 ~]# nginx -s reload

# /nginx1/ 和 /nginx2/ 被正则抢走,转给 zhb-s4
[root@zhb-m2 ~]# curl http://www.zhb.cloud/nginx1/
Welcome to zhb-s4.zhb.cloud
[root@zhb-m2 ~]# curl http://www.zhb.cloud/nginx2/
Welcome to zhb-s4.zhb.cloud
# /nginx3/ 被精确匹配抢回来,转给 zhb-s5
[root@zhb-m2 ~]# curl http://www.zhb.cloud/nginx3/
Welcome to zhb-s5.zhb.cloud一次改动同时验证了三件事:rewrite 能改写转发路径、proxy_pass 不带尾斜杠时要靠 rewrite 补路径替换、精确匹配仍压得住正则。
附:命令英文全称速查表
| 命令 / 缩写 | 英文全称 / 原意 | 作用 |
|---|---|---|
nginx |
engine X | 高性能 HTTP 与反向代理服务器 |
proxy |
proxy | 代理;正向代理代表客户端,反向代理代表服务端 |
upstream |
upstream | 上游,指后端服务器分组 |
location |
location | 位置,指 URL 路径匹配块 |
root |
root | 网站根目录 |
alias |
alias | 别名,把匹配到的路径映射到另一个目录 |
rewrite |
rewrite | 重写 URL 路径 |
ssl |
S ecure S ockets Layer | 安全套接层,现由 TLS 取代 |
TLS |
T ransport L ayer Security | 传输层安全协议 |
http2 |
HTTP version 2 | HTTP 第二代协议 |
fastcgi |
Fast C ommon G ateway Interface | 快速通用网关接口,PHP 走这条 |
php-fpm |
PHP F astCGI P rocess Manager | PHP 的 FastCGI 进程管理器 |
mime |
M ultipurpose I nternet M ail Extensions | 多用途互联网邮件扩展,此处指文件类型映射 |
epoll |
e vent poll | Linux 下的高性能事件驱动模型 |
auth_basic |
auth entication basic | HTTP 基本认证 |
htpasswd |
h ypert ext passw ord | 生成 Basic 认证账号密码文件的工具 |
📚 参考资料(官方文档 · 中英双语)
官方文档(nginx.org)
- ngx_http_core_module(含 location 匹配规则的官方原文)
- ngx_http_proxy_module(反向代理全部指令与内嵌变量)
- ngx_http_auth_basic_module(Basic 认证与 htpasswd 格式)
中文版
其余手册在服务器上直接查:
bash
nginx -h              # 命令行参数
nginx -t              # 检查配置语法
nginx -T              # 打印实际生效的完整配置
nginx -s reload       # 平滑重载配置
man 8 nginx           # 服务端手册
总结 :Nginx 的坑几乎都集中在两个地方。一是配置层级 :全局、
events、http、server、location层层嵌套,子级覆盖父级;虚拟主机拆到conf.d后用include汇入。二是匹配规则 :location按「先记最长前缀 → 正则第一个命中即用 → 都不中再回退最长前缀」的顺序选;proxy_pass末尾带不带/,决定路径前缀是剔除还是保留。把这两条吃透,404 与 502 基本都能自己定位。
📚 同系列 · Linux 系统管理(其余篇目见博客主页)
- 上一篇:《Linux 趣味命令与 Nginx 云盘建站实操记录》
- 相关篇:《Linux firewalld 防火墙区域与规则实战指南》
- 相关篇:《Linux SELinux 安全加固与标签排错手册》
💬 你的 proxy_pass 尾斜杠踩过坑吗?把 curl -v 的请求行贴到评论区,一起看路径是怎么被改的。