文章目录
- [1. 概述](#1. 概述)
- [2. Stub](#2. Stub)
- [3. 基本示例](#3. 基本示例)
-
- [3.1 前置工作处理](#3.1 前置工作处理)
- [3.2 proto 接口](#3.2 proto 接口)
-
- [3.2.1 proto 代码](#3.2.1 proto 代码)
- [3.2.2 语法解释](#3.2.2 语法解释)
- [3.2.3 构建命令解释](#3.2.3 构建命令解释)
- [3.2.4 生成代码解释-hello.pb.go](#3.2.4 生成代码解释-hello.pb.go)
- [3.2.5 生成代码解释-hello_grpc.pb.go](#3.2.5 生成代码解释-hello_grpc.pb.go)
- [3.3 服务端实现对象](#3.3 服务端实现对象)
- [3.4 服务端启动](#3.4 服务端启动)
- [3.5 客户端启动](#3.5 客户端启动)
- [3.6 结果输出](#3.6 结果输出)
- [4. 小结](#4. 小结)
本系列文章:
- Java 转 go 学习 - 项目管理
- Java 转 go 学习 - 基本语法
- Java 转 go 学习 - 类型转换
- Java 转 go 学习 - 流程控制结构
- Java 转 go 学习 - 数组和切片
- Java 转 go 学习 - map
- Java 转 go 学习 - 函数(1)
- Java 转 go 学习 - 函数(2)
- Java 转 go 学习 - 结构体
- Java 转 go 学习 - 接口
- Java 转 go 学习 - 并发编程(1)
- Java 转 go 学习 - 并发编程(2)
- Java 转 go 学习 - 并发编程(3)
- Java 转 go 学习 - web 编程
- Java 转 go 学习 - Hertz 学习(1)
- Java 转 go 学习 - Hertz 学习(2)
- Java 转 go 学习 - Redis(1)
- Java 转 go 学习 - Redis(2)
- Java 转 go 学习 - MYSQL
1. 概述
grpc 是 Google 开发的 高性能、开源、通用的远程过程调用(RPC)框架 ,官网如下:gRPC 简介,有需要的可以直接看官网的示例。
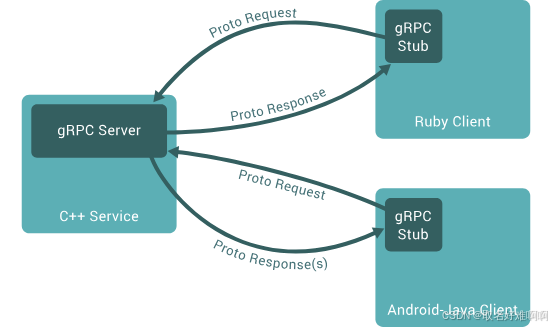
上面就是 grpc 服务器和客户端之间的相互调用,客户端可以直接通过 grpc 方法调用另一台服务器上面的方法,跟本地调用一样,比如 Java 程序里面调用 go 方法就可以这么做,非常方便。
grpc 的优点就是结合了现代网络协议和高效的序列化技术:
- 基于 HTTP/2 协议:
- 多路复用:在单个 TCP 连接上可以同时处理多个请求和响应 ,避免了传统 HTTP/1.1 的 队头阻塞 问题,提高连接利用率。
- 双向流式通信:支持客户端和服务端同时、独立地发送消息流,非常适合实时聊天、直播推送等场景。
- 头部压缩:减少了网络传输的开销。
- ...
- 使用 Protocol Buffers (Protobuf):这个是 grpc 默认且推荐的 接口定义语言(IDL) 和 数据序列化格式
- 二进制格式:Protobuf 是二进制格式,比 JSON、XML 等文本格式 更小 、更快
- 强类型:通过
.proto文件去定义接口和消息结构,可以自动生成多种语言的客户端和服务端代码,保证类型安全。
- 跨语言支持:这个是 grpc 比较重要的特性,支持包括
C++, Java, Python, Go, Ruby, JavaScript, C#, Objective-C, PHP, Dart等在内的多种主流编程语言,支持微服务架构中多语言相互调用。
一个典型的 grpc 服务的工作流程如下:
- 定义服务: 使用 Protobuf 在
.proto文件里面定义服务接口(方法名、参数、返回值)。 - 生成代码: 使用
Protobuf编辑器protoc和 grpc 插件,根据.proto文件生成指定语言的客户端 Stub 和服务端 Skeleton 代码。 - 实现服务: 服务端,开发者实现由 Skeleton 生成的接口。
- 发起调用: 客户端,开发者调用由 Stub 生成的本地方法,Stub 会将参数序列化,然后通过 HTTP/2 发送给服务端。
- 处理响应: 服务端收到请求之后,将参数反序列化,执行对应的方法,再将结果序列化之后返回给客户端,客户端 Stub 收到响应之后,反序列化并且返回给客户端。
2. Stub
Stub(存根) 在分布式系统和 RPC 框架中可以理解成 远程服务在本地代码中的一个替身或者代理,又或者是拦截器。核心作用就是将底层通信和数据序列化、反序列化的逻辑给封装起来,调用者只关心方法调用,不用关系这些复杂的底层通信逻辑。
如果没有 Stub,客户端每次调用远程服务都要自己处理这些事情:
- 连接服务端
- 按协议组装请求数据
- 发送网络请求
- 接收返回结果
- 解析响应数据
- 处理错误、超时等问题
有了 Stub 之后,开发者只需要像调用普通函数一样写代码,底层细节由 gRPC 自动处理。
Stub 的主要类型有下面几种:
- 阻塞式 Stub: 最简单的模式,客户端发起调用之后会一直等待,直到收到服务器的响应或者超时。
- 异步 Stub: 客户端发起调用之后不会阻塞等待,可以去执行其他任务,服务端响应会通过回调函数或者 Future 来处理。
- 流式 Stub: 用于处理流式数据串数,支持客户端流、服务端流或者双向流,服务端和客户端可以互相发送和接收数据,而不是一来一回。
3. 基本示例
3.1 前置工作处理
要使用 grpc,首先要安装 Protocol Buffers 编译器 protoc,到官网下载对应的版本 https://github.com/protocolbuffers/protobuf/releases,一般就是最新版,解压之后将 protoc 加入系统 PATH,然后通过 protoc --version 可以看到对应的版本号就算成功了。
接下来安装 protoc 的相关 go 插件,然后把 $GOPATH/bin 加到系统 PATH。
go
go install google.golang.org/protobuf/cmd/protoc-gen-go@latest
go install google.golang.org/grpc/cmd/protoc-gen-go-grpc@latest
为什么要加入这个 $GOPATH/bin,因为 go install 下载的插件会下载到 GOPATH 下,由于需要用到 protoc 命令去生成文件,所以需要将这个路径加入 path,下面来生成代码,项目结构如下。
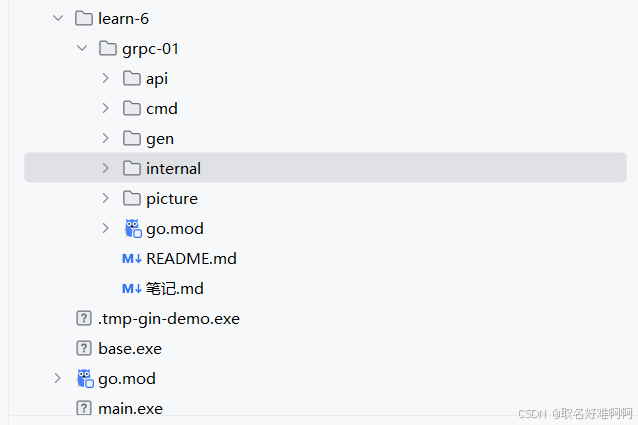
3.2 proto 接口
3.2.1 proto 代码
接下来开始编写 proto 接口,grpc 的核心就是这个接口文件,我们在 grpc/api/proto/helloworld/v1 下面创建一个 hello.proto。
go
syntax = "proto3";

package helloworld.v1;

// go_package 指定生成后的 Go 包路径和包名。
option go_package = "example.com/grpc-01/gen/helloworld/v1;helloworldv1";

// Greeter 定义一个最基础的问候服务。
service Greeter {
  // SayHello 是一个一元 RPC:客户端发一个请求,服务端回一个响应。
  rpc SayHello(HelloRequest) returns (HelloReply);
}

message HelloRequest {
  // name 是客户端传入的用户名。
  string name = 1;
}

message HelloReply {
  // message 是服务端返回的问候语。
  string message = 1;
}
3.2.2 语法解释
下面解释下上面的语法。
- syntax = "proto3" :表示这个
.proto文件使用的是 proto3 语法版本, proto3 是现在最常见的 protobuf 语法,字段写法更简洁,也更适合 gRPC。 - package helloworld.v1 :这里定义了 proto 层的包名,也就是给这份接口定义一个命名空间,避免和别的 .proto 冲突,同时这里的 v1 就表示版本,表示这是第一版接口,注意这里不是 go 的包名,可以把它理解成 协议里的包路径 ,会影响生成代码和服务全名,比如这里 gRPC 底层会把服务识别成
helloworld.v1.Greeter。 - option go_package = "example.com/grpc-01/gen/helloworld/v1;helloworldv1";: 按照
;分割之后,example.com/grpc-01/gen/helloworld/v1代表生成的代码会放到gen/helloworld/v1目录下,一般来说都建议搞一个 gen 目录来存生产的代码,跟首写的代码分离来开。helloworldv1代表生成的 go 文件的包名,因为 Go 语言不允许包名中包含-或者.,所以通常将helloworld.v1转换为helloworldv1。
然后来说下这个 example.com 是干什么的,因为这里的代码是我用 codex 生成的,生成代码的时候 go.mod 结构如下。
go
module example.com/grpc-01

go 1.25.0

require (
	google.golang.org/grpc v1.76.0
	google.golang.org/protobuf v1.36.10
)

require (
	golang.org/x/net v0.42.0 // indirect
	golang.org/x/sys v0.34.0 // indirect
	golang.org/x/text v0.27.0 // indirect
	google.golang.org/genproto/googleapis/rpc v0.0.0-20250804133106-a7a43d27e69b // indirect
)
可以看到当前项目的 module 被我定义成了 example.com/grpc-01,所以 go_package 自然也要加上这个前缀了,避免结构乱了。
- service Greeter:
Greeter就是服务名称,编译之后会生成一个GreeterServer接口,我们如果要提供 grpc 接口,就需要实现里面的方法。 - rpc SayHello(HelloRequest) returns (HelloReply): 实现的方法就是这个,
HelloRequest就是这个方法的请求,HelloReply就是返回结果,也就是方法的输入参数和返回。
最后来看下 HelloRequest 和 HelloReply。
go
message HelloRequest {
  // name 是客户端传入的用户名。
  string name = 1;
}
HelloRequest 就是请求参数,message 是消息定义,所以这个语法就是定义消息参数,string name = 1 意思是字段为 name,类型是 string,这个 1 意思是 protobuf 的字段编号,protobuf 在二进制编码时,真正依赖的是字段编号,不是字段名,所以这个编号一旦发布出去,通常就不要随便改。可以这么理解:
- 字段名给人看
- 字段编号给 protobuf 编码用
最后的 HelloReply 就是返回结果了,跟请求是一样的。
go
message HelloReply {
  // message 是服务端返回的问候语。
  string message = 1;
}
3.2.3 构建命令解释
定义好了 proto 文件,下面使用命令生成 go 代码,命令如下:protoc --go_out=. --go_opt=module=example.com/grpc-01 --go-grpc_out=. --go-grpc_opt=module=example.com/grpc-01 api/proto/helloworld/v1/hello.proto。
下面解释下各个参数的含义:
protoc:代表使用 Protocol Buffers 编辑器去读取 .proto 文件生成代码。--go_out=.:输出目标 ,生成普通的 Go 结构体代码(基于 protoc-gen-go 插件),.代表输出到当前目录,这里生成的是普通 protobuf 代码,主要包括 message 对应的 Go 结构体 ,比如上面例子中就会生成hello.pb.go。--go_opt=module=example.com/grpc-01:模块修正 ,告诉生成器,当前 Go 模块名是 example.com/grpc-01,如果 go_package 里带了这个模块前缀,就把这部分裁掉,最终按照相对路径输出,而不是还需要创建example.com/grpc-01目录。
这个参数还是很重要的,比如我们定义的 hello.proto 定义了要生成的文件包名。
go
option go_package = "example.com/grpc-01/gen/helloworld/v1;helloworldv1";这时候设置了 go_opt,生成文件的时候就会把 example.com/grpc-01 去掉,直接在当前目录下创建 gen/helloworld/v1 这个文件夹,将生成的文件放到里面。
--go-grpc_out=.: 输出目标 ,生成 gRPC 服务相关的接口代码(基于 protoc-gen-go-grpc 插件),比如Client Stub、Server 接口、Register 函数...,文件比如hello_grpc.pb.go。--go-grpc_opt=...:模块修正 ,同上 go_opt,针对 gRPC 插件的模块名设置,只是go_opt是针对 message 对应的代码路径修正,而这个参数是针对 grpc 的代码路径修正。
最后的 api/proto/helloworld/v1/hello.proto 就是指定要生成的 proto 文件了。
3.2.4 生成代码解释-hello.pb.go
最后我们来看下生成的代码,首先是 hello.pb.go,这个文件我们上一小节说了就是针对 message 比如请求和返回结果生成的文件。
下面看下各个方法,首先就是 init 方法,这个方法会初始化的时候调用,把 HelloRequest、HelloReply、Gretter、文件路径、包名、字段信息 这些元数据初始化好,提供给 gRPC 运行时使用,简单来说就是在程序启动时初始化并注册 hello.proto 的元数据描述信息,让 protobuf 和 gRPC 运行时知道这个 proto 文件里定义了哪些消息和服务。
go
var File_api_proto_helloworld_v1_hello_proto protoreflect.FileDescriptor

const file_api_proto_helloworld_v1_hello_proto_rawDesc = "" +
	"\n" +
	"#api/proto/helloworld/v1/hello.proto\x12\rhelloworld.v1\"\"\n" +
	"\fHelloRequest\x12\x12\n" +
	"\x04name\x18\x01 \x01(\tR\x04name\"&\n" +
	"\n" +
	"HelloReply\x12\x18\n" +
	"\amessage\x18\x01 \x01(\tR\amessage2M\n" +
	"\aGreeter\x12B\n" +
	"\bSayHello\x12\x1b.helloworld.v1.HelloRequest\x1a\x19.helloworld.v1.HelloReplyB4Z2example.com/grpc-01/gen/helloworld/v1;helloworldv1b\x06proto3"

var file_api_proto_helloworld_v1_hello_proto_msgTypes = make([]protoimpl.MessageInfo, 2)
var file_api_proto_helloworld_v1_hello_proto_goTypes = []any{
	(*HelloRequest)(nil), // 0: helloworld.v1.HelloRequest
	(*HelloReply)(nil),   // 1: helloworld.v1.HelloReply
}
var file_api_proto_helloworld_v1_hello_proto_depIdxs = []int32{
	0, // 0: helloworld.v1.Greeter.SayHello:input_type -> helloworld.v1.HelloRequest
	1, // 1: helloworld.v1.Greeter.SayHello:output_type -> helloworld.v1.HelloReply
	1, // [1:2] is the sub-list for method output_type
	0, // [0:1] is the sub-list for method input_type
	0, // [0:0] is the sub-list for extension type_name
	0, // [0:0] is the sub-list for extension extendee
	0, // [0:0] is the sub-list for field type_name
}

// 初始化调用 file_api_proto_helloworld_v1_hello_proto_init, 把 HelloRequest、HelloReply、Gretter、文件路径、包名、字段信息
// 这些元数据初始化好, 提供给 gRPC 运行时使用, 简单来说就是在程序启动时初始化并注册 hello.proto 的元数据描述信息, 让 protobuf 和
// gRPC 运行时知道这个 proto 文件里定义了哪些消息和服务
func init() { file_api_proto_helloworld_v1_hello_proto_init() }
func file_api_proto_helloworld_v1_hello_proto_init() {
	// 避免重复初始化
	if File_api_proto_helloworld_v1_hello_proto != nil {
		return
	}
	type x struct{}
	out := protoimpl.TypeBuilder{
		// 包装文件元数据
		File: protoimpl.DescBuilder{
			// 当前包的真实路径
			GoPackagePath: reflect.TypeOf(x{}).PkgPath(),
			// 包含 .proto 文件的完整结构, 压缩过的二进制字符串
			RawDescriptor: unsafe.Slice(unsafe.StringData(file_api_proto_helloworld_v1_hello_proto_rawDesc), len(file_api_proto_helloworld_v1_hello_proto_rawDesc)),
			NumEnums:      0,
			// 两个 messsage, 分别是请求和响应 message
			NumMessages:   2,
			NumExtensions: 0,
			// 一个 Service, 就是 Greeter
			NumServices:   1,
		},
		// proto 里定义的类型, 对应到 Go 里的实际类型列表, 比如我们的 proto 里面定义了 HelloRequest 和 HelloReply, 就存储这两个类型,
		// 这个属性作用就是告诉 protobuf 运行的时候 proto 里的这些 message 在 Go 里面分别对应哪些 struct 类型, 简单来说就是将 proto
		// 类型和 Go 类型关联起来
		GoTypes:           file_api_proto_helloworld_v1_hello_proto_goTypes,
		// proto 文件中各种依赖关系对应的索引信息, 不存类型本身, 而是存某个地方依赖了哪个类型的下标关系, 常见的依赖包括下面几种:
		//  - 某个 message 字段用到了哪个 message
		//  - 某个 RPC 方法的输入参数是哪种 message
		//  - 某个 RPC 方法的返回值是哪种 message
		// 对于我们这个 proto 文件, 这个数组存储的就是 SayHello 的输入类型 HelloRequest 和输出类型 HelloReply 的位置, 这个位置是
		// 下标, 通过下标去上面的 GoTypes 中就能拿到具体类型
		DependencyIndexes: file_api_proto_helloworld_v1_hello_proto_depIdxs,
		// 存储对应的 message 消息, 因为我们 proto 文件中有两个 message, 所以这里创建出来的长度就是 2, 存的是每个 message 的运行时元信息
		MessageInfos:      file_api_proto_helloworld_v1_hello_proto_msgTypes,
	}.Build()
	// example.com/grpc-01/gen/helloworld/v1 对应的文件
	File_api_proto_helloworld_v1_hello_proto = out.File
	file_api_proto_helloworld_v1_hello_proto_goTypes = nil
	file_api_proto_helloworld_v1_hello_proto_depIdxs = nil
}
下面再来看下 file_api_proto_helloworld_v1_hello_proto_rawDescGZIP 方法,这个方法主要是给 protobuf 反射系统和 protobuf 反射系统和文件描述器构建过程用的,业务代码用不到,比如在初始化 FileDescriptor 时,需要拿到 proto 文件的原始描述信息,这时候就可能会用到这个 GZIP 后的 descriptor 数据。
go
const file_api_proto_helloworld_v1_hello_proto_rawDesc = "" +
	"\n" +
	"#api/proto/helloworld/v1/hello.proto\x12\rhelloworld.v1\"\"\n" +
	"\fHelloRequest\x12\x12\n" +
	"\x04name\x18\x01 \x01(\tR\x04name\"&\n" +
	"\n" +
	"HelloReply\x12\x18\n" +
	"\amessage\x18\x01 \x01(\tR\amessage2M\n" +
	"\aGreeter\x12B\n" +
	"\bSayHello\x12\x1b.helloworld.v1.HelloRequest\x1a\x19.helloworld.v1.HelloReplyB4Z2example.com/grpc-01/gen/helloworld/v1;helloworldv1b\x06proto3"


func file_api_proto_helloworld_v1_hello_proto_rawDescGZIP() []byte {
	file_api_proto_helloworld_v1_hello_proto_rawDescOnce.Do(func() {
		// CompressGZIP: 返回 hello.proto 的原始描述数据,并且是 GZIP 压缩后的版本, 避免一次性返回的消息太长, 这个函数只会调用一次,
		// 压缩之后存到 file_api_proto_helloworld_v1_hello_proto_rawDescData 中, 下次就直接返回了, 主要是给 protobuf 反射系统和
		// 文件描述器构建过程用的, 业务代码用不到, 比如在初始化 FileDescriptor 时,需要拿到 proto 文件的原始描述信息, 这时候就可能会
		// 用到这个 GZIP 后的 descriptor 数据
		file_api_proto_helloworld_v1_hello_proto_rawDescData = protoimpl.X.CompressGZIP(unsafe.Slice(unsafe.StringData(file_api_proto_helloworld_v1_hello_proto_rawDesc), len(file_api_proto_helloworld_v1_hello_proto_rawDesc)))
	})
	return file_api_proto_helloworld_v1_hello_proto_rawDescData
}

// Deprecated: Use HelloReply.ProtoReflect.Descriptor instead.
func (*HelloReply) Descriptor() ([]byte, []int) {
	return file_api_proto_helloworld_v1_hello_proto_rawDescGZIP(), []int{1}
}
剩下的方法就是跟我们自定义的结构体相关的了,先来看下 HelloRequest 相关方法。
go
type HelloRequest struct {
	// 保存当前 message 的运行时状态, 一般业务代码不用管它, 也不要手动改
	state protoimpl.MessageState `protogen:"open.v1"`
	// name 是客户端传入的用户名
	Name          string `protobuf:"bytes,1,opt,name=name,proto3" json:"name,omitempty"`
	// 未知字段存储, 程序解析 protobuf 数据时候如果收到一些当前版本不认识的字段就会存到里面, 不会直接丢掉
	unknownFields protoimpl.UnknownFields
	// 序列化大小缓存, 也就是缓存这个 message 编码之后大概有多大, 避免重复计算大小, 提高 protobuf 编码性能
	sizeCache     protoimpl.SizeCache
}
我们要关注的就是这个 Name 字段,其他的都是内部使用的一些字段,不需要怎么关注,下面是这个 request 绑定的其他的方法。
go
// Reset 把当前消息重置为零值,并重新绑定对应的 message 元信息。
func (x *HelloRequest) Reset() {
	*x = HelloRequest{}
	mi := &file_api_proto_helloworld_v1_hello_proto_msgTypes[0]
	ms := protoimpl.X.MessageStateOf(protoimpl.Pointer(x))
	ms.StoreMessageInfo(mi)
}

// String 返回当前消息的字符串表示,常用于日志打印或调试输出。
func (x *HelloRequest) String() string {
	return protoimpl.X.MessageStringOf(x)
}

// ProtoMessage 用来表明 HelloRequest 是一个 protobuf message。
func (*HelloRequest) ProtoMessage() {}

// ProtoReflect 返回 protobuf 反射对象,框架内部和反射场景会用到它。
func (x *HelloRequest) ProtoReflect() protoreflect.Message {
	mi := &file_api_proto_helloworld_v1_hello_proto_msgTypes[0]
	if x != nil {
		ms := protoimpl.X.MessageStateOf(protoimpl.Pointer(x))
		if ms.LoadMessageInfo() == nil {
			ms.StoreMessageInfo(mi)
		}
		return ms
	}
	return mi.MessageOf(x)
}
最后就是 HelloReply 的结构体和绑定的方法,跟 HelloRequest 是一样的,所以就不多解释了。
go
type HelloReply struct {
	state protoimpl.MessageState `protogen:"open.v1"`
	// message 是服务端返回的问候语。
	Message       string `protobuf:"bytes,1,opt,name=message,proto3" json:"message,omitempty"`
	unknownFields protoimpl.UnknownFields
	sizeCache     protoimpl.SizeCache
}

// Reset 把当前消息重置为零值,并重新绑定对应的 message 元信息。
func (x *HelloReply) Reset() {
	*x = HelloReply{}
	mi := &file_api_proto_helloworld_v1_hello_proto_msgTypes[1]
	ms := protoimpl.X.MessageStateOf(protoimpl.Pointer(x))
	ms.StoreMessageInfo(mi)
}

// String 返回当前消息的字符串表示,常用于日志打印或调试输出。
func (x *HelloReply) String() string {
	return protoimpl.X.MessageStringOf(x)
}

// ProtoMessage 用来表明 HelloReply 是一个 protobuf message。
func (*HelloReply) ProtoMessage() {}

// ProtoReflect 返回 protobuf 反射对象,框架内部和反射场景会用到它。
func (x *HelloReply) ProtoReflect() protoreflect.Message {
	mi := &file_api_proto_helloworld_v1_hello_proto_msgTypes[1]
	if x != nil {
		ms := protoimpl.X.MessageStateOf(protoimpl.Pointer(x))
		if ms.LoadMessageInfo() == nil {
			ms.StoreMessageInfo(mi)
		}
		return ms
	}
	return mi.MessageOf(x)
}

// Deprecated: Use HelloReply.ProtoReflect.Descriptor instead.
func (*HelloReply) Descriptor() ([]byte, []int) {
	return file_api_proto_helloworld_v1_hello_proto_rawDescGZIP(), []int{1}
}

// GetMessage 安全读取 Message 字段;即使接收者为 nil,也会返回空字符串。
func (x *HelloReply) GetMessage() string {
	if x != nil {
		return x.Message
	}
	return ""
}
3.2.5 生成代码解释-hello_grpc.pb.go
首先我们要看入口方法,也就是 Server 启动的时候调用的注册方法。
go
// 服务端调用的, 将我们实现的 GreeterService 注册到 gRPC Server 里面, 为什么要注册, 因为 gRPC 框架本身只知道有一个 grpc.Server,
// 负责监听端口、接收请求处理请求, 但是收到 /helloworld.v1.Greeter/SayHello 这个请求时要交给哪个 Go 对象处理, 这个方法就是要将服务
// 注册进去, 以后收到这个方法调用就转发给我们传入的 GreeterServer 去处理
func RegisterGreeterServer(s grpc.ServiceRegistrar, srv GreeterServer) {
	// If the following call panics, it indicates UnimplementedGreeterServer was
	// embedded by pointer and is nil.  This will cause panics if an
	// unimplemented method is ever invoked, so we test this at initialization
	// time to prevent it from happening at runtime later due to I/O.
	if t, ok := srv.(interface{ testEmbeddedByValue() }); ok {
		// 判断是不是实现了 testEmbeddedByValue 方法, 在程序启动的时候强制检查你的 Service 结构体是否正确实现了接口, 防止因为
		// "指针接收者" 和 "值接收者" 的混用导致运行时崩溃, 也就是说实现了这个接口之后调用这个方法 GreeterServer 必须传指针
		t.testEmbeddedByValue()
	}
	// 真正的注册服务
	s.RegisterService(&Greeter_ServiceDesc, srv)
}

// 辅助结构体, 用于实现下面的 testEmbeddedByValue 和 mustEmbedUnimplementedGreeterServer 方法
type UnimplementedGreeterServer struct{}

func (UnimplementedGreeterServer) SayHello(context.Context, *HelloRequest) (*HelloReply, error) {
	return nil, status.Error(codes.Unimplemented, "method SayHello not implemented")
}
func (UnimplementedGreeterServer) mustEmbedUnimplementedGreeterServer() {}
func (UnimplementedGreeterServer) testEmbeddedByValue()                 {}
服务端启动的时候会调用这个方法将接口和处理的 Handler 通过这个方法绑定起来,这样客户端调用 SayHello 的时候就知道用哪个 GreeterServer 去处理了,这个方法同时对指针做了一个校验,也就是说我们调用这个方法的时候必须要注意 srv 不能为 nil。
那么为什么要有这么一个检查呢?看起来好像也没什么用,这就要说到生成的 GreeterServer 接口了,也就是服务端接口 API。
go
// Greeter 定义一个最基础的问候服务
type GreeterServer interface {
	// SayHello 是一个一元 RPC:客户端发一个请求,服务端回一个响应。
	SayHello(context.Context, *HelloRequest) (*HelloReply, error)
	mustEmbedUnimplementedGreeterServer()
}
上面就是 grpc 为我们生成的接口,RegisterGreeterServer 方法在注册实现类的时候这个实现类必须实现 GreeterServer 接口里面的方法,可以看到里面有一个 mustEmbedUnimplementedGreeterServer 方法,这个方法就是绑定在结构体 UnimplementedGreeterServer 上面的,因为这个是 grpc 的规范 ,所以你自己的实现里面就必须嵌入 UnimplementedGreeterServer 这个结构体。
我们自己的实现类是下面的结构体。
go
type GreeterService struct {
	// 嵌入未实现结构体,兼容后续 proto 接口扩展。
	helloworldv1.UnimplementedGreeterServer
}
而新建结构体的方法是:
go
func NewGreeterService() *GreeterService {
	return &GreeterService{}
}
调用这个新建结构体的方法,里面的嵌入的结构体由于是值传递,会被初始化为零值而不是 nil。

但是如果我们改一下,嵌入结构体改成下面这种方式。
go
type GreeterService struct {
	// 嵌入未实现结构体,兼容后续 proto 接口扩展。
	*helloworldv1.UnimplementedGreeterServer
}
那么启动 main 方法的时候这个嵌入的指针就是 nil。

换句话说我们在自己写实现类的时候一定要正确嵌入 UnimplementedGreeterServer 结构体,从这个角度来看 RegisterGreeterServer 的断言就是为了判断这个结构体有没有正确嵌入,如果没有,比如上面指针的情况就会发生 panic,因为指针零值就是 nil,除非你在初始化结构体的时候把这个嵌入结构体也初始化了。
go
func NewGreeterService() *GreeterService {
	return &GreeterService{&helloworldv1.UnimplementedGreeterServer{}}
}
所以可以说上面的校验就是为了校验我们传入的 UnimplementedGreeterServer 结构体是不是空,因为 testEmbeddedByValue 就是一个空实现,只要不是 nil 都能通过校验。
回到 UnimplementedGreeterServer,为什么要确保这个结构体不为空,是为了什么呢?可以看到我的注释上写了前向兼容,这个很好理解。
假设现在我们的接口是:
go
service Greeter {
  rpc SayHello(HelloRequest) returns (HelloReply);
}
生成的接口就是:
go
type GreeterServer interface {
      SayHello(...)
      mustEmbedUnimplementedGreeterServer()
}
但是以后 proto 改了,新加一个方法:
go
service Greeter {
  rpc SayHello(HelloRequest) returns (HelloReply);
  rpc SayHi(HelloRequest) returns (HelloReply);
}
重新生成接口之后就变成了:
go
type GreeterServer interface {
      SayHello(...)
      SayHi(...)
      mustEmbedUnimplementedGreeterServer()
}
改了接口,如果我们实现类里面没有实现 SayHi,这种情况下就问题了,编译会报错,这个时候就要 UnimplementedGreeterServer 来发挥作用了,proto 在生成代码的时候会给 UnimplementedGreeterServer 也实现我们定义的所有接口,实现如下。
go
type UnimplementedGreeterServer struct{}

func (UnimplementedGreeterServer) SayHello(context.Context, *HelloRequest) (*HelloReply, error) {
	return nil, status.Error(codes.Unimplemented, "method SayHello not implemented")
}
func (UnimplementedGreeterServer) SayHi(context.Context, *HelloRequest) (*HelloReply, error) {
	return nil, status.Error(codes.Unimplemented, "method SayHi not implemented")
}
func (UnimplementedGreeterServer) mustEmbedUnimplementedGreeterServer() {}
func (UnimplementedGreeterServer) testEmbeddedByValue()                 {}
可以看到,如果新增了接口,而我们自己的实现类没有实现 SayHi,就会走保底的 SayHi,这种方式能兼容所有新生成的接口,这也就是为什么我们的接口里面要嵌入 UnimplementedGreeterServer 同时确保嵌入的这个结构体不为空。
好了,回到 RegisterGreeterServer,这个方法最后是调用了 RegisterService 将 Greeter_ServiceDesc 和我们传入的实现类绑定起来了,下面来看下 Greeter_ServiceDesc,本质上就是 Greeter 这个 gRPC 服务的描述信息对象。
go
var Greeter_ServiceDesc = grpc.ServiceDesc{
	// 完整服务名
	ServiceName: "helloworld.v1.Greeter",
	// 告诉 grpc 这个服务对应的处理对象必须实现 GreeterServer 接口, 也就是服务端传入的实现对象必须实现这个接口
	HandlerType: (*GreeterServer)(nil),
	// 方法描述数组
	Methods: []grpc.MethodDesc{
		{
			// Greeter 有一个方法, 方法名是 SayHello
			MethodName: "SayHello",
			// 这个方法的处理函数是 _Greeter_SayHello_Handler
			Handler:    _Greeter_SayHello_Handler,
		},
	},
	// 有哪些流式 RPC, 这里是一元 RPC, 所以是空数组
	Streams:  []grpc.StreamDesc{},
	// proto 源文件路径, 也就是这个服务描述来自哪个 .proto 文件
	Metadata: "api/proto/helloworld/v1/hello.proto",
}
下面来看下各个字段是干什么的:
- ServiceName: 完整服务名,也就是 proto 中的文件
package helloworld.v1+service Greeter,合起来就是helloworld.v1.Greeter。 - HandlerType: 告诉 gRPC 这个服务对应的处理对象,必须实现 GreeterServer 接口。
- Methods: 这个服务有哪些普通 RPC 方法,每个方法收到请求之后需要用哪个处理函数处理,数组,因为一个 service 里面可以有多个方法。
- MethodName: 方法名。
- Handler: 用来处理的函数,也就是说 gRPC 以后收到
/helloworld.v1.Greeter/SayHello,就会调用这个处理函数去处理。
- Streams: 有哪些流式 RPC, 这里是一元 RPC, 所以是空数组。
- Metadata: proto 源文件路径, 也就是这个服务描述来自哪个 .proto 文件。
那我们再顺便看下 _Greeter_SayHello_Handler 这个处理函数是如何处理请求的。
go
const (
	Greeter_SayHello_FullMethodName = "/helloworld.v1.Greeter/SayHello"
)

// _Greeter_SayHello_Handler 函数处理
// - srv: 传进来的服务实现对象,也就是注册进去的那个 GreeterService
// - ctx: 当前请求上下文
// - dec: 解码函数, 用来把网络请求数据解析到某个 Go 对象里
// - interceptor: 一元 RPC 拦截器, proto 里面没有配置就是 nil
func _Greeter_SayHello_Handler(srv interface{}, ctx context.Context, dec func(interface{}) error, interceptor grpc.UnaryServerInterceptor) (interface{}, error) {
	// 创建空的 HelloRequest 对象
	in := new(HelloRequest)
	// 解码函数会解析客户端请求数据, 设置到 HelloRequest 中
	if err := dec(in); err != nil {
		// 解析失败
		return nil, err
	}
	// 如果设置了拦截器
	if interceptor == nil {
		// 转成 GreeterServer 接口, 调用 SayHello, 这里就是我们真正的业务逻辑
		return srv.(GreeterServer).SayHello(ctx, in)
	}

	// 有拦截器就准备一个 UnaryServerInfo
	info := &grpc.UnaryServerInfo{
		Server:     srv,								// 当前服务对象
		FullMethod: Greeter_SayHello_FullMethodName,	// 当前正在调用的完整 RPC 方法名
	}
	// 封装匿名函数
	handler := func(ctx context.Context, req interface{}) (interface{}, error) {
		return srv.(GreeterServer).SayHello(ctx, req.(*HelloRequest))
	}
	// 调用拦截器, 由拦截器内部去调用业务逻辑
	return interceptor(ctx, in, info, handler)
}
最后我们来看下客户端的 SayHello 请求部分,流程大概是:
- 客户端调用 gRPC 生成的 SayHello。
- 服务端收到请求,调用上面的 _Greeter_SayHello_Handler 函数处理。
- 函数内部最终调用到服务提供者的 SayHello 方法。
那么我们就看下客户端的 SayHello,客户端的 SayHello 是 gRPC 生成的,不是客户端自己实现的,跟服务端不一样。
go
// Greeter 定义一个最基础的问候服务
type GreeterClient interface {
	// SayHello 是一个一元 RPC:客户端发一个请求,服务端回一个响应。
	SayHello(ctx context.Context, in *HelloRequest, opts ...grpc.CallOption) (*HelloReply, error)
}

type greeterClient struct {
	// 客户端 stub, 用于向服务端发起调用的
	cc grpc.ClientConnInterface
}

func NewGreeterClient(cc grpc.ClientConnInterface) GreeterClient {
	return &greeterClient{cc}
}

// SayHello 客户端请求
// - ctx: 上下文对象, 可以用来控制超时
// - in: 客户端发送的请求
// - opts: 可选调用参数
func (c *greeterClient) SayHello(ctx context.Context, in *HelloRequest, opts ...grpc.CallOption) (*HelloReply, error) {
	// 组装调用参数, cOpts 就是 opts 切片
	cOpts := append([]grpc.CallOption{grpc.StaticMethod()}, opts...)
	// 新建返回结果
	out := new(HelloReply)
	// 发起一元调用, 本次要调用的方法名为 /helloworld.v1.Greeter/SayHello
	err := c.cc.Invoke(ctx, Greeter_SayHello_FullMethodName, in, out, cOpts...)
	if err != nil {
		return nil, err
	}
	// 返回结果
	return out, nil
}
NewGreeterClient 就是客户端主流程用的,用于创建一个通信的客户端 stub,用于调用 SayHello 方法,发起 grpc 请求。
3.3 服务端实现对象
上面就是 proto 接口以及生成的 go 文件的介绍,可以看到 grpc 生成 go 的时候考虑的东西确实是很多了。那么现在来看下服务端的具体实现对象 GreeterService,内容很简单,看下面代码的注释就行了。
go
type GreeterService struct {
	// 嵌入未实现结构体,兼容后续 proto 接口扩展。
	helloworldv1.UnimplementedGreeterServer
}

func NewGreeterService() *GreeterService {
	return &GreeterService{}
}

func (s *GreeterService) SayHello(_ context.Context, req *helloworldv1.HelloRequest) (*helloworldv1.HelloReply, error) {
	name := req.GetName()
	if name == "" {
		// 没传名字时给一个默认值,方便示例演示。
		name = "world"
	}

	return &helloworldv1.HelloReply{
		Message: "hello, " + name,
	}, nil
}
3.4 服务端启动
go
package main

import (
	"log"
	"net"

	helloworldv1 "example.com/grpc-01/gen/helloworld/v1"
	"example.com/grpc-01/internal/config"
	"example.com/grpc-01/internal/service"
	"google.golang.org/grpc"
)

func main() {
	// 监听一个 TCP 端口,供 gRPC 服务对外提供访问。
	lis, err := net.Listen("tcp", config.ServerPort)
	if err != nil {
		log.Fatalf("listen failed: %v", err)
	}

	// 创建 gRPC 服务实例,并注册业务实现。
	server := grpc.NewServer()
	helloworldv1.RegisterGreeterServer(server, service.NewGreeterService())

	log.Printf("gRPC server listening on %s", config.ServerPort)
	// 开始阻塞式提供服务。
	if err := server.Serve(lis); err != nil {
		log.Fatalf("serve failed: %v", err)
	}
}


package config

const (
	// ServerAddress 给客户端连接使用。
	ServerAddress = "localhost:50051"
	// ServerPort 给服务端监听使用。
	ServerPort = ":50051"
)
上面就是主流程的启动,先通过 net.Listen("tcp", config.ServerPort) 监听端口,然后我们通过 server := grpc.NewServer() 去创建 gRPC 服务实例,接下来还记得上面 hello_grpc.pb.go 里面的 RegisterGreeterServer 方法吗,第一个参数就是 grpc.ServiceRegistrar,我们将 server 传进去,然后再将具体的实现传到第二个方法进行绑定。
最后通过 Serve 方法启动 grpc 服务,监听端口和请求。
3.5 客户端启动
go
package main

import (
	"context"
	"log"
	"time"

	helloworldv1 "example.com/grpc-01/gen/helloworld/v1"
	"example.com/grpc-01/internal/config"
	"google.golang.org/grpc"
	"google.golang.org/grpc/credentials/insecure"
)

func main() {
	// 建立到 gRPC 服务端的连接。
	conn, err := grpc.NewClient(
		config.ServerAddress,
		grpc.WithTransportCredentials(insecure.NewCredentials()),
	)
	if err != nil {
		log.Fatalf("dial failed: %v", err)
	}
	defer conn.Close()

	// 基于连接创建客户端桩代码对象。
	client := helloworldv1.NewGreeterClient(conn)

	// 给 RPC 调用设置超时,避免请求无限阻塞。
	ctx, cancel := context.WithTimeout(context.Background(), 3*time.Second)
	defer cancel()

	// 发起一次一元 RPC 请求。
	resp, err := client.SayHello(ctx, &helloworldv1.HelloRequest{
		Name: "gRPC",
	})
	if err != nil {
		log.Fatalf("SayHello failed: %v", err)
	}

	log.Printf("server response: %s", resp.GetMessage())
}
grpc 生成的客户端方法 NewGreeterClient 需要传入 grpc.ClientConnInterface 的连接参数,所以一开始就用 grpc.NewClient 创建一个 grpc 连接,设置连接地址,然后通过 helloworldv1.NewGreeterClient 去创建出对应的 stub,最后可以通过这个 stub 发起调用。
3.6 结果输出
启动服务端 main 方法。

启动客户端,输出如下。

4. 小结
这篇文章就先演示下 GRPC 的基础例子,后面还有双向流等等方式,下一篇文章再看了。
如有问题,欢迎指出!!!