💁♂️个人主页:进击的荆棘
👇作者其它专栏:
目录
1.什么是库
2.静态库
3.动态库
4.使用外部库
5.目标文件
6.ELF文件
7.ELF从形成到加载轮廓
8.理解连接与加载
附录:操作大全
1.什么是库
库是写好的现有的,成熟的,可以复用的代码。现实中每个程序都要依赖很多基础的底层库,不可能每个人的代码都从0开始,因此库的存在意义非同寻常。
本质上来说库是一种可执行代码的二进制形式,可以被操作系统载入内存执行。库有两种:
●静态库 .aLinux、.libWindows
●动态库 .soLinux、.dllWindows
// ubuntu 动静态库
// C
$ ls -l /lib/x86_64-linux-gnu/libc-2.31.so
-rwxr-xr-x 1 root root 2029592 May 1 02:20 /lib/x86_64-linux-gnu/libc-2.31.so
$ ls -l /lib/x86_64-linux-gnu/libc.a
-rw-r--r-- 1 root root 5747594 May 1 02:20 /lib/x86_64-linux-gnu/libc.a

//C++
$ ls /usr/lib/gcc/x86_64-linux-gnu/9/libstdc++.so -l
lrwxrwxrwx 1 root root 40 Oct 24 2022 /usr/lib/gcc/x86_64-linuxgnu/9/libstdc++.so -> ../../../x86_64-linux-gnu/libstdc++.so.6
$ ls /usr/lib/gcc/x86_64-linux-gnu/9/libstdc++.a
/usr/lib/gcc/x86_64-linux-gnu/9/libstdc++.a

// Centos 动静态库
// C
$ ls /lib64/libc-2.17.so -l
-rwxr-xr-x 1 root root 2156592 Jun 4 23:05 /lib64/libc-2.17.so
[whb@bite-alicloud ~]$ ls /lib64/libc.a -l
-rw-r--r-- 1 root root 5105516 Jun 4 23:05 /lib64/libc.a

// C++
$ ls /lib64/libstdc++.so.6 -l
lrwxrwxrwx 1 root root 19 Sep 18 20:59 /lib64/libstdc++.so.6 ->
libstdc++.so.6.0.19
$ ls /usr/lib/gcc/x86_64-redhat-linux/4.8.2/libstdc++.a -l
-rw-r--r-- 1 root root 2932366 Sep 30 2020 /usr/lib/gcc/x86_64-redhatlinux/4.8.2/libstdc++.a
封装libc代码,在任意位置新增"库文件"
cpp
 //mystdio.h
  1 #pragma once
  2
  3 #include <stdio.h>
  4
  5 #define MAX 1024
  6 //缓冲区刷新
  7 #define NONE_FLUSH 1
  8 #define LINE_FLUSH 2
  9 #define FULL_FLUSH 3
 10
 11 typedef struct IO_FILE{
 12   int fileno;
 13   int filemode;
 14   char outbuffer[MAX];
 15   int bufferlen;
 16   int flush_method;
 17 }MyFile;
 18
 19 MyFile* MyFOpen(const char *path, const char *mode);
 20 void MyFClose(MyFile *);
 21 int MyFWrite(MyFile *,void *str,int len);
 22 void MyFFlush(MyFile* );

//mystdio.c
  1 #include "mystdio.h"
  2
  3 #include <string.h>
  4 #include <sys/types.h>
  5 #include <sys/stat.h>
  6 #include <fcntl.h>
  7 #include <stdlib.h>
  8 #include <unistd.h>
  9
 10 static MyFile* buyfile(int fd,int filemode){
 11   MyFile* file=(MyFile*)malloc(sizeof(MyFile));
 12   if(file==NULL) return NULL;

 13   file->filemode=filemode;
 14   file->fileno=fd;
 15   file->bufferlen=0;
 16   file->flush_method=LINE_FLUSH;
 17   memset(file->outbuffer,0,sizeof(file->outbuffer));
 18   return file;
 19 }
 20
 21 MyFile* MyFOpen(const char *path, const char *mode){
 22   int fd=-1;
 23   int filemode=0;
 24   if(strcmp(mode,"w")==0){
 25     filemode=O_CREAT|O_WRONLY|O_TRUNC;
 26   }
 27   else if(strcmp(mode,"r")==0){
 28     filemode=O_RDONLY;
 29   }
 30   else if(strcmp(mode,"a")==0){
 31     filemode=O_CREAT|O_WRONLY|O_APPEND;
 32   }
 33   else{
 34     //
 35   }
 36   fd=open(path,filemode,0666);
 37
 38   if(fd<0) return NULL;
 39   return buyfile(fd,filemode);
 40 }
 41
 42 void MyFClose(MyFile *file){
 43   if(file->filemode<0) return ;
 44   MyFFlush(file);
 45   file->fileno=0;
 46   free(file);
 47 }
 48
 49 int MyFWrite(MyFile *file,void *str,int len){
 50   //1.拷贝
 51   memcpy(file->outbuffer+file->bufferlen,str,len);
 52   file->bufferlen+=len;
 53   //判断刷新
 54   if((file->flush_method&LINE_FLUSH)&&(file->outbuffer[file->bufferlen-1]=='\n'))
 55     MyFFlush(file);
 56   return 0;
 57 }
 58
 59 void MyFFlush(MyFile* file){
 60   //把数据从用户拷贝到内核文件缓冲区中
 61   int n=write(file->fileno,file->outbuffer,file->bufferlen);
 62   (void)n;//消除编译器报警
 63   fsync(file->fileno);//强制将文件数据和元数据从内核页缓存写入磁盘
 64   file->bufferlen=0;
 65 }

//mystring.h
  1 #pragma once
  2
  3 int MyStrlen(const char *);

//mystring.c
  1 #include "mystdio.h"
  2
  3 int MyStrlen(const char *str){
  4   int i=0;
  5   while(*str){
  6     i++;
  7     str++;
  8   }
  9   return i;
 10 }
2.静态库
●静态库(.a):程序在编译链接的时候把库的代码链接到可执行文件中,程序运行的时候将不再需要静态库
●一个可执行程序可能用到许多的库,这些库运行有的是静态库,有的是动态库,而编译默认是动态链接库,只有在该库下找不到动态.so的时候才会采用同名静态库。也可以使用gcc的 -static 强转设置链接静态库
2.1静态库生成
cpp
  1 libmyc.a:mystdio.o mystring.o
  2   ar -rc $@ $^
  3 %.o:%.c
  4   gcc -c $<
  5
  6 .PHONY:clean
  7 clean:
  8   rm -f *a *.o
  9
 10 .PHONY:output
 11 output:
 12   mkdir -p lib/include
 13   mkdir -p lib/mylib
 14   cp -f *.h lib/include
 15   cp -f *.a lib/mylib
 16   tar -czf myc.tgz myc
●ar是gnu归档工具,rc表示(replace and create)
cpp
[sjx@VM-0-6-centos lib]$ ar -tv libmyc.a
rw-rw-r-- 1001/1001   2944 Sep 29 22:10 2026 mystdio.o
rw-rw-r-- 1001/1001   1264 Sep 29 22:10 2026 mystring.o
2.2静态库使用
cpp
// 任意⽬录下,新建
// main.c,引⼊库头⽂件
#include "mystdio.h"
#include "mystring.h"
#include <stdio.h>

int main()
{
    const char *s = "abcdefg";
    printf("%s: %d\n", s, my_strlen(s));
    mFILE *fp = mfopen("./log.txt", "a");
    if(fp == NULL) return 1;
    mfwrite(s, my_strlen(s), fp);
    mfwrite(s, my_strlen(s), fp);
    mfwrite(s, my_strlen(s), fp);
    mfclose(fp);
    return 0;
}

// 场景1:头⽂件和库⽂件安装到系统路径下
$ gcc main.c -lmyc
// 场景2:头⽂件和库⽂件和我们⾃⼰的源⽂件在同⼀个路径下
$ gcc main.c -L. -lmyc
// 场景3:头⽂件和库⽂件有⾃⼰的独⽴路径
$ gcc main.c -I头⽂件路径 -L库⽂件路径 -lmyc
● -L:指定库路径
● -I:指定头文件搜索路径
● -l:指定库名
●测试目标文件生成后,静态库删除,程序依旧可以运行
●**库文件名称和引入库的名称:**去掉前缀lib,去掉后缀.so,.a,如:libc.so -> c
3.动态库
●动态库(.so):程序在运行的时候才去链接动态库的代码,多个程序共享使用库的代码
●一个与动态库链接的可执行文件仅仅包含它用到的函数入口地址的一个表,而不是外部函数所在目标文件的整个机器码
●在可执行文件开始运行以前,外部函数的机器码由操作系统从磁盘上的该动态库中复制到内存中,这个过程称为动态链接(dynamic linking)
●动态库可以在多个程序间共享,所以动态链接使得可执行文件更小,节省了磁盘空间。操作系统采用虚拟内存机制允许物理内存中的一份动态库被用到该库的所有进程共用,节省了内存和磁盘空间。
3.1动态库生成
cpp
// Makefile
libmystdio.so:my_stdio.o my_string.o
    gcc -o $@ $^ -shared
%.o:%.c
    gcc -fPIC -c $<

.PHONY:clean
clean:
    @rm -rf *.so *.o stdc*
    @echo "clean ... done"

.PHONY:output
output:
    @mkdir -p stdc/include
    @mkdir -p stdc/lib
    @cp -f *.h stdc/include
    @cp -f *.so stdc/lib
    @tar -czf stdc.tgz stdc
    @echo "output stdc ... done"
●shared:表示生成共享库格式
●fPIC:产生位置无关码(position independent code)
●库名规则:libxxx.so
3.2动态库使用
cpp
// 场景1:头⽂件和库⽂件安装到系统路径下
$ gcc main.c -lmyc

// 场景2:头⽂件和库⽂件和我们⾃⼰的源⽂件在同⼀个路径下
$ gcc main.c -L. -lc // 从左到右搜索-L指定的⽬录

// 场景3:头⽂件和库⽂件有⾃⼰的独⽴路径
$ gcc main.c -I头⽂件路径 -L库⽂件路径 -lmyc

$ ldd libmyc.so // 查看库或者可执⾏程序的依赖
linux-vdso.so.1 => (0x00007fffacbbf000)
libc.so.6 => /lib64/libc.so.6 (0x00007f8917335000)
/lib64/ld-linux-x86-64.so.2 (0x00007f8917905000)

// 以场景2为例
$ ll
total 24
-rwxrwxr-x 1 sjx sjx 8592 Oct 29 14:50 libmyc.so
-rw-rw-r-- 1 sjx sjx 359 Oct 19 16:07 main.c
-rw-rw-r-- 1 sjx sjx 447 Oct 29 14:50 mystdio.h
-rw-rw-r-- 1 sjx sjx 447 Oct 29 14:50 mystring.h
$ gcc main.c -L. -lmyc
$ ll
total 36
-rwxrwxr-x 1 sjx sjx 8600 Oct 29 14:51 code
-rwxrwxr-x 1 sjx sjx 8592 Oct 29 14:50 libmyc.so
-rw-rw-r-- 1 sjx sjx 359 Oct 19 16:07 main.c
-rw-rw-r-- 1 sjx sjx 447 Oct 29 14:50 mystdio.h
-rw-rw-r-- 1 sjx sjx 447 Oct 29 14:50 mystring.h
[sjx@VM-0-6-centos lib]$ ./code
...
3.3库运行搜索路径
3.3.1问题
cpp
[sjx@VM-0-6-centos lib]$ ldd code
	linux-vdso.so.1 =>  (0x00007ffdcbdce000)
	libmyc.so  => not found
	libc.so.6 => /lib64/libc.so.6 (0x00007fccefd6d000)
	/lib64/ld-linux-x86-64.so.2 (0x00007fccf033d000)
3.3.2解决方案
●拷贝.so文件到系统共享库路径下,一般指/usr/lib、/usr/local/lib、/lib64等
●像系统共享库路径下建立同名软连接
●更改环境变量:LD_LIBRARY_PATH(export LD_LIBRARY_PATH=$LD_LIBRARY_PATH:~/lib/lib/mylib)
●ldconfig方案:配置/etc/ld.so.conf.d/,ldconfig更新
cpp
//第一步创建独立的配置文件,不能直接修改/etc/ld.so.conf,最好在/etc/ld.so.conf.d/目录下创建一个新的.conf文件
sudo vim /etc/ld.so/conf.d/mylib.conf
//在文件中写入库所在目录的绝对路径
[root@localhost linux]# cat /etc/ld.so.conf.d/bit.conf
/root/tools/linux
//第二步刷新系统缓存
[root@localhost linux]# ldconfig // 要⽣效,这⾥要执⾏ldconfig,重新加载库搜索路径
4.使用外部库
现在我们只接触过C、C++标准库,下面是一个图形库:ncuress
// 安装
// Centos
$ sudo yum install -y ncurses-devel
// ubuntu
$ sudo apt install -y libncurses-dev
在系统中有很多库,它们通常由一组互相关联的用来完成某项常见工作的函数构成。比如用来处理屏幕显示情况的函数(ncuress库)
cpp
#include <stdio.h>
#include <string.h>
#include <ncurses.h>
#include <unistd.h>
#define PROGRESS_BAR_WIDTH 30
#define BORDER_PADDING 2
#define WINDOW_WIDTH (PROGRESS_BAR_WIDTH + 2 * BORDER_PADDING + 2) // 加边框的宽度
#define WINDOW_HEIGHT 5
#define PROGRESS_INCREMENT 3
#define DELAY 300000 // 微秒(300毫秒)

int main() {
    initscr();
    start_color();
    init_pair(1, COLOR_GREEN, COLOR_BLACK); // 已完成部分:绿⾊前景,⿊⾊背景
    init_pair(2, COLOR_RED, COLOR_BLACK); // 剩余部分(虽然⽤红⾊可能不太合适,
    //但为演⽰⽬的):红⾊背景
    cbreak();
    noecho();
    curs_set(FALSE);
    int max_y, max_x;
    getmaxyx(stdscr, max_y, max_x);
    int start_y = (max_y - WINDOW_HEIGHT) / 2;
    int start_x = (max_x - WINDOW_WIDTH) / 2;
    WINDOW *win = newwin(WINDOW_HEIGHT, WINDOW_WIDTH, start_y, start_x);
    box(win, 0, 0); // 加边框
    wrefresh(win);
    int progress = 0;
    int max_progress = PROGRESS_BAR_WIDTH;
    while (progress <= max_progress) {
        werase(win); // 清除窗⼝内容
        // 计算已完成的进度和剩余的进度
        int completed = progress;
        int remaining = max_progress - progress;
        // 显⽰进度条
        int bar_x = BORDER_PADDING + 1; // 进度条在窗⼝中的x坐标
        int bar_y = 1; // 进度条在窗⼝中的y坐标(居中)
        // 已完成部分
        attron(COLOR_PAIR(1));
        for (int i = 0; i < completed; i++) {
            mvwprintw(win, bar_y, bar_x + i, "#");
        }
        attroff(COLOR_PAIR(1));
        // 剩余部分(⽤背景⾊填充)
        attron(A_BOLD | COLOR_PAIR(2)); // 加粗并设置背景⾊为红⾊(仅⽤于演⽰)
        for (int i = completed; i < max_progress; i++) {
            mvwprintw(win, bar_y, bar_x + i, " ");
        }
        attroff(A_BOLD | COLOR_PAIR(2));
        // 显⽰百分⽐
        char percent_str[10];
        snprintf(percent_str, sizeof(percent_str), "%d%%", (progress *100)/max_progress);
        int percent_x = (WINDOW_WIDTH - strlen(percent_str)) / 2; // 居中显⽰
        mvwprintw(win, WINDOW_HEIGHT - 1, percent_x, percent_str);
        wrefresh(win); // 刷新窗⼝以显⽰更新
        // 增加进度
        progress += PROGRESS_INCREMENT;
        // 延迟⼀段时间
        usleep(DELAY);
    }
    // 清理并退出ncurses模式
    delwin(win);
    endwin();
    return 0;
}
5.目标文件
编译和链接这两个步骤,在Windows下被IDE封装的很完美,我们一般都是一键构建非常方便,但若遇到错误的时候,尤其是链接相关的错误,很多人就束手无策。在Linux下,我们知道了如何通过gcc编译器来完成这一系列操作。
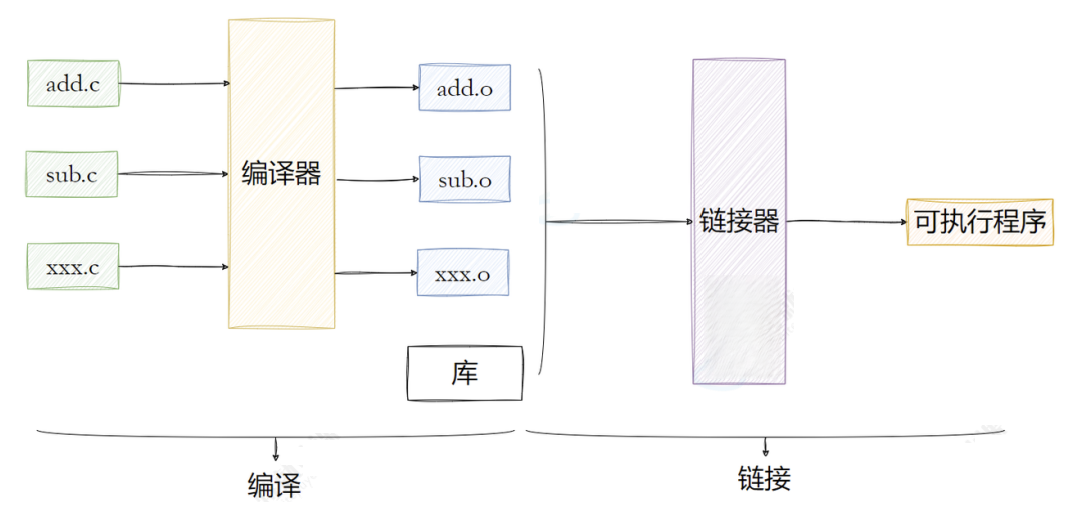
回顾:什么是编译?编译的过程其实就是将程序的源代码翻译成CPU能够直接运行的机器码。
如:在一个源文件hello.c里输出"hello world!",并调用一个run函数,而这个函数被定义在另一个源文件code.c中。此时就可以调用gcc -c来分别编译这两个源文件。
cpp
// hello.c
#include<stdio.h>
void run();

int main() {
    printf("hello world!\n");
    run();
    return 0;
}

// code.c
#include<stdio.h>
void run() {
    printf("running...\n");
}

// 编译两个源⽂件
$ gcc -c hello.c
$ gcc -c code.c
$ ls
code.c code.o hello.c hello.o
编译后会生成两个扩展名为**.o** 的文件,它们被称为目标文件。要注意的是,若修改一个源文件,只需要单独编译这一个文件,而不需要重新编译整个工程。目标文件是一个二进制的文件,文件的格式是ELF,是对二进制代码的一种封装。