一、引言
WebSocket提供了一种在客户端和服务器之间进行实时双向通信的方式。结合Django Channels,我们可以轻松地在Django项目中实现WebSocket功能。本文将通过一个简单的聊天应用示例,展示如何使用Django Channels和WebSocket。
二、环境搭建
项目的目录结构大致如下:
my_project/
├── application/
│   ├── __init__.py
│   ├── asgi.py
│   ├── routings.py
│   ├── settings.py
│   ├── urls.py
│   ├── wsgi.py
├── apps/
│   ├── app03/
│   │   ├── __init__.py
│   │   ├── consumers.py
│   │   ├── models.py
│   │   ├── tests.py
│   │   ├── views.py
│   │   └── routings.py
│   └── __init__.py
├── templates/
│   ├── chat.html
│   ├── A.html
│   └── B.html
└── manage.py
1.首先,确保你的系统中已安装Python和Django。然后,通过pip安装Channels:
bash
pip install channels2.配置settings.py
在application/settings.py中,需要添加Channels相关的配置:
- 安装Channels
python
INSTALLED_APPS = [
    # ...
    'channels',
]- 配置ASGI应用
python
ASGI_APPLICATION = 'application.asgi.application'- Channels的Redis配置
python
CHANNEL_LAYERS = {
    'default': {
        'BACKEND': 'channels_redis.core.RedisChannelLayer',
        'CONFIG': {
            "hosts": [('127.0.0.1', 6379)],
        },
    },
}3.确保您已安装channels_redis:
bash
pip install channels_redis并且有一个运行的Redis实例:(启动本地的redis)
在Django项目中,创建一个新的ASGI应用配置文件asgi.py:
python
import os

import django
from django.core.asgi import get_asgi_application
from channels.routing import ProtocolTypeRouter, URLRouter
from channels.auth import AuthMiddlewareStack

from application.routings import websocket_urlpatterns

os.environ.setdefault('DJANGO_SETTINGS_MODULE', 'application.settings')
django.setup()
application = ProtocolTypeRouter({
    'http': get_asgi_application(),
    "websocket": AuthMiddlewareStack(
        URLRouter(
            websocket_urlpatterns
        )
    ),
})在application/routings.py中,导入你的WebSocket路由模式:
python
from apps.app03.routings import ws_urlpatterns
websocket_urlpatterns = []
websocket_urlpatterns += ws_urlpatterns
三、创建WebSocket Consumer
在application/views.py中,创建一个ChatConsumer类来处理WebSocket连接:
python
import json
from channels.generic.websocket import AsyncWebsocketConsumer


class ChatConsumer(AsyncWebsocketConsumer):
    async def connect(self):
        self.room_name = self.scope['url_route']['kwargs']['room_name']
        self.room_group_name = 'chat_%s' % self.room_name

        # Join room group
        await self.channel_layer.group_add(
            self.room_group_name,
            self.channel_name
        )

        await self.accept()

    async def disconnect(self, close_code):
        # Leave room group
        await self.channel_layer.group_discard(
            self.room_group_name,
            self.channel_name
        )

    # Receive message from WebSocket
    async def receive(self, text_data):
        text_data_json = json.loads(text_data)
        message = text_data_json['message']

        # Send message to room group
        await self.channel_layer.group_send(
            self.room_group_name,
            {
                'type': 'chat_message',
                'message': message
            }
        )

        # 控制台输出
        print(message)

    # Receive message from room group
    async def chat_message(self, event):
        message = event['message']

        # Send message to WebSocket
        await self.send(text_data=json.dumps({
            'message': message
}))在app03/routings.py中:
python
# -*- coding: utf-8 -*-
from django.urls import path
from apps.app03.views import ChatConsumer

# 定义WebSocket路由模式
ws_urlpatterns = [
    path('ws/chat/<room_name>/', ChatConsumer.as_asgi()),
]
四、前端实现
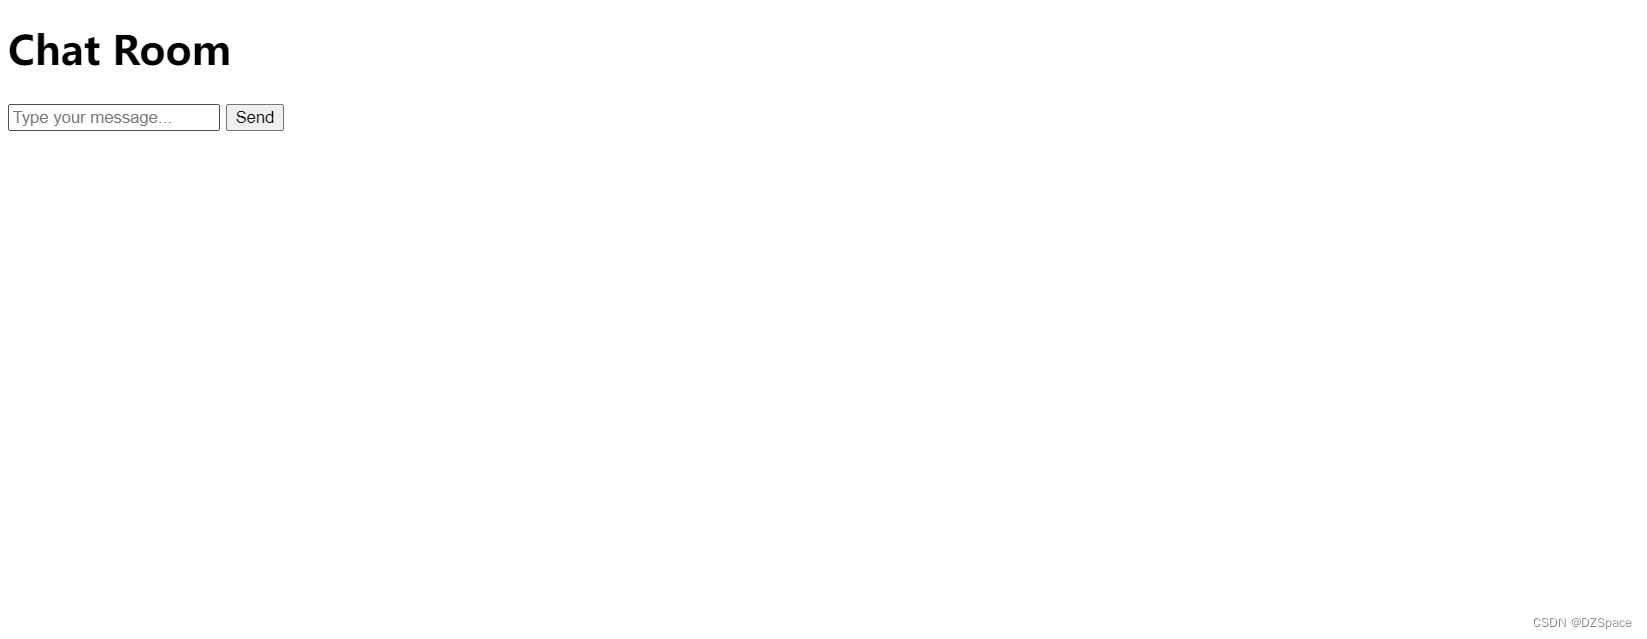
创建一个HTML文件(例如chat.html)来作为聊天室的界面:
html
<!DOCTYPE html>
<html>
<head>
    <title>Chat Example</title>
</head>
<body>
    <h1>Chat Room</h1>
    <div id="chat-messages"></div>
    <!-- 添加输入框和发送按钮 -->
    <input type="text" id="chat-message-input" placeholder="Type your message...">
    <button id="chat-message-send">Send</button>

    <script>
        const chatSocket = new WebSocket('ws://127.0.0.1:8000/ws/chat/room_name/');

        chatSocket.onmessage = function(e) {
            const data = JSON.parse(e.data);
            console.log(data.message);
            const messageElement = document.createElement('p');
            messageElement.textContent = data.message;
            document.getElementById('chat-messages').appendChild(messageElement);
        };

        chatSocket.onclose = function(e) {
            console.error('Chat socket closed unexpectedly');
        };

        // 绑定发送按钮的点击事件
        document.getElementById('chat-message-send').onclick = function(e) {
            const messageInputDom = document.getElementById('chat-message-input');
            const message = messageInputDom.value;
            chatSocket.send(JSON.stringify({
                'message': message
            }));
            messageInputDom.value = '';
        };
    </script>
</body>
</html>
四、测试和运行
在完成所有必要的配置和编码之后,您需要测试您的聊天应用以确保其正常工作。以下是测试和运行聊天应用的详细步骤:
1. 启动Django开发服务器
在命令行中,运行以下命令以启动Django开发服务器:
bash
python manage.py runserver 0.0.0.0:8001 # 这里使用8001端口2. 启动Asgi服务器
要启动使用Django Channels的WebSocket服务,您可以使用daphne命令。daphne是一个ASGI服务器,专门用于运行Channels应用程序。以下是使用daphne启动WebSocket服务的步骤:
-
安装Daphne (如果尚未安装):
在命令行中运行以下命令:
bashpip install daphne -
启动Daphne服务器:
-
导航到您的项目目录(例如
my_project/)。 -
运行以下命令:
bashdaphne application.asgi:application这个命令告诉
daphne使用application.asgi模块中的application对象作为ASGI应用。这通常是您在application/asgi.py文件中定义的内容。 -
启动成功效果:
bash(lyadmin) D:\ProjectPython\Test\drf_test>daphne application.asgi:application D:\ProjectPython\Test\drf_test 2024-06-06 11:23:21,620 INFO Starting server at tcp:port=8000:interface=127.0.0.1 2024-06-06 11:23:21,620 INFO HTTP/2 support enabled 2024-06-06 11:23:21,620 INFO Configuring endpoint tcp:port=8000:interface=127.0.0.1 2024-06-06 11:23:21,620 INFO Listening on TCP address 127.0.0.1:8000
-
-
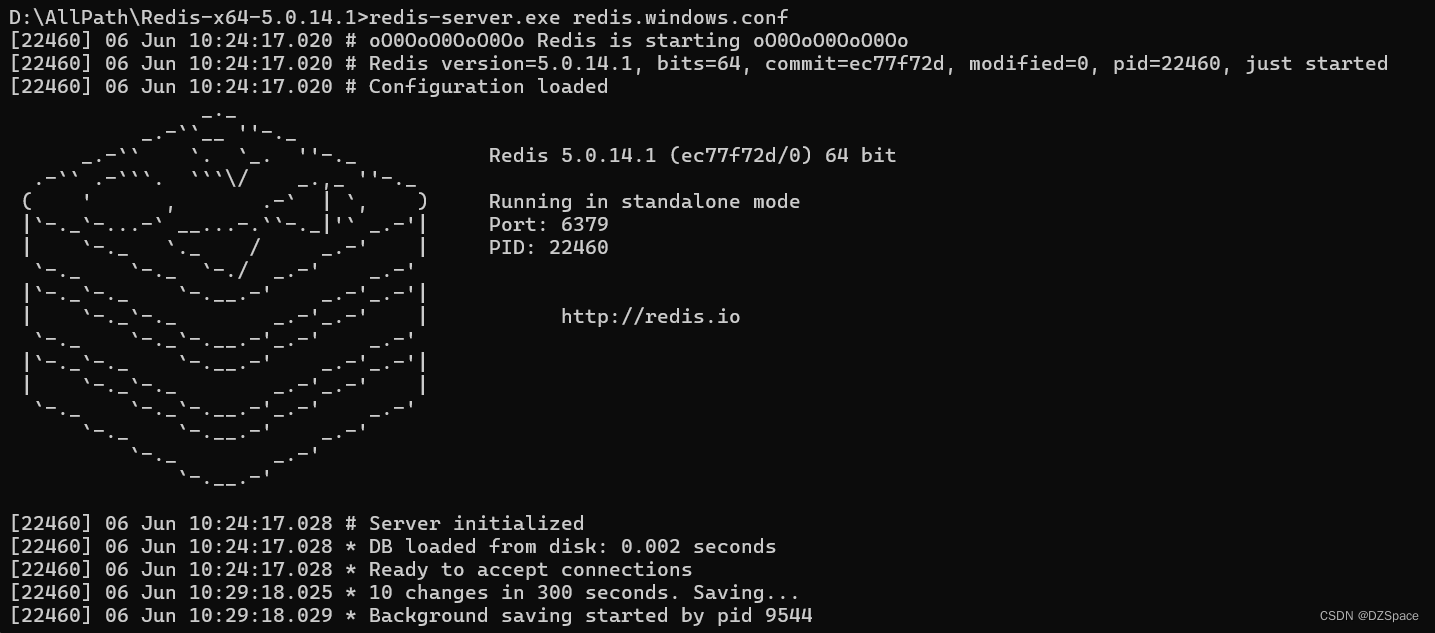
确保Redis正在运行(如果使用Redis作为通道层)
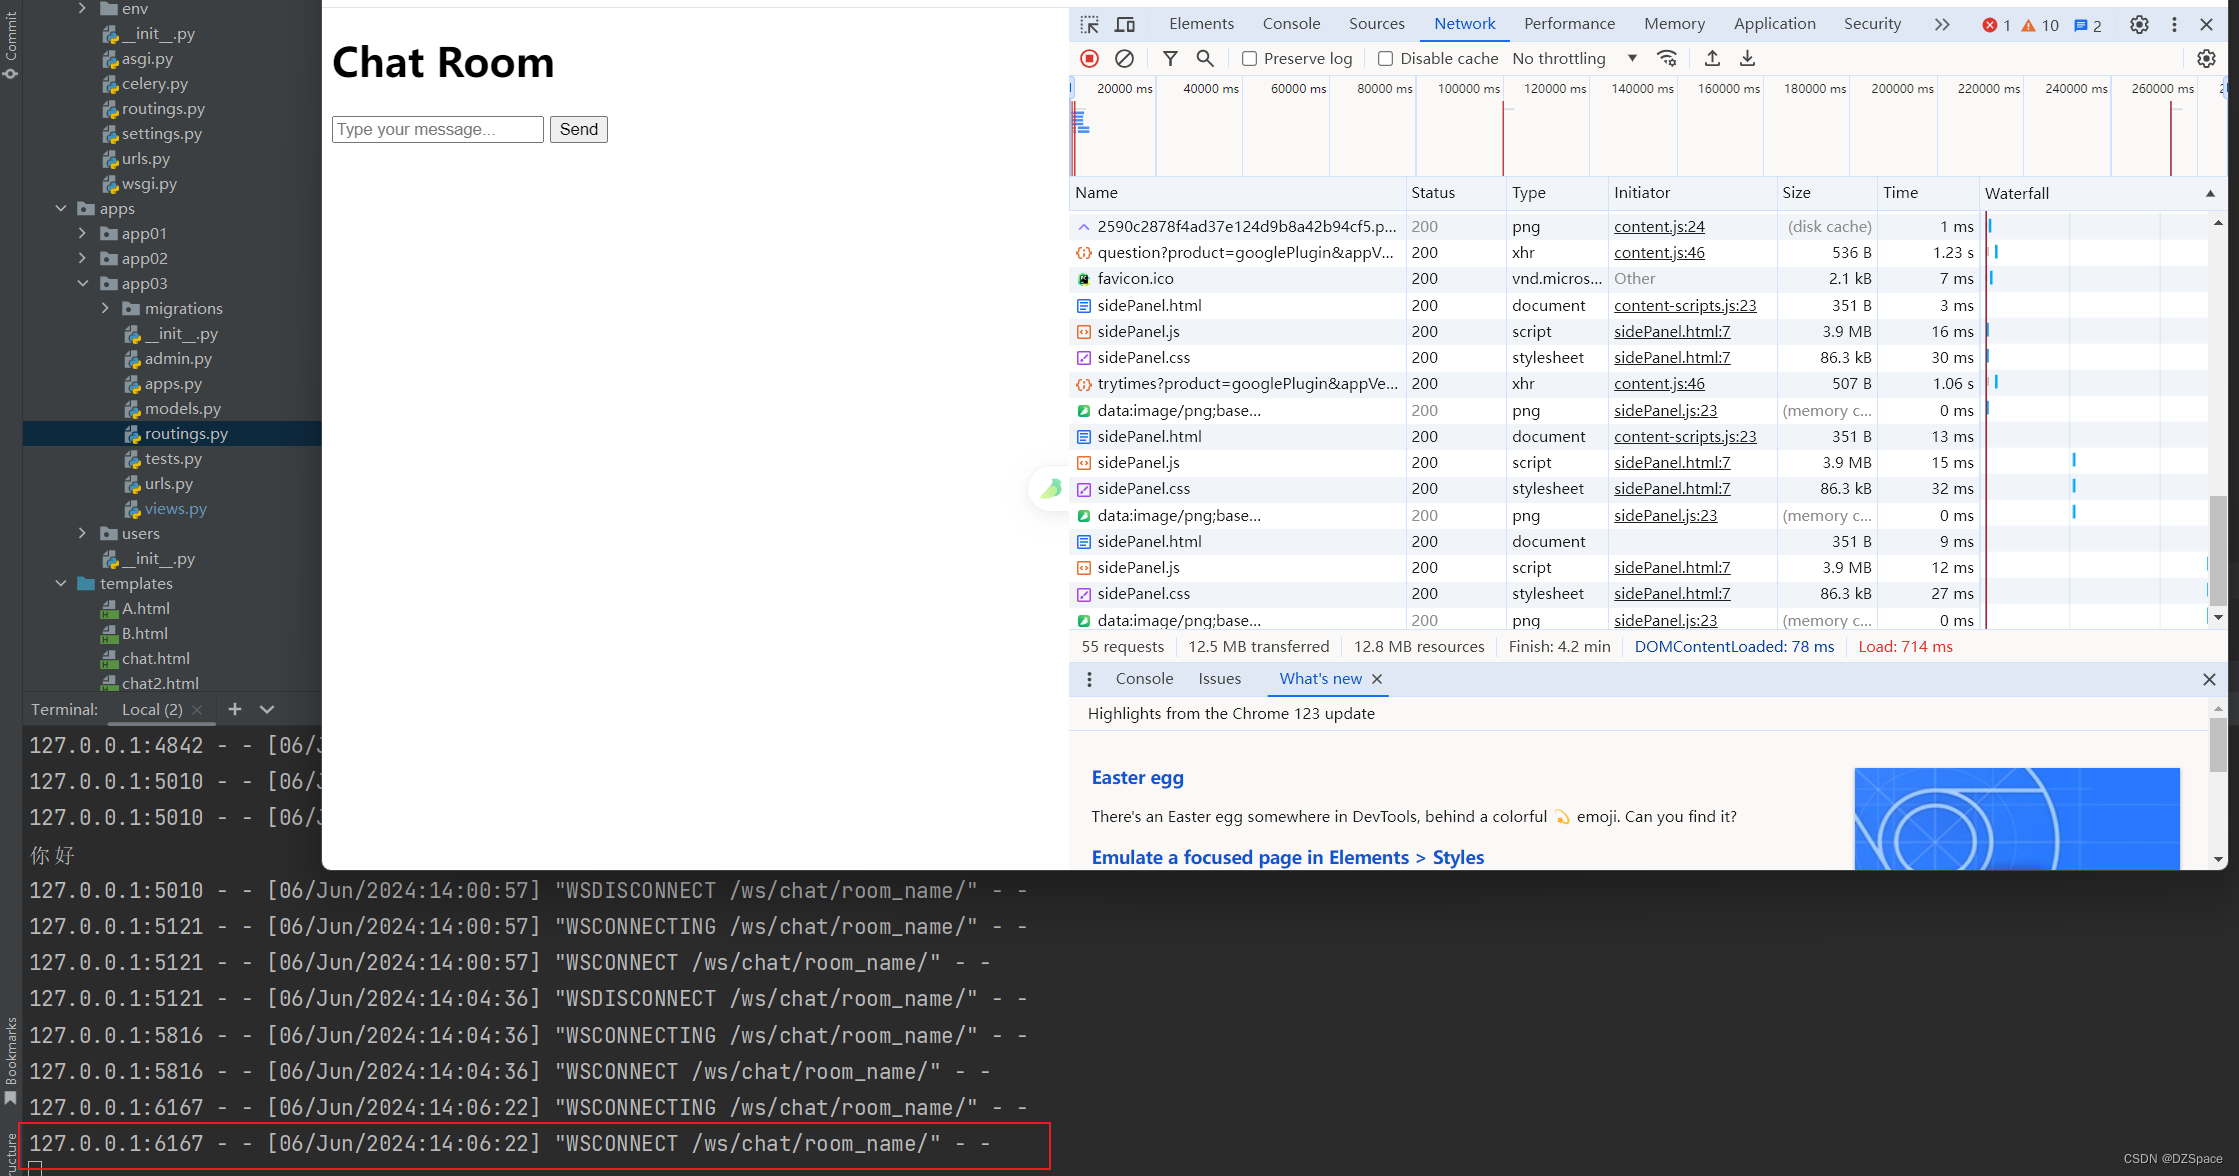
2. 打开聊天室界面
在您的网络浏览器中,打开聊天室的界面。这通常是您的chat.html模板对应的URL。

3. 连接WebSocket
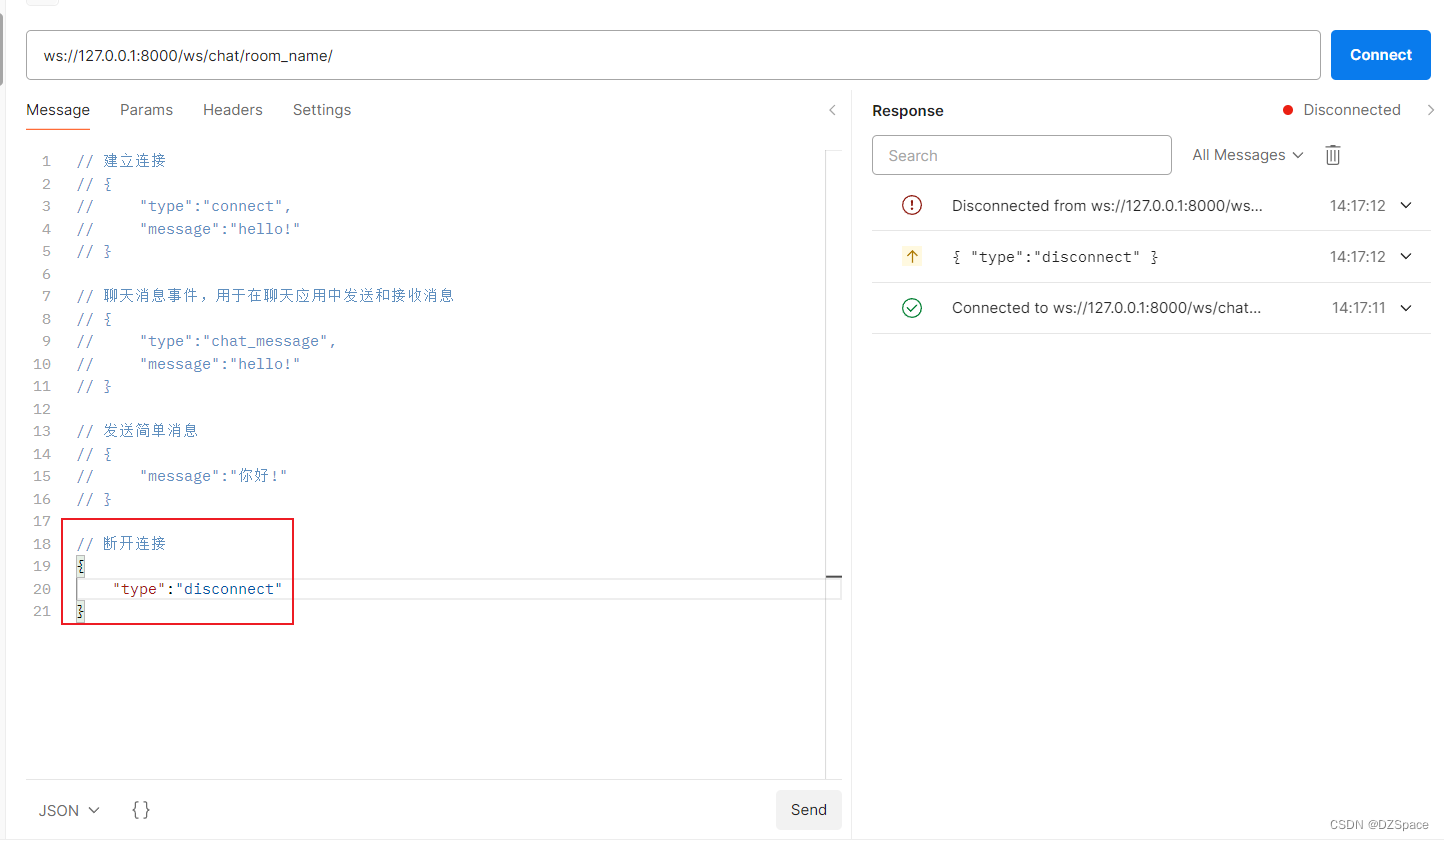
在浏览器中打开聊天室界面时,打开浏览器的开发者工具(通常是F12打开),使用Postman测试:
-
建立连接
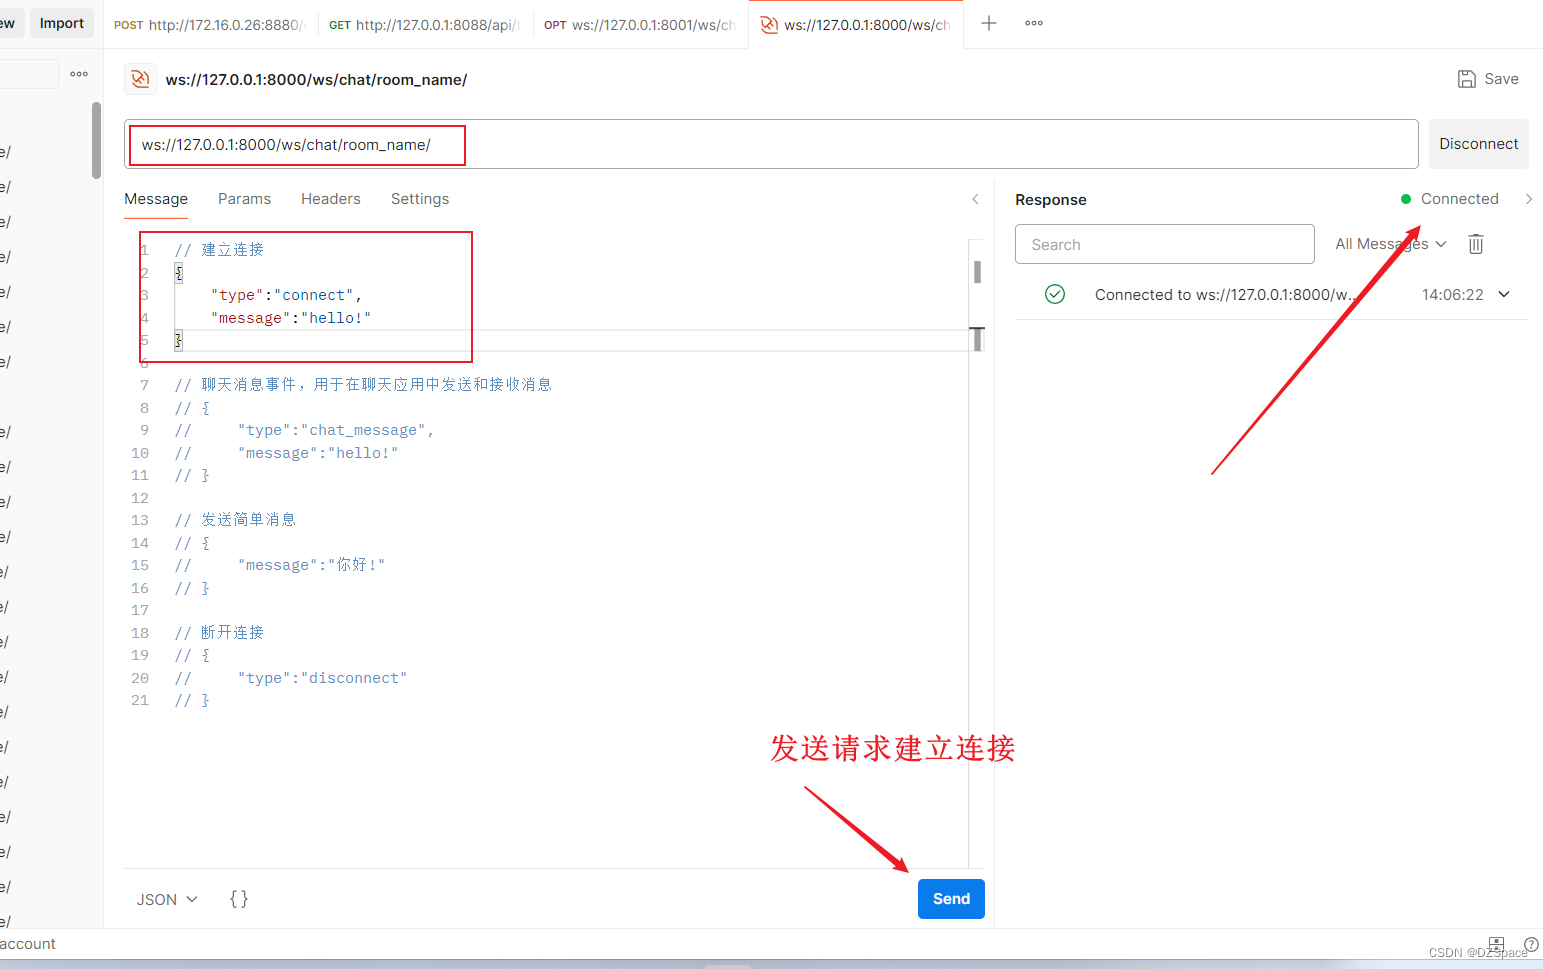
-
发送简单消息

-
聊天消息事件,用于在聊天应用中发送和接收消息
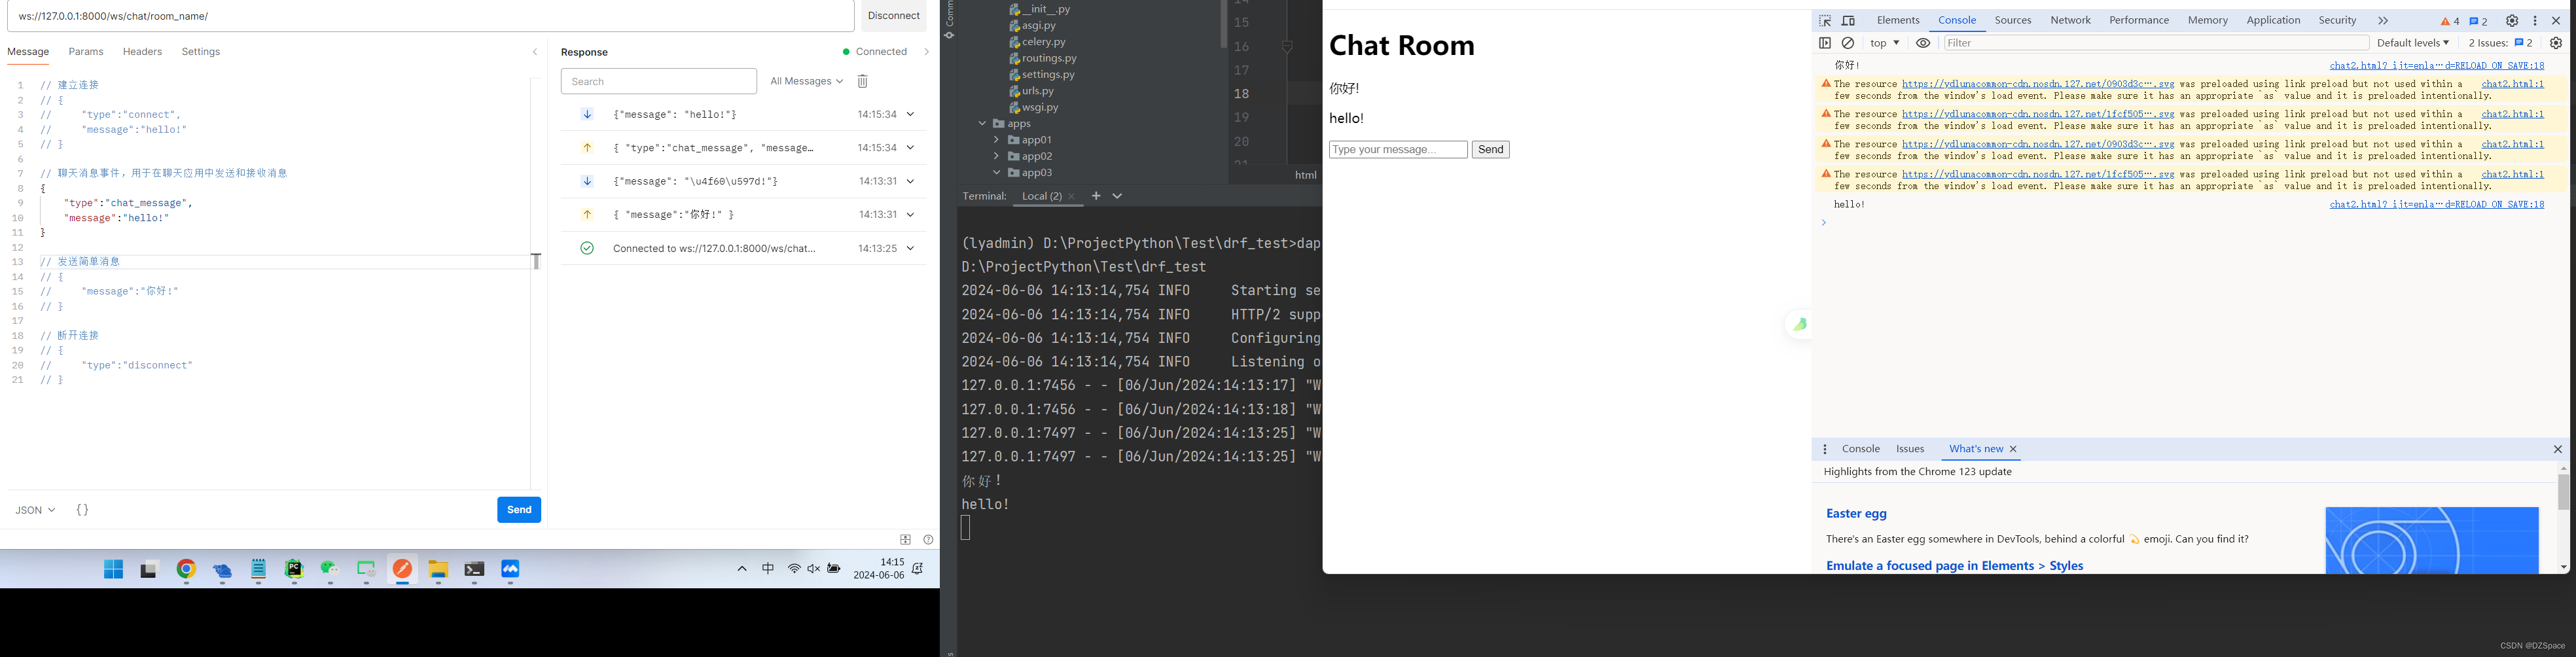
-
断开连接
示例二:测试聊天应用
1. 修改WebSocket Consumer
在application/views.py中,创建一个ChatConsumer类来处理WebSocket连接:
python
# ChatConsumer.py
# 实现聊天功能
import json
from channels.generic.websocket import AsyncWebsocketConsumer


class ChatConsumer(AsyncWebsocketConsumer):
    async def connect(self):
        self.room_name = self.scope['url_route']['kwargs']['room_name']
        self.room_group_name = 'chat_%s' % self.room_name

        # Join room group
        await self.channel_layer.group_add(
            self.room_group_name,
            self.channel_name
        )

        await self.accept()

    async def disconnect(self, close_code):
        # Leave room group
        await self.channel_layer.group_discard(
            self.room_group_name,
            self.channel_name
        )

    # Receive message from WebSocket
    async def receive(self, text_data):
        text_data_json = json.loads(text_data)
        message = text_data_json['message']

        # Send message to both room groups with origin information
        await self.channel_layer.group_send(
            self.room_group_name,  # Send to the same room group
            {
                'type': 'chat_message',
                'message': message,
                'room_origin': self.room_group_name
            }
        )
        await self.channel_layer.group_send(
            'chat_room_b' if self.room_group_name == 'chat_room_a' else 'chat_room_a',
            # Send to the opposite room group
            {
                'type': 'chat_message',
                'message': message,
                'room_origin': self.room_group_name
            }
        )

        # Console output
        print(message)

    # Receive message from room group
    async def chat_message(self, event):
        message = event['message']
        room_origin = event['room_origin']

        # Send message to WebSocket with origin information
        await self.send(text_data=json.dumps({
            'message': message,
            'room_origin': room_origin
        }))
2. 前端实现
创建两个HTML文件(例如A.html\B.html)来作为聊天室的界面:
- 聊天室A页面:
html
<!-- 聊天室A的HTML页面 -->
<!DOCTYPE html>
<html>
<head>
    <title>Chat Room A</title>
</head>
<body>
<h1>Chat Room A</h1>
<div id="chat-messages"></div>
<input type="text" id="chat-message-input" placeholder="Type your message...">
<button id="chat-message-send">Send</button>

<script>
    const chatSocket = new WebSocket('ws://127.0.0.1:8000/ws/chat/room_a/');

    chatSocket.onmessage = function (e) {
        const data = JSON.parse(e.data);
        const messageElement = document.createElement('p');
        // 根据消息来源格式化消息
        if (data.room_origin === 'chat_room_a') {
            messageElement.textContent = `[chat_room_a] ${data.message}`;
        } else {
            messageElement.textContent = `[chat_room_b] ${data.message}`;
        }
        document.getElementById('chat-messages').appendChild(messageElement);
    };


    chatSocket.onclose = function (e) {
        console.error('Chat socket closed unexpectedly');
    };

    document.getElementById('chat-message-send').onclick = function (e) {
        const messageInputDom = document.getElementById('chat-message-input');
        const message = messageInputDom.value;
        chatSocket.send(JSON.stringify({
            'message': message
        }));
        messageInputDom.value = '';
    };
</script>
</body>
</html>- 聊天室B页面:
html
<!-- 聊天室B的HTML页面 -->
<!DOCTYPE html>
<html>
<head>
    <title>Chat Room B</title>
</head>
<body>
<h1>Chat Room B</h1>
<div id="chat-messages"></div>
<input type="text" id="chat-message-input" placeholder="Type your message...">
<button id="chat-message-send">Send</button>

<script>
    const chatSocket = new WebSocket('ws://127.0.0.1:8000/ws/chat/room_b/');

    chatSocket.onmessage = function (e) {
        const data = JSON.parse(e.data);
        const messageElement = document.createElement('p');
        // 根据消息来源格式化消息
        if (data.room_origin === 'chat_room_a') {
            messageElement.textContent = `[chat_room_a] ${data.message}`;
        } else {
            messageElement.textContent = `[chat_room_b] ${data.message}`;
        }
        document.getElementById('chat-messages').appendChild(messageElement);
    };


    chatSocket.onclose = function (e) {
        console.error('Chat socket closed unexpectedly');
    };

    document.getElementById('chat-message-send').onclick = function (e) {
        const messageInputDom = document.getElementById('chat-message-input');
        const message = messageInputDom.value;
        chatSocket.send(JSON.stringify({
            'message': message
        }));
        messageInputDom.value = '';
    };
</script>
</body>
</html>
3. 功能测试:重启ASGI服务器,分别打开A.html、B.html测试
启动ASGI服务器命令:
python
daphne application.asgi:application
结论
通过本文,你现在应该能够使用Django Channels和WebSocket创建一个基本的聊天应用。你可以在此基础上添加更多功能,如用户认证、消息存储等,来丰富你的应用。