ssh远程管理
ssh是一种安全通道协议,用来实现字符界面的远程登录。远程复制,远程文本传输。
ssh对通信双方的数据进行了加密。
用户名和密码登录
密钥对认证方式(可以实现免密登录)
ssh 22 网络层 传输层
数据传输的过程中是加密的
数据在传输过程中是压缩的
一、ssh远程登录--密码认证
1、ssh root@192.168.168.30 ##远程登录默认端口22
[root@localhost ~]# ssh root@192.168.168.30
The authenticity of host '192.168.168.30 (192.168.168.30)' can't be established.
ECDSA key fingerprint is SHA256:yaufdRU2oi//z+PpV7wdWdPdTdEZT2SrypnKy30CsdY.
ECDSA key fingerprint is MD5:85:b0:7c:f3:f0:3a:95:f0:25:19:47:f4:90:46:bc:f5.
Are you sure you want to continue connecting (yes/no)? yes
Warning: Permanently added '192.168.168.30' (ECDSA) to the list of known hosts.
root@192.168.168.30's password:
Last login: Thu Jun  6 11:45:42 2024 from 192.168.168.11
2、ssh -p 222 root@192.168.168.30 ##远程登录指定端口222
[root@test2 ~]# ssh -p 222 root@192.168.168.30
ssh: connect to host 192.168.168.30 port 222: No route to host
[root@test2 ~]# ssh -p 222 root@192.168.168.10
The authenticity of host '[192.168.168.10]:222 ([192.168.168.10]:222)' can't be established.
ECDSA key fingerprint is SHA256:yaufdRU2oi//z+PpV7wdWdPdTdEZT2SrypnKy30CsdY.
ECDSA key fingerprint is MD5:85:b0:7c:f3:f0:3a:95:f0:25:19:47:f4:90:46:bc:f5.
Are you sure you want to continue connecting (yes/no)? yes
Warning: Permanently added '[192.168.168.10]:222' (ECDSA) to the list of known hosts.
root@192.168.168.10's password:
Last login: Thu Jun  6 11:42:01 2024 from 192.168.168.11
[root@localhost ~]#
ssh分为服务端和客户端
服务端:Openssh
客户端:xshell moba
sshd 应用名称
22
ssh_config 针对客户端的配置文件
sshd_config 服务端的配置
都是配置文件,作用不同
监听地址 就是对外提供服务的地址。
端口号修改
1、vim /etc/ssh/sshd_config ##修改端口号
二、scp远程复制:把目标主机的文件复制到本机。
1、scp root@目标主机ip:/opt/xy102 /opt
把192.168.168.20的/opt目录下的xy102复制到本机的opt目录下
[root@test2 ~]# cd /opt
[root@test2 opt]# touch xy102
[root@test2 opt]# echo 456 > xy102

[root@test1 ssh]# scp root@192.168.168.20:/opt/xy102 /opt
The authenticity of host '192.168.168.20 (192.168.168.20)' can't be established.
ECDSA key fingerprint is SHA256:yaufdRU2oi//z+PpV7wdWdPdTdEZT2SrypnKy30CsdY.
ECDSA key fingerprint is MD5:85:b0:7c:f3:f0:3a:95:f0:25:19:47:f4:90:46:bc:f5.
Are you sure you want to continue connecting (yes/no)? yes
Warning: Permanently added '192.168.168.20' (ECDSA) to the list of known hosts.
root@192.168.168.20's password:
xy102                                            100%    4     4.5KB/s   00:00
[root@test1 ssh]# cd /opt
[root@test1 opt]# ls
login.sh  nginx-1.22.0  nginx-1.22.0.tar.gz  xy102
[root@test1 opt]# cat xy102
456
2、复制目录: scp -r root@192.168.168.20:/opt/test1 /opt
[root@test2 opt]# mkdir test1
[root@test2 opt]# cd test1
[root@test2 test1]# touch 123
[root@test2 test1]# echo 123 > 123

[root@test1 opt]# scp -r root@192.168.168.20:/opt/test1 /opt
root@192.168.168.20's password:
123                                              100%    4     4.8KB/s   00:00
[root@test1 opt]# cd test1
[root@test1 test1]# ls
123
[root@test1 test1]# cat 123
123
3、复制不同端口目录: scp -rP 复制目录的端口号 root@192.168.168.20:/opt/test1 /opt
[root@test3 test1]# systemctl stop firewalld
[root@test3 test1]# setenforce 0
[root@test3 test1]# vim sshd_config
[root@test3 test1]# cd /etc
[root@test3 etc]# cd ssh
[root@test3 ssh]# ls
moduli       ssh_host_ecdsa_key      ssh_host_ed25519_key.pub
ssh_config   ssh_host_ecdsa_key.pub  ssh_host_rsa_key
sshd_config  ssh_host_ed25519_key    ssh_host_rsa_key.pub
[root@test3 ssh]# vim sshd_config
[root@test3 ssh]# systemctl restart sshd
[root@test3 ssh]#

[root@test1 test1]# scp -rP 222 root@192.168.168.30:/opt/test1 /opt/
The authenticity of host '[192.168.168.30]:222 ([192.168.168.30]:222)' can't be established.
ECDSA key fingerprint is SHA256:yaufdRU2oi//z+PpV7wdWdPdTdEZT2SrypnKy30CsdY.
ECDSA key fingerprint is MD5:85:b0:7c:f3:f0:3a:95:f0:25:19:47:f4:90:46:bc:f5.
Are you sure you want to continue connecting (yes/no)? yes
Warning: Permanently added '[192.168.168.30]:222' (ECDSA) to the list of known hosts.
root@192.168.168.30's password:
123

[root@test1 test1]# ssh -p 22 root@192.168.168.30
ssh: connect to host 192.168.168.30 port 22: Connection refused
[root@test1 test1]# ssh -p 222 root@192.168.168.30
root@192.168.168.30's password:
Last login: Thu Jun  6 10:08:11 2024 from 192.168.168.11
[root@test3 ~]#

ssh -p 10022 root@192.168.233.10
scp root@192.168.233.10:/opt/123 /opt

scp -r 复制目录
scp -rP 指定端口复制目录

scp -P指定端口复制文件
三、sftp 远程文件传输协议
Openssh包含3个功能
远程连接
远程复制
文件传输
sftp是加密的文件传输协议,传输效率比ftp低,但是更安全,语法和ftp是一样的。
1、sftp root@192.168.168.30 ##远程登录默认端口
[root@test2 ~]# sftp root@192.168.168.30
The authenticity of host '192.168.168.30 (192.168.168.30)' can't be established.
ECDSA key fingerprint is SHA256:yaufdRU2oi//z+PpV7wdWdPdTdEZT2SrypnKy30CsdY.
ECDSA key fingerprint is MD5:85:b0:7c:f3:f0:3a:95:f0:25:19:47:f4:90:46:bc:f5.
Are you sure you want to continue connecting (yes/no)? yes
Warning: Permanently added '192.168.168.30' (ECDSA) to the list of known hosts.
root@192.168.168.30's password:
Connected to 192.168.168.30.
sftp> cd /opt
sftp> ls
login.sh                   nginx-1.22.0               nginx-1.22.0.tar.gz

[root@test2 opt]# cat 123     ##test2的文件通过sftp远程连接上传文件
123.
[root@test2 opt]# sftp root@192.168.168.30
root@192.168.168.30's password:
Connected to 192.168.168.30.
sftp> cd /opt
sftp> ls
login.sh                   nginx-1.22.0               nginx-1.22.0.tar.gz
sftp> put 123
Uploading 123 to /opt/123
123                                              100%    5     7.9KB/s   00:00

[root@test3 opt]# ls  ##到test3查看文件在opt目录下
123  login.sh  nginx-1.22.0  nginx-1.22.0.tar.gz

sftp> get 456 #下载在opt目录下
Fetching /opt/456 to 456
/opt/456                                         100%    4     3.9KB/s   00:00
[root@test2 opt]# ls
123  456  login.sh  nginx-1.22.0  nginx-1.22.0.tar.gz
[root@test2 opt]# cat 456
456
2、sftp root@192.168.168.30 ##远程登录指定端口
[root@test2 test1]# sftp -P 222 root@192.168.168.30
The authenticity of host '[192.168.168.30]:222 ([192.168.168.30]:222)' can't be established.
ECDSA key fingerprint is SHA256:yaufdRU2oi//z+PpV7wdWdPdTdEZT2SrypnKy30CsdY.
ECDSA key fingerprint is MD5:85:b0:7c:f3:f0:3a:95:f0:25:19:47:f4:90:46:bc:f5.
Are you sure you want to continue connecting (yes/no)? yes
Warning: Permanently added '[192.168.168.30]:222' (ECDSA) to the list of known hosts.
root@192.168.168.30's password:
Connected to 192.168.168.30.
sftp> cd /opt
sftp> get -r test1
Fetching /opt/test1/ to test1
Retrieving /opt/test1
/opt/test1/123                                   100%    4     2.5KB/s   00:00
sftp> cd test1
sftp> ls
123
sftp> get 123
Fetching /opt/test1/123 to 123
/opt/test1/123
小结:
put上传,cd进入哪个文件夹中,就是上传到哪个文件夹中
get下载,在哪个文件夹远程连接,就是下载在哪个文件夹中
put -r 文件夹,上传文件夹
get -r 文件夹,下载文件夹
sftp不同scp的是,scp -p,而sftp -P。
四、ssh密钥对认证(免密登录)
密钥:密钥是一种参数,把明文转换成密文,转换成的密文是一种算法声场的参数。
密钥的形式分为两种:对称密钥,非对称密钥
ssh 非对称密钥
ssh的加密方式:
RSA
ECDSA
DSA
加密的算法,可以指定。
1、密钥登录
1、指定加密方式:root@test1 opt# ssh-keygen -t ecdsa
[root@test1 opt]# ssh-keygen -t ecdsa
Generating public/private ecdsa key pair.
Enter file in which to save the key (/root/.ssh/id_ecdsa):
Enter passphrase (empty for no passphrase):
Enter same passphrase again:
Your identification has been saved in /root/.ssh/id_ecdsa.
Your public key has been saved in /root/.ssh/id_ecdsa.pub.
The key fingerprint is:
SHA256:dfTfOfTjTFsGT+cpmQGmBlUhXziPmU5N+AuNHhB2EPQ root@test1
The key's randomart image is:
+---[ECDSA 256]---+
|       .oO=*=.   |
|        o.B=oo   |
|         ooE&.o.o|
|        .. X ==**|
|        S + o+.*O|
|           o .=.=|
|               + |
|                 |
|                 |
+----[SHA256]-----+
id_ecdsa 私钥文件
id ecdsa.pub 公钥文件
2、进入/root/.ssh目录下
[root@test1 opt]# cd /root/.ssh
[root@test1 .ssh]# ls
id_ecdsa  id_ecdsa.pub  known_hosts
[root@test1 .ssh]#
3、把test1的公钥文件传输到test3里
[root@test1 opt]# cd /root/.ssh
[root@test1 .ssh]# ls
id_ecdsa  id_ecdsa.pub  known_hosts
[root@test1 .ssh]# ssh-copy-id -i id_ecdsa.pub root@192.168.168.30      ##默认不用加端口
/usr/bin/ssh-copy-id: INFO: Source of key(s) to be installed: "id_ecdsa.pub"
/usr/bin/ssh-copy-id: INFO: attempting to log in with the new key(s), to filter out any that are already installed
/usr/bin/ssh-copy-id: INFO: 1 key(s) remain to be installed -- if you are prompted now it is to install the new keys
root@192.168.168.30's password:

Number of key(s) added: 1

Now try logging into the machine, with:   "ssh 'root@192.168.168.30'"
and check to make sure that only the key(s) you wanted were added.
4、生成ssh环境
[root@test1 .ssh]# ssh-agent bash5、直接密钥免密登录
[root@test1 .ssh]# ssh root@192.168.168.30
Last login: Thu Jun 6 14:54:00 2024 from 192.168.168.10
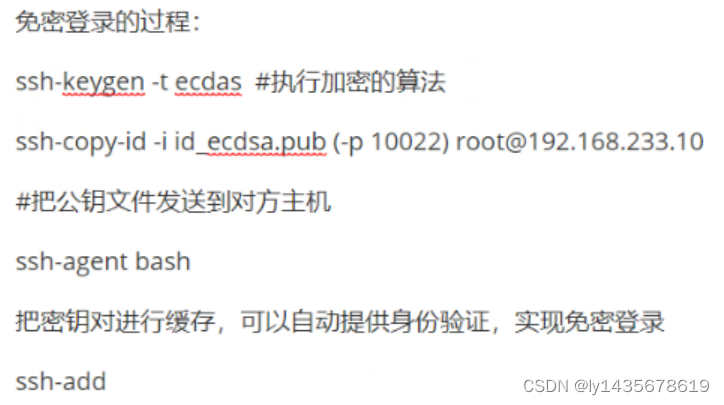
[root@test3 ~]# 免密登录的过程:
ssh-keygen -t ecdsa #执行加密的算法
ssh -copy -id -i id ecdsa.pub (-p 端口)
免密登录的过程:
ssh-keygen-tecdas #执行加密的算法
ssh-copy-id -iid ecdsa.pub (-p 10022) root@192.168.233.10
#把公钥文件发送到对方主机
ssh-agent bash
把密钥对进行缓存,可以自动提供身份验证,实现免密登录
ssh-add ##前面输入密码的话,需要在这输入密码
2、工具登录
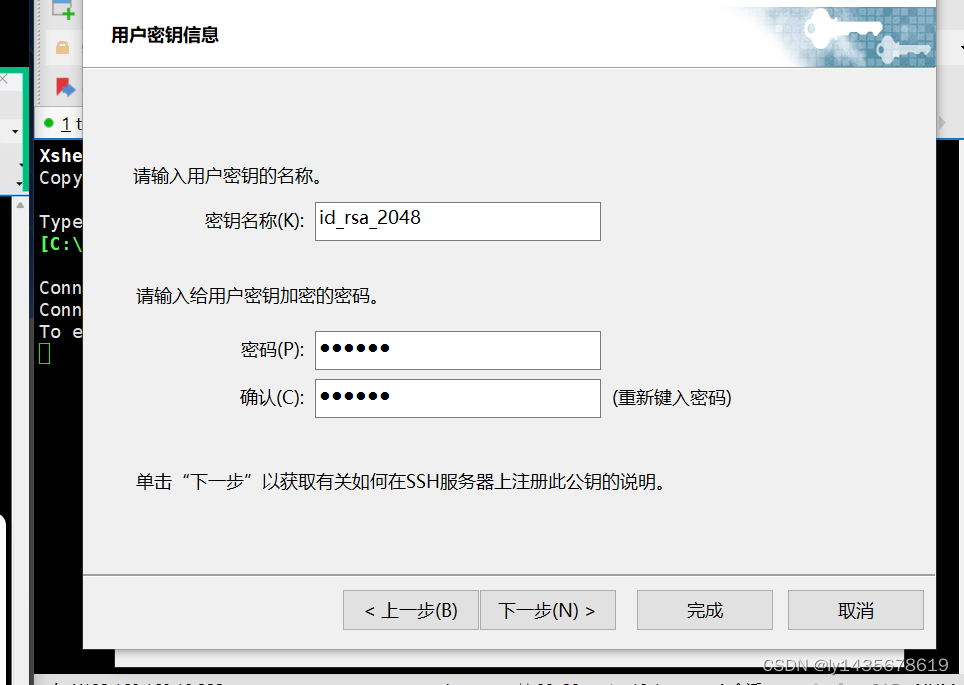
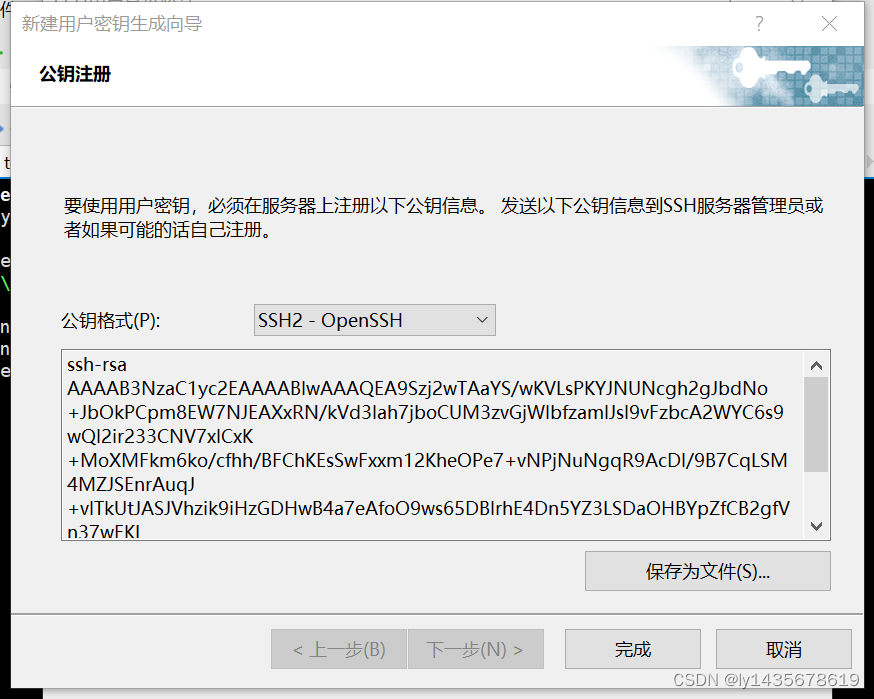

[root@test3 ~]# cd .ssh
[root@test3 .ssh]# ls
authorized_keys
[root@test3 .ssh]# rm -rf *
[root@test3 .ssh]# rz -E
rz waiting to receive.
[root@test3 .ssh]# ls
id_rsa_2048.pub
[root@test3 .ssh]# cat id_rsa_2048.pub >> authorized_keys
[root@test3 .ssh]# ls
authorized_keys  id_rsa_2048.pub
[root@test3 .ssh]# chmod 600 authorized_keys
到test1
[root@test1 ~]# cd .ssh/
[root@test1 .ssh]# ls
id_ecdsa  id_ecdsa.pub  known_hosts
[root@test1 .ssh]# rm -rf *
[root@test1 .ssh]# ls
[root@test1 .ssh]# rz -E
rz waiting to receive.
[root@test1 .ssh]#

[root@test1 .ssh]# cat id_rsa_2048.pub >> authorized_keys
[root@test1 .ssh]# chmod 600 authorized_keys
[root@test1 .ssh]# ls
authorized_keys  id_rsa_2048.pub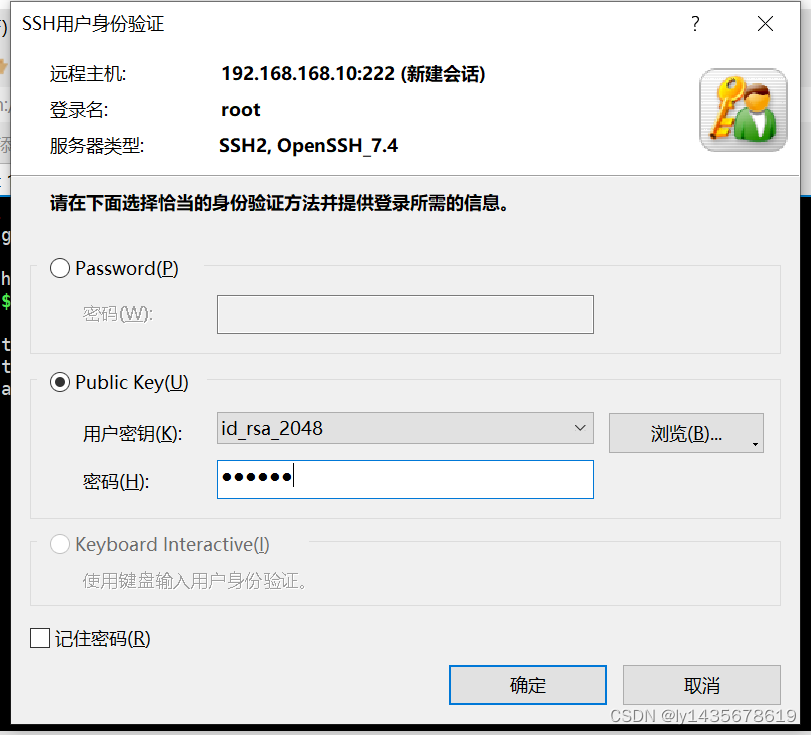
五、NFS共享存储服务
network file system 在计算机网络中共享文件系统的协议
计算机之间可以通过网络共享目录和文件
rpcbind:远程共享调用
nfs:共享服务
配置nfs是,要先启动调用rpcbind,再开启nfs
rpcbind端口号111
nfs 端口2049(查询不到)
1、提供网段共享文件夹服务
1、安装软件
[root@test1 opt]# yum -y install nfs-utils rpcbind2、创建共享目录
[root@test1 opt]# mkdir gongxiang
[root@test1 opt]# chmod 777 gongxiang
[root@test1 opt]# ls
gongxiang login.sh nginx-1.22.0 nginx-1.22.0.tar.gz3、root@test1 opt# vim /etc/exports
写入权限和网段使用
/opt/gongxiang 192.168.168.0/24(rw,sync,no_root_squash)
/opt/gongxiang 192.168.168.0/24(rw,sync,no_root_squash)
[root@test1 opt]# vim /etc/exports
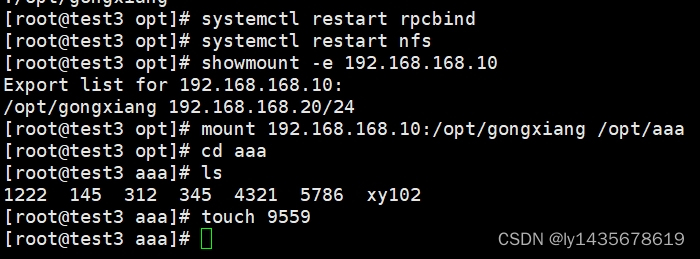
[root@test1 opt]# systemctl restart rpcbind
[root@test1 opt]# systemctl restart nfs
[root@test1 opt]# showmount -e
Export list for test1:
/opt/gongxiang 192.168.168.0/244、到其他主机安装软件,重启,显示共享软件
[root@test3 ~]# yum -y install rpcbind nfs

[root@test3 ~]# systemctl restart rpcbind
[root@test3 ~]# systemctl restart nfs
[root@test3 opt]# showmount -e 192.168.168.10
Export list for 192.168.168.10:
/opt/gongxiang 192.168.168.0/24
5、创建文件夹,临时挂载
mkdir test1

mount 192.168.168.10:/opt/gongxiang /opt/test1
永久挂载
vim /etc/fstab
192.168.168.10:/opt/gongxiang /opt/test1 nfs defaults, netdev 0 0
netdev:有网络目录才能挂载成功。
/opt/gongxiang 声明本机的共享目录
192.168.233.0/24声明网段,谁可以访问本机的共享目录。(声明指定的主机可以访问共享目录 作业)
(rw,sync,no root squash)权限,共享目录的使用者的权限
"rw"表示允许读写,"ro" 表示为只读。
sync 同步写入到硬盘中(共享用户的操作。)
no_root_squash 如果客户机以root用户访问共享目录,就给你和本机的root用户一样的权限。
root_squash 客户机root登录共享目录,就会把你变成匿名用户。
all_squash 所有访问用户都映射为匿名用户或用户组
async 将数据先保存在内存缓冲区中,必要时才写入磁盘。
subtree_check(默认) 若输出目录是一个子目录,则nfs服务器将检查其父目录的权限。
no_subtree_check 即使输出目录是一个子目录,nfs服务器也不检查其父目录的权限,这样可以提高效率。
主机:
vim /etc/exports
/opt/gongxiang 192.168.168.0/24(rw,sync,no root squash)
systemctl restart rpcbind
systemctl restart nfs
showmount -e
查看本机共享出去的目录
客户机
安装rpcbind和nfs
systemctl restart rpcbind
systemctl restart nfs
showmount -e 192.168.168.10
查看目标主机暴露出的共享目录
挂载
临时
mount 192.168.233.10:/opt/gongxiang /opt/test1
永久挂载
vim /etc/fstab
192.168.168.10:/opt/gongxiang /opt/test1 nfs defaults, netdev 0 0
netdev:有网络目录才能挂载成功。
2、指定的主机可以访问共享目录
1、安装软件nfs-utils rpcbind
root@test1 opt# yum -y install nfs-utils rpcbind
2、创建共享文件夹gongxiang,修改权限
mkdir /opt/gongxiang
chmod 777 gongxiang
3、进入共享配置文件,写入192.168.168.20可以访问共享目录
vim /etc/exports
/opt/opt 192.168.168.20(rw,sync,no_root_squash)
4、重启服务rpcbind、nfs,展示共享目录
systemctl restart rpcbind
systemctl restart nfs
showmount -e
5、到指定主机192.168.168.20,安装软件,并重启服务
root@test3 opt# yum -y install nfs-utils rpcbind
systemctl restart rpcbind
systemctl restart nfs
showmount -e 192.168.168.10
6、创建目录ab,挂载

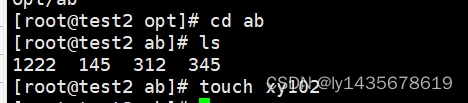
7、用其他用户挂载不上

8、若是网段192.168.168.0/24,可以挂载,并写入文件
|
六、yum的进阶
1、yum的主要作用:
依赖关系
自动安装
自动升级
centos7 yum
centos 8 dnf (yum的升级版)
dnf -y install
2、Ubuntu
apt
apt -y install 软件=yum -y install 软件
重启网卡命令:netplan apply
安装的包不一样
yum的包都是.rpm
Ubuntu的包都是.deb
3、yum日志文件和缓存
日志文件和缓存/var/log/yum.log
缓存:
下载在/etc/yum.conf
安装日志/var/log/yum.conf
访问目录在/var/www/html
访问192.168.168.10展开的是默认的是/var/www/html
访问192.168.168.10/centos 7的是/usr/share///idex.html
网页版的形式做一个yum源
curl页面测试工具,后面跟上ip地址或者域名可以访问这个页面(测试web软件故障是否正常)
vsftpd
http
混合
1、root@test1 \~# yum -y remove nginx
2、/var/cache/yum/x86_64/7/base/packages ##日志文件
3、
[root@test1 ~]# cd /etc/yum

[root@test1 yum]# vim /etc/yum
yum/         yum.conf     yum.repos.d/
[root@test1 yum]# vim /etc/yum.conf

cachedir=/var/cache/yum/$basearch/$releasever
keepcache=0   ##不保存安装包
4、安装软件日志。
[root@test1 yum]# tail /var/log/yum.log
Jun 06 17:33:46 Erased: libvirt-daemon-driver-storage-core-4.5.0-10.el7.x86_64
Jun 06 17:33:46 Erased: 1:nfs-utils-1.3.0-0.68.el7.2.x86_64
Jun 06 17:33:46 Erased: 1:quota-4.01-17.el7.x86_64
Jun 06 17:33:47 Erased: rpcbind-0.2.0-49.el7.x86_64
Jun 06 17:34:57 Installed: rpcbind-0.2.0-49.el7.x86_64
Jun 06 17:34:57 Updated: 1:quota-nls-4.01-19.el7.noarch
Jun 06 17:34:57 Installed: 1:quota-4.01-19.el7.x86_64
Jun 06 17:34:57 Installed: 1:nfs-utils-1.3.0-0.68.el7.2.x86_64
Jun 06 19:45:44 Erased: 1:nginx-1.20.1-10.el7.x86_64
Jun 06 19:45:55 Installed: 1:nginx-1.20.1-10.el7.x86_64
4、安装httpd
1、root@test1 \~# yum -y install httpd
2、
[root@test1 ~]# systemctl stop nginx
[root@test1 ~]# systemctl restart httpd
[root@test1 ~]# vim /etc/ssh/sshd_config
[root@test1 ~]# systemctl restart sshd
[root@test1 ~]# cd /var/www/html
[root@test1 html]# pwd
/var/www/html
3、此处注意有可能存在永久挂载,需要解除挂载
[root@test1 html]# mount /dev/cdrom /var/www/html/
mount: /dev/sr0 写保护,将以只读方式挂载4、root@test1 yum.repos.d# vim httpd.repo
[httpd]
name=123
baseurl=http://192.168.168.10/centos7
gpgcheck=0
5、
[root@test1 yum.repos.d]# cd /var/www/html/
[root@test1 html]# ls

[root@test1 html]# cd /
[root@test1 /]# umount /dev/cdrom
[root@test1 /]# cd /var/www/html/
[root@test1 html]# ls
[root@test1 html]# mkdir centos7
[root@test1 html]# ls
centos7
[root@test1 html]# mount /dev/cdrom /var/www/html/centos7/
6、
[root@test1 html]# yum clean all && yum makecache7、
8、

访问192.168.168.10
9、root@test1 html# vim index.html
root@test1 html#
curl页面测试工具
1、root@test2 \~# curl www.baidu.com
2、
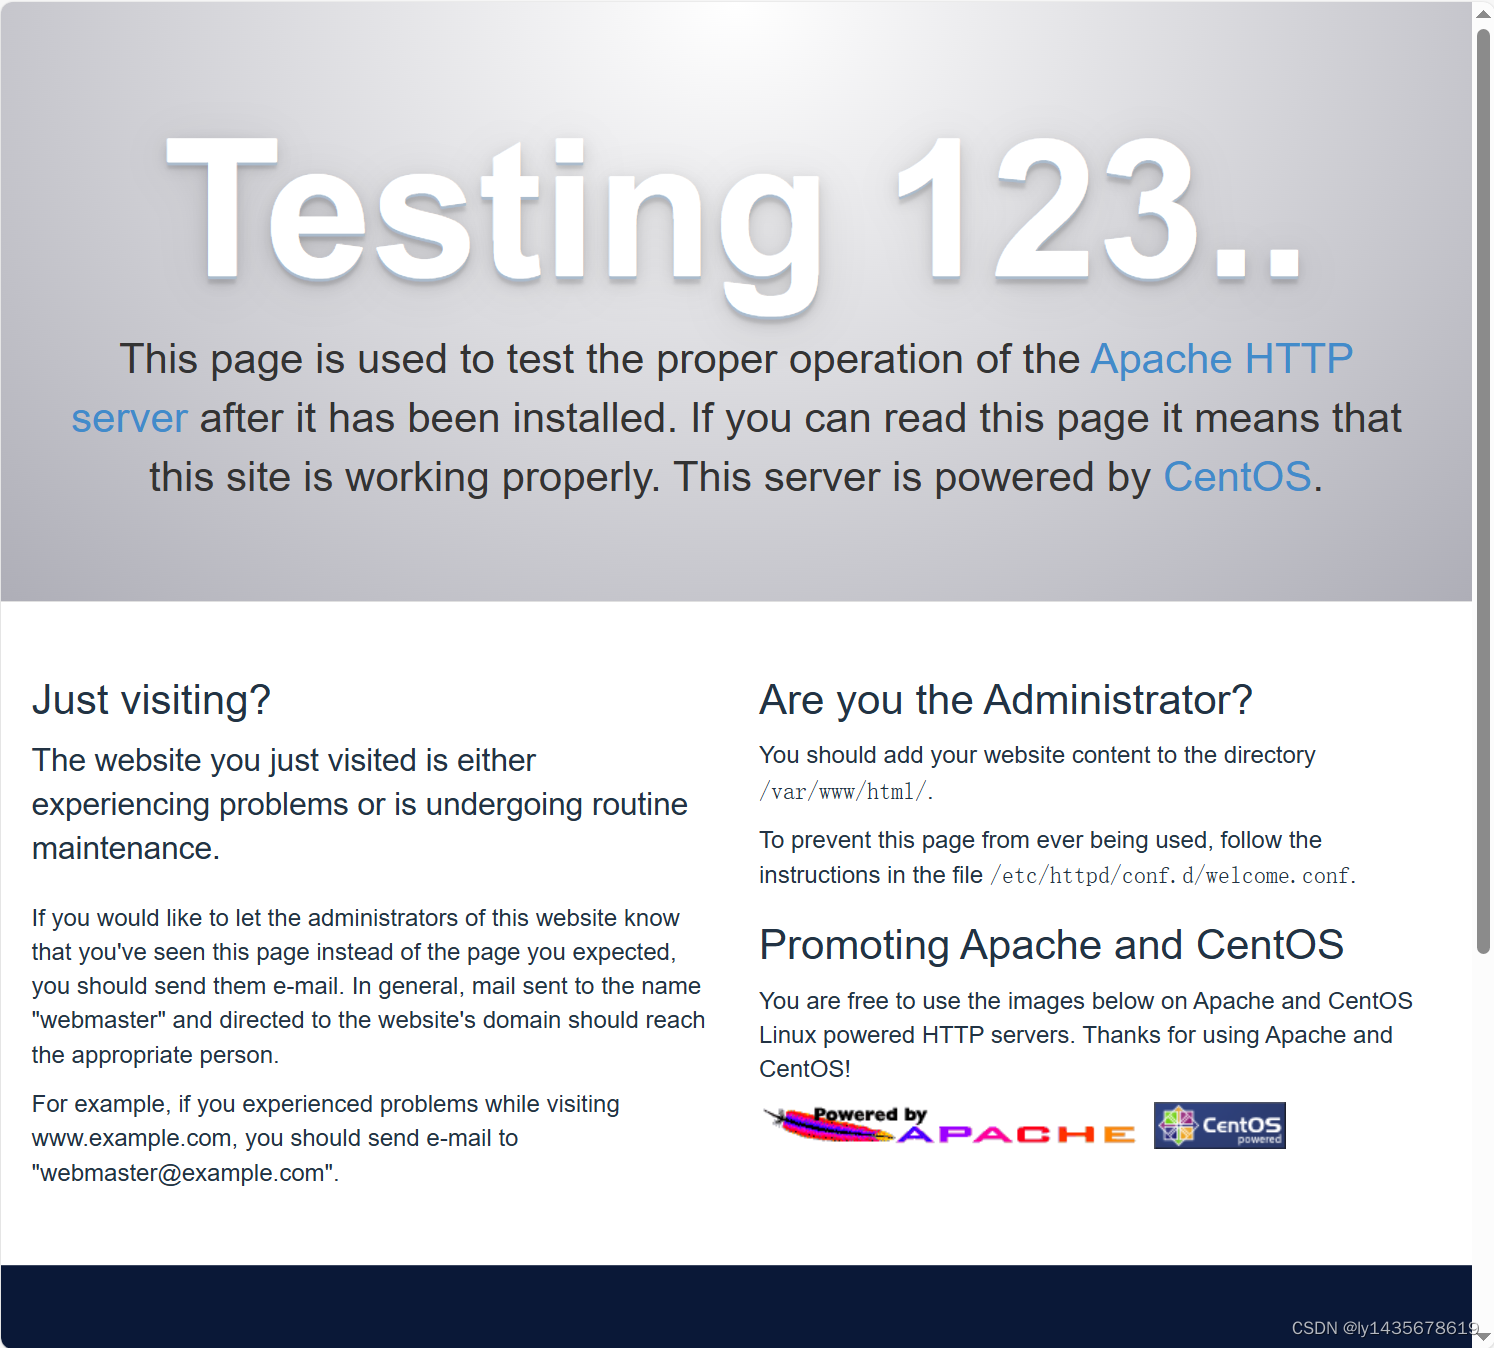
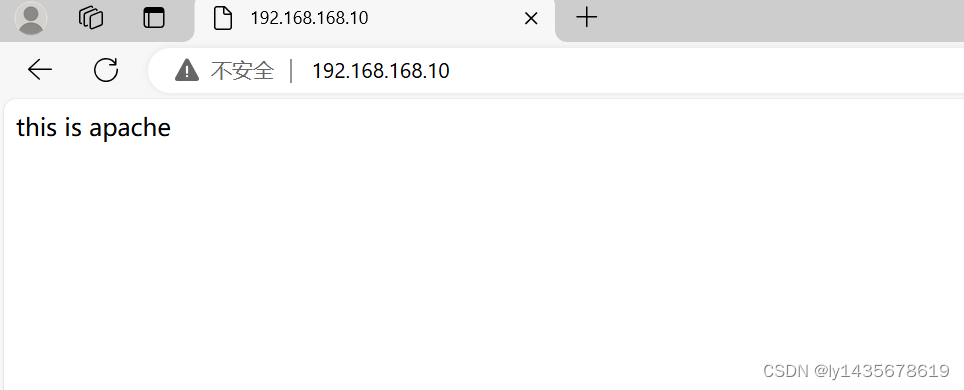
[root@test2 ~]# curl 192.168.168.10
this is apache
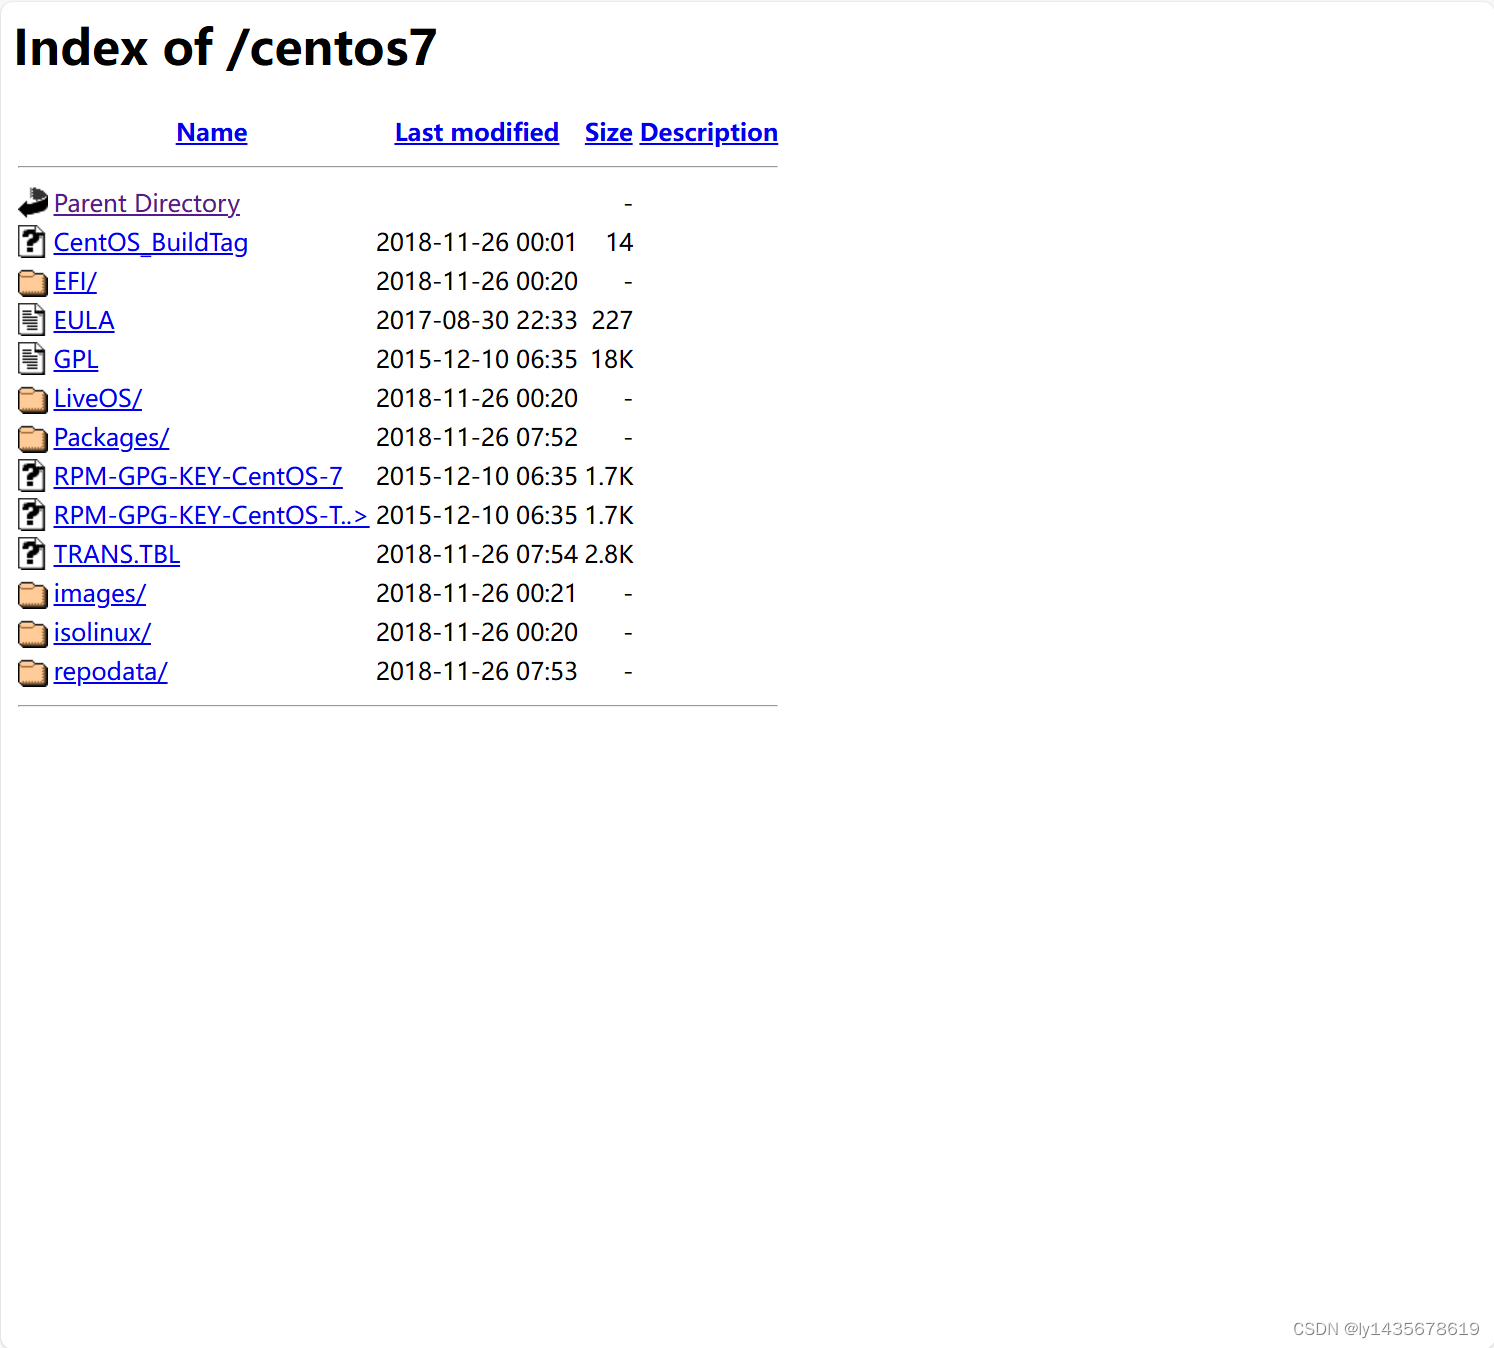
[root@test2 ~]# curl 192.168.168.10/centos7/Index of /centos7
Index of /centos7
| ![]() | Name | Last modified | Size | Description |
| Name | Last modified | Size | Description |
| *** ** * ** *** | ||||
|---|---|---|---|---|
| Parent Directory | - | |||
| <CentOS_BuildTag> | 2018-11-26 00:01 | 14 | ||
| 2018-11-26 00:20 | - | |||
| 2017-08-30 22:33 | 227 | |||
| 2015-12-10 06:35 | 18K | |||
| 2018-11-26 00:20 | - | |||
| 2018-11-26 07:52 | - | |||
| 2015-12-10 06:35 | 1.7K | |||
| RPM-GPG-KEY-CentOS-T..> | 2015-12-10 06:35 | 1.7K | ||
| <TRANS.TBL> | 2018-11-26 07:54 | 2.8K | ||
| 2018-11-26 00:21 | - | |||
| 2018-11-26 00:20 | - | |||
| 2018-11-26 07:53 | - |
另外一个
[root@test2 ~]# cd /etc/yum.repos.d/
[root@test2 yum.repos.d]# ls
Centos-7.repo     CentOS-Debuginfo.repo  CentOS-Vault.repo
Centos-7.repo.1   CentOS-fasttrack.repo  epel.repo
CentOS-Base.repo  CentOS-Media.repo      epel-testing.repo
CentOS-CR.repo    CentOS-Sources.repo    local.repo
[root@test2 yum.repos.d]# rm -rf *
[root@test2 yum.repos.d]# ls
[root@test2 yum.repos.d]#

[root@test2 yum.repos.d]# vim local.repo


[local]
name=123
baseurl=http://192.168.168.10/centos7
gpgcheck=0


[root@test2 yum.repos.d]# yum clean all && yum makecache
5、vsftpd
root@test3 \~# yum -y install vsftpd
root@test3 \~# cd /var/ftp
root@test3 ftp# ls
pub
root@test3 ftp# mkdir centos7
root@test3 ftp# mount /dev/cdrom /var/ftp/centos7/
mount: /dev/sr0 写保护,将以只读方式挂载
root@test3 ftp# cd /etc/yum.repos.d/
root@test3 yum.repos.d# rm -rf *
root@test3 yum.repos.d# ls
root@test3 yum.repos.d# mount /dev/cdrom /var/ftp/centos7/
注意永久挂载
root@test3 yum.repos.d# systemctl restart vsftpd
root@test3 yum.repos.d# vim local.repo
local
name=123
baseurl=ftp://192.168.168.30/centos7
gpgcheck=0
关闭防火墙、安全机制
yum clean all && yum makecache
6、yum混合源
cd /etc/yum.repo.d
vim local.repo
local
name=123
baseurl=http://192.168.168.10/centos7
gpgcheck=0
priority=2
#指定优先级,数字越大,优先级越高
net
name=456
baseurl=https://mirrors.aliyun.com/epel/7Server/x86_64/
gpgcheck=0
priority=1
root@test2 yum.repos.d# yum clean all && yum makecache
.本地安装很快
cd /var/ftp
root@test3 ftp# ls
pub
root@test3 ftp# mkdir centos7
root@test3 ftp# mount /dev/cdrom /var/ftp/centos7/
mount: /dev/sr0 写保护,将以只读方式挂载
root@test3 ftp# cd /etc/yum.repos.d/
root@test3 yum.repos.d# rm -rf *
root@test3 yum.repos.d# ls
root@test3 yum.repos.d# mount /dev/cdrom /var/ftp/centos7/
注意永久挂载
root@test3 yum.repos.d# systemctl restart vsftpd
root@test3 yum.repos.d# vim local.repo
local
name=123
baseurl=ftp://192.168.168.30/centos7
gpgcheck=0
关闭防火墙、安全机制
yum clean all && yum makecache
6、yum混合源
cd /etc/yum.repo.d
vim local.repo
local
name=123
baseurl=http://192.168.168.10/centos7
gpgcheck=0
priority=2
#指定优先级,数字越大,优先级越高
net
name=456
baseurl=https://mirrors.aliyun.com/epel/7Server/x86_64/
gpgcheck=0
priority=1
root@test2 yum.repos.d# yum clean all && yum makecache
.本地安装很快