文章目录
[1. TCP简介](#1. TCP简介)
[2. 服务端程序编写](#2. 服务端程序编写)
[3. 客户端程序编写](#3. 客户端程序编写)
[4. 服务端与客户端测试](#4. 服务端与客户端测试)
[1. UDP简介](#1. UDP简介)
[2. UDP单播与广播程序](#2. UDP单播与广播程序)
前言
承接【QT5】<总览四> QT常见绘图、图表及动画。若存在版权问题,请联系作者删除!
一、QThread多线程
**1. 作用:**创建多线程,防止应用程序界面卡顿。
2. 主要操作:
- ①创建的类需要继承QThread类。
- ②重写run函数,新建的线程会执行run函数。
- ③线程开启:对象调用start方法,使线程执行run函数。
- ④线程终止:对象调用terminate方法,使线程不再执行run函数。
- ⑤线程销毁:动态申请new需要调用deleteLater方法销毁线程对象。(该函数可以放置于run函数内,当run函数执行完毕后就会销毁该线程对象,防止内存泄漏)注意:尽量少用静态申请栈空间的方式创建线程对象,因为很可能该对象销毁时线程仍在执行,就会报错。
**3. 实例演示:**创建两个按钮,一个按钮点击时创建新线程,另一个按钮点击时终止新线程。
【1】widget.h:
cpp#ifndef WIDGET_H #define WIDGET_H #include <QWidget> #include <QThread> QT_BEGIN_NAMESPACE namespace Ui { class Widget; } QT_END_NAMESPACE //自定义的线程类 class MyThread : public QThread { Q_OBJECT public: MyThread(QWidget *parent = nullptr){ Q_UNUSED(parent)//防止编译器警告 } ~MyThread(){ qDebug("线程销毁"); } void run() override{ qDebug("线程开始"); sleep(5);//QThread里才有该方法 qDebug("线程停止"); deleteLater();//销毁线程 } }; //Widget类 class Widget : public QWidget { Q_OBJECT public: Widget(QWidget *parent = nullptr); ~Widget(); private slots: void on_pushButton_clicked(); void on_pushButton_2_clicked(); private: Ui::Widget *ui; MyThread *mythread; }; #endif // WIDGET_H【2】widget.cpp:
cpp#include "widget.h" #include "ui_widget.h" Widget::Widget(QWidget *parent) : QWidget(parent) , ui(new Ui::Widget) { ui->setupUi(this); } Widget::~Widget() { delete ui; } //"线程开始"按钮的槽函数 void Widget::on_pushButton_clicked() { mythread = new MyThread; mythread->start(); } //"线程终止"按钮的槽函数 void Widget::on_pushButton_2_clicked() { //若线程没有完成,则终止 if (!mythread->isFinished()) mythread->terminate(); }【3】运行效果:
- ①当我们点击"线程开始"按钮后,控制台打印"线程开始",五秒后控制台打印"线程停止"和"线程销毁"。
- ②当我们点击"线程开始"按钮后,控制台打印"线程开始",当我们在五秒内点击"线程结束"按钮,控制台什么都没有打印。
二、QT中的TCP编程
1. TCP简介
- TCP是面向连接的 、可靠的 、基于字节流的传输层通信协议。
- TCP的服务端和客户端通信首先必须建立连接。
- **建立连接方式:**服务端监听某个端口,当有客户端通过ip和port连接时,就会创建一个socket连接,之后就可以互发数据了。
- QT中将socket视为输入输出流,数据的收发是通过read() 和**write()**来进行,而不是常见的send和recv。
----------------------------接下来,我们以一个实例来解析服务端和用户端程序编写-------------------------
2. 服务端程序编写
2.1 编写步骤:
**【1】配置:**①pro文件中添加network;②添加头文件<QTcpServer>和<QTcpSocket>。
**【2】创建服务端对象:**QTcpServer *tcpServer;(具体分配空间在构造函数中)
**【3】服务端-客户端的信号槽连接:**connect(tcpServer, SIGNAL(newConnection()), this, SLOT(mNewConnection()));
【4】编写【3】中的槽函数mNewConnection():
- ①获取客户端对象:QTcpSocket *tmpTcpSocket = tcpServer->nextPendingConnection();
- ②获取客户端信息:
- 获取客户端ip:tmpTcpSocket->peerAddress().toString();
- 获取客户端port:tmpTcpSocket->peerPort();
- ③创建信号槽来处理客户端的连接状态:connect(tmpTcpSocket, SIGNAL(stateChanged(QAbstractSocket::SocketState)), this, SLOT(mStateChanged(QAbstractSocket::SocketState)));
- ④创建信号槽来接收客户端发送的信息:connect(tmpTcpSocket, SIGNAL(readyRead()), this, SLOT(receiveMessage()));
**【5】编写【4】中的槽函数mStateChanged(...):**用switch-case结构来处理连接状态,当状态为断开连接时,删除当前调用的客户端对象。
**【6】编写【4】中的槽函数receiveMessage():**调用tmpTcpSocket->readAll()来获取客户端发送的信息。
**【7】创建函数来给客户端发送数据:**内部调用"客户端对象.write("写入的内容")"。
**【8】开始监听:**调用tcpServer->listen(QHostAddress("192.168.124.151"), 9999); 监听ip为192.168.124.151,port为9999。
2.2 编写代码:
【1】widget.h:
cpp#ifndef WIDGET_H #define WIDGET_H #include <QWidget> #include <QTcpServer> #include <QTcpSocket> QT_BEGIN_NAMESPACE namespace Ui { class Widget; } QT_END_NAMESPACE class Widget : public QWidget { Q_OBJECT public: Widget(QWidget *parent = nullptr); ~Widget(); private slots: void mNewConnection(); void receiveMessage(); void mStateChanged(QAbstractSocket::SocketState socketState); void on_pushButton_3_clicked(); void on_pushButton_clicked(); void on_pushButton_2_clicked(); private: Ui::Widget *ui; QTcpServer *tcpServer; }; #endif // WIDGET_H【2】widget.cpp:
cpp#include "widget.h" #include "ui_widget.h" /*********************************************************** * @函数名:Widget * @功 能:构造函数---创建服务端对象,与客户端连接 * @参 数:parent---父对象 * @返回值:无 *********************************************************/ Widget::Widget(QWidget *parent) : QWidget(parent) , ui(new Ui::Widget) { ui->setupUi(this); this->setWindowTitle("服务端"); //创建对象,与客户端连接 tcpServer = new QTcpServer(this); connect(tcpServer, SIGNAL(newConnection()), this, SLOT(mNewConnection())); } /*********************************************************** * @函数名:~Widget * @功 能:析构函数 * @参 数:无 * @返回值:无 *********************************************************/ Widget::~Widget() { delete ui; } /*********************************************************** * @函数名:mNewConnection * @功 能:槽函数---若客户端发起连接,服务端连接客户端 * @参 数:无 * @返回值:无 *********************************************************/ void Widget::mNewConnection() { //获取客户端 QTcpSocket *tmpTcpSocket = tcpServer->nextPendingConnection(); //打印客户端的ip和port QString ipAddr = tmpTcpSocket->peerAddress().toString(); quint16 port = tmpTcpSocket->peerPort(); ui->textBrowser->append("客户端的ip地址:" + ipAddr); ui->textBrowser->append("客户端的端口:" + QString::number(port)); //处理客户端连接状态,接收客户端发送的数据 connect(tmpTcpSocket, SIGNAL(readyRead()), this, SLOT(receiveMessage())); connect(tmpTcpSocket, SIGNAL(stateChanged(QAbstractSocket::SocketState)), this, SLOT(mStateChanged(QAbstractSocket::SocketState))); } /*********************************************************** * @函数名:receiveMessage * @功 能:槽函数---服务端接收客户端发送的数据 * @参 数:无 * @返回值:无 *********************************************************/ void Widget::receiveMessage() { QTcpSocket *tmpTcpSocket = (QTcpSocket*)sender(); ui->textBrowser->append("客户端:" + tmpTcpSocket->readAll()); } /*********************************************************** * @函数名:mStateChanged * @功 能:槽函数---服务端处理客户端的连接状态 * @参 数:socketState---客户端连接状态 * @返回值:无 *********************************************************/ void Widget::mStateChanged(QAbstractSocket::SocketState socketState) { QTcpSocket *tmpTcpSocket = (QTcpSocket*)sender(); //处理状态,删除断开的QTcpSocket对象 switch (socketState) { case QAbstractSocket::UnconnectedState://断开连接,删除对象 ui->textBrowser->append("客户端断开连接"); tmpTcpSocket->deleteLater(); break; case QAbstractSocket::ConnectedState://已连接 ui->textBrowser->append("客户端已连接"); break; default: break; } } /*********************************************************** * @函数名:on_pushButton_3_clicked * @功 能:按钮"发送消息"的槽函数,将文本信息发送给所有客户端 * @参 数:无 * @返回值:无 *********************************************************/ void Widget::on_pushButton_3_clicked() { QList <QTcpSocket*> clients = tcpServer->findChildren<QTcpSocket*>(); for (int i = 0; i < clients.length(); ++i) { clients[i]->write(ui->lineEdit->text().toUtf8()); } } /*********************************************************** * @函数名:on_pushButton_clicked * @功 能:按钮"开始监听"的槽函数,监听指定的ip和port * @参 数:无 * @返回值:无 *********************************************************/ void Widget::on_pushButton_clicked() { tcpServer->listen(QHostAddress("192.168.124.151"), 9999); } /*********************************************************** * @函数名:on_pushButton_2_clicked * @功 能:按钮"停止监听"的槽函数 * @参 数:无 * @返回值:无 *********************************************************/ void Widget::on_pushButton_2_clicked() { tcpServer->close(); }
3. 客户端程序编写
3.1 编写步骤:
**【1】配置:**①pro文件中添加network;②添加头文件<QTcpSocket>和<QHostAddress>。
**【2】创建客户端对象:**QTcpSocket *tcpSocket;(具体分配空间在构造函数中)
**【3】创建信号槽来处理客户端的连接状态:**connect(tcpSocket, SIGNAL(stateChanged(QAbstractSocket::SocketState)), this, SLOT(mStateChanged(QAbstractSocket::SocketState)));
**【4】创建信号槽来接收客户端发送的信息:**connect(tcpSocket, SIGNAL(readyRead()), this, SLOT(receiveMessage()));
**【5】编写【3】中的槽函数mStateChanged(...):**switch-case处理。
**【6】编写【4】中的槽函数receiveMessage():**调用tcpSocket->readAll().
**【7】创建函数来给服务端发送数据:**内部调用"客户端对象.write("写入的内容")"。
**【8】启动连接服务端:**调用tcpSocket->connectToHost(QHostAddress("192.168.124.151"), 9999);
**【9】断开连接服务端:**调用tcpSocket->disconnectFromHost();
3.2 编写代码:
【1】widget.h:
cpp#ifndef WIDGET_H #define WIDGET_H #include <QWidget> #include <QTcpSocket> #include <QHostAddress> QT_BEGIN_NAMESPACE namespace Ui { class Widget; } QT_END_NAMESPACE class Widget : public QWidget { Q_OBJECT public: Widget(QWidget *parent = nullptr); ~Widget(); private slots: void receiveMessage(); void mStateChanged(QAbstractSocket::SocketState socketstate); void on_pushButton_3_clicked(); void on_pushButton_clicked(); void on_pushButton_2_clicked(); private: Ui::Widget *ui; QTcpSocket *tcpSocket; }; #endif // WIDGET_H【2】widget.cpp:
cpp#include "widget.h" #include "ui_widget.h" /*********************************************************** * @函数名:Widget * @功 能:构造函数---创建客户端对象,与服务端连接 * @参 数:parent---父对象 * @返回值:无 *********************************************************/ Widget::Widget(QWidget *parent) : QWidget(parent) , ui(new Ui::Widget) { //ui部分 ui->setupUi(this); this->setWindowTitle("客户端"); ui->pushButton->setEnabled(true); ui->pushButton_2->setEnabled(false); //tcp部分 tcpSocket = new QTcpSocket(this); connect(tcpSocket, SIGNAL(readyRead()), this, SLOT(receiveMessage())); connect(tcpSocket, SIGNAL(stateChanged(QAbstractSocket::SocketState)), this, SLOT(mStateChanged(QAbstractSocket::SocketState))); } /*********************************************************** * @函数名:~Widget * @功 能:析构函数 * @参 数:无 * @返回值:无 *********************************************************/ Widget::~Widget() { delete ui; } /*********************************************************** * @函数名:receiveMessage * @功 能:槽函数---客户端接收服务端发送的数据 * @参 数:无 * @返回值:无 *********************************************************/ void Widget::receiveMessage() { ui->textBrowser->append("服务端:" + tcpSocket->readAll()); } /*********************************************************** * @函数名:mStateChanged * @功 能:槽函数---客户端连接状态改变的处理 * @参 数:socketstate---当前连接状态 * @返回值:无 *********************************************************/ void Widget::mStateChanged(QAbstractSocket::SocketState socketstate) { switch (socketstate) { case QAbstractSocket::UnconnectedState: ui->textBrowser->append("与服务端断开连接"); ui->pushButton->setEnabled(true); ui->pushButton_2->setEnabled(false); break; case QAbstractSocket::ConnectedState: ui->textBrowser->append("与服务端成功连接"); ui->pushButton->setEnabled(false); ui->pushButton_2->setEnabled(true); break; default: break; } } /*********************************************************** * @函数名:on_pushButton_3_clicked * @功 能:"发送消息"按钮的槽函数,必须连接了服务端才发送 * @参 数:无 * @返回值:无 *********************************************************/ void Widget::on_pushButton_3_clicked() { if (tcpSocket->state() == QAbstractSocket::ConnectedState){ tcpSocket->write(ui->lineEdit->text().toUtf8()); } else { ui->textBrowser->append("请先连接服务端!"); } } /*********************************************************** * @函数名:on_pushButton_clicked * @功 能:"连接服务端"按钮的槽函数 * @参 数:无 * @返回值:无 *********************************************************/ void Widget::on_pushButton_clicked() { tcpSocket->connectToHost(QHostAddress("192.168.124.151"), 9999); } /*********************************************************** * @函数名:on_pushButton_2_clicked * @功 能:"断开服务端"按钮的槽函数 * @参 数:无 * @返回值:无 *********************************************************/ void Widget::on_pushButton_2_clicked() { tcpSocket->disconnectFromHost(); }
4. 服务端与客户端测试
4.1 注意事项:
- 服务端中的"开始监听"和"停止监听"应该设置成互斥的。方法一: 在ui设计器里将它们添加到一个按钮组,然后选中"exclusive",将它们的"checkable"勾选上,再将"停止监听"按钮的"checked"勾选。**方法二:**使用代码ui->pushButton->setEnable(对/错);实现它们逻辑的互斥。
- 客户端中的"连接服务端"和"断开服务端"应该用上述的方法二实现互斥。
- 在服务端中,当客户端断开连接时,直接调用delete可能会出错(其他地方可能还在用这个变量)。因此,应当使用tmpTcpSocket.deleteLater(); 来删除客户端对象。
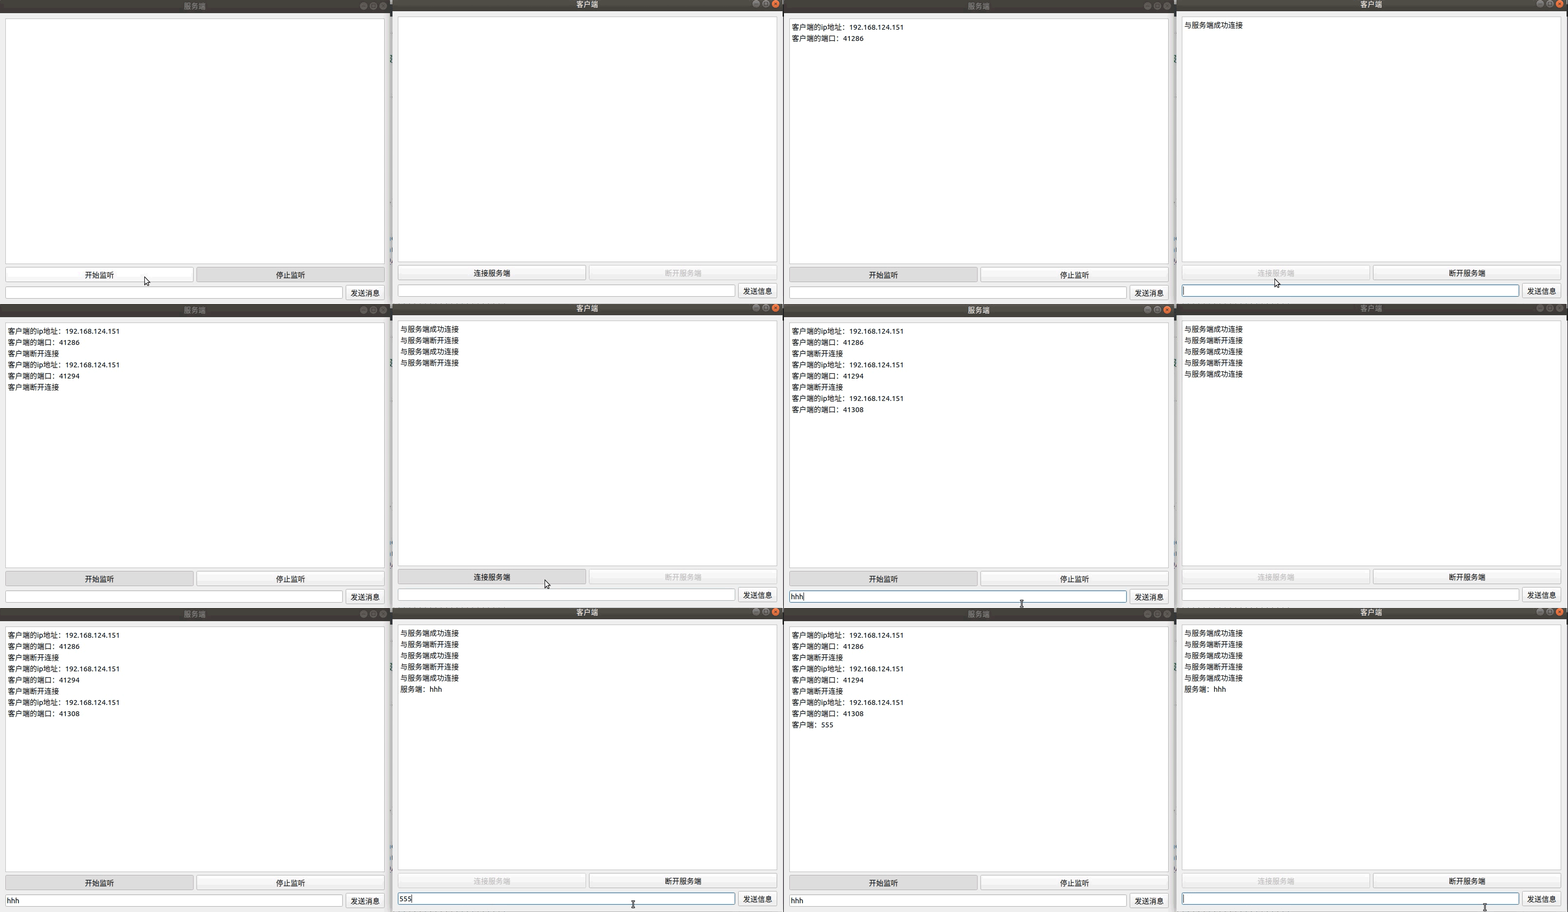
4.2 运行效果:

三、QT中的UDP编程
1. UDP简介
- 是一个轻量级的,不可靠的,面向数据报的无连接协议。
- 通常音频、视频和普通数据在传送时使用 UDP 较多。
- UDP 消息传送有三种模式:单播、广播和组播三种模式。
2. UDP单播与广播程序
2.1 编写步骤:
**【1】配置:**①pro文件中添加network;②添加头文件<QUdpSocket>。
**【2】创建UDP对象:**QUdpSocket *udpSocket;(具体分配空间在构造函数中)
**【3】编写函数绑定端口:**调用udpSocket->bind(端口号);
**【4】编写函数解除绑定:**调用udpSocket->abort();
**【5】"发送-接收"的信号槽连接:**connect(udpSocket, SIGNAL(readyRead()), this, SLOT(receiveMessage()));
**【6】编写【5】中的receiveMessage来获取接收的数据:**内部调用udpSocket->readDatagram(mesg.data(), mesg.size(), &receiveAddress, &port);
**【7】编写函数来单播发送数据:**调用udpSocket->writeDatagram(ui->lineEdit->text().toUtf8(), QHostAddress("127.0.0.1"), 9999);
【8】编写函数来广播发送数据: 与【7】类似,只是将倒数第二个参数换成QHostAddress::Broadcast。要广播几个ip和端口,就调用几次****writeDatagram。
【8】要想获取当前连接的状态,操作和TCP中的一样。
2.2 实例代码:
【1】widget.h:
cpp#ifndef WIDGET_H #define WIDGET_H #include <QWidget> #include <QUdpSocket> QT_BEGIN_NAMESPACE namespace Ui { class Widget; } QT_END_NAMESPACE class Widget : public QWidget { Q_OBJECT public: Widget(QWidget *parent = nullptr); ~Widget(); private slots: void receiveMessage(); void on_pushButton_3_clicked(); void on_pushButton_clicked(); void on_pushButton_2_clicked(); void on_pushButton_4_clicked(); private: Ui::Widget *ui; QUdpSocket *udpSocket; }; #endif // WIDGET_H【2】widget.cpp:
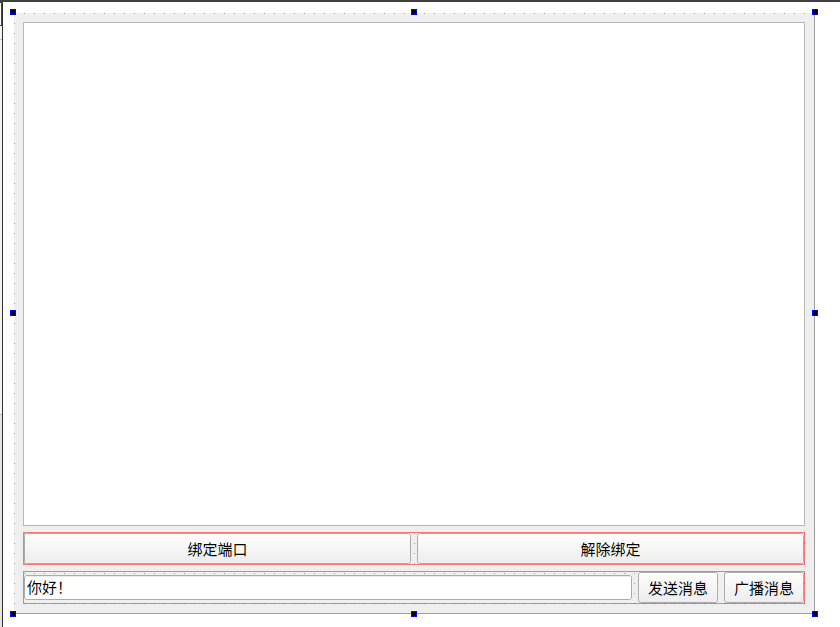
cpp#include "widget.h" #include "ui_widget.h" /* 构造函数 */ Widget::Widget(QWidget *parent) : QWidget(parent) , ui(new Ui::Widget) { ui->setupUi(this); ui->pushButton->setEnabled(true); ui->pushButton_2->setEnabled(false); //创建udp对象 udpSocket = new QUdpSocket(this); connect(udpSocket, SIGNAL(readyRead()), this, SLOT(receiveMessage())); } /* 析构函数 */ Widget::~Widget() { delete ui; } /* 接收信息的槽函数*/ void Widget::receiveMessage() { QByteArray mesg; mesg.resize(udpSocket->pendingDatagramSize()); QHostAddress receiveAddress; quint16 port; while (udpSocket->hasPendingDatagrams()) { udpSocket->readDatagram(mesg.data(), mesg.size(), &receiveAddress, &port);//保存接收的数据 ui->textBrowser->append("接收来自:" + receiveAddress.toString() + ", 端口:" + QString::number(port)); ui->textBrowser->append("接收信息:" + mesg); } } /* 发送信息按钮的槽函数 */ void Widget::on_pushButton_3_clicked() { udpSocket->writeDatagram(ui->lineEdit->text().toUtf8(), QHostAddress("127.0.0.1"), 9999); ui->textBrowser->append("发送信息:" + ui->lineEdit->text().toUtf8()); } /* 绑定端口按钮的槽函数 */ void Widget::on_pushButton_clicked() { udpSocket->bind(9999); ui->textBrowser->append("当前绑定端口:" + QString::number(9999)); ui->pushButton->setEnabled(false); ui->pushButton_2->setEnabled(true); } /* 解除绑定按钮的槽函数 */ void Widget::on_pushButton_2_clicked() { udpSocket->abort(); ui->textBrowser->append("解除绑定"); ui->pushButton->setEnabled(true); ui->pushButton_2->setEnabled(false); } /* 广播信息按钮的槽函数 */ void Widget::on_pushButton_4_clicked() { udpSocket->writeDatagram(ui->lineEdit->text().toUtf8(), QHostAddress::Broadcast, 9999); ui->textBrowser->append("发送信息:" + ui->lineEdit->text().toUtf8()); }【3】ui设计器:
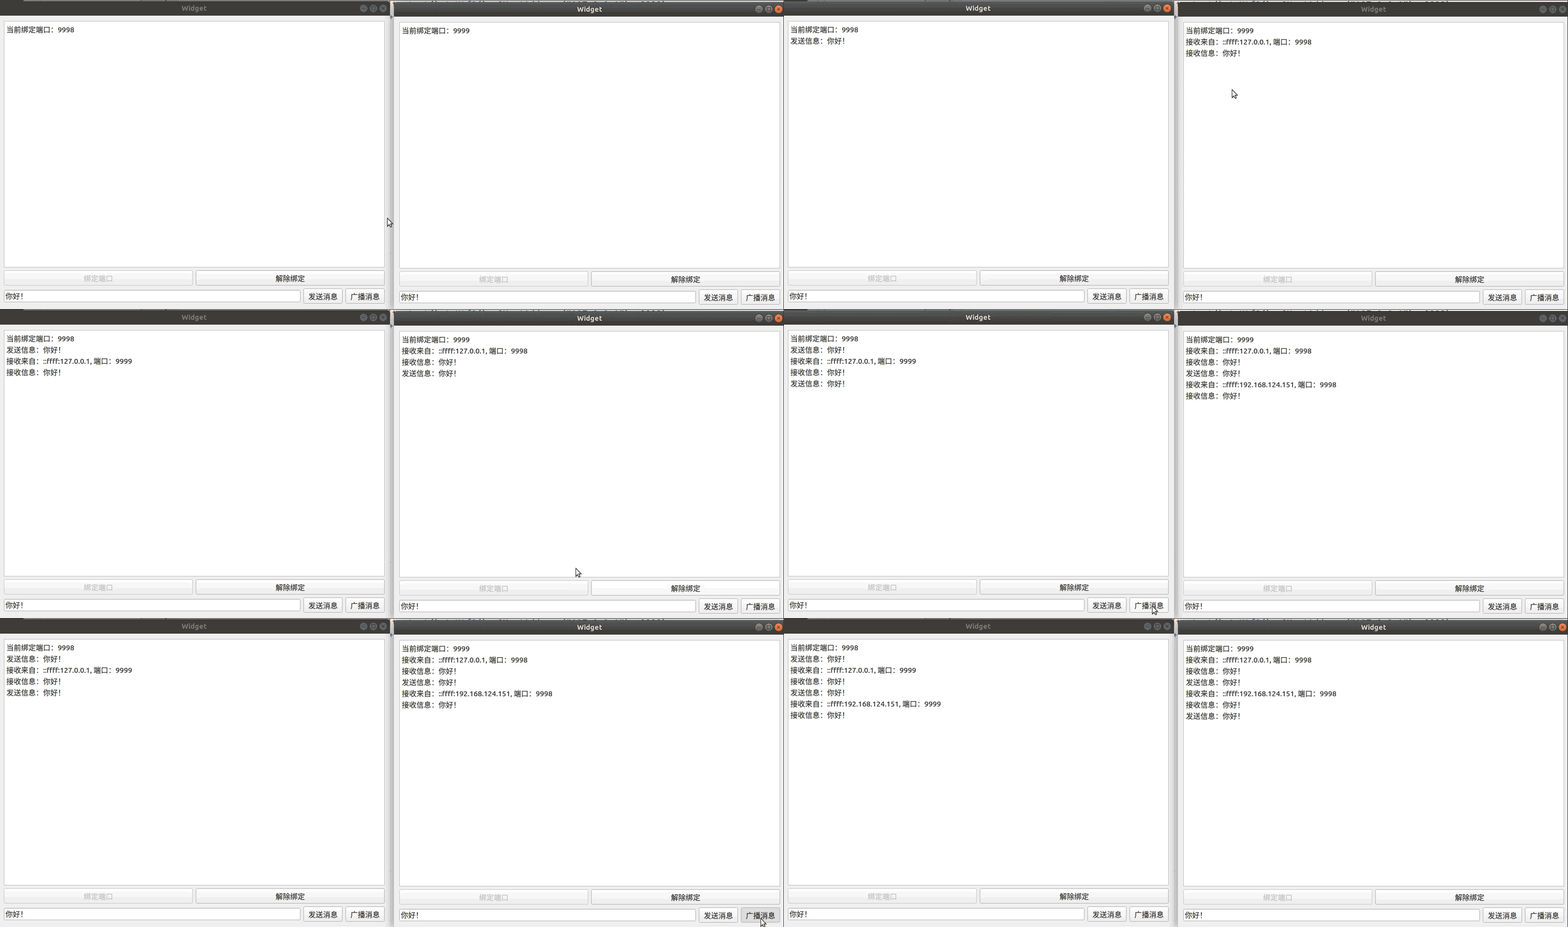
**【4】运行效果:**双开该程序,每次新运行程序前修改一下绑定的端口号并编译。同时,这两个端口号需要对应才能显示单播的效果。

