最近我在Kaggle上找到一个跟XGBOOST相关的代码,这有助于我们去实战性的学习。
这段代码旨在使用XGBoost和TPU进行大规模的分子绑定预测。
比赛项目:NeurIPS 2024 - Predict New Medicines with BELKA | Kaggle
训练样本代码:
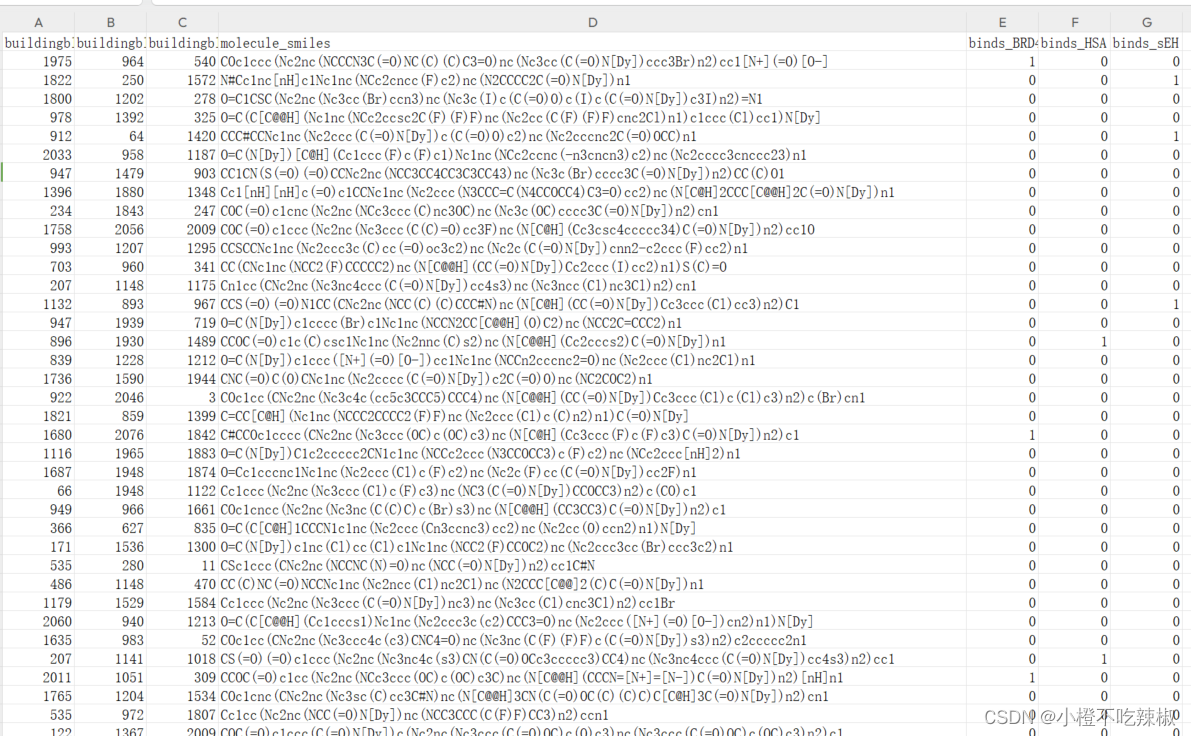
上图是我们已经处理好的训练样本,右边三列是我们要去预测的蛋白质
python
import numpy as np  # linear algebra
import pandas as pd  # data processing, CSV file I/O (e.g. pd.read_csv)
import pickle
import random, os, gc
from scipy import sparse
from sklearn.metrics import average_precision_score
from sklearn.feature_selection import VarianceThreshold
from xgboost import DMatrix
import xgboost as xgb
from sklearn.model_selection import StratifiedKFold
import tensorflow as tf
这部分导入了所需的库,包括NumPy、Pandas、Pickle、SciPy、Scikit-learn、XGBoost和TensorFlow。VarianceThreshold是方差阈值。
python
# Detect hardware, return appropriate distribution strategy
try:
tpu = tf.distribute.cluster_resolver.TPUClusterResolver.connect(tpu="local") # "local" for 1VM TPU
strategy = tf.distribute.TPUStrategy(tpu)
print("Running on TPU")
print("REPLICAS: ", strategy.num_replicas_in_sync)
except tf.errors.NotFoundError:
strategy = tf.distribute.get_strategy() # Default strategy for CPU/GPU
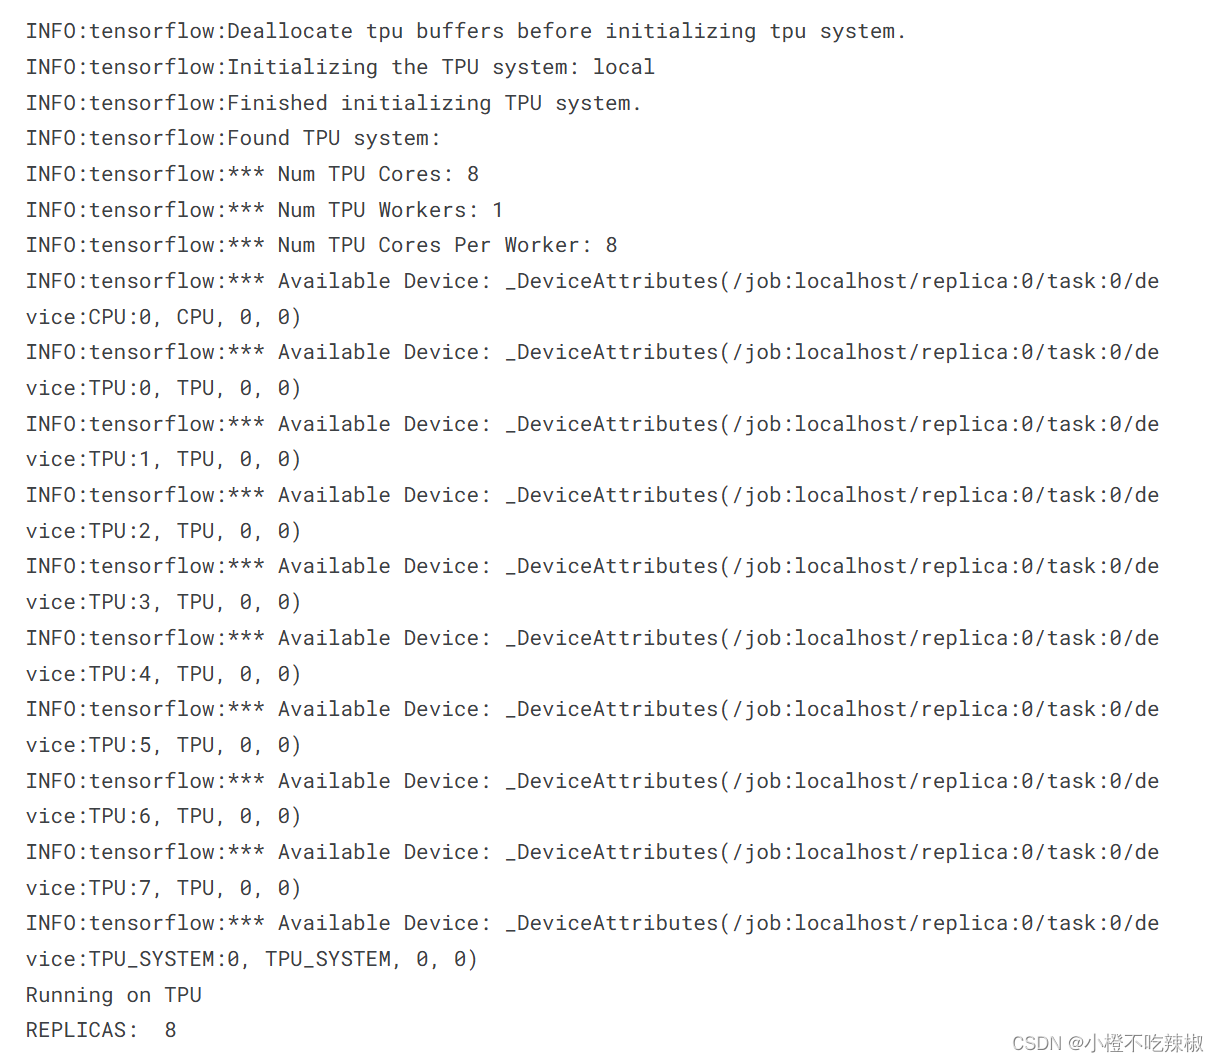
print("Not on TPU, running on ", strategy)这是我在源代码的基础上增添了在TPU上训练,尝试连接TPU集群。如果连接成功,使用TPUStrategy,否则使用默认的分布式策略。
- TPUClusterResolver:
-
`TPUClusterResolver` 是 TensorFlow 中用于连接 TPU 群集的类。在这段代码中,使用 `TPUClusterResolver.connect(tpu="local")` 尝试连接本地的 TPU 资源。参数 `"local"` 表示连接到单个虚拟机(1VM)上的 TPU。
-
如果成功连接到 TPU,就会创建一个 `TPUStrategy` 对象 `strategy`,用于在 TPU 上进行分布式训练。
- TPUStrategy:
- `TPUStrategy` 是 TensorFlow 中专门为 TPU 设计的分布策略。它可以管理和分发计算任务到 TPU 设备上,并提供了一些工具和接口来简化在 TPU 上的模型训练过程。
- Fallback to CPU/GPU:
-
如果无法连接到 TPU(捕获到 `tf.errors.NotFoundError`),则执行 `tf.distribute.get_strategy()`,该函数返回默认的策略,通常是针对 CPU 或 GPU 的单机训练策略。
-
`get_strategy()` 返回的是 `MirroredStrategy`,用于在单个设备(单机多 GPU)上进行分布式训练。
- 输出信息:
-
如果连接成功,输出 "Running on TPU" 并打印 TPU 群集的 REPLICA 数量。
-
如果连接失败(没有找到 TPU),输出 "Not on TPU, running on " 后面跟着默认策略(通常是 CPU 或 GPU)的信息。
因此,这段代码展示了如何在 TensorFlow 中利用 `TPUClusterResolver` 和 `TPUStrategy` 来实现分布式训练,并在没有 TPU 可用时回退到 CPU/GPU 上进行训练。
输出信息示例
python
# 设置随机种子的函数,确保结果的可重复性
def seed_everything(seed: int):
    random.seed(seed)
    np.random.seed(seed)
    os.environ['PYTHONHASHSEED'] = str(seed)

# 设置随机种子为42
seed_everything(42)定义并调用seed_everything函数,设置随机种子为42,以确保结果的可重复性。
python
# 函数:打印数据框的基本属性
def fold_properties(df):
    print('Shape :', df.shape)
    print('block1 :', df.buildingblock1_smiles.nunique())
    print('block2 :', df.buildingblock2_smiles.nunique())
    print('block3 :', df.buildingblock3_smiles.nunique())
    for target in TARGETS: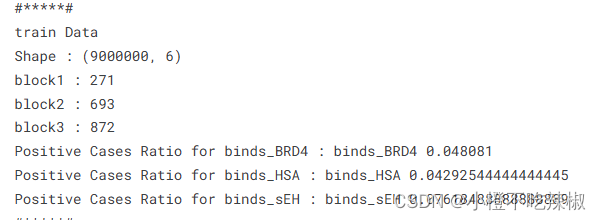
print(f'Positive Cases Ratio for {target} :', target, (df[target].sum() / df.shape[0]))定义fold_properties函数,用于打印数据框的基本属性,包括形状、唯一值数量和目标列的正样本比例。
唯一值数量举例:
学号 姓名 年龄 成绩
0 1001 小明 18 85
1 1002 小红 17 90
2 1003 小刚 18 88
3 1004 小丽 17 92
学号列中的唯一值数量为 4,因为有四个不同的学号。姓名列中的唯一值数量为 4,因为每个学生的姓名都是唯一的。年龄列中的唯一值数量为 2,因为只有 17 岁和 18 岁两种可能的年龄。成绩列中的唯一值数量为 4,因为每个学生的成绩都是唯一的。
通过计算每列唯一值的数量,我们可以快速了解数据的一些基本特征,比如类别型特征的多样性程度,数值型特征的离散程度等。
示例输出信息
python
# 目标变量列表
TARGETS = ['binds_BRD4', 'binds_HSA', 'binds_sEH']
定义目标变量列表。
python
# 指定数据类型的字典
dtypes = {
    'buildingblock1_smiles': np.int16,
    'buildingblock2_smiles': np.int16,
    'buildingblock3_smiles': np.int16,
    'binds_BRD4': np.byte,
    'binds_HSA': np.byte,
    'binds_sEH': np.byte
}
指定数据类型的字典,用于读取CSV文件时指定列的数据类型。
python
# 从CSV文件中读取训练数据,只使用指定列,并指定数据类型
train = pd.read_csv('/kaggle/input/leashbio-10m-data-sample/train_sample.csv', dtype=dtypes, usecols=[0, 1, 2, 4, 5, 6])
从CSV文件中读取训练数据,只使用指定的列,并指定数据类型。
python
# 打印训练数据的基本属性
print('Train Sample Properties')
fold_properties(train)
打印训练数据的基本属性。
python
# 加载稀疏矩阵train_ecfp
train_ecfp = sparse.load_npz("/kaggle/input/leashbio-10m-data-sample/train_ecfp.npz")
print('train_ecfp Shape :', train_ecfp.shape)加载稀疏矩阵train_ecfp并打印其形状。
python
# 获取训练数据中的唯一smiles列表
train_B1_unique = train.buildingblock1_smiles.unique().tolist()
train_B2_unique = train.buildingblock2_smiles.unique().tolist()
train_B3_unique = train.buildingblock3_smiles.unique().tolist()
train_unique_smiles = set(train_B1_unique + train_B2_unique + train_B3_unique)获取训练数据中每个块的唯一smiles列表并合并成一个集合。
python
# 使用VarianceThreshold进行特征选择,选择方差大于0.005的列
var_thresh = VarianceThreshold(threshold=0.005)
var_thresh.fit(train_ecfp[:100000].A)
var_thresh_index_1 = var_thresh.get_support()
train_ecfp_1 = train_ecfp[:, var_thresh_index_1]
print('train_ecfp Shape after Variance Threshold:', train_ecfp_1.shape)使用VarianceThreshold进行特征选择,选择方差大于0.005的列,并打印处理后的train_ecfp形状。
python
# K折交叉验证参数设置
folds = 5
skf = StratifiedKFold(n_splits=folds, shuffle=True, random_state=42)
设置K折交叉验证的参数。
python
# 模型训练参数设置
iterations = 5000
early_stopping_rounds = 100
verbose_eval = 100
python
xgb_models = []  # 存储训练好的XGBoost模型列表
valid_preds_score = []  # 存储验证集的预测分数列表

with strategy.scope():  # 在策略范围内进行模型训练
    for i, target in enumerate(TARGETS):
        print(f'training target {target}')
        fold_scores = []  # 存储每个折的分数
        for fold, (train_idx, valid_idx) in enumerate(skf.split(train, train[target])):
            print(f'Fold {fold+1}')
            X_tr, X_val = train_ecfp_1[train_idx, :], train_ecfp_1[valid_idx, :]
            y_tr, y_val = train[target].values[train_idx], train[target].values[valid_idx]

            xtrain = DMatrix(data=X_tr, label=y_tr)
            xvalid = DMatrix(data=X_val, label=y_val)

            scale_pos_weight = (len(y_tr) - y_tr.sum()) / y_tr.sum()  # 计算scale_pos_weight
            print('scale_pos_weight :', scale_pos_weight)

            xgb_params = {
                'objective': 'binary:logistic',  # 二分类逻辑回归
                'eval_metric': 'aucpr',  # 评估指标为AUC-PR
                'learning_rate': 0.1,  # 学习率
                "n_jobs": 12,  # 并行工作数
                "seed": 42,  # 随机种子
                'colsample_bytree': 0.8,  # 每棵树使用的特征列比例
                'scale_pos_weight': scale_pos_weight  # 正负样本权重比例
            }

            # 训练XGBoost模型
            XModel = xgb.train(xgb_params, xtrain,
                               evals=[(xvalid, 'validation')],
                               verbose_eval=verbose_eval,
                               early_stopping_rounds=early_stopping_rounds,
                               xgb_model=None,
                               num_boost_round=iterations)

            # 在验证集上进行预测,并计算平均精度分数(MAP)
            y_pred_proba = XModel.predict(xvalid)  # 预测正类的概率
            map_score = average_precision_score(y_val, y_pred_proba)  # 计算平均精度分数
            fold_scores.append(map_score)  # 将分数添加到列表中
            print(f"Mean Average Precision for Fold {fold+1} Valid {target}: {map_score:.2f}")

            xgb_models.append(XModel)  # 将训练好的模型添加到列表中

        mean_map_score = np.mean(fold_scores)
        print(f"Mean Average Precision for Valid {target} across all folds: {mean_map_score:.2f}")
        valid_preds_score.append(mean_map_score)  # 将平均分数添加到列表中
在策略范围内进行模型训练,使用5折交叉验证训练每个目标变量的XGBoost模型,并计算平均精度分数。
python
# 打印每个目标变量的平均MAP分数
print('binds_BRD4 :', valid_preds_score[0])
print('binds_HSA :', valid_preds_score[1])
print('binds_sEH :', valid_preds_score[2])
打印每个目标变量的平均MAP分数。
python
# 清理内存
del train, xtrain, X_tr, xvalid, X_val, y_tr, y_val, valid_preds_score
gc.collect()
清理内存,删除不再需要的变量,并进行垃圾回收。
python
# 创建用于存储预测结果的DataFrame
preds_cols = ['BRD4', 'HSA', 'sEH']
test = pd.read_parquet('/kaggle/input/leash-BELKA/test.parquet', engine='pyarrow')  # 读取测试集数据

blocks_dict = np.load('/kaggle/input/leashbio-10m-data-sample/blocks_dict.npy', allow_pickle=True)  # 加载blocks_dict
blocks_dict = blocks_dict.tolist()  # 转换为字典格式

# 将测试集中的smiles映射为对应的整数值并转换为uint16类型
test['buildingblock1_smiles'] = test['buildingblock1_smiles'].map(blocks_dict).values.astype('uint16')
test['buildingblock2_smiles'] = test['buildingblock2_smiles'].map(blocks_dict).values.astype('uint16')
test['buildingblock3_smiles'] = test['buildingblock3_smiles'].map(blocks_dict).values.astype('uint16')读取测试集数据,将smiles映射为对应的整数值,并转换为uint16类型。
python
# 创建用于存储预测结果的DataFrame
test_preds = pd.DataFrame(test['molecule_smiles'].unique(), columns=['molecule_smiles'])

# 复制并去重测试集的smiles列
test_preds = test[['molecule_smiles', 'buildingblock1_smiles', 'buildingblock2_smiles', 'buildingblock3_smiles']].copy().drop_duplicates()创建用于存储预测结果的DataFrame,并去重smiles
python
# 加载测试集的ECFP特征
test_ecfp = sparse.load_npz("/kaggle/input/leashbio-10m-data-sample/test_ecfp.npz")
test_ecfp_1 = test_ecfp[:, var_thresh_index_1]
print('test_ecfp Shape after Variance Threshold:', test_ecfp_1.shape)
加载测试集的ECFP特征,并应用方差阈值处理。
python
# 获取测试集中的唯一smiles列表
test_B1_unique = test_preds.buildingblock1_smiles.unique().tolist()
test_B2_unique = test_preds.buildingblock2_smiles.unique().tolist()
test_B3_unique = test_preds.buildingblock3_smiles.unique().tolist()
test_unique_smiles = set(test_B1_unique + test_B2_unique + test_B3_unique)获取测试集中的唯一smiles列表。
python
# 初始化预测结果列为0
test_preds[preds_cols] = np.zeros((len(test_preds), 3))

print('Shape Test :', test.shape)
test_no_overlap = [bb for bb in test_unique_smiles if bb not in train_unique_smiles]
train_no_overlap = [bb for bb in train_unique_smiles if bb not in test_unique_smiles]
print('Test Block Unique :', len(test_unique_smiles))
print('Train Block Unique :', len(train_unique_smiles))
print('Test Block not in train :', len(test_no_overlap))
print('Train Block not in test :', len(train_no_overlap))初始化预测结果列为0,并打印测试集的形状和唯一smiles数量及其重叠情况。
python
# 针对每个目标变量进行预测
for i, target in enumerate(TARGETS):
    test_target = target.split('_')[1]
test_preds[test_target] = xgb_models[i].predict(DMatrix(data=test_ecfp_1))使用训练好的XGBoost模型进行预测,并将结果存储在test_preds中。
python
# 创建预测结果DataFrame,分别存储每个目标变量的预测结果
test_BRD4 = test_preds[['molecule_smiles', 'BRD4']].copy()
test_BRD4['protein_name'] = 'BRD4'
test_BRD4 = test_BRD4.rename(columns={"BRD4": "binds_1"})

test_HSA = test_preds[['molecule_smiles', 'HSA']].copy()
test_HSA['protein_name'] = 'HSA'
test_HSA = test_HSA.rename(columns={"HSA": "binds_1"})

test_sEH = test_preds[['molecule_smiles', 'sEH']].copy()
test_sEH['protein_name'] = 'sEH'
test_sEH = test_sEH.rename(columns={"sEH": "binds_1"})
创建预测结果DataFrame,分别存储每个目标变量的预测结果。
python
# 合并三个目标变量的预测结果
test_preds_1 = pd.concat([test_BRD4, test_HSA, test_sEH])

# 将预测结果与原始测试集合并,保留'molecule_smiles'和'protein_name'列,并按左连接方式合并
test = pd.merge(test, test_preds_1, on=['molecule_smiles', 'protein_name'], how='left')
合并三个目标变量的预测结果,并与原始测试集合并。
python
# 读取示例提交文件,用预测结果替换绑定概率列,并保存为CSV文件
sample_submission = pd.read_csv("/kaggle/input/leash-BELKA/sample_submission.csv")
sample_submission['binds'] = test['binds_1']
sample_submission.to_csv('submission.csv', index=False)
sample_submission.head()
读取示例提交文件,用预测结果替换绑定概率列,并保存为CSV文件。
python
# 打印预测结果的统计信息:最大值、最小值、平均值
print(sample_submission.binds.max())
print(sample_submission.binds.min())
print(sample_submission.binds.mean())
打印预测结果的统计信息:最大值、最小值、平均值。