LogicFlow 进阶 节点(Node)
连线规则
在某些时候,我们可能需要控制边的连接方式,比如开始节点不能被其他节点连接、结束节点不能连接其他节点、用户节点后面必须是判断节点等,想要达到这种效果,我们需要为节点设置以下两个属性。
sourceRules- 当节点作为边的起始节点(source)时的校验规则targetRules- 当节点作为边的目标节点(target)时的校验规则
以正方形(square)为例,在边时我们希望它的下一节点只能是圆形节点(circle),那么我们应该给square添加作为source节点的校验规则。
typescript
import { RectNode, RectNodeModel } from '@logicflow/core';
class SquareModel extends RectNodeModel {
  initNodeData(data) {
    super.initNodeData(data);

    const circleOnlyAsTarget = {
      message: "正方形节点下一个节点只能是圆形节点",
      validate: (sourceNode, targetNode, sourceAnchor, targetAnchor) => {
        return targetNode.type === "circle";
      },
    };
    this.sourceRules.push(circleOnlyAsTarget);
  }
}在上例中,我们为model的sourceRules属性添加了一条校验规则,校验规则是一个对象,我们需要为其提供message和validate属性。
message属性是当不满足校验规则时所抛出的错误信息,validate则是传入规则的校验的回调函数。validate方法有两个参数,分别为边的起始节点(source)和目标节点(target),我们可以根据参数信息来决定是否通过校验,其返回值是一个布尔值。
提示
当我们在面板上进行边操作的时候,LogicFlow会校验每一条规则,只有全部通过后才能连接。
在边时,当鼠标松开后如果没有通过自定义规则(
validate方法返回值为false),LogicFlow会对外抛出事件connection:not-allowed
typescript
lf.on('connection:not-allowed', (msg) => {
	console.log(msg)
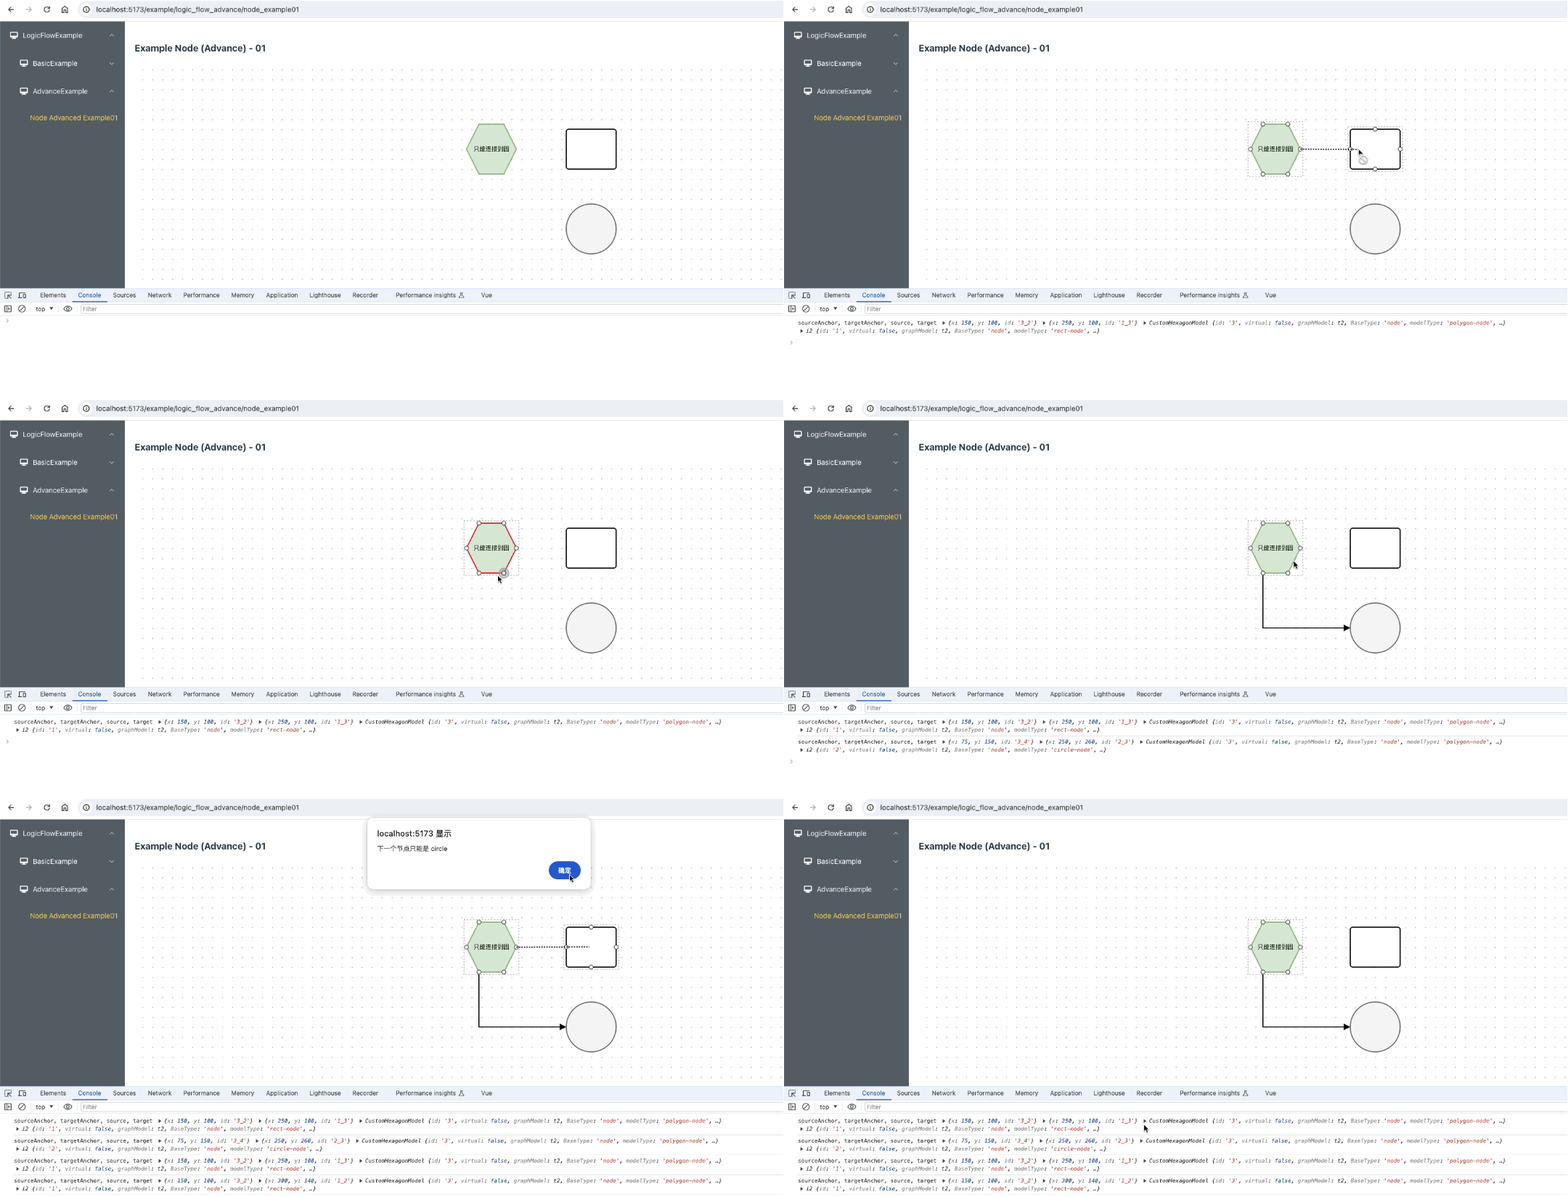
})下面举个例子,通过设置不同状态下节点的样式 来展示连接状态
在节点model中,有个state属性,当节点连接规则校验不通过时,state属性值为5。我们可以通过这个属性来实现连线是节点的提示效果。
新建src/views/Example/LogicFlowAdvance/NodeExample/Component/HexagonNode/index.ts代码如下:
typescript
import { ConnectRule, PointTuple, PolygonNode, PolygonNodeModel } from '@logicflow/core'

class CustomHexagonModel extends PolygonNodeModel {
  setAttributes(): void {
    const width = 100
    const height = 100
    const x = 50
    const y = 50
    // 计算六边形,中心点为 [50, 50],宽高均为 100
    const pointsList: PointTuple[] = [
      [x - 0.25 * width, y - 0.5 * height],
      [x + 0.25 * width, y - 0.5 * height],
      [x + 0.5 * width, y],
      [x + 0.25 * width, y + 0.5 * height],
      [x - 0.25 * width, y + 0.5 * height],
      [x - 0.5 * width, y]
    ]
    this.points = pointsList
  }

  getConnectedSourceRules(): ConnectRule[] {
    const rules = super.getConnectedSourceRules()
    const geteWayOnlyAsTarget = {
      message: '下一个节点只能是 circle',
      validate: (source: any, target: any, sourceAnchor: any, targetAnchor: any) => {
        console.log(
          'sourceAnchor, targetAnchor, source, target',
          sourceAnchor,
          targetAnchor,
          source,
          target
        )
        return target.type === 'circle'
      }
    }
    rules.push(geteWayOnlyAsTarget)
    return rules
  }

  getNodeStyle(): {
    [x: string]: any
    fill?: string | undefined
    stroke?: string | undefined
    strokeWidth?: number | undefined
  } {
    const style = super.getNodeStyle()
    if (this.properties.isSelected) {
      style.fill = 'red'
    }
    if (this.isHovered) {
      style.stroke = 'red'
    }
    // 如果此节点不允许被连接,节点变红
    if (this.state === 5) {
      style.fill = 'red'
    }
    if (this.state === 4) {
      style.fill = 'green'
    }
    return style
  }
}

export default {
  type: 'HexagonNode',
  view: PolygonNode,
  model: CustomHexagonModel
}之后新建src/views/Example/LogicFlowAdvance/NodeExample/Example01.vue代码如下:
html
<script setup lang="ts">
import LogicFlow, { Definition } from '@logicflow/core'
import { onMounted } from 'vue'
import HexagonNode from './Component/HexagonNode'
import '@logicflow/core/dist/style/index.css'

const data = {
  nodes: [
    {
      id: '1',
      type: 'rect',
      x: 300,
      y: 100
    },
    {
      id: '2',
      type: 'circle',
      x: 300,
      y: 250
    },
    {
      id: '3',
      type: 'HexagonNode',
      x: 100,
      y: 100,
      text: '只能连接到圆'
    }
  ],
  edges: []
}

const SilentConfig = {
  stopScrollGraph: true,
  stopMoveGraph: true,
  stopZoomGraph: true
}

const styleConfig: Partial<Definition> = {
  style: {
    rect: {
      rx: 5,
      ry: 5,
      strokeWidth: 2
    },
    circle: {
      fill: '#f5f5f5',
      stroke: '#666'
    },
    ellipse: {
      fill: '#dae8fc',
      stroke: '#6c8ebf'
    },
    polygon: {
      fill: '#d5e8d4',
      stroke: '#82b366'
    },
    diamond: {
      fill: '#ffe6cc',
      stroke: '#d79b00'
    },
    text: {
      color: '#b85450',
      fontSize: 12
    }
  }
}

onMounted(() => {
  const lf = new LogicFlow({
    container: document.getElementById('container')!,
    grid: true,
    ...SilentConfig,
    ...styleConfig
  })
  lf.register(HexagonNode)
  lf.setTheme({
    nodeText: {
      color: '#000000',
      overflowMode: 'ellipsis',
      lineHeight: 1.2,
      fontSize: 12
    }
  })
  lf.render(data)
  lf.translateCenter()
  lf.on('connection:not-allowed', (error) => {
    alert(error.msg)
  })
})
</script>
<template>
  <h3>Example Node (Advance) - 01</h3>
  <div id="container"></div>
</template>
<style>
#container {
  /* 定义容器的宽度和高度 */
  width: 100%;
  height: 500px;
}
</style>
运行后效果如下:

移动
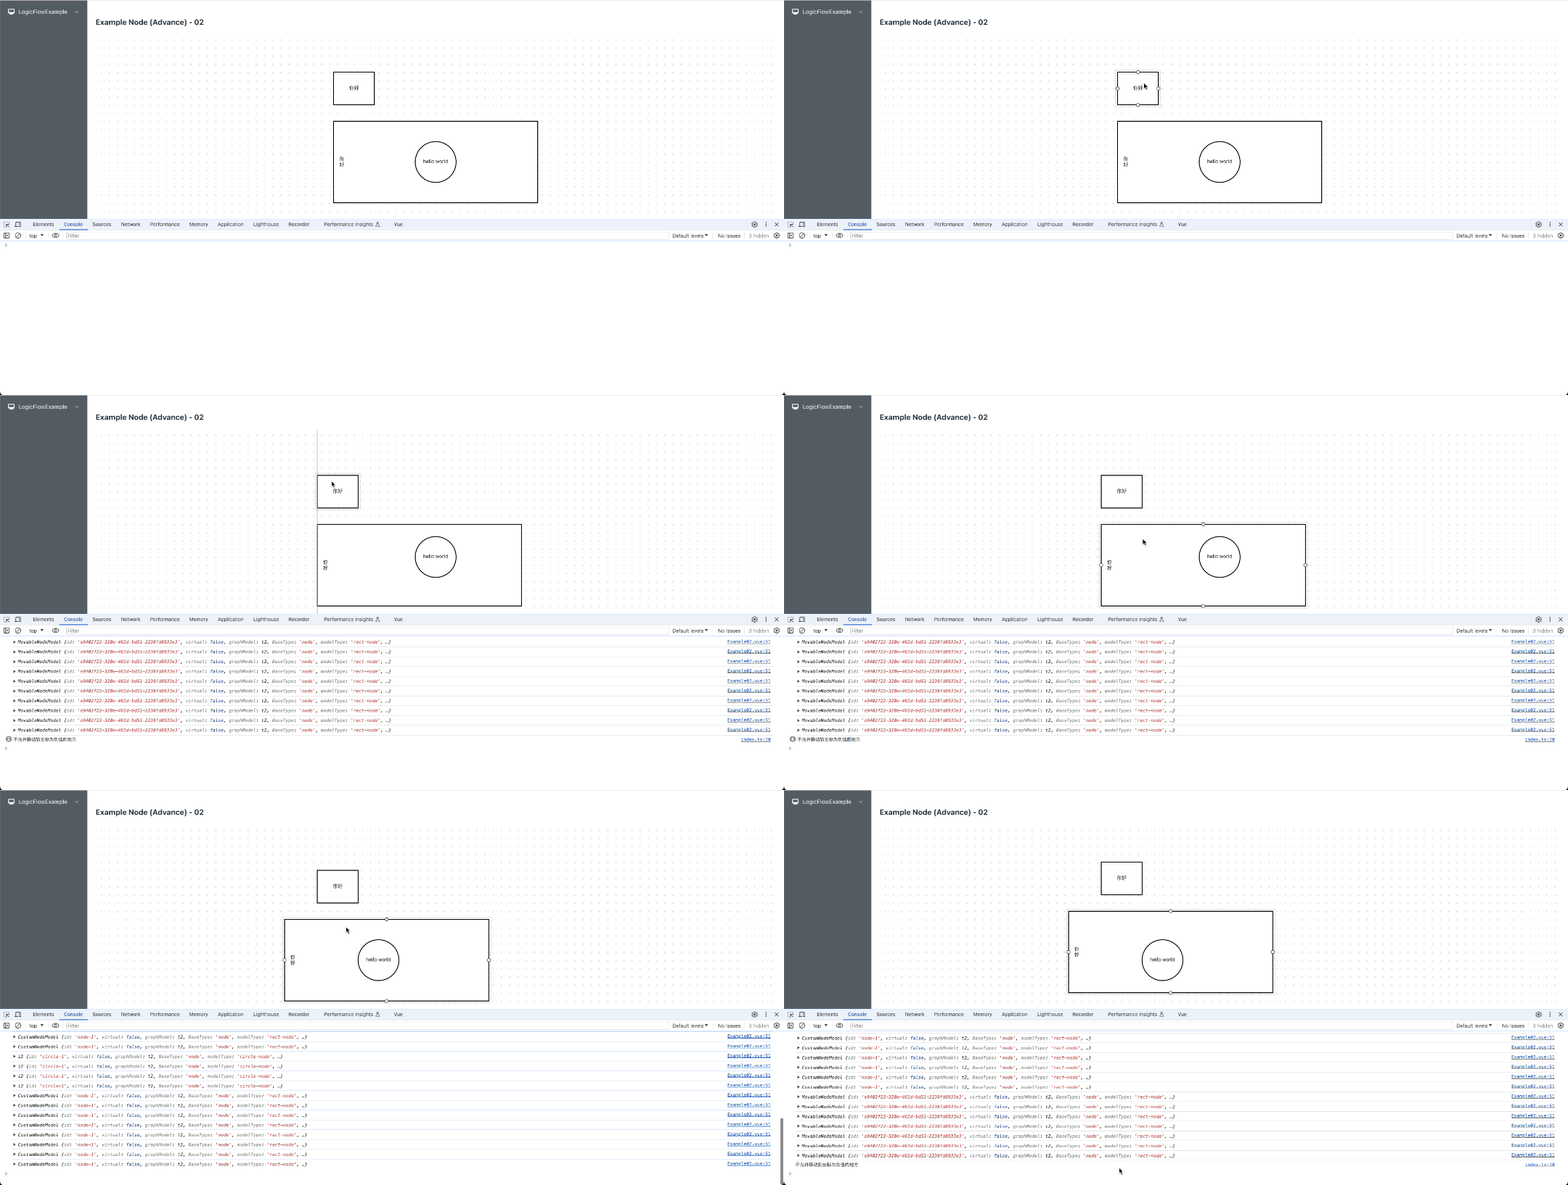
有些时候,我们需要更加细粒度的控制节点什么时候可以移动,什么时候不可以移动,比如在实现分组插件时,需要控制分组节点子节点不允许移动出分组。和连线规则类似,我们可以给节点的moveRules添加规则函数。
typescript
class MovableNodeModel extends RectNodeModel {
  initNodeData(data) {
    super.initNodeData(data);
    this.moveRules.push((model, deltaX, deltaY) => {
      // 需要处理的内容
    });
  }
}
在 graphModel中支持添加全局移动规则,例如在移动A节点的时候,期望把B节点也一起移动了。
typescript
lf.graphModel.addNodeMoveRules((model, deltaX, deltaY) => {
  // 如果移动的是分组,那么分组的子节点也跟着移动。
  if (model.isGroup && model.children) {
    lf.graphModel.moveNodes(model.children, deltaX, deltaY, true);
  }
  return true;
});新建src/views/Example/LogicFlowAdvance/NodeExample/Component/CustomNode/index.ts代码如下:
typescript
import { RectNode, RectNodeModel } from '@logicflow/core'
class CustomNode extends RectNode {
  // 禁止节点点击后被显示到所有元素前面
  toFront() {
    return false
  }
}

class CustomNodeModel extends RectNodeModel {
  initNodeData(data: any) {
    if (!data.text || typeof data.text === 'string') {
      data.text = {
        value: data.text || '',
        x: data.x - 230,
        y: data.y
      }
    }
    super.initNodeData(data)
    this.width = 500
    this.height = 200
    this.isGroup = true
    this.zIndex = -1
    this.children = data.children
  }
  getTextStyle() {
    const style = super.getTextStyle()
    style.overflowMode = 'autoWrap'
    style.width = 15
    return style
  }
}

export default {
  type: 'custom-node',
  view: CustomNode,
  model: CustomNodeModel
}新建src/views/Example/LogicFlowAdvance/NodeExample/Component/MovableNode/index.ts,代码如下:
typescript
import { RectNode, RectNodeModel } from '@logicflow/core'
class MovableNode extends RectNode {}

class MovableNodeModel extends RectNodeModel {
  initNodeData(data: any) {
    super.initNodeData(data)
    this.moveRules.push((model, deltaX, deltaY) => {
      // 不允许移动到坐标为负值的地方
      if (model.x + deltaX - this.width / 2 < 0 || model.y + deltaY - this.height / 2 < 0) {
        return false
      }
      return true
    })
    console.log(data)
    this.children = data.children
    if (this.children) {
      this.isGroup = true
    }
  }
}

export default {
  type: 'movable-node',
  view: MovableNode,
  model: MovableNodeModel
}新建src/views/Example/LogicFlowAdvance/NodeExample/Example02.vue代码如下:
html
<script setup lang="ts">
import LogicFlow from '@logicflow/core'
import { onMounted } from 'vue'
import '@logicflow/core/dist/style/index.css'
import CustomNode from './Component/CustomNode'
import MovableNode from './Component/MovableNode'

const data = {
  nodes: [
    {
      id: 'node-1',
      type: 'custom-node',
      x: 300,
      y: 250,
      text: '你好',
      children: ['circle-1']
    },
    {
      type: 'movable-node',
      x: 100,
      y: 70,
      text: '你好',
      children: ['node-1']
    },
    {
      id: 'circle-1',
      type: 'circle',
      x: 300,
      y: 250,
      text: 'hello world'
    }
  ],
  edges: []
}

const SilentConfig = {
  stopScrollGraph: true,
  stopMoveGraph: true,
  stopZoomGraph: true
}

onMounted(() => {
  const lf = new LogicFlow({
    container: document.getElementById('container')!,
    grid: true,
    ...SilentConfig
  })
  lf.register(CustomNode)
  lf.register(MovableNode)
  lf.graphModel.addNodeMoveRules((model, deltaX, deltaY) => {
    console.log(model)
    if (model.isGroup && model.children) {
      // 如果移动的是分组,那么分组的子节点也跟着移动。
      lf.graphModel.moveNodes(model.children, deltaX, deltaY, true)
    }
    return true
  })
  lf.render(data)
  lf.translateCenter()
})
</script>
<template>
  <h3>Example Node (Advance) - 02</h3>
  <div id="container"></div>
</template>
<style>
#container {
  /* 定义容器的宽度和高度 */
  width: 100%;
  height: 500px;
}
</style>
运行后效果如下:

锚点
对于各种基础类型节点,LogicFlow都内置了默认锚点。LogicFlow支持通过重写获取锚点的方法来实现自定义节点的锚点。
新建src/views/Example/LogicFlowAdvance/NodeExample/Component/SqlEdge/index.ts代码如下:
typescript
import { PolylineEdge, PolylineEdgeModel } from '@logicflow/core'

// 自定义边模型类,继承自 BezierEdgeModel
class CustomEdgeModel2 extends PolylineEdgeModel {
  /**
   * 重写 getEdgeStyle 方法,定义边的样式
   */
  getEdgeStyle() {
    const style = super.getEdgeStyle() // 调用父类方法获取默认的边样式
    style.strokeWidth = 1 // 设置边的线条宽度为1
    style.stroke = '#ababac' // 设置边的颜色为淡灰色
    return style // 返回自定义的边样式
  }

  /**
   * 重写 getData 方法,增加锚点数据的保存
   */
  getData() {
    const data: any = super.getData() // 调用父类方法获取默认的边数据
    // 添加锚点ID到数据中,以便保存和后续使用
    data.sourceAnchorId = this.sourceAnchorId // 保存源锚点ID
    data.targetAnchorId = this.targetAnchorId // 保存目标锚点ID
    return data // 返回包含锚点信息的边数据
  }

  /**
   * 自定义方法,基于锚点的位置更新边的路径
   */
  updatePathByAnchor() {
    // 获取源节点模型
    const sourceNodeModel = this.graphModel.getNodeModelById(this.sourceNodeId)
    // 从源节点的默认锚点中查找指定的锚点
    const sourceAnchor = sourceNodeModel
      .getDefaultAnchor()
      .find((anchor) => anchor.id === this.sourceAnchorId)

    // 获取目标节点模型
    const targetNodeModel = this.graphModel.getNodeModelById(this.targetNodeId)
    // 从目标节点的默认锚点中查找指定的锚点
    const targetAnchor = targetNodeModel
      .getDefaultAnchor()
      .find((anchor) => anchor.id === this.targetAnchorId)

    // 如果找到源锚点,则更新边的起始点
    if (sourceAnchor) {
      const startPoint = {
        x: sourceAnchor.x,
        y: sourceAnchor.y
      }
      this.updateStartPoint(startPoint)
    }

    // 如果找到目标锚点,则更新边的终点
    if (targetAnchor) {
      const endPoint = {
        x: targetAnchor.x,
        y: targetAnchor.y
      }
      this.updateEndPoint(endPoint)
    }

    // 清空当前边的控制点列表,以便贝塞尔曲线重新计算控制点
    this.pointsList = []
    this.initPoints()
  }
}

// 导出自定义边配置
export default {
  type: 'sql-edge', // 自定义边的类型标识
  view: PolylineEdge, // 使用贝塞尔曲线边的视图
  model: CustomEdgeModel2 // 使用自定义的边模型
}新建src/views/Example/LogicFlowAdvance/NodeExample/Component/SqlNode/index.ts代码如下:
typescript
import { h, HtmlNode, HtmlNodeModel } from '@logicflow/core'

class SqlNode extends HtmlNode {
  /**
   * 1.1.7 版本后支持在 view 中重写锚点形状
   */
  getAnchorShape(anchorData: any) {
    const { x, y, type } = anchorData
    return h('rect', {
      x: x - 5,
      y: y - 5,
      width: 10,
      height: 10,
      className: `custom-anchor ${type === 'left' ? 'incomming-anchor' : 'outgoing-anchor'}`
    })
  }

  setHtml(rootEl: HTMLElement): void {
    rootEl.innerHTML = ''
    const {
      properties: { fields, tableName }
    } = this.props.model
    rootEl.setAttribute('class', 'table-container')
    const container = document.createElement('div')
    container.className = `table-node table-color-${Math.ceil(Math.random() * 4)}`
    const tableNameElement = document.createElement('div')
    tableNameElement.innerHTML = tableName
    tableNameElement.className = 'table-name'
    container.appendChild(tableNameElement)
    const fragment = document.createDocumentFragment()
    for (let i = 0; i < fields.length; i++) {
      const item = fields[i]
      const fieldElement = document.createElement('div')
      fieldElement.className = 'table-feild'
      const itemKey = document.createElement('span')
      itemKey.innerText = item.key
      const itemType = document.createElement('span')
      itemType.innerText = item.type
      itemType.className = 'feild-type'
      fieldElement.appendChild(itemKey)
      fieldElement.appendChild(itemType)
      fragment.appendChild(fieldElement)
    }
    container.appendChild(fragment)
    rootEl.appendChild(container)
  }
}

class SqlNodeModel extends HtmlNodeModel {
  /**
   * 给 model 自定义添加字段方法
   */
  addField(item: any) {
    this.properties.fields.unshift(item)
    this.setAttributes()
    // 为了保持节点顶部位置不变,在节点变化后,对节点进行一个位移,位移距离为添加高度的一半
    this.move(0, 24 / 2)
    // 更新节点连接边的 path
    this.incoming.edges.forEach((egde) => {
      // 调用自定义的更新方案
      egde.updatePathByAnchor()
    })
    this.outgoing.edges.forEach((edge) => {
      // 调用自定义的更新方案
      edge.updatePathByAnchor()
    })
  }

  getOutlineStyle() {
    const style = super.getOutlineStyle()
    style.stroke = 'none'
    if (style.hover) {
      style.hover.stroke = 'none'
    }
    return style
  }

  // 如果不用修改锚的形状,可以重写颜色相关样式
  getAnchorStyle(anchorInfo: any) {
    const style = super.getAnchorStyle(anchorInfo)
    if (anchorInfo.type === 'left') {
      style.fill = 'red'
      style.hover.fill = 'transparent'
      style.hover.stroke = 'transpanrent'
      style.className = 'lf-hide-default'
    } else {
      style.fill = 'green'
    }
    return style
  }

  setAttributes() {
    this.width = 200
    const {
      properties: { fields }
    } = this
    this.height = 60 + fields.length * 24
    const circleOnlyAsTarget = {
      message: '只允许从右边的锚点连出',
      validate: (_sourceNode: any, _targetNode: any, sourceAnchor: any) => {
        return sourceAnchor.type === 'right'
      }
    }
    this.sourceRules.push(circleOnlyAsTarget)
    this.targetRules.push({
      message: '只允许连接左边的锚点',
      validate: (_sourceNode, _targetNode, _sourceAnchor, targetAnchor: any) => {
        return targetAnchor.type === 'left'
      }
    })
  }

  getDefaultAnchor() {
    const {
      id,
      x,
      y,
      width,
      height,
      isHovered,
      isSelected,
      properties: { fields, isConnection }
    } = this
    const anchors: any[] = []
    fields.forEach((feild: any, index: any) => {
      // 如果是连出,就不显示左边的锚点
      if (isConnection || !(isHovered || isSelected)) {
        anchors.push({
          x: x - width / 2 + 10,
          y: y - height / 2 + 60 + index * 24,
          id: `${id}_${feild.key}_left`,
          edgeAddable: false,
          type: 'left'
        })
      }
      if (!isConnection) {
        anchors.push({
          x: x + width / 2 - 10,
          y: y - height / 2 + 60 + index * 24,
          id: `${id}_${feild.key}_right`,
          type: 'right'
        })
      }
    })
    return anchors
  }
}

export default {
  type: 'sql-node',
  model: SqlNodeModel,
  view: SqlNode
}
新建 src/views/Example/LogicFlowAdvance/NodeExample/Example03.vue 代码如下:
html
<script setup lang="ts">
import LogicFlow from '@logicflow/core'
import { onMounted, ref } from 'vue'
import '@logicflow/core/dist/style/index.css'
import SqlEdge from './Component/SqlEdge'
import SqlNode from './Component/SqlNode'
import { ElButton } from 'element-plus'

const data = {
  nodes: [
    {
      id: 'node_id_1',
      type: 'sql-node',
      x: 100,
      y: 100,
      properties: {
        tableName: 'Users',
        fields: [
          {
            key: 'id',
            type: 'string'
          },
          {
            key: 'name',
            type: 'string'
          },
          {
            key: 'age',
            type: 'integer'
          }
        ]
      }
    },
    {
      id: 'node_id_2',
      type: 'sql-node',
      x: 400,
      y: 200,
      properties: {
        tableName: 'Settings',
        fields: [
          {
            key: 'id',
            type: 'string'
          },
          {
            key: 'key',
            type: 'integer'
          },
          {
            key: 'value',
            type: 'string'
          }
        ]
      }
    }
  ],
  edges: []
}

const SilentConfig = {
  stopScrollGraph: true,
  stopMoveGraph: true,
  stopZoomGraph: true
}

const lfRef = ref<LogicFlow>()

onMounted(() => {
  const lf = new LogicFlow({
    container: document.getElementById('container')!,
    grid: true,
    ...SilentConfig
  })
  lf.register(SqlEdge)
  lf.register(SqlNode)
  lf.setDefaultEdgeType('sql-edge')
  lf.setTheme({
    bezier: {
      stroke: '#afafaf',
      strokeWidth: 1
    }
  })
  lf.render(data)
  lf.translateCenter()

  // 1.1.28新增,可以自定义锚点显示时机了
  lf.on('anchor:dragstart', ({ data, nodeModel }) => {
    console.log('dragstart', data)
    if (nodeModel.type === 'sql-node') {
      lf.graphModel.nodes.forEach((node) => {
        if (node.type === 'sql-node' && nodeModel.id !== node.id) {
          node.isShowAnchor = true
          node.setProperties({
            isConnection: true
          })
        }
      })
    }
  })

  lf.on('anchor:dragend', ({ data, nodeModel }) => {
    console.log('dragend', data)
    if (nodeModel.type === 'sql-node') {
      lf.graphModel.nodes.forEach((node) => {
        if (node.type === 'sql-node' && nodeModel.id !== node.id) {
          node.isShowAnchor = false
          lf.deleteProperty(node.id, 'isConnection')
        }
      })
    }
  })

  lfRef.value = lf
})

const addField = () => {
  lfRef.value?.getNodeModelById('node_id_1').addField({
    key: Math.random().toString(36).substring(2, 7),
    type: ['integer', 'long', 'string', 'boolean'][Math.floor(Math.random() * 4)]
  })
}
</script>
<template>
  <h3>Example Node (Advance) - 02</h3>
  <ElButton @click="addField()" style="margin-bottom: 10px">Add Field</ElButton>
  <div id="container" class="sql"></div>
</template>
<style>
#container {
  /* 定义容器的宽度和高度 */
  width: 100%;
  height: 500px;
}
.sql {
  .table-container {
    box-sizing: border-box;
    padding: 10px;
  }

  .table-node {
    width: 100%;
    height: 100%;
    overflow: hidden;
    background: #fff;
    border-radius: 4px;
    box-shadow: 0 1px 3px rgb(0 0 0 / 30%);
  }

  .table-node::before {
    display: block;
    width: 100%;
    height: 8px;
    background: #d79b00;
    content: '';
  }

  .table-node.table-color-1::before {
    background: #9673a6;
  }

  .table-node.table-color-2::before {
    background: #dae8fc;
  }

  .table-node.table-color-3::before {
    background: #82b366;
  }

  .table-node.table-color-4::before {
    background: #f8cecc;
  }

  .table-name {
    height: 28px;
    font-size: 14px;
    line-height: 28px;
    text-align: center;
    background: #f5f5f5;
  }

  .table-feild {
    display: flex;
    justify-content: space-between;
    height: 24px;
    padding: 0 10px;
    font-size: 12px;
    line-height: 24px;
  }

  .feild-type {
    color: #9f9c9f;
  }
  /* 自定义锚点样式 */
  .custom-anchor {
    cursor: crosshair;
    fill: #d9d9d9;
    stroke: #999;
    stroke-width: 1;
    /* rx: 3; */
    /* ry: 3; */
  }

  .custom-anchor:hover {
    fill: #ff7f0e;
    stroke: #ff7f0e;
  }

  .lf-node-not-allow .custom-anchor:hover {
    cursor: not-allowed;
    fill: #d9d9d9;
    stroke: #999;
  }

  .incomming-anchor {
    stroke: #d79b00;
  }

  .outgoing-anchor {
    stroke: #82b366;
  }
}
</style>
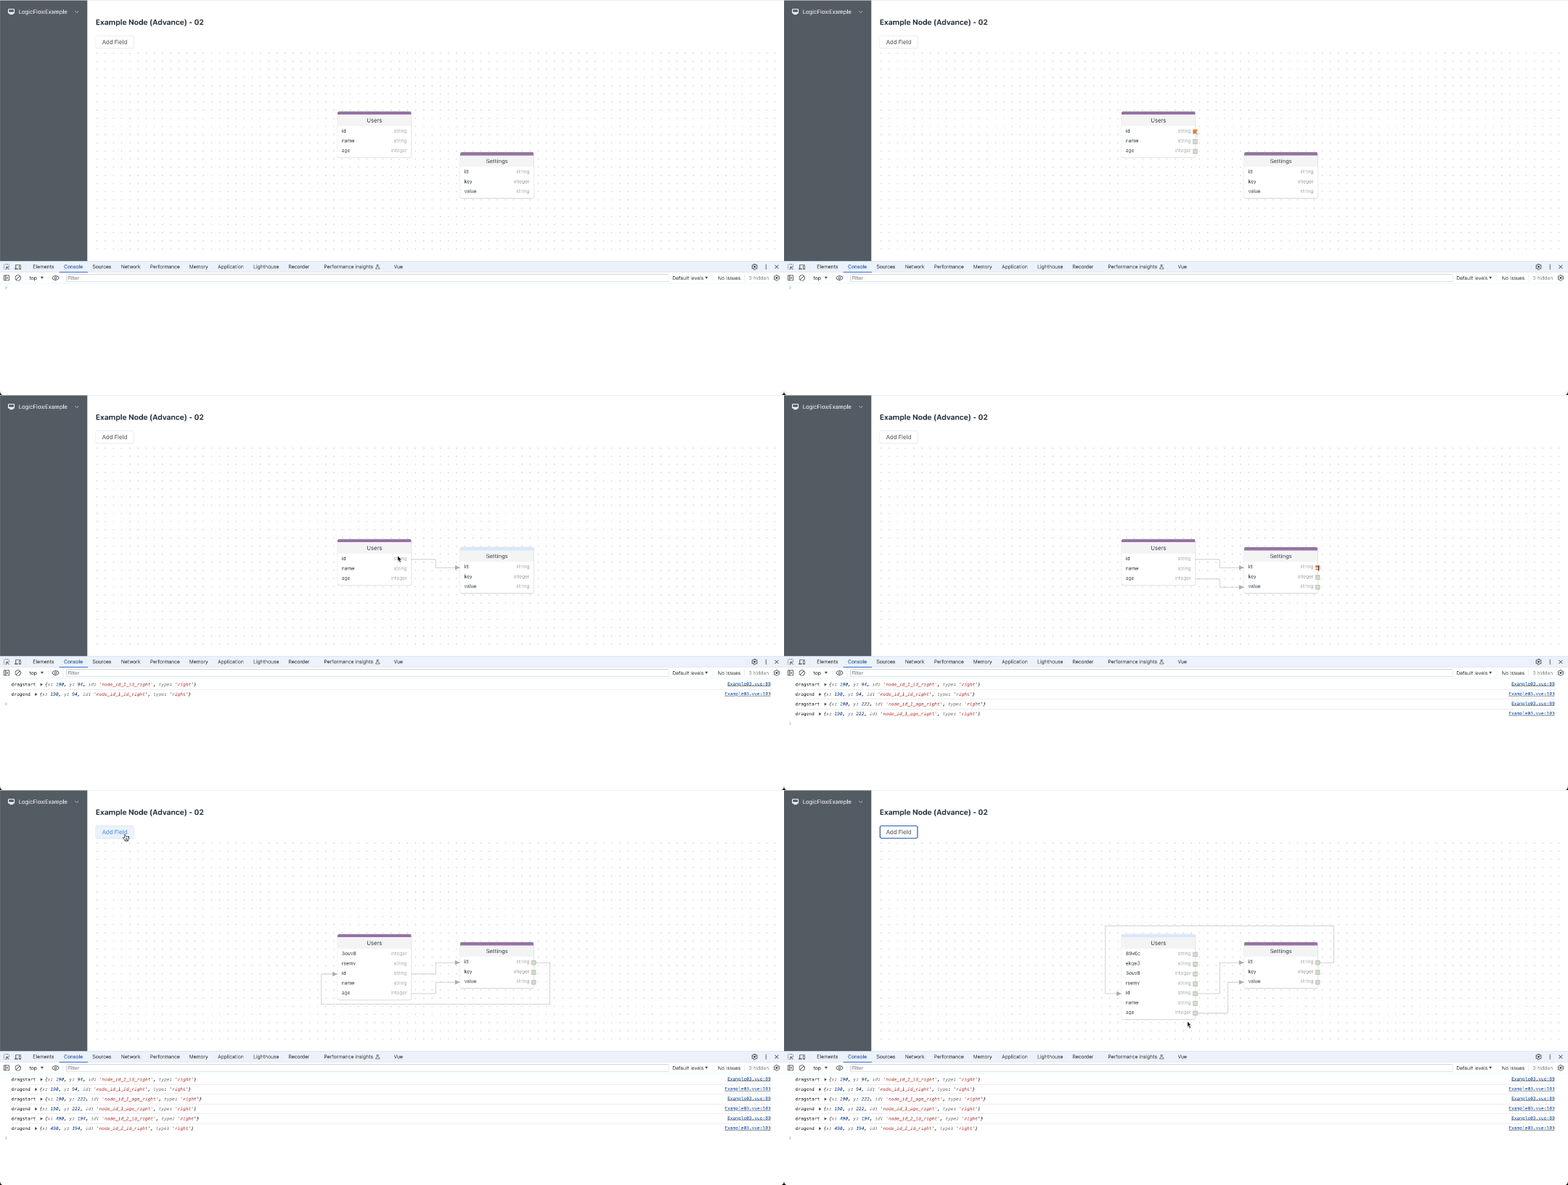
启动后效果如下:

上面的示例中,我们自定义锚点的时候,不仅可以定义锚点的数量和位置,还可以给锚点加上任意属性。有了这些属性,我们可以再做很多额外的事情。例如,我们增加一个校验规则,只允许节点从右边连出,从左边连入;或者加个id,在获取数据的时候保存当前连线从哪个锚点连接到哪个锚点。
注意
一定要确保锚点id唯一,否则可能会出现在连线规则校验不准确的问题。在实际开发中,存在隐藏锚点的需求,可以参考 github issue 如何隐藏锚点?
更新
HTML 节点目前通过修改 properties 触发节点更新
typescript
 /**
  * @overridable 支持重写
  * 和react的shouldComponentUpdate类似,都是为了避免出发不必要的render.
  * 但是这里不一样的地方在于,setHtml方法,我们只在properties发生变化了后再触发。
  * 而x,y等这些坐标相关的方法发生了变化,不会再重新触发setHtml.
  */
 shouldUpdate() {
   if (this.preProperties && this.preProperties === this.currentProperties) return;
   this.preProperties = this.currentProperties;
   return true;
 }
 componentDidMount() {
   if (this.shouldUpdate()) {
     this.setHtml(this.rootEl);
   }
 }
 componentDidUpdate() {
   if (this.shouldUpdate()) {
     this.setHtml(this.rootEl);
   }
 }
如果期望其他内容的修改可以触发节点更新,可以重写shouldUpdate(相关issue: #1208)
typescript
shouldUpdate() {
  if (this.preProperties &&
   this.preProperties === this.currentProperties &&
   this.preText === this.props.model.text.value
 ) return;
  this.preProperties = this.currentProperties;
  this.preText = this.props.model.text.value
  return true;
}