Arduino - LED 矩阵
LED matrix display, also known as LED display, or dot matrix display, are wide-used. In this tutorial, we are going to learn:
LED矩阵显示器,也称为LED显示器,或点阵显示器,应用广泛。在本教程中,我们将学习:
- LED matrix LED矩阵
- How to connect Arduino to 8x8 LED matrix
如何将Arduino连接到8x8 LED矩阵 - How to connect Arduino to 32x8 LED matrix
如何将Arduino连接到32x8 LED矩阵 - How to connect Arduino to display text, numbers, and animated effects on the LED matrix.
如何连接Arduino以在LED矩阵上显示文本,数字和动画效果。
After that, you can easily adapt the code for other LED matrices such as 16x8 LED matrix, 64x8 LEd matrix ...
之后,您可以轻松地将代码调整为其他 LED 矩阵,例如 16x8 LED 矩阵、64x8 LEd 矩阵...
About LED Matrix 关于LED Matrix
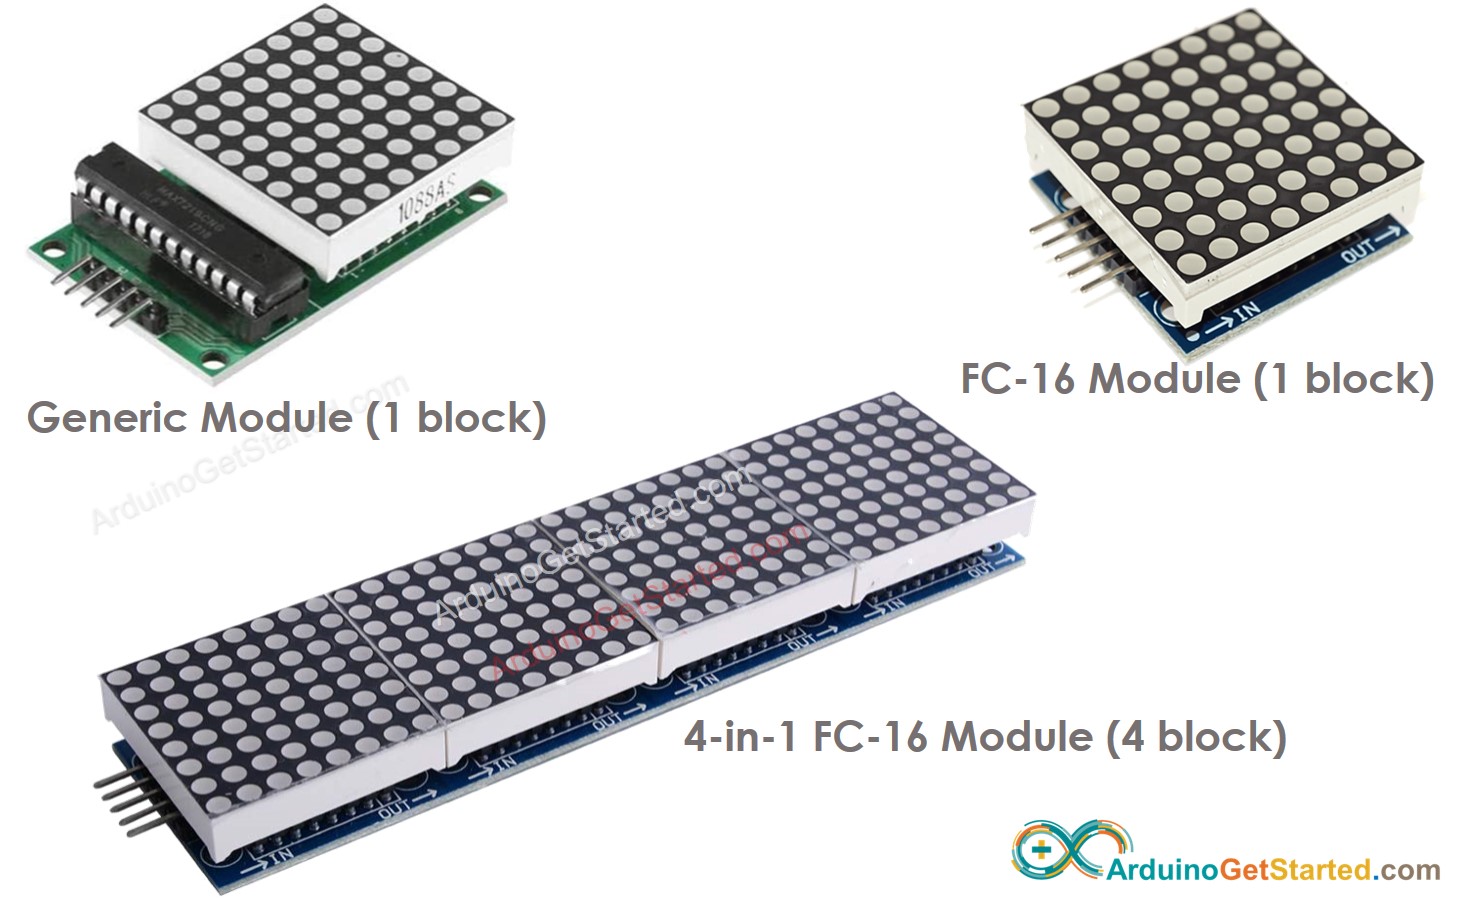
There are many kinds of LED Matrix. With Arduino, the MAX7219-based LED matrix is widely used. MAX7219-based LED matrix has the following features:
LED矩阵有很多种。在Arduino中,基于MAX7219的LED矩阵被广泛使用。基于MAX7219的LED矩阵具有以下特点:
- A base unit of an LED matrix is a block
LED 矩阵的基本单元是一个块 - Each block has an 8x8 LED matrix (64 LED) and a MAX7219 driver.
每个模块都有一个 8x8 LED 矩阵 (64 LED) 和一个MAX7219驱动器。 - There are two popular block forms: the generic module and the FC-16 module.
有两种流行的块形式:通用模块和 FC-16 模块。 - A LED matrix can be composed of a single block or multiple blocks in a daisy-chain
LED矩阵可以由菊花链中的单个块或多个块组成 - You can buy a pre-built multiple-block LED Matrix (e.g. 4-in-1, 8-in-1)
您可以购买预制的多块 LED 矩阵(例如 4 合 1、8 合 1) - You can also buy multiple blocks and wire them to form a LED matrix with the desired size.
您还可以购买多个块并将它们连接起来以形成具有所需尺寸的 LED 矩阵。 - You will declare the size of the LED matrix you use in the Arduino code.
您将声明在Arduino代码中使用的LED矩阵的大小。
Pinout 引脚排列
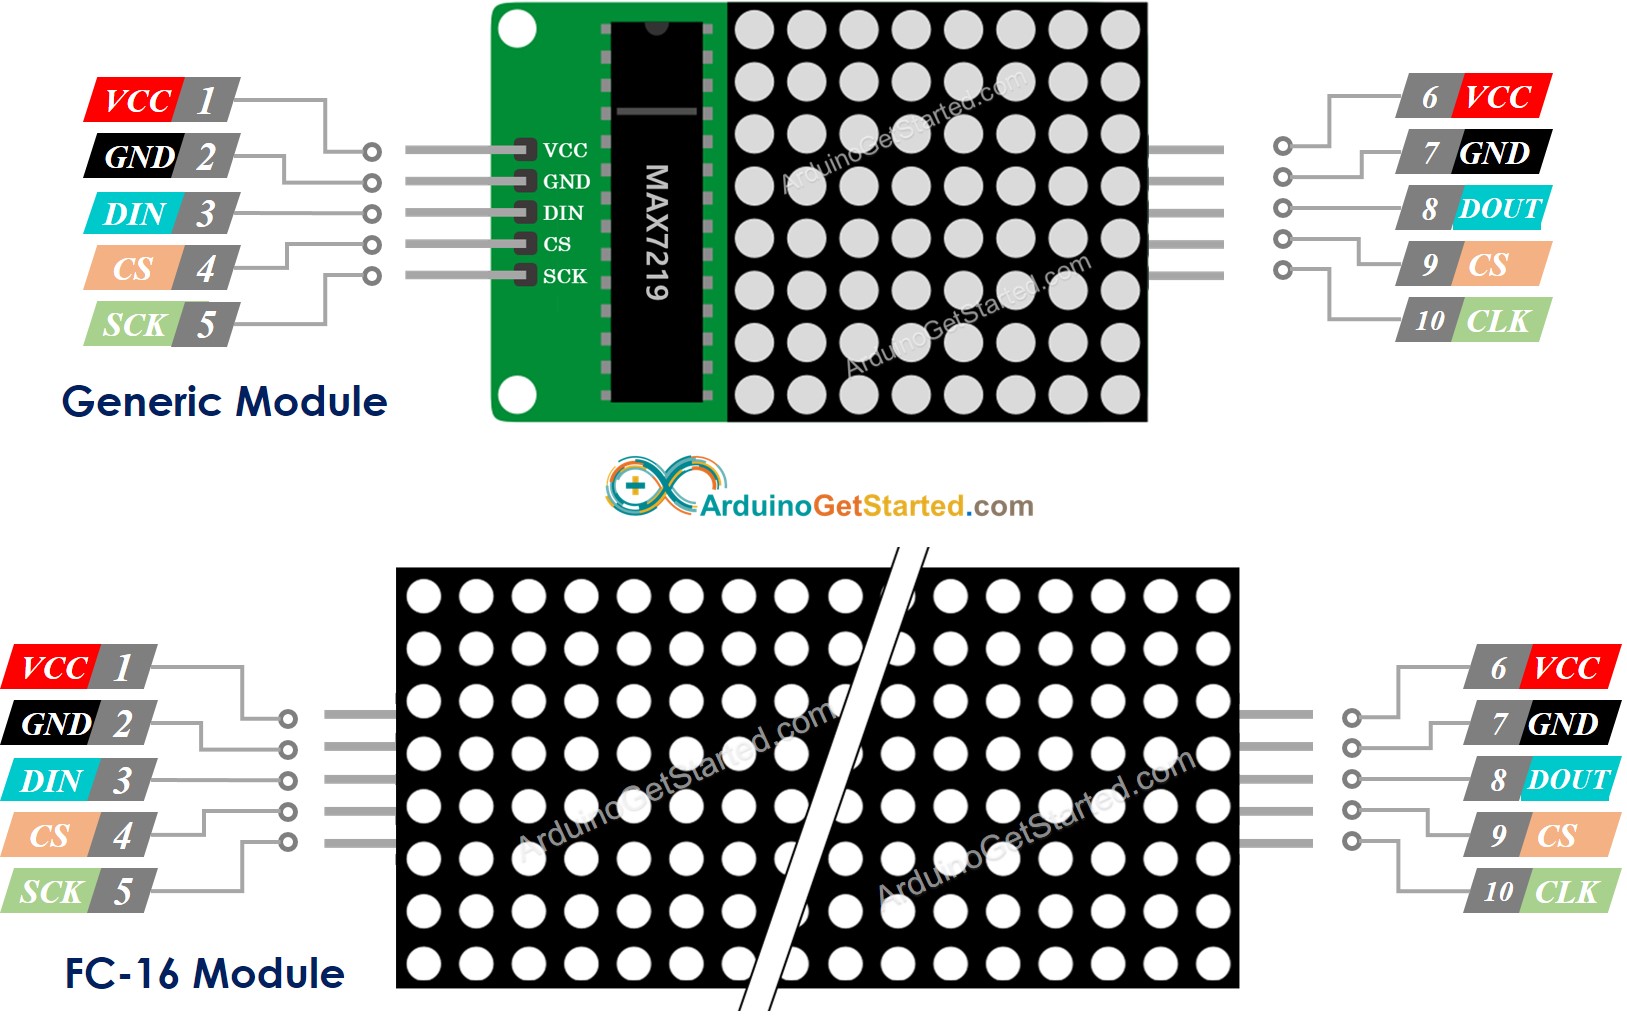
A LED Matrix is formed by a single or multiple blocks. Each block includes two groups of pins:
LED矩阵由单个或多个块组成。每个模块包括两组引脚:
- Input pins group: 输入引脚组:
- VCC: connected to 5V. VCC:连接到 5V。
- GND: connected to GND. GND:连接到 GND。
- DIN is the Data pin, Connect it to SPI MOSI pin of the Arduino.
DIN是数据引脚,将其连接到Arduino的SPI MOSI引脚。 - CS: Chip Select, Connect it to any digital pin of the Arduino.
CS:芯片选择,将其连接到Arduino的任何数字引脚。 - CLK: Clock pin, Connect it to SPI CLK pin of the Arduino.
CLK:时钟引脚,将其连接到Arduino的SPI CLK引脚。
- Output pins group: 输出引脚组:
- VCC: connects to VCC on the next module.
VCC:连接到下一个模块上的 VCC。 - GND: connects to GND on the next module.
GND:连接到下一个模块上的 GND。 - DOUT: Data Out, connects to the DIN pin of the next module.
DOUT:数据输出,连接到下一个模块的DIN引脚。 - CS: connects to CS on the next module.
CS:连接到下一个模块的 CS。 - CLK connects to CLK on the next module.
CLK 连接到下一个模块上的 CLK。
- VCC: connects to VCC on the next module.
Wiring Diagram 接线图
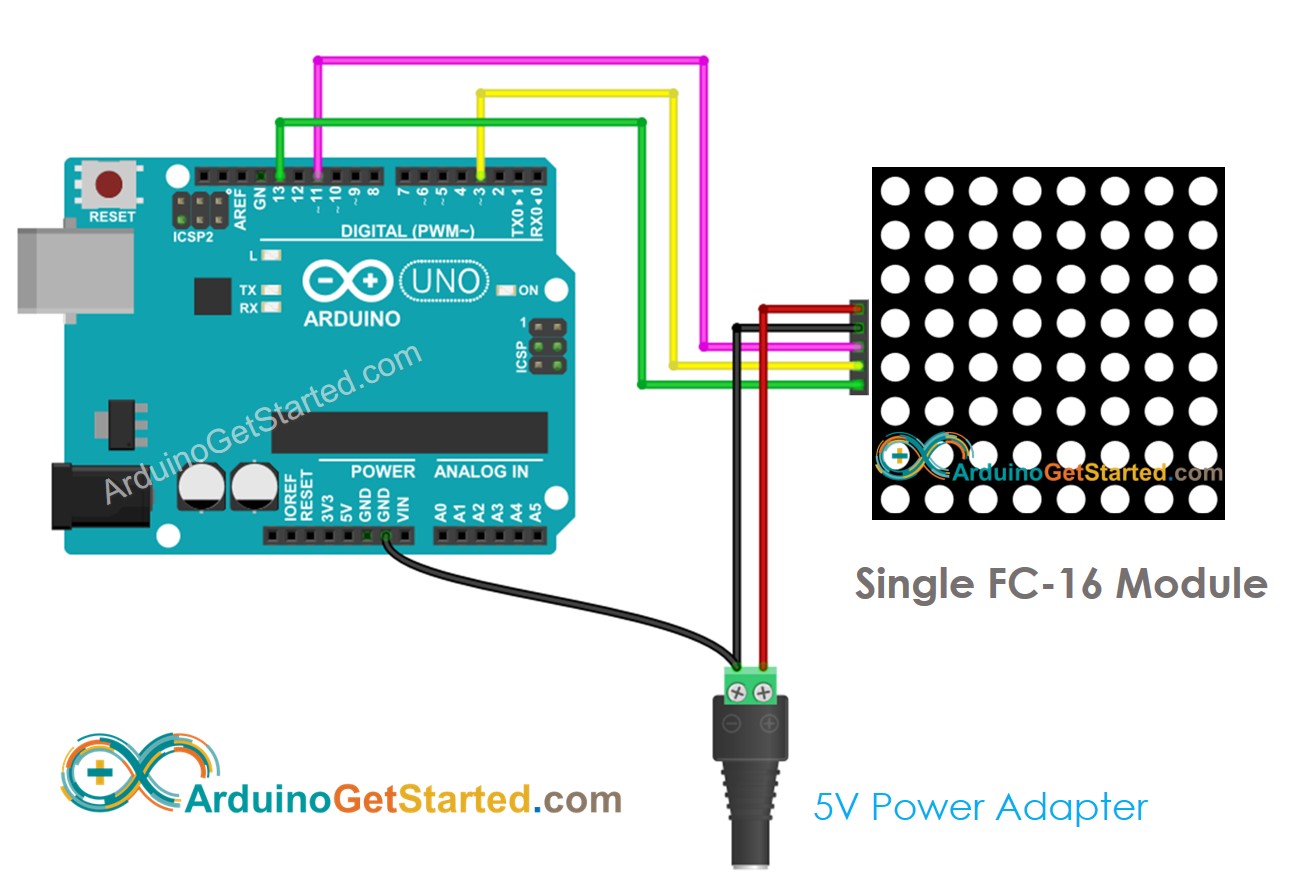
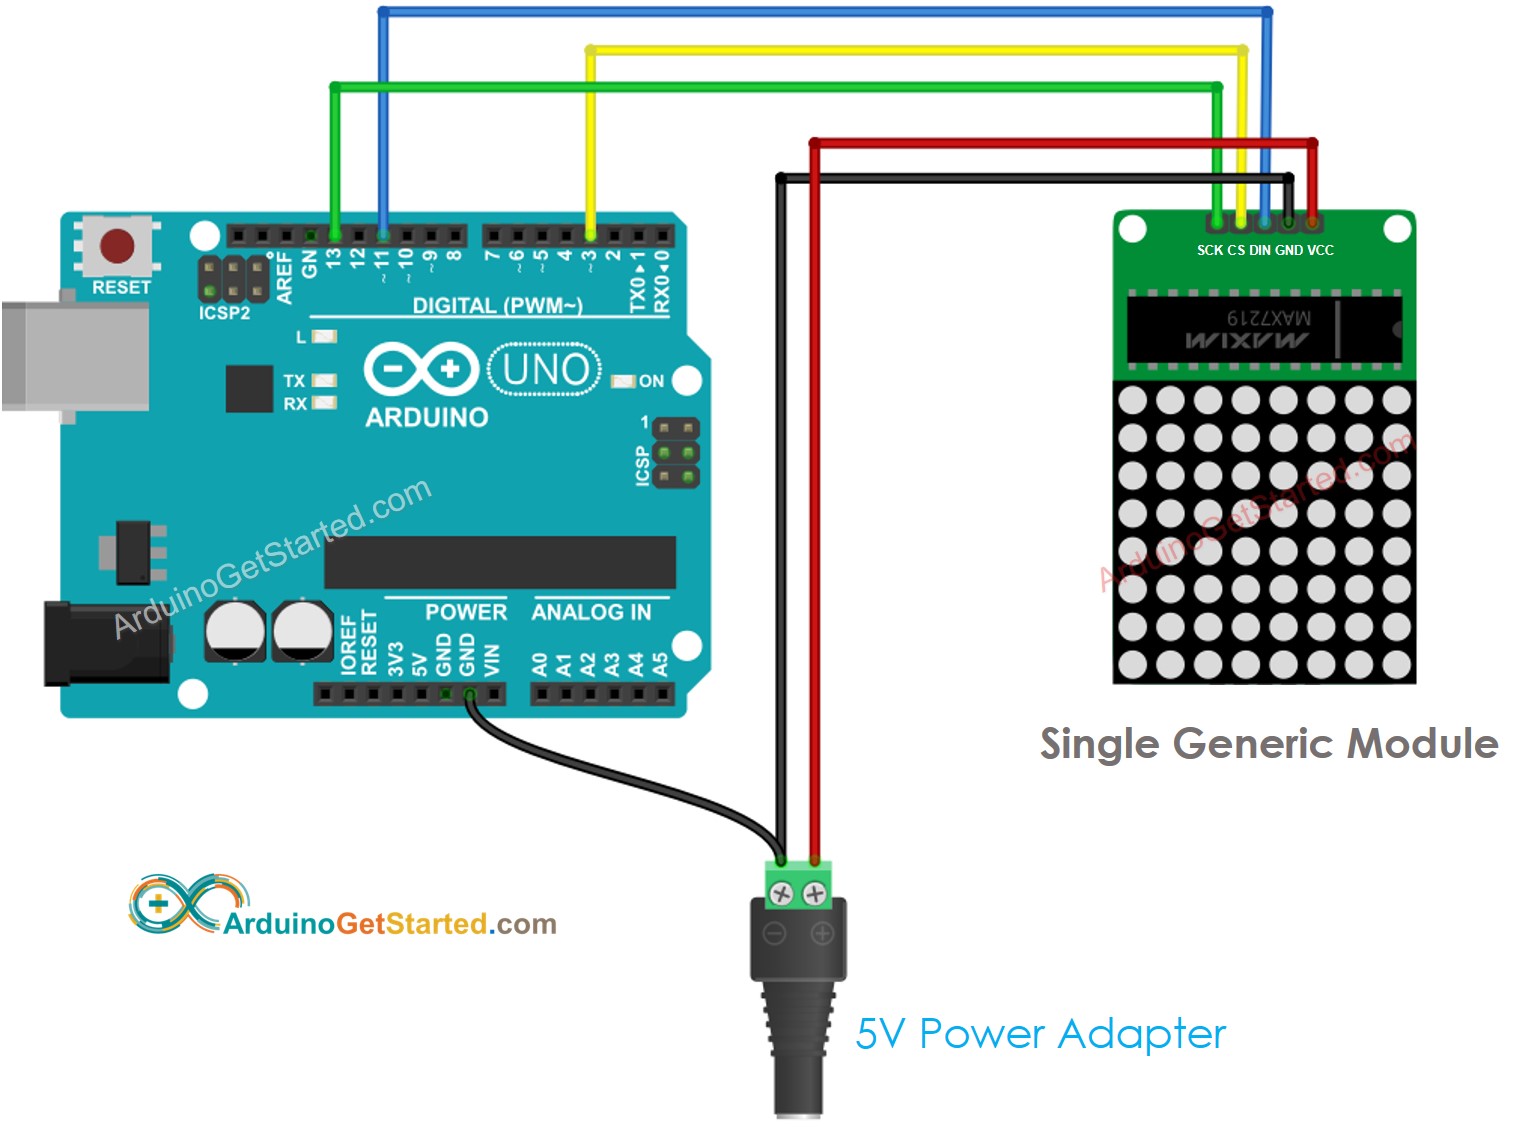
If the LED matrix is made of a single block:
如果 LED 矩阵由单个块组成:
- Connect the input pins groups to Arduino
将输入引脚组连接到Arduino - Let the output pins group unconnected
让输出引脚组断开连接
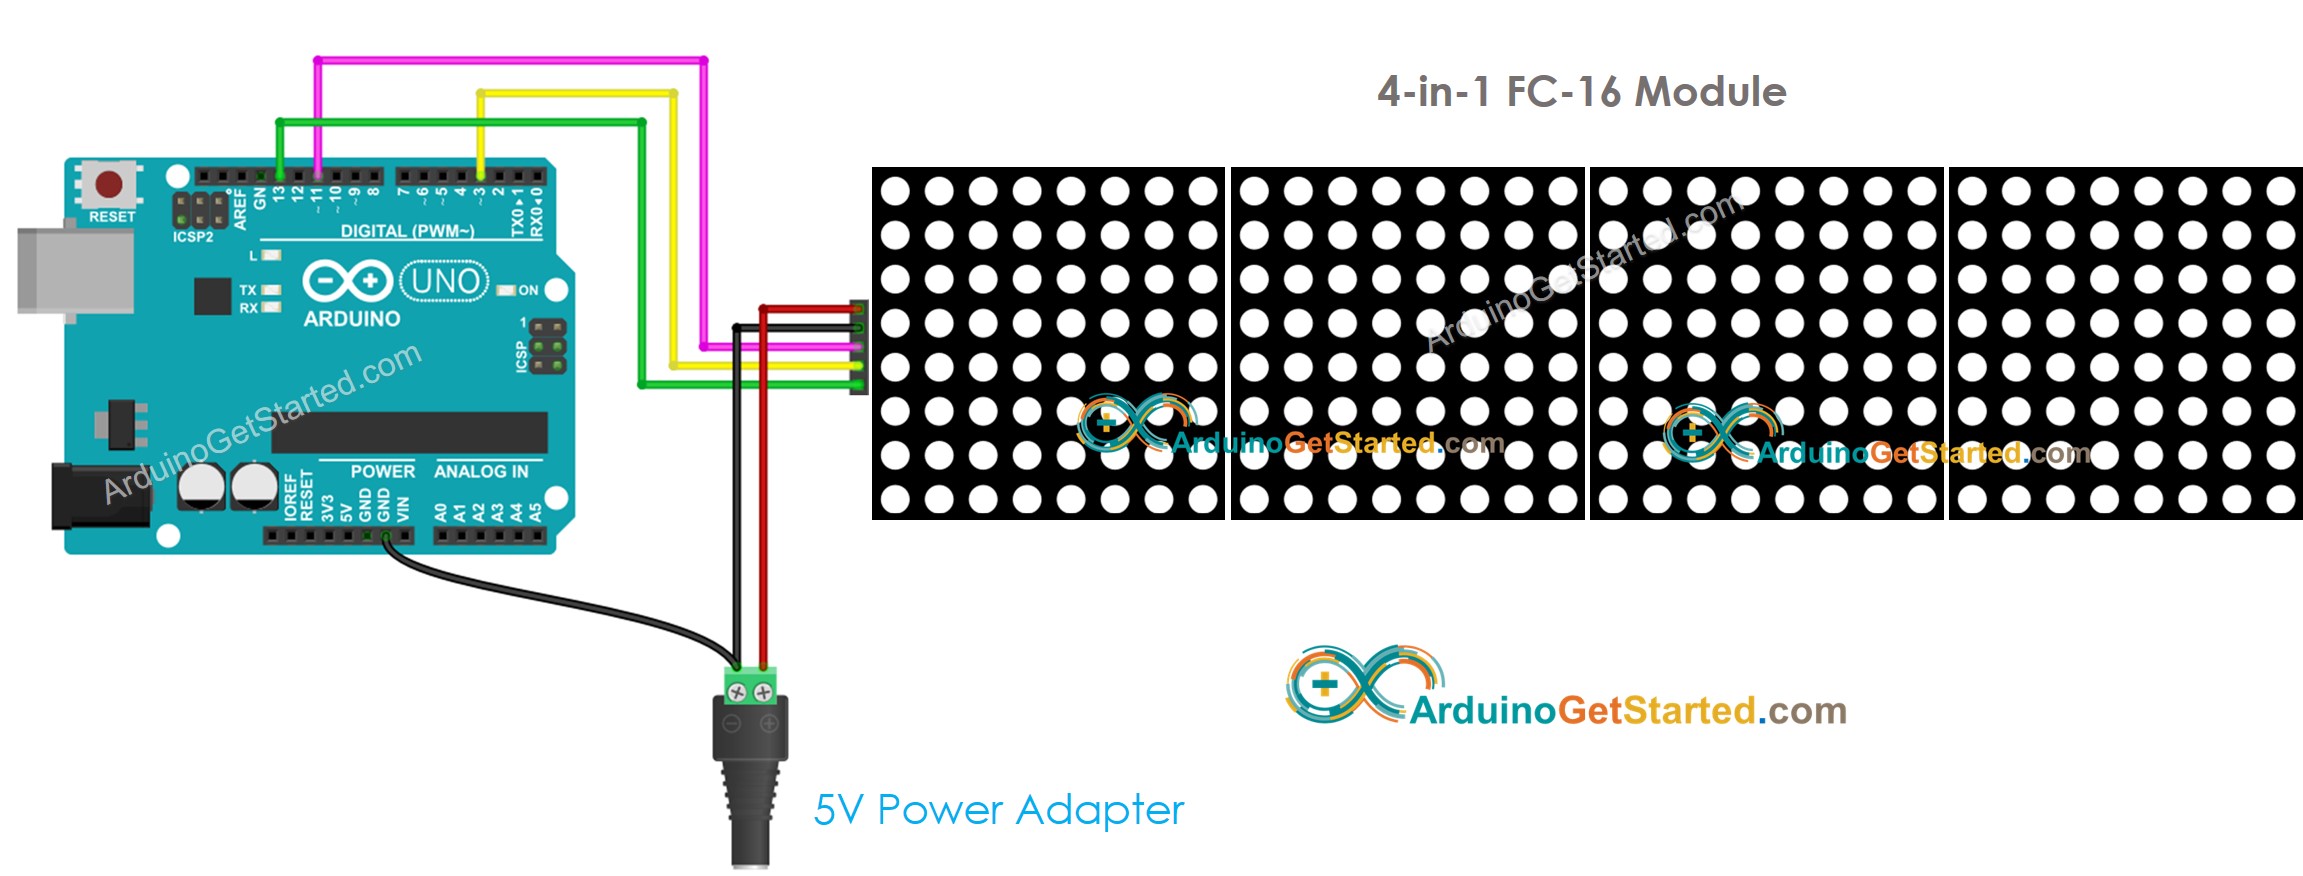
If the LED matrix is pre-built multiple blocks:
如果 LED 矩阵是预先构建的多个块:
- Connect the input pins groups to Arduino
将输入引脚组连接到Arduino - Let the output pins group unconnected
让输出引脚组断开连接
If the LED matrix is made of multiple blocks by yourself:
如果 LED 矩阵由多个块组成:
- Connect the input pins groups of the first block to Arduino
将第一个模块的输入引脚组连接到Arduino - Connect the output pins groups of each block to the input pins groups of the next block
将每个模块的输出引脚组连接到下一个模块的输入引脚组 - Let the output pins group of the last block unconnected
让最后一个块的输出引脚组解开连接
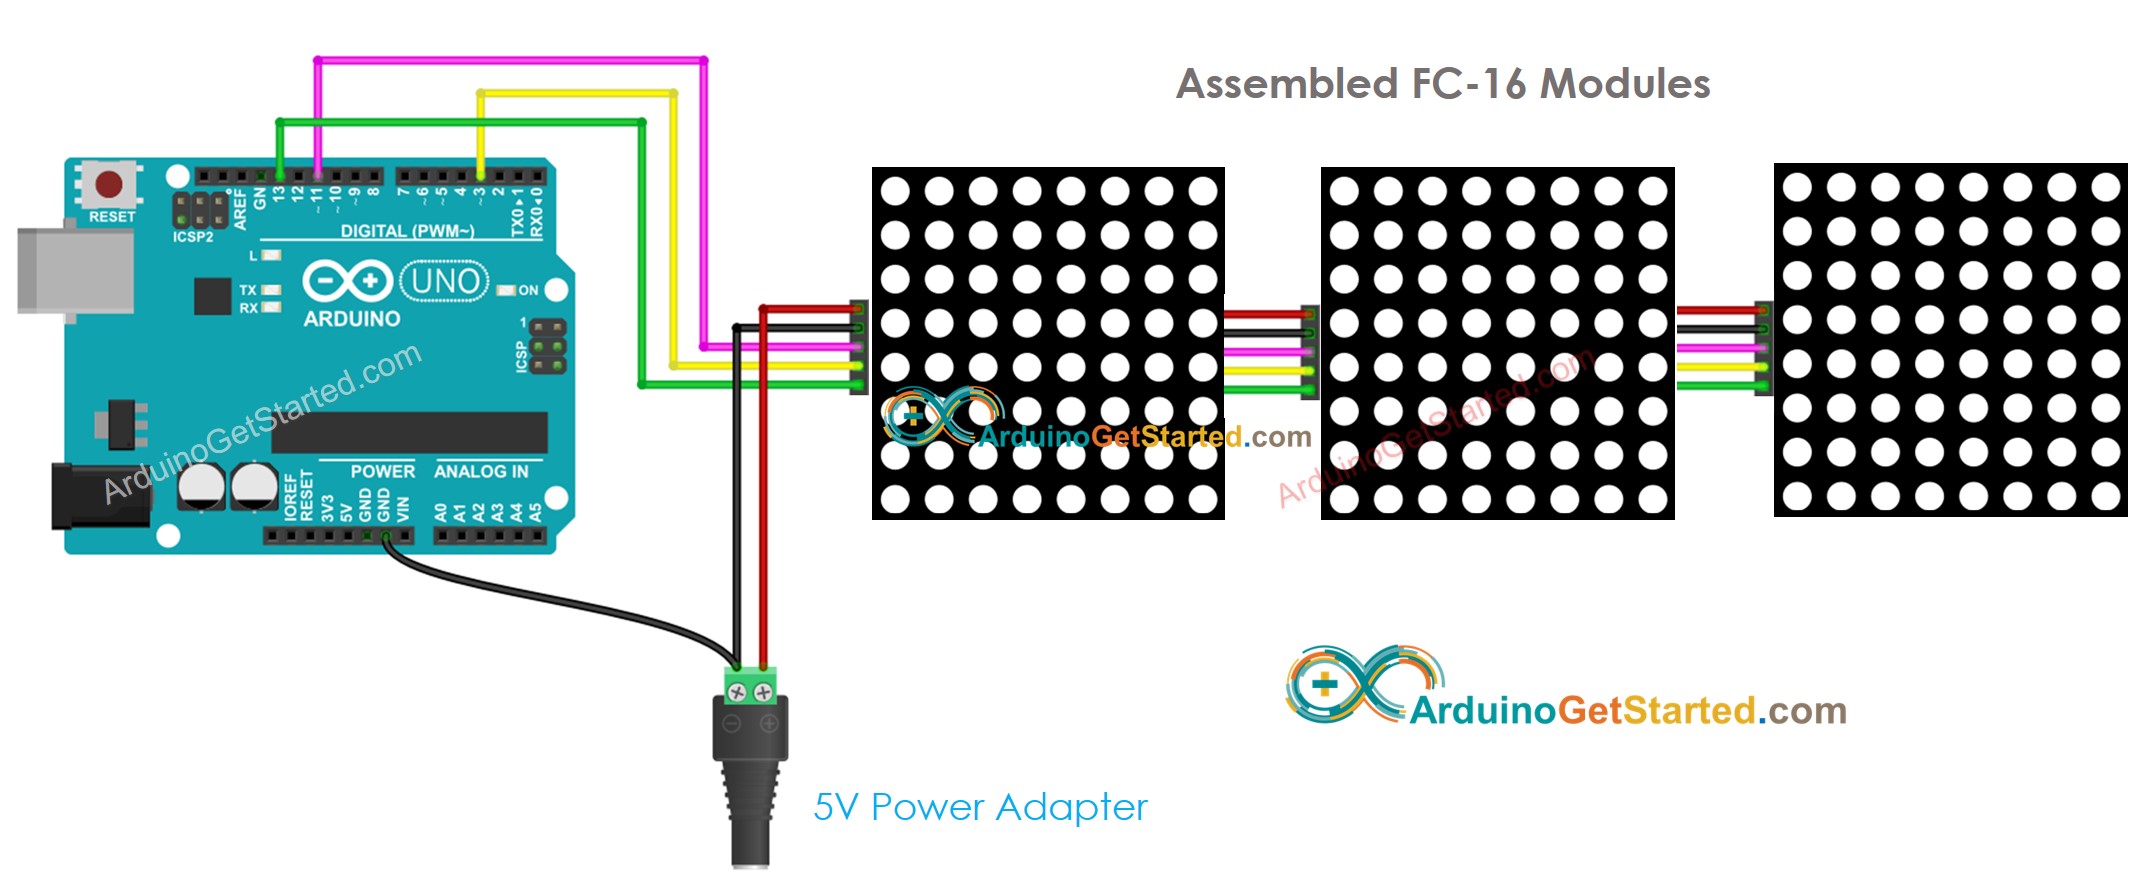
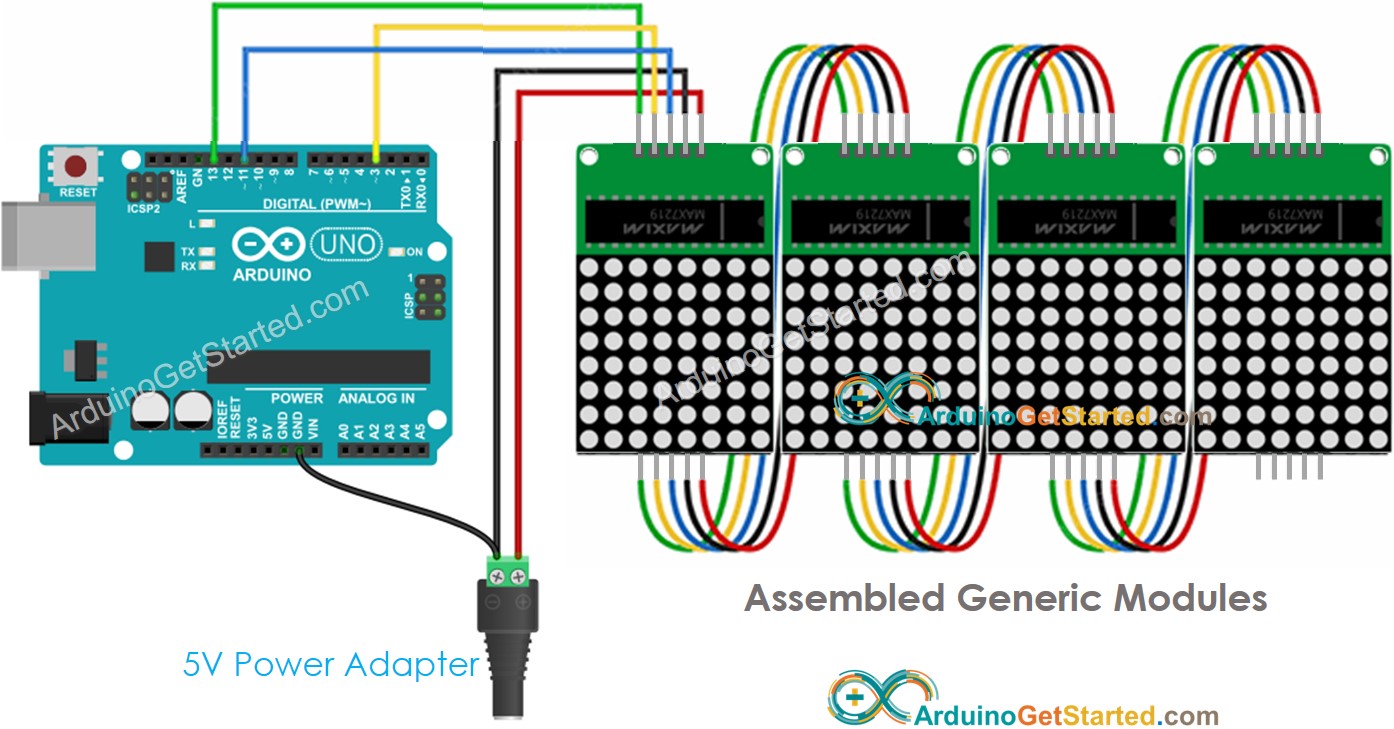
This image is created using Fritzing. Click to enlarge image
此图像是使用 Fritzing 创建的。点击放大图片
Because the display draws a lot of currents (up to 1A at maximum brightness):
因为显示器消耗了大量电流(最大亮度下高达 1A):
- Do not use the power from the 5V pin of Arduino.
请勿使用 Arduino 的 5V 引脚供电。 - Use an external 5V power supply instead. Arduino and LED matrix can share power from a 5V power adapter
请改用外部 5V 电源。Arduino 和 LED 矩阵可以共享来自 5V 电源适配器的电源
Because Arduino connects to LED matrix via SPI pins:
由于Arduino通过SPI引脚连接到LED矩阵:
- Pin 13 (SCK) and 11 (MOSI) on Arduino Uno must be used. If you're using another Arduino board, check the official documentation for equivalent SPI pins.
必须使用 Arduino Uno 上的引脚 13 (SCK) 和 11 (MOSI)。如果您使用的是另一块Arduino板,请查看官方文档以获取等效的SPI引脚。 - Pin 3 (CS) can be changed to any pin
引脚 3 (CS) 可以更改为任何引脚
How To Program For LED Matrix 如何对 LED 矩阵进行编程
It is not easy to control the LED matrix. Fortunately, libraries are available to make it easy. Below is a step-by-step on how to write Arduino code to control the LED matrix
控制LED矩阵并不容易。幸运的是,可以使用库来简化它。以下是如何编写Arduino代码来控制LED矩阵的分步操作
Include libraries: 包括库:
#include <MD_Parola.h>
#include <MD_MAX72xx.h>-
Specify which hardware is being used: GENERIC_HW or FC16_HW.
指定正在使用的硬件:GENERIC_HW 或 FC16_HW。#define HARDWARE_TYPE MD_MAX72XX::FC16_HW
-
Define how many LED block is used. for example, a 4-in-1 LED matrix has 4 blocks.
定义使用多少个 LED 块。例如,一个 4 合 1 LED 矩阵有 4 个模块。#define MAX_DEVICES 4
-
Define the pin that connects to the LED matrix's CS pin. For example, pin D3
定义连接到 LED 矩阵的 CS 引脚的引脚。例如,引脚 D3#define CS_PIN 3
-
Create a new instance of the MD_Parola class for the LED matrix display.
为 LED 矩阵显示创建 MD_Parola 类的新实例。MD_Parola ledMatrix = MD_Parola(HARDWARE_TYPE, CS_PIN, MAX_DEVICES);
-
Code in the setup() function:
setup() 函数中的代码:void setup() {
ledMatrix.begin(); // initialize the object
ledMatrix.setIntensity(0); // set the brightness of the LED matrix display (from 0 to 15)
ledMatrix.displayClear(); // clear led matrix display
} -
Display text, number and show animated effects: see next part
显示文本、数字和显示动画效果:请参阅下一部分
Arduino - LED Matrix Code Arduino - LED矩阵代码
The below code is for 32x8 FC-16 LED matrix display (4 blocks). But you can easily adapt it for 8x8, 16x8, 64x8...
以下代码适用于 32x8 FC-16 LED 矩阵显示器(4 块)。但是您可以轻松地将其调整为 8x8、16x8、64x8...
/*

 * Created by ArduinoGetStarted.com
   *
 * This example code is in the public domain
   *
 * Tutorial page: https://arduinogetstarted.com/tutorials/arduino-led-matrix
   */

#include <MD_Parola.h>
#include <MD_MAX72xx.h>

#define HARDWARE_TYPE MD_MAX72XX::FC16_HW
#define MAX_DEVICES 4 // 4 blocks
#define CS_PIN 3

// create an instance of the MD_Parola class
MD_Parola ledMatrix = MD_Parola(HARDWARE_TYPE, CS_PIN, MAX_DEVICES);

void setup() {
  ledMatrix.begin();         // initialize the object
  ledMatrix.setIntensity(0); // set the brightness of the LED matrix display (from 0 to 15)
  ledMatrix.displayClear();  // clear LED matrix display
}

void loop() {
  ledMatrix.setTextAlignment(PA_LEFT);
  ledMatrix.print("Left"); // display text
  delay(2000);

  ledMatrix.setTextAlignment(PA_CENTER);
  ledMatrix.print("Center"); // display text
  delay(2000);

  ledMatrix.setTextAlignment(PA_RIGHT);
  ledMatrix.print("Right"); // display text
  delay(2000);

  ledMatrix.setTextAlignment(PA_CENTER);
  ledMatrix.setInvert(true);
  ledMatrix.print("Invert"); // display text inverted
  delay(2000);

  ledMatrix.setInvert(false);
  ledMatrix.print(1234); // display number
  delay(2000);
}
Quick Steps 快速步骤
- Connect Arduino to LED matrix as above wiring diagram
如上接线图所示将Arduino连接到LED矩阵 - Connect Arduino to PC via USB cable
通过USB线将Arduino连接到PC - Navigate to the Libraries icon on the left bar of the Arduino IDE.
导航到 Arduino IDE 左侧栏上的 Libraries 图标。 - Search "MD_Parola" , then find the MD_Parola library
搜索"MD_Parola",然后找到MD_Parola库 - Click Install button. 单击"安装"按钮。
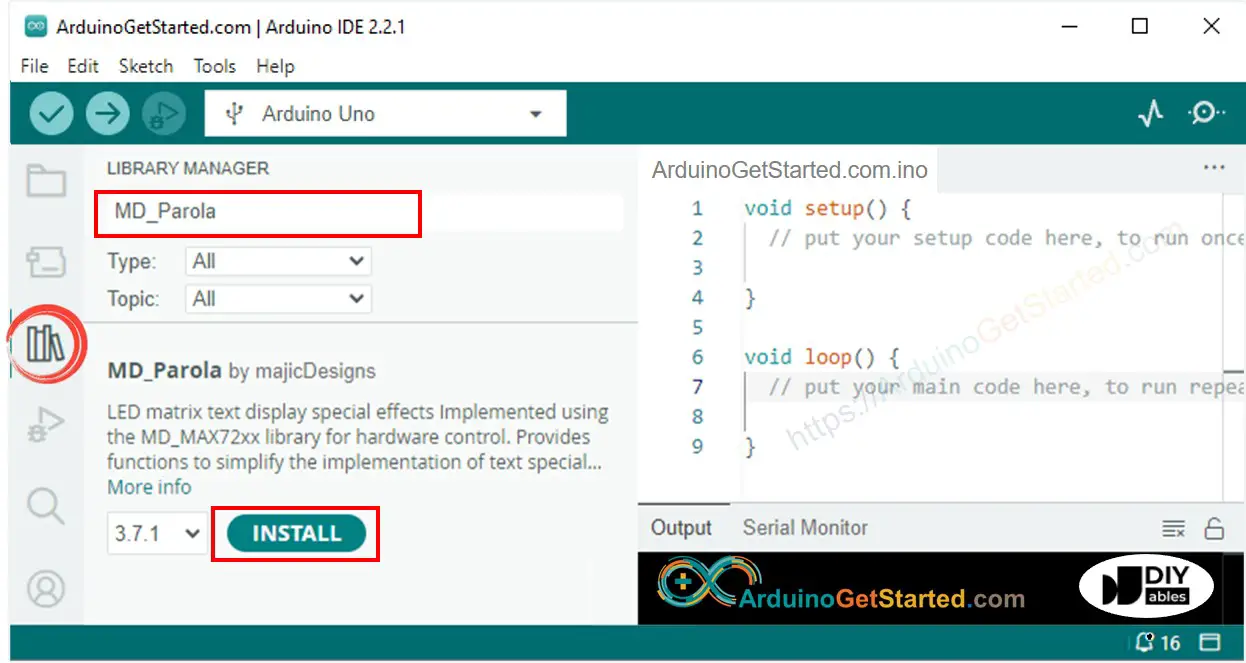
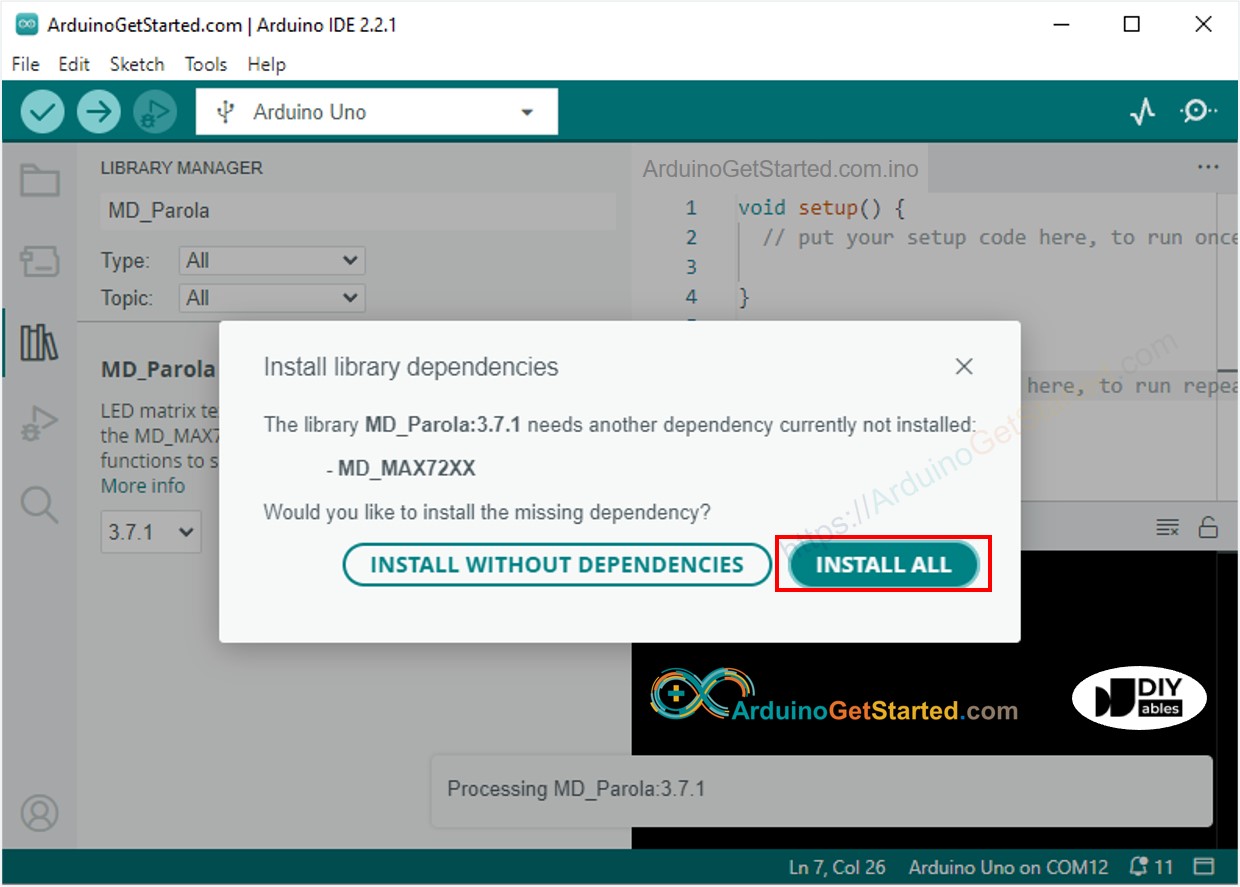
- You will be asked to install the MD_MAX72XX library for dependency. Click Install All button.
系统将要求您安装 MD_MAX72XX 库以进行依赖。单击"全部安装"按钮。
- Copy the above code and open it with Arduino IDE
复制上面的代码并使用Arduino IDE打开它 - Click Upload button on Arduino IDE to upload code to Arduino
单击Arduino IDE上的"上传"按钮,将代码上传到Arduino - See the LED matrix display
查看 LED 矩阵显示
Arduino LED Matrix Code -- Scrolling Text Arduino LED 矩阵代码 -- 滚动文本
When you want to print a long message that is too long to fit on a LED matrix display, you can use the scroll text effect technique.
当您想要打印太长而无法安装在 LED 矩阵显示器上的长消息时,您可以使用滚动文本效果技术。
The below Arduino code shows how to scroll a message on the LED matrix display.
下面的Arduino代码显示了如何在LED矩阵显示屏上滚动消息。
/*

 * Created by ArduinoGetStarted.com
   *
 * This example code is in the public domain
   *
 * Tutorial page: https://arduinogetstarted.com/tutorials/arduino-led-matrix
   */

#include <MD_Parola.h>
#include <MD_MAX72xx.h>

#define HARDWARE_TYPE MD_MAX72XX::FC16_HW
#define MAX_DEVICES 4 // 4 blocks
#define CS_PIN 3

// create an instance of the MD_Parola class
MD_Parola ledMatrix = MD_Parola(HARDWARE_TYPE, CS_PIN, MAX_DEVICES);

void setup() {
  ledMatrix.begin();         // initialize the object
  ledMatrix.setIntensity(0); // set the brightness of the LED matrix display (from 0 to 15)
  ledMatrix.displayClear();  // clear led matrix display

  ledMatrix.displayScroll("Hello", PA_CENTER, PA_SCROLL_LEFT, 100);
}

void loop() {
  if (ledMatrix.displayAnimate()) {
    ledMatrix.displayReset();
  }
}
For more text effects, please visit MD_Parola Library Reference.
如需更多文本效果,请访问MD_Parola库参考。