Abstract Syntax Trees in Python
注:机翻,未校对。
Requirement : All examples are compatible with at least Python v3.6, except for using
ast.dump()with the attributeindent=which has been added in Python v3.9.要求:所有示例至少与 Python v3.6 兼容,除了使用
ast.dump()和 Python v3.9 中添加的属性indent=。
What is an Abstract Syntax Tree (AST)? 什么是抽象语法树 (AST)?
An Abstract Syntax Tree (AST) is a data structure used to reason about the grammar of a programming language in the context of the instructions provided into source code.
抽象语法树 (AST) 是一种数据结构,用于在源代码中提供的指令上下文中推理编程语言的语法。

For instance, compilers use ASTs when transforming source code into binary code:
例如,编译器在将源代码转换为二进制代码时使用 AST:
- Given some text source code, the compiler first tokenizes the text to identify programming language keywords, variables, literals, etc. Each token represents an "atom" of an instruction.
给定一些文本源代码,编译器首先对文本进行标记化,以识别编程语言关键字、变量、文字等。每个令牌代表指令的一个"原子"。 - Tokens are then rearranged into an AST, a tree where nodes are the "atoms" of the instructions, and edges the relationships between the atoms based on the programming language grammar. For instance, the AST make explicit the presence of a function call, the related input arguments, the instructions composing the function, etc.
然后,令牌被重新排列成一个 AST,这是一个树,其中节点是指令的"原子",并根据编程语言语法对原子之间的关系进行边缘处理。例如,AST 明确了函数调用的存在、相关的输入参数、组成函数的指令等。 - The compiler then can apply multiple optimizations to the AST, and ultimately converts it into binary code.
然后,编译器可以对 AST 应用多个优化,并最终将其转换为二进制代码。
Despite their role for compilers, ASTs are useful for a broader set of use-cases. Let's discuss this more in details.
尽管 AST 在编译器中扮演着重要角色,但它们对于更广泛的用例集很有用。让我们更详细地讨论这个问题。
The ast Python module and its use ast Python 模块及其用法
The ast module in the Python standard library can be used to create, visit, and modify AST related to Python source code. It has been introduced in Python 2.6, and since then it evolved alongside the Python grammar.
Python 标准库中的 ast 模块可用于创建、访问和修改与 Python 源代码相关的 AST。它已在 Python 2.6 中引入,从那时起它与 Python 语法一起发展。
Even if it is part of standard library since a long time, it is not common to use it directly . Rather, you might have used it indirectly as popular tools use it under-the-hood:
即使它长期以来一直是标准库的一部分,直接使用它也不常见。相反,您可能间接地使用了它,因为流行的工具在引擎盖下使用它:
- code testing :
mutpyis a mutation testing tool used to alters the code under testing to broaden the set of tests in an automated fashion. In practice a mutation is an artificial modification of the AST generated from the code under testing. To see how PyBites usesmutpy, check out this article.
代码测试:Mutpy 是一种突变测试工具,用于更改被测试的代码,以自动化方式扩展测试集。在实践中,突变是对被测代码生成的 AST 的人为修改。要了解 PyBites 如何使用mutpy,请查看这篇文章。 - code coverage :
vultureis a static code analyzer that studies an AST to identify portion of the code not used.
代码覆盖率:Vulture 是一个静态代码分析器,它研究 AST 以识别未使用的代码部分。 - code vulnerabilities :
bandituses the AST representation to identify security vulnerabilities.
代码漏洞:Bandit 使用 AST 表示来识别安全漏洞。 - code autocompletion :
jediis an IDE and text editors autocompletion tool relying on theastmodule functionality to safely evaluate expressions.
代码自动完成:绝地是一个 IDE 和文本编辑器自动完成工具,它依赖于ast模块功能来安全地计算表达式。 - code reformating :
blackandflake8are two popular tools to enforce code reformatting, and they both use an AST representation of the source code to apply their formatting rules.
代码重整:Black 和 flake8 是强制代码重新格式化的两种常用工具,它们都使用源代码的 AST 表示来应用其格式化规则。
Using the ast module to investigate the PyBites Bite exercises 使用 ast 模块调查 PyBites 咬合练习
Still not convinced of the relevance of an AST? Fair enough: let's consider a more practical, and closer to the PyBites Platform, use-case.
仍然不相信 AST 的相关性?公平地说:让我们考虑一个更实用、更接近 PyBites 平台的用例。
The PyBites Platform is currently offering 300+ Bite exercises, and the number is constantly increasing. Given the (semi)hidden intention of the platform is to offer a varied set of challenges covering different Python modules and functionalities, it starts to be more and more challenging to identify what is covered by already available exercises, and what is instead left to explore.
PyBites 平台目前提供 300+ 个咬合练习,而且数量还在不断增加。鉴于该平台的(半)隐藏意图是提供涵盖不同 Python 模块和功能的各种挑战,因此确定现有练习涵盖的内容以及需要探索的内容开始变得越来越具有挑战性。
This is where we can take advantage of the ast module. Specifically, we can process the source code of the solution of the exercises (as provided by the authors of the challenges) and recover some statistics about their content. For instance, which are the popular modules and builtin functions used.
这就是我们可以利用 ast 模块的地方。具体来说,我们可以处理练习解决方案的源代码(由挑战的作者提供)并恢复有关其内容的一些统计信息。例如,哪些是流行的模块和使用的内置函数。
Here some of the results. To follow along check out this Jupyter notebook.
以下是一些结果。要继续学习,请查看此 Jupyter 笔记本。
Builtins popularity 内置人气

The histogram above shows the Python builtin calls sorted by their popularity. In other words, using the ast module one can detect when a function call has been made, and if it relates to the builtins module or not. Three colors are used to visually distinguish between exception types, the creation of base types (int, float, bool, list, and set), or other functions. The histogram is a normalized frequency count, i.e., the frequency of each element is cumulated across all exercises, and divided by the sum of all elements occurrence across all exercises.
上面的直方图显示了按其受欢迎程度排序的 Python 内置调用。换句话说,使用 ast 模块可以检测何时进行了函数调用,以及它是否与 builtins 模块相关。三种颜色用于直观地区分异常类型、创建基类型(int、float、bool、list 和 set)或其他函数。直方图是归一化的频率计数,即每个元素的频率在所有练习中累积,然后除以所有练习中出现的所有元素的总和。
A few observations: 几点观察:
- The distribution is heavy tailed, with
len()representing 13.4% of all builtin calls, whiledir()being used only once.
该分布是重尾的,len()占所有内置调用的 13.4%,而dir()只使用一次。 - All five base types are used, but
bool()is used only in 1 challenge.
所有五种基本类型都使用,但bool()仅在 1 个挑战中使用。 - Only 5 of the standard exceptions are used, with
ValueErrorbeing the most common.
仅使用了 5 个标准例外,其中ValueError是最常见的。 - Most of the builtin functions are already used by exercises, but considering the functional programming calls you can notice that
map()appears whilefilter()does not (as indeed the common practice is to prefer list comprehension).
大多数内置函数已经被练习使用,但考虑到函数式编程调用,您可以注意到map()出现而filter()没有(因为通常的做法是更喜欢列表推导)。
Modules popularity 模块受欢迎程度

The histogram above shows the ranking for modules. For simplicity we limit to report on the root modules only. If submodules are used, their frequencies are cumulated into the frequency of the respective root modules.
上面的直方图显示了模块的排名。为简单起见,我们仅限于报告根模块。如果使用子模块,则它们的频率将累积到相应根模块的频率中。
As before, the histogram is heavy tailed, a testament that the PyBites Bite exercises try to "cover a little bit of everything".
和以前一样,直方图是沉重的尾巴,这证明了 PyBites Bite 练习试图"覆盖一切"。
We can observe the presence of non-standard modules, such as pandas and pytest, as well more ad-hoc modules such as as zodiac and fibonacci that are created for the purpose of the challenges themselves.
我们可以观察到非标准模块的存在,例如 pandas 和 pytest,以及更多的临时模块,例如 zodiac 和 fibonacci,这些模块是为挑战本身的目的而创建的。
One can easily expand the analysis to understand the functions used in each module/submodule, as well as dive into more specific analysis. What is relevant to highlight is that the results reported here are generated with about 50 lines of Python code and using ast module. Processing the 300+ source code files with tools like awk, grep, or anything else would have been significantly harder.
可以轻松扩展分析以了解每个模块/子模块中使用的功能,并深入研究更具体的分析。需要强调的是,这里报告的结果是用大约 50 行 Python 代码并使用 ast 模块生成的。使用 awk、grep 或其他任何工具处理 300+ 源代码文件会更加困难。
Hopefully this examples gave you a rough idea of what you can achieve with an AST. The next step is to understand how to create such data structures, and investigate their composition.
希望这个例子能让你大致了解一下AST可以实现什么。下一步是了解如何创建此类数据结构,并研究它们的组成。
Dissecting an assignment instruction using the ast module 使用 ast 模块剖析作业指令
To start familiarize with the ast module, let's see what happens when we analyze a single instruction: one_plus_two = 1+2
为了开始熟悉 ast 模块,让我们看看当我们分析一条指令时会发生什么:one_plus_two = 1+2
python
>>> import ast
>>> code = "one_plus_two = 1+2"
>>> tree = ast.parse(code)
>>> ast.dump(tree, indent=4)
This will output: 这将输出:
python
Module(
    body=[
        Assign(
            targets=[
                Name(id='one_plus_two', ctx=Store())],
            value=BinOp(
                left=Constant(value=1),
                op=Add(),
                right=Constant(value=2)))],
    type_ignores=[])
It might not be obvious at first, but the output generated by ast.dump() is actually a tree:
乍一看可能并不明显,但 ast.dump() 生成的输出实际上是一棵树:
- The words starting with capital letter are nodes of the tree.
以大写字母开头的单词是树的节点。 - The attributes of the nodes are either edges of the tree or metadata.
节点的属性是树的边缘或元数据。
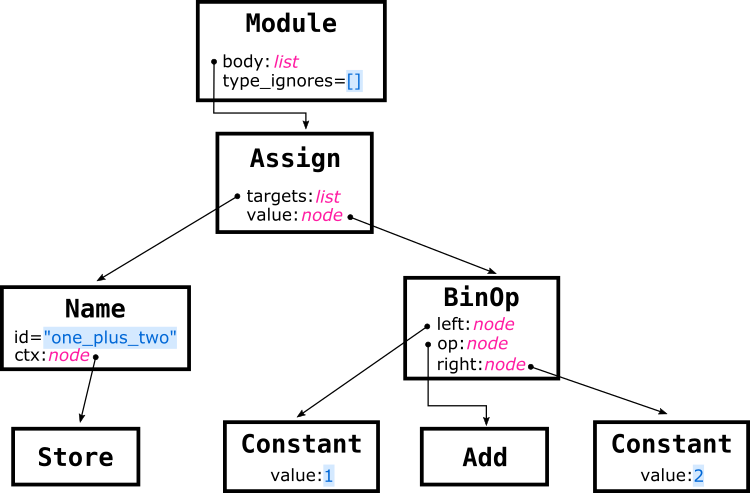
Let's rework the output into a diagram with the following conventions:
让我们使用以下约定将输出重新设计为关系图:
- One rectangle for each node, marking in bold the related node type.
每个节点一个矩形,以粗体标记相关节点类型。 - Node attributes collecting metadata are reported in blue.
收集元数据的节点属性以蓝色报告。 - Other node attributes are annotated with their type.
其他节点属性使用其类型进行批注。 - Nodes are connected based on their attributes.
节点根据其属性进行连接。
With this visualization at hand we can observe a few things.
通过手头的这种可视化,我们可以观察到一些事情。
The root of the tree is a Module node. In fact, even if our example is a single line program, it is still a true Python module. The node contains two attributes body and type_ignores. Let's put the aside type_ignores for a moment and focus on body.
树的根是 Module 节点。事实上,即使我们的示例是一个单行程序,它仍然是一个真正的 Python 模块。该节点包含两个属性 body 和 type_ignores。让我们暂时把 type_ignores 放在一边,专注于 body。
As a Python module contains a series of instructions, the Module.body attribute is a list of nodes, one for each instruction in the program. Our example consists of a single assignment operation, hence Module.body contains only one Assign node.
由于 Python 模块包含一系列指令,因此 Module.body 属性是节点列表,程序中的每条指令对应一个节点。我们的示例由单个赋值操作组成,因此 Module.body 只包含一个 Assign 节点。
An assignment operation has a right-hand side specifying the operation to perform, and a left-hand side specifying the destination of the operation. The two sides are associated to the Assign.value and Assign.targets attributes of the Assign node.
分配操作的右侧指定要执行的操作,左侧指定操作的目标。两边与 Assign 节点的 Assign.value 和 Assign.targets 属性相关联。
Considering the right-hand side, the Assign.value attribute is a BinOp node, since the instruction is a binary operation between two operands, which is fully specified with three attributes:
考虑到右侧,Assign.value 属性是一个 BinOp 节点,因为指令是两个操作数之间的二进制操作,完全由三个属性指定:
BinOp.opis aAddnode given we are performing an addition.
BinOp.op是一个Add节点,给定我们正在执行加法。BinOp.leftandBinOp.rightare the addition operands and consist ofConstantnodes, each holding the raw value in theConstant.valueattribute.
BinOp.left和BinOp.right是加法操作数,由Constant个节点组成,每个节点都保存Constant.value属性中的原始值。
Considering the left-side, as Python supports multiple assignments and tuple unpacking, the Assign.targets attribute is a list collecting the different destinations of the operation. In our case the assignment is for a single variable, so a single Name node is used. In turn, the Name node has 2 attributes:
考虑到左侧,由于 Python 支持多个赋值和元组解包,因此 Assign.targets 属性是一个收集操作不同目标的列表。在我们的例子中,赋值是针对单个变量的,因此使用单个 Name 节点。反过来,Name 节点有 2 个属性:
Name.idstores the name of the variable used in the program ("one_plus_two").
Name.id存储程序中使用的变量的名称 ("one_plus_two")。Name.ctxspecifies how variable reference is used in the program. This can only be one of typesast.Load,ast.Removeorast.Store, but those are always empty nodes.
Name.ctx指定如何在程序中使用变量引用。这只能是类型ast.Load、ast.Remove或ast.Store之一,但这些节点始终是空节点。
The Module.type_ignores attribute and type comments Module.type_ignores 属性和类型注释
The attribute Module.type_ignores in the vast majority of the cases is going to be an empty list. This is why in the sketch is colored in blue. To understand why this is the case and what is the actual purpose of the attribute, we need to make a digression.
在绝大多数情况下,属性 Module.type_ignores 将是一个空列表。这就是为什么在草图中是蓝色的。为了理解为什么会这样以及该属性的实际目的是什么,我们需要做一个题外话。
Python 3.0 introduced annotations, and few years later those have been expanded into type hints. If you are not familiar with those concepts, check this Real Python tutorial and the official doc.
Python 3.0 引入了注释,几年后,这些注释已扩展为类型提示。如果您不熟悉这些概念,请查看此 Real Python 教程和官方文档。
Those changes were not back ported to Python 2, which instead was using type comments as a form of annotation. For more information, see PEP 484 or this Real Python tutorial.
这些更改没有向后移植到 Python 2,而是使用类型注释作为注释的一种形式。有关详细信息,请参阅 PEP 484 或此 Real Python 教程。
The attribute Module.type_ignores refers to a special type comment # type: ignore that was used to indicate to type checker (such as mypy) to suppress errors if one was found. For legacy reasons, the ast module is still reporting on those comments, but only when asked to do so.
属性 Module.type_ignores 是指一种特殊的类型注释 # type: ignore,用于指示类型检查器(如 mypy)以在发现错误时禁止显示错误。由于遗留原因,ast 模块仍在报告这些评论,但只有在被要求时才会这样做。
Let's see an example.
让我们看一个例子。
python
>>> code = 'one_plus_two = 1+2 # type: int'
>>> tree = ast.parse(code, type_comments=True)
>>> print(ast.dump(tree, indent=4))
This will output: 这将输出:
python
Module(
    body=[
        Assign(
            targets=[
                Name(id='one_plus_two', ctx=Store())],
            value=BinOp(
                left=Constant(value=1),
                op=Add(),
                right=Constant(value=2)),
            type_comment='int')],
    type_ignores=[])
Notice that the only difference with respect to the detailed analysis of the AST previously discussed is the presence of the attribute Assign.type_comment='int'. The attribute reflects the metadata provided by type comment # type: int, and is added to the AST tree Assign node because we specified type_comment=True when triggering the parsing.
请注意,与前面讨论的 AST 的详细分析相比,唯一的区别是属性 Assign.type_comment='int' 的存在。该属性反映了类型 comment # type: int 提供的元数据,并添加到 AST 树 Assign 节点,因为我们在触发解析时指定了 type_comment=True。
However, # type: ignore is treated differently. Those type comments are stored into the Module.type_ignores attribute as TypeIgnore objects rather than being collected as metadata in the inner nodes of the tree.
但是,# type: ignore 的处理方式不同。这些类型注释作为 TypeIgnore 对象存储在 Module.type_ignores 属性中,而不是作为元数据收集在树的内部节点中。
python
>>> code = 'one_plus_two = 1+2 # type: ignore'
>>> tree = ast.parse(code, type_comments=True)
>>> print(ast.dump(tree, indent=4))
This will output: 这将输出:
python
Module(
    body=[
        Assign(
            targets=[
                Name(id='one_plus_two', ctx=Store())],
            value=BinOp(
                left=Constant(value=1),
                op=Add(),
                right=Constant(value=2)))],
    type_ignores=[
        TypeIgnore(lineno=1, tag='')])
The ast module APIs ast 模块 API
The ast module is mostly a large collection of classes, one for each of the different aspects of the Python grammar. Overall, there are about 100 classes, ranging from literals, to more complex construct such as list comprehensions.
ast 模块主要是一大堆类,每个类对应 Python 语法的不同方面。总的来说,大约有 100 个类,从文字到更复杂的结构,如列表推导式。
ast.AST is the base class for all other classes in the module, and it defines the following base attributes for all AST nodes:
ast.AST 是模块中所有其他类的基类,它为所有 AST 节点定义以下基属性:
lineno,col_offset,end_lineno, andend_col_offsetare used to track the precise position of the related instruction in the source code.
lineno、col_offset、end_lineno和end_col_offset用于跟踪相关指令在源代码中的精确位置。_fieldscontains the list of attribute names (you can think that is a list of "children" names).
_fields包含属性名称列表(您可以认为这是"子"名称的列表)。
When dealing with an AST the trickiest part is understanding nodes and attributes semantic. In fact, there are a lot of variants and corner cases, so it is easy to get confused.
在处理 AST 时,最棘手的部分是理解节点和属性语义。事实上,有很多变体和极端情况,所以很容易混淆。
A good way to start to familiarize with an AST is to use an interactive console such as ipython similarly to what we did in the previous examples. If you are used to an IDE, both PyCharm and Visual Studio Code provide plugins to visualize an AST (notice that PyCharm uses its own version of AST called Program Structure Interface -- PSI)
开始熟悉 AST 的一个好方法是使用交互式控制台,例如 ipython,类似于我们在前面的示例中所做的。如果您习惯使用 IDE,PyCharm 和 Visual Studio Code 都提供了用于可视化 AST 的插件(请注意,PyCharm 使用自己的 AST 版本,称为程序结构接口 -- PSI)
No matter your preferred choice, the documentation is a fundamental resource to keep at hand. Yet, a couple of remarks:
无论您喜欢哪种选择,文档都是手头的基本资源。然而,有几点评论:
- Given that the Python language is in constant evolution, make sure to use the most recent version of the Python doc.
鉴于 Python 语言在不断发展,请确保使用最新版本的 Python 文档。 - The official documentation also suggests to consult Green Tree Snake, which indeed does a good job at complementing the official documentation on parts that that otherwise would seem "dry" of details.
官方文档还建议咨询 Green Tree Snake,它确实很好地补充了官方文档,否则这些部分看起来会"枯燥"的细节。
Beside the classes, the ast module defines how to perform a visit of a tree, and how to do transformations.
除了类之外,ast 模块还定义了如何执行树的访问以及如何进行转换。
Visiting an AST 访问 AST
You can visit an AST in two ways: using helper functions, or via an ast.NodeVisitor class.
您可以通过两种方式访问 AST:使用帮助程序函数或通过 ast.NodeVisitor 类。
Let's starts reviewing the helper functions:
让我们开始回顾帮助程序函数:
ast.walk()visit the specified node, and recursively all its descendant, but in a non specified order.
ast.walk()访问指定的节点,并以非指定顺序递归访问其所有后代。ast.iter_fields()andast.iter_child_nodes()are similar to.items()and.keys()of adictdata structure, but applied to a specific node only, and they are not recursive.
ast.iter_fields()和ast.iter_child_nodes()类似于dict数据结构的.items()和.keys(),但仅应用于特定节点,并且它们不是递归的。
Here some examples: 以下是一些示例:
python
>>> import ast
>>> code = "one_plus_two = 1+2"
>>> tree = ast.parse(code)

>>> for node in ast.walk(tree):
        print(node.__class__.__name__)

Module
Assign
Name
BinOp
Store
Constant
Add
Constant

>>> for name, value in ast.iter_fields(tree):
        print(name, value)

body [<_ast.Assign object at 0x10c60be80>]
type_ignores []

>>> for node in ast.iter_child_nodes(tree):
        print(node.__class__.__name__)

Assign
When using an ast.NodeVisitor instead, one can register specific callbacks to trigger when visiting specific node types:
当使用 ast.NodeVisitor 时,可以注册特定的回调以在访问特定节点类型时触发:
python
class BinOpVisitor(ast.NodeVisitor):

    def visit_BinOp(self, node):
        print(f"found BinOp at line: {node.lineno}")
        self.generic_visit(node)
In this example: 在此示例中:
- We define a class
BinOpVisitorextending theast.NodeVisitor.
我们定义了一个类BinOpVisitor来扩展ast.NodeVisitor。 - We register a callback to be triggered when
ast.BinOpnodes are visited. The name of callback is alwaysvisit_XYZwhereXYZis one of the predefined node types name (BinOpin our case).
我们注册一个回调,以便在访问ast.BinOp个节点时触发。回调的名称始终为visit_XYZ,其中XYZ是预定义的节点类型名称之一(在本例中为BinOp)。 - When the callback is invoked it receives the reference of the node under analysis. In this example we use the node info to print the line number of the instruction it relates to.
当调用回调时,它会接收被分析节点的引用。在此示例中,我们使用节点信息来打印与之相关的指令的行号。 - Finally, we invoke
self.generic_visit(node)to propagate the visit on the children of the input node.
最后,我们调用self.generic_visit(node)将访问传播到输入节点的子节点上。
What sort of black magic happens behind the scene to trigger the callbacks? It is actually simple. A ast.NodeVisitor also defines a visit() function which is always invoked first: if the input node type matches one of the callbacks, such callback is called, otherwise generic_visit() is invoked to visit the node children. In our example we are not overwriting visit(), hence we can trigger a visit of the tree simply invoking the method:
幕后发生了什么样的黑魔法来触发回调?其实很简单。 ast.NodeVisitor 还定义了一个 visit() 函数,该函数总是首先调用:如果输入节点类型与其中一个回调匹配,则调用此类回调,否则调用 generic_visit() 来访问节点子节点。在我们的示例中,我们没有覆盖 visit(),因此我们只需调用该方法即可触发树的访问:
python
>>> vis = BinOpVisitor()
>>> vis.visit(tree)
Here the complete example:
完整示例如下:
python
import ast

class BinOpVisitor(ast.NodeVisitor):

    def visit_BinOp(self, node):
        print(f"found BinOp at line: {node.lineno}")
        self.generic_visit(node)


code = """
left_op = 1
right_op = 2
sum_two_things = left_op + right_op
other_sum = sum_two_things - 1

print(sum_two_things)
print(other_sum)
"""

tree = ast.parse(code)

print("=== full AST ===")
print(ast.dump(tree, indent=4))

print()
print("=== visit ===")
vis = BinOpVisitor()
vis.visit(tree)
Running the program we obtain the following output:
运行程序,我们获得以下输出:
python
=== full AST ===
Module(
    body=[
        Assign(
            targets=[
                Name(id='left_op', ctx=Store())],
            value=Constant(value=1)),
        Assign(
            targets=[
                Name(id='right_op', ctx=Store())],
            value=Constant(value=2)),
        Assign(
            targets=[
                Name(id='sum_two_things', ctx=Store())],
            value=BinOp(
                left=Name(id='left_op', ctx=Load()),
                op=Add(),
                right=Name(id='right_op', ctx=Load()))),
        Assign(
            targets=[
                Name(id='other_sum', ctx=Store())],
            value=BinOp(
                left=Name(id='sum_two_things', ctx=Load()),
                op=Sub(),
                right=Constant(value=1))),
        Expr(
            value=Call(
                func=Name(id='print', ctx=Load()),
                args=[
                    Name(id='sum_two_things', ctx=Load())],
                keywords=[])),
        Expr(
            value=Call(
                func=Name(id='print', ctx=Load()),
                args=[
                    Name(id='other_sum', ctx=Load())],
                keywords=[]))],
    type_ignores=[])

=== visit ===
found BinOp at line: 4
found BinOp at line: 5
Modifying an AST 修改 AST
A ast.NodeTransformer can be used as base class for a transformers, similarly to the logic used for the visitor class. This time, rather than simply visiting the nodes, the callbacks are used to modify, replace, add new nodes.
ast.NodeTransformer 可以用作 transformer 的基类,类似于用于访问器类的逻辑。这一次,回调不是简单地访问节点,而是用于修改、替换、添加新节点。
Here an example: 下面是一个示例:
python
import ast
import random

class ConstantTransformer(ast.NodeTransformer):
    def visit_Constant(self, node):
        new_value = random.randint(-10, 10)
        new_node = ast.Constant(new_value)
        print(f"replacing constant {node.value} -> {new_value} at lineno: {node.lineno}")
        return new_node
In this example: 在此示例中:
- We registered a callback to be triggered when handing a
ast.Constantnode.
我们注册了一个回调,在处理ast.Constant节点时触发。 - The callback generates a random number between (-10, 10), creates a new
ast.Constant()node with the generated value, and reports a message on the standard output.
回调生成一个介于 (-10, 10) 之间的随机数,使用生成的值创建一个新的ast.Constant()节点,并在标准输出上报告一条消息。 - Finally, it returns the reference of the new node.
最后,它返回新节点的引用。
The reference returned by the callbacks represent the node to use in the AST. In this example we are replacing the original node. When returning None instead, the visited node is removed from the tree.
回调返回的引用表示要在 AST 中使用的节点。在此示例中,我们将替换原始节点。相反,当返回 None 时,访问的节点将从树中删除。
To trigger the transformation, we use the same operation used for the visit. This time the visit returns the reference of the tree modified:
为了触发转换,我们使用与访问相同的操作。这一次,访问将返回修改后的树的引用:
python
>>> vis = ConstantTransformer()
>>> new_tree = vis.visit(tree)
Here the full example:
以下是完整的示例:
python
import ast
import random

class ConstantTransformer(ast.NodeTransformer):
    def visit_Constant(self, node):
        new_value = random.randint(-10, 10)
        print(f"replacing constant {node.value} -> {new_value} at lineno: {node.lineno}")
        new_node = ast.Constant(new_value)
        return new_node

def exec_tree(tree):
    print()
    print("=== AST ===")
    print(ast.dump(tree, indent=4))
    print('---')

    tree_fixed = ast.fix_missing_locations(tree)
    code_obj = compile(tree_fixed, '', 'exec')
    exec(code_obj)

code = """
left_op = 1
right_op = 2
sum_two_things = left_op + right_op
other_sum = sum_two_things - 1

print(sum_two_things)
print(other_sum)
"""

tree = ast.parse(code)
exec_tree(tree)

## fix seed
random.seed(10)

## apply the transformations
vis = ConstantTransformer()
new_tree = vis.visit(tree)
The source code in code is the same as the one used to do a simple visit. Likewise, the process to generate the related tree.
code 中的源代码与用于进行简单访问的源代码相同。同样,生成相关树的过程。
Then we fix a seed for the random number generator via random.seed(), so to have consistent output when running the program multiple times.
然后我们通过 random.seed() 为随机数生成器固定一个种子,以便在多次运行程序时获得一致的输出。
We create a ConstantTransformer() object, and we visit it obtaining new_tree, which is a transformed version of the original tree.
我们创建一个 ConstantTransformer() 对象,然后访问它,获得 new_tree,它是原始树的转换版本。
To verify the transformations, we can print the AST, and "run it" by transforming into executable code. To do so, we use the helper function exec_tree():
为了验证转换,我们可以打印 AST,并通过转换为可执行代码来"运行它"。为此,我们使用 helper 函数 exec_tree():
- We start printing the content of the tree using
ast.dump()as seen in previous examples.
我们使用ast.dump()开始打印树的内容,如前面的示例所示。 - We then apply
ast.fix_missing_locations()to the tree. Each node in the AST is indeed expected to havelinenofilled, but rather than filling it when doing the transformations, the helper functionast.fix_missing_locations()allows to delay this fix until the compilation is required.
然后,我们将ast.fix_missing_locations()应用于树。AST 中的每个节点确实都应该填充lineno,但是辅助函数ast.fix_missing_locations()允许延迟此修复,直到需要编译时,而不是在进行转换时填充它。 - Finally, the builtin function
compile()is used to transform the AST to a code object, which in turn is executed calling the builtinexec().
最后,内置函数compile()用于将 AST 转换为代码对象,然后调用内置函数exec()执行该代码对象。
Here the output related to exec_tree(tree):
这里与 exec_tree(tree) 相关的输出:
python
=== AST ===
Module(
    body=[
        Assign(
            targets=[
                Name(id='left_op', ctx=Store())],
            value=Constant(value=1)),
        Assign(
            targets=[
                Name(id='right_op', ctx=Store())],
            value=Constant(value=2)),
        Assign(
            targets=[
                Name(id='sum_two_things', ctx=Store())],
            value=BinOp(
                left=Name(id='left_op', ctx=Load()),
                op=Add(),
                right=Name(id='right_op', ctx=Load()))),
        Assign(
            targets=[
                Name(id='other_sum', ctx=Store())],
            value=BinOp(
                left=Name(id='sum_two_things', ctx=Load()),
                op=Sub(),
                right=Constant(value=1))),
        Expr(
            value=Call(
                func=Name(id='print', ctx=Load()),
                args=[
                    Name(id='sum_two_things', ctx=Load())],
                keywords=[])),
        Expr(
            value=Call(
                func=Name(id='print', ctx=Load()),
                args=[
                    Name(id='other_sum', ctx=Load())],
                keywords=[]))],
    type_ignores=[])
---
3
2
The output for exec_tree(new_tree): exec_tree(new_tree) 的输出:
python
replacing constant 1 -> 8 at lineno: 2
replacing constant 2 -> -9 at lineno: 3
replacing constant 1 -> 3 at lineno: 5

=== AST ===
Module(
    body=[
        Assign(
            targets=[
                Name(id='left_op', ctx=Store())],
            value=Constant(value=8)),
        Assign(
            targets=[
                Name(id='right_op', ctx=Store())],
            value=Constant(value=-9)),
        Assign(
            targets=[
                Name(id='sum_two_things', ctx=Store())],
            value=BinOp(
                left=Name(id='left_op', ctx=Load()),
                op=Add(),
                right=Name(id='right_op', ctx=Load()))),
        Assign(
            targets=[
                Name(id='other_sum', ctx=Store())],
            value=BinOp(
                left=Name(id='sum_two_things', ctx=Load()),
                op=Sub(),
                right=Constant(value=3))),
        Expr(
            value=Call(
                func=Name(id='print', ctx=Load()),
                args=[
                    Name(id='sum_two_things', ctx=Load())],
                keywords=[])),
        Expr(
            value=Call(
                func=Name(id='print', ctx=Load()),
                args=[
                    Name(id='other_sum', ctx=Load())],
                keywords=[]))],
    type_ignores=[])
---
-1
-4
The output now is "randomized", as expected by the transformation. However, the transformation has overwritten the original tree, as new_tree and tree are the same object.
现在的输出是"随机的",正如转换所预期的那样。但是,转换覆盖了原始树,因为 new_tree 和 tree 是同一个对象。
python
>>> id(tree), id(new_tree)
4350659920, 4350659920
To avoid this however one simply use the copy module to clone the whole tree before triggering the transformation, or overwrite the visit() method and define the ad-hoc logic for the use-case at hand.
然而,为了避免这种情况,只需在触发转换之前使用复制模块克隆整个树,或者覆盖 visit() 方法并为手头的用例定义临时逻辑。
Keep calm and happy Python coding!
保持冷静和快乐的 Python 编码!
--- Alessandro --- 亚历山大
Introduction to Abstract Syntax Trees 抽象语法树简介
Picture a typical Python program you've written: a few classes, more than a few functions, and dozens or even hundreds of lines of code. As humans, we read and write code as text , and we take for granted the fact that we can ask the computer to run our code to accomplish pretty amazing things.
想象一下你编写的典型 Python 程序:几个类、多个函数以及数十甚至数百行代码。作为人类,我们以文本的形式阅读和编写代码,我们理所当然地认为我们可以要求计算机运行我们的代码来完成非常惊人的事情。
But what actually happens when we "run" a program? Another program, called the Python interpreter , is responsible for taking our file and running it. But as you've experienced first-hand by now, writing programs that work directly with strings is hard ; reading sequences of characters and extracting meaning from them requires a lot of fussing with small details. There's a fundamental problem with working directly with text: strings are a linear structure (a sequence of characters), but programs are much more complex, and in fact have a naturally recursive structure. Think about all of the different types of Python code we've learned so far: arithemtic expressions, lists and other collections, if statements and for loops, for example. Each of these types of code have the potential to be arbitrarily nested, and it is this nesting that makes program structure recursive. Of course, we consider it poor style to write any code that has too much nested, and tools like PythonTA will complain if you do. But deeply nested code is still valid Python code, and can certainly be run by the Python interpreter.
但是,当我们"运行"一个程序时,实际上会发生什么?另一个程序,称为 Python 解释器,负责获取我们的文件并运行它。但是,正如您现在亲身经历的那样,编写直接使用字符串的程序是很困难的;阅读字符序列并从中提取含义需要对小细节进行大量大惊小怪。直接处理文本存在一个基本问题:字符串是线性结构(字符序列),但程序要复杂得多,实际上具有自然递归结构。想想我们目前所学的所有不同类型的 Python 代码:算术表达式、列表和其他集合,例如 if 语句和 for 循环。这些类型的代码中的每一个都有可能被任意嵌套,正是这种嵌套使程序结构具有递归性。 当然,我们认为编写任何嵌套过多的代码都是糟糕的风格,如果你这样做,像 PythonTA 这样的工具会抱怨。但深度嵌套代码仍然是有效的 Python 代码,并且当然可以由 Python 解释器运行。
So the first step that the Python interpreter takes when given a Python file to run is to parse file's contents and create a new representation of the program code called an Abstract Syntax Tree (AST) . This is, in fact, a simplification: given the complex nature of parsing and Python programs, there is usually more than one kind of tree that is created during the execution of the program, representing different "phases" of the process. You'll learn about this more in a course on programming languages or compilers, like CSC324 and CSC488. The "Tree" part is significant: given the recursive nature of Python programs, it is natural that we'll use a tree-based data structure to represent them!
因此,当给定要运行的 Python 文件时,Python 解释器采取的第一步是解析文件的内容并创建称为抽象语法树 (AST) 的程序代码的新表示形式。 事实上,这是一种简化:鉴于解析和 Python 程序的复杂性,在程序执行过程中通常会创建不止一种树,代表过程的不同"阶段"。您将在编程语言或编译器(如 CSC324 和 CSC488)课程中了解更多相关内容。 "树"部分很重要:鉴于 Python 程序的递归性质,我们很自然地会使用基于树的数据结构来表示它们!
In this chapter, we're going to explore the basics of modeling programs using abstract syntax trees. In this section we'll start with the fundamental building blocks of a programming language: expressions that can be evaluated.
在本章中,我们将探讨使用抽象语法树对程序进行建模的基础知识。在本节中,我们将从编程语言的基本构建块开始:可以计算的表达式。
The Expr class Expr 类
Recall that an expression is a piece of code which is meant to be evaluated, returning the value of that expression. This is in contrast with statements , which represent some kind of action like variable assignment or return, or which represent a definition , using keywords like def and class. Expressions are the basic building blocks of the language, and are necessary for computing anything. But because of the immense variety of expression types in Python, we cannot use just one single class to represent all types of expressions. Instead, we'll use different classes to represent each kind of expression---but use inheritance to ensure that they all follows the same fundamental interface.
回想一下,表达式是一段要计算的代码,返回该表达式的值。 这与语句形成鲜明对比,语句表示某种操作,如变量赋值或返回,或者表示定义,使用 def 和 class 等关键字。 表达式是语言的基本构建块,对于计算任何内容都是必需的。但是,由于 Python 中的表达式类型种类繁多,我们不能只使用一个类来表示所有类型的表达式。相反,我们将使用不同的类来表示每种表达式,但使用继承来确保它们都遵循相同的基本接口。
To begin, here is an abstract class that establishes a common shared interface for all expression types.
首先,下面是一个抽象类,它为所有表达式类型建立了一个通用的共享接口。
class Expr:
    """An abstract class representing a Python expression.
    """
    def evaluate(self) -> Any:
        """Return the *value* of this expression.

        The returned value should be the result of how this expression would be
        evaluated by the Python interpreter.
        """
        raise NotImplementedError
Notice that we haven't specified any attributes for this class. Every type of expression will use a different set of attributes to represent the expression. Let's make this concrete by looking at two expression types.
请注意,我们尚未为此类指定任何属性。每种类型的表达式都将使用一组不同的属性来表示表达式。让我们通过查看两种表达式类型来具体化这一点。
Num: numeric literals Num:数字文字
The simplest type of Python expression is a literal like 3 or 'hello'. We'll start just by representing numeric literals (ints and floats). As you might expect, this is a pretty simple class, with just a single attribute representing the value of the literal.
最简单的 Python 表达式类型是像 3 或 'hello' 这样的文字。我们将从表示数字文字(int 和 float)开始。如您所料,这是一个非常简单的类,只有一个属性表示文本的值。
class Num(Expr):
    """A numeric literal.

    Instance Attributes:
        - n: the value of the literal
    """
    n: int | float

    def __init__(self, number: int | float) -> None:
        """Initialize a new numeric literal."""
        self.n = number

    def evaluate(self) -> Any:
        """Return the *value* of this expression.

        The returned value should the result of how this expression would be
        evaluated by the Python interpreter.

        >>> expr = Num(10.5)
        >>> expr.evaluate()
        10.5
        """
        return self.n  # Simply return the value itself!
You can think of literals as being the base cases, or leaves, of an abstract syntax tree. Next, we'll look at one way of combining these literals in larger expressions.
您可以将文字视为抽象语法树的基本情况或叶子。接下来,我们将研究一种将这些文字组合成更大表达式的方法。
BinOp: arithmetic operations BinOp: 算术运算
The obvious way to combine numbers in code is through the standard arithmetic operations. In Python, an arithmetic operation is an expression that consists of three parts: a left and right subexpression (the two operands of the expression), and the operator itself. We'll represent this with the following class: For simplicity, we restrict the possible operations to only + and * for this example.
在代码中组合数字的明显方法是通过标准算术运算。在 Python 中,算术运算是一个表达式,它由三个部分组成:左右子表达式(表达式的两个操作数)和运算符本身。我们将用以下类来表示这一点: 为简单起见,在此示例中,我们将可能的操作限制为仅 + 和 *。
class BinOp(Expr):
    """An arithmetic binary operation.

    Instance Attributes:
        - left: the left operand
        - op: the name of the operator
        - right: the right operand

    Representation Invariants:
        - self.op in {'+', '*'}
    """
    left: Expr
    op: str
    right: Expr

    def __init__(self, left: Expr, op: str, right: Expr) -> None:
        """Initialize a new binary operation expression.

        Preconditions:
            - op in {'+', '*'}
        """
        self.left = left
        self.op = op
        self.right = right
Note that the BinOp class is basically a binary tree! Its "root" value is the operator name (stored in the attribute op), while its left and right "subtrees" represent the two operand subexpressions .
请注意,BinOp 类基本上是一个二叉树!它的"root"值是运算符名称(存储在属性 op 中),而它的左右"子树"表示两个操作数子表达式。
For example, we could represent the simple arithmetic expression 3 + 5.5 in the following way:
例如,我们可以用以下方式表示简单的算术表达式 3 + 5.5:
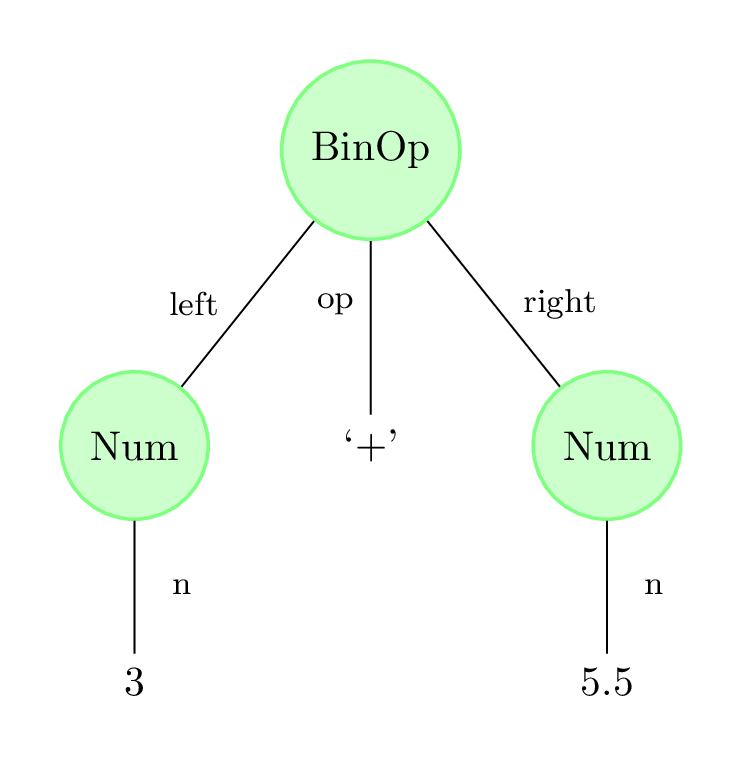
BinOp(Num(3), '+', Num(5.5))But the truly powerful thing about our BinOp data type is that its left and right attributes aren't Nums, they're Exprs. This is what makes this data type recursive, and allows it to represent nested arithmetic operations:
但是我们的 BinOp 数据类型真正强大的一点是,它的 left 和 right 属性不是 Num,而是 Expr。这就是使此数据类型递归的原因,并允许它表示嵌套算术运算:
# ((3 + 5.5) * (0.5 + (15.2 * -13.3)))
BinOp(
    BinOp(Num(3), '+', Num(5.5)),
    '*',
    BinOp(
        Num(0.5),
        '+',
        BinOp(Num(15.2), '*', Num(-13.3)))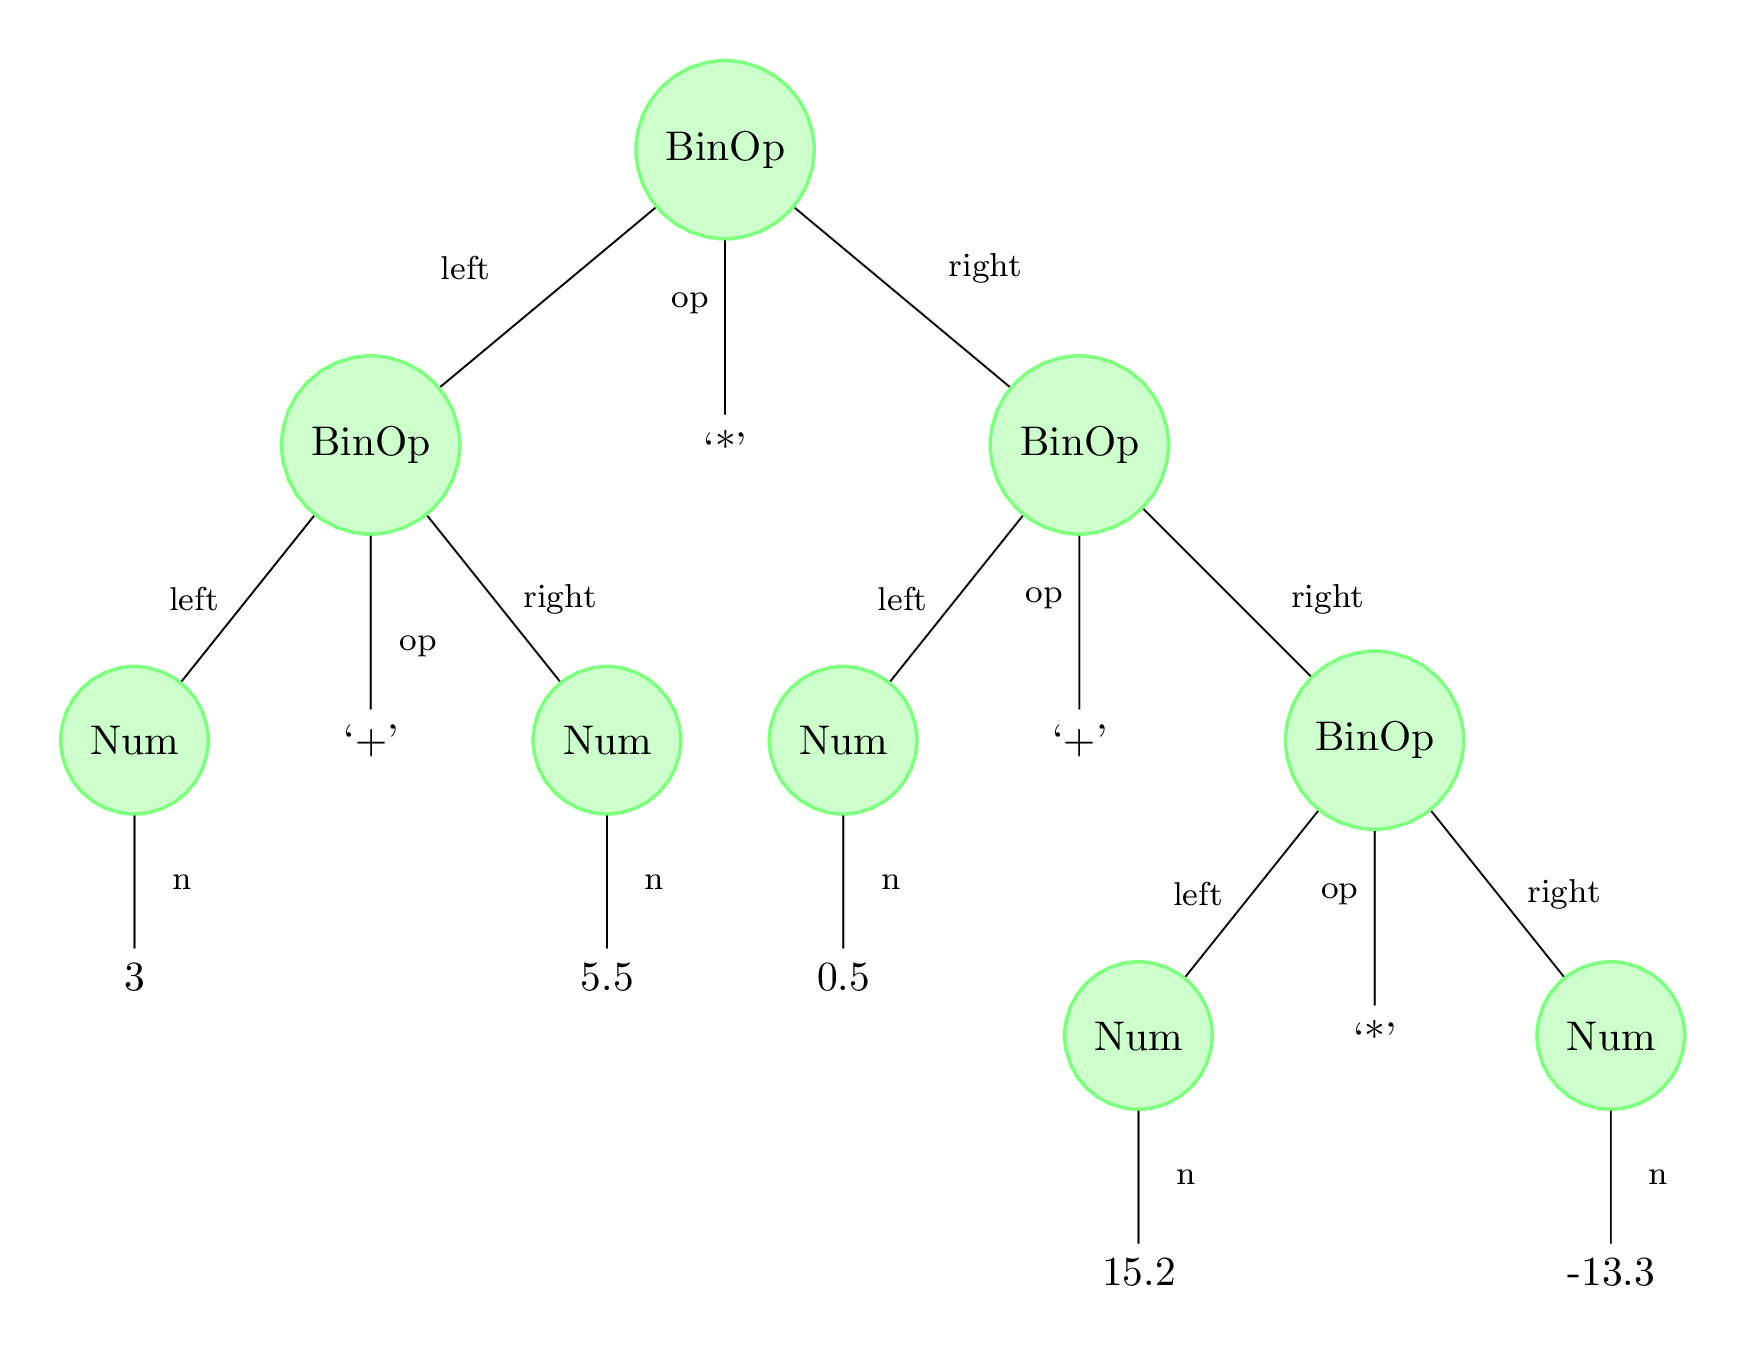
Now, it might seem like this representation is more complicated, and certainly more verbose. But we must be aware of our own human biases: because we're used to reading expressions like ((3 + 5.5) * (0.5 + (15.2 * -13.3))), we take it for granted that we can quickly parse this text in our heads to understand its meaning. A computer program like the Python interpreter, on the other hand, can't do anything "in its head": a programmer needs to have written code for every action it can take! And this is where the tree-like structure of BinOp really shines. To evaluate a binary operation, we first evaluate its left and right operands, and then combine them using the specified arithmetic operator.
现在,这种表示似乎更复杂,当然也更冗长。但我们必须意识到我们自己的人类偏见:因为我们习惯于阅读像 ((3 + 5.5) * (0.5 + (15.2 * -13.3))) 这样的表达方式,所以我们理所当然地认为我们可以在脑海中快速解析这段文字以理解其含义。另一方面,像 Python 解释器这样的计算机程序不能"在脑海中"做任何事情:程序员需要为它可以采取的每一个动作编写代码!这就是 BinOp 的树状结构真正闪耀的地方。为了计算二进制运算,我们首先计算它的左操作数和右操作数,然后使用指定的算术运算符将它们组合在一起。
class BinOp:
    def evaluate(self) -> Any:
        """Return the *value* of this expression.

        The returned value should the result of how this expression would be
        evaluated by the Python interpreter.

        >>> expr = BinOp(Num(10.5), '+', Num(30))
        >>> expr.evaluate()
        40.5
        """
        left_val = self.left.evaluate()
        right_val = self.right.evaluate()

        if self.op == '+':
            return left_val + right_val
        elif self.op == '*':
            return left_val * right_val
        else:
            # We shouldn't reach this branch because of our representation invariant
            raise ValueError(f'Invalid operator {self.op}')
Recursion and multiple AST classes 递归和多个 AST 类
Even though the code for BinOp.evaluate looks simple, it actually uses recursion in a subtle way. Notice that we're making pretty normal-looking recursive calls self.left.evaluate() and self.right.evaluate(), matching the tree structure of BinOp. But... where's the base case?
尽管 BinOp.evaluate 的代码看起来很简单,但它实际上以一种微妙的方式使用递归。请注意,我们正在进行看起来非常正常的递归调用 self.left.evaluate() 和 self.right.evaluate(),与 BinOp 的树结构相匹配。但。。。基本情况在哪里?
This is probably the most significant difference between our abstract syntax tree representation and the other tree-based classes we've studied so far. Because we are using multiple subclasses of Expr, there are multiple evaluate methods, one in each subclass. Each time self.left.evaluate and self.right.evaluate are called, they could either refer to BinOp.evaluate or Num.evaluate, depending on the types of self.left and self.right.
这可能是我们的抽象语法树表示与我们迄今为止研究过的其他基于树的类之间最显着的区别。由于我们使用的是 Expr 的多个子类,因此有多个 evaluate 方法,每个子类一个。每次调用 self.left.evaluate 和 self.right.evaluate 时,它们都可以引用 BinOp.evaluate 或 Num.evaluate,具体取决于 self.left 和 self.right 的类型。
In particular, notice that Num.evaluate does not make any subsequent calls to evaluate, since it just returns the object's n attribute. This is the true "base case" of evaluate, and it happens to be located in a completely different method than BinOp.evaluate! So fundamentally, evaluate is still an example of structural recursion, just one that spans multiple Expr subclasses.
特别要注意的是,Num.evaluate 不会对 evaluate 进行任何后续调用,因为它只返回对象的 n 属性。这是 evaluate 的真正"基本情况",它恰好位于与 BinOp.evaluate 完全不同的方法中!因此,从根本上说,evaluate 仍然是结构递归的一个例子,只是一个跨越多个 Expr 子类的例子。
抽象语法树(AST)中的 BinOp 节点
ast 模块在 Python 中用于将源码转换成抽象语法树(Abstract Syntax Trees,AST)。通过 AST,我们可以读取、修改、分析 Python 代码。本质上,它将源码转化为树形结构,节点代表语法构造,如表达式、语句等。这对于编写代码分析、优化工具或自动代码生成等任务非常有用。
在 Python 的 AST 中,Expression 节点表示一个表达式。这里,它是整个 AST 的根节点。Expression 节点有一个 body 属性,用于存储表达式的主体。body=BinOp (...): body 属性包含一个 BinOp 节点,表示一个二元操作(binary operation)。
BinOp 在 Python 的抽象语法树(AST)中指的是一个涉及到两个操作数的运算。例如,加法、减法或者任何二元操作都可以在 AST 中表示为一个 BinOp 节点。
ast.BinOp 类通常具备如下属性:
left:表示操作的左边操作数。op:一个子类对象表示操作符的具体类型,例如ast.Add表示加法操作符,ast.Sub表示减法操作符等。right:表示操作的右边操作数。
via:
-
Abstract Syntax Trees In Python
--- By Alessandro Finamore on 20 February 2021
-
Introduction to Abstract Syntax Trees