特别说明:本文章因业务组件功能,不完全开放/暂vip可见,有需要者留言找博主!
ps:注意!!本效果为图片分割切割!!不是文档切割!!图片仅供参考!
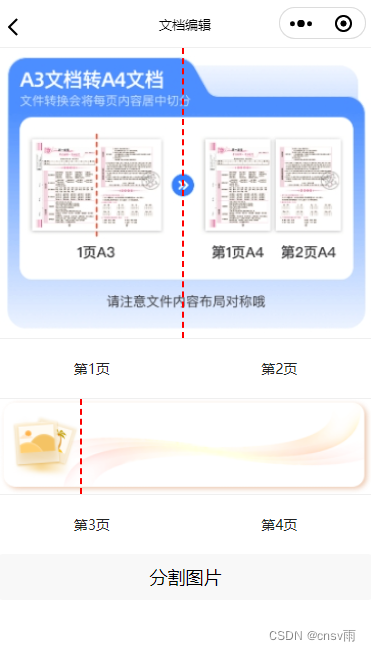
效果图
父组件 / 上传图片页面(index)

写一个上传按钮即可,事件方法:
javascript
uni.chooseMessageFile({
  extension: [".jpg", ".png", ".jpeg"],
  success: (res) => {
    const paths = res.tempFiles.map((item) => item.path);
    uni.navigateTo({
      url: `/pages/document/detail?files=${paths}`,
    });
  },
});
上方跳转地址说明看下方组件页面:
子组件(detail)
javascript
<template>
  <view class="container">
    <view v-for="(item, index) in files" :key="index">
      <imageCutting :imgSrc="item" :currenIndex="index" ref="prints" />
    </view>
    <button @click="splitImageButtonClick">分割图片</button>
  </view>
</template>

<script>
import imageCutting from "./print.vue";
export default {
  components: {
    imageCutting,
  },
  data() {
    return {
      files: [], // 存放图片路径的数组
      splitResults: [], // 存放分割后图片路径的数组
    };
  },
  onLoad(option) {
    this.files = option.files.split(",");
  },
  methods: {
    splitImageButtonClick() {
      this.splitResults = []; // 清空分割结果数组
      const promises = this.$refs.prints.map((item) => {
        return new Promise((resolve) => {
          item.splitImage((leftImagePath, rightImagePath) => {
            this.splitResults.push({
              left: leftImagePath,
              right: rightImagePath,
            });
            resolve();
          });
        });
      });
      Promise.all(promises).then(() => {
        console.log("所有图片分割完成", this.splitResults);
      });
    },
  },
};
</script>
<style scoped></style>
子组件(imageCutting)
javascript
<template>
  <view class="container">
    <view
      class="canvas-container"
      @touchstart="touchStart"
      @touchmove="touchMove"
    >
      <image
        class="main-image"
        mode="widthFix"
        :src="imgSrc"
        @load="onImageLoad"
      ></image>
      <view class="divider" :style="{ left: lineX + 'px' }"></view>
    </view>
    <view class="count-print">
      <text> 第{{ currenIndex * 2 + 1 }}页 </text>
      <text> 第{{ currenIndex * 2 + 2 }}页 </text>
    </view>
  </view>
</template>

<script>
export default {
  props: {
    imgSrc: {
      default: "",
      type: String,
    },
    currenIndex: {
      default: 0,
      type: Number,
    },
  },
  data() {
    return {
      // 设备宽度
      deviceWidth: uni.getSystemInfoSync().windowWidth,
      // 线条默认left位置
      lineX: uni.getSystemInfoSync().windowWidth * 0.5,
      // 图片宽度
      imageWidth: 0,
      // 图片高度
      imageHeight: 0,
      // 线条初始位置
      startX: 0,
    };
  },
  methods: {
    splitImage(callback) {
      const drp = uni.getWindowInfo().pixelRatio;
      const canvasLeft = uni.createOffscreenCanvas({ type: "2d" });
      const ctxLeft = canvasLeft.getContext("2d");
      const canvasRight = uni.createOffscreenCanvas({ type: "2d" });
      const ctxRight = canvasRight.getContext("2d");
      // 图片实际显示宽高
      const displayWidth = this.imageWidth / drp;
      const displayHeight = this.imageHeight / drp;
      // 分割线在图片中的实际位置
      const splitPosition = (this.lineX / this.deviceWidth) * displayWidth;
      // 设置左边画布大小
      const canvasLeftWidth = splitPosition * drp;
      const canvasLeftHeight = displayHeight * drp;
      canvasLeft.width = canvasLeftWidth;
      canvasLeft.height = canvasLeftHeight;
      // 设置右边画布大小
      const canvasRightWidth = (displayWidth - splitPosition) * drp;
      canvasRight.width = canvasRightWidth;
      canvasRight.height = canvasLeftHeight;
      const image = canvasLeft.createImage();
      image.src = this.imgSrc;
      image.onload = () => {
        // 绘制左半部分图像
        ctxLeft.drawImage(
          image,
          0,
          0,
          canvasLeftWidth,
          canvasLeftHeight,
          0,
          0,
          canvasLeftWidth,
          canvasLeftHeight
        );
        // 绘制右半部分图像
        ctxRight.drawImage(
          image,
          canvasLeftWidth,
          0,
          canvasRightWidth,
          canvasLeftHeight,
          0,
          0,
          canvasRightWidth,
          canvasLeftHeight
        );
        uni.canvasToTempFilePath({
          canvas: canvasLeft,
          success: (res) => {
            const leftImagePath = res.tempFilePath;
            console.log("左半部分图片路径:", leftImagePath);
            uni.canvasToTempFilePath({
              canvas: canvasRight,
              success: (res) => {
                const rightImagePath = res.tempFilePath;
                console.log("右半部分图片路径:", rightImagePath);
                callback(leftImagePath, rightImagePath);
              },
            });
          },
        });
      };
    },
    touchStart(event) {
      this.startX = event.touches[0].clientX;
    },
    touchMove(event) {
      const moveX = event.touches[0].clientX - this.startX;
      this.startX = event.touches[0].clientX;
      this.lineX = Math.min(
        Math.max(0, this.lineX + moveX),
        this.deviceWidth - 2
      );
    },
    onImageLoad(event) {
      const imageInfo = event.detail;
      this.imageWidth = imageInfo.width;
      this.imageHeight = imageInfo.height;
    },
  },
};
</script>

<style lang="scss" scoped>
.main-image {
  width: 100%;
  vertical-align: bottom;
}
.canvas-container {
  position: relative;
  border: 2rpx solid #efefef;
}
.divider {
  position: absolute;
  top: 0;
  bottom: 0;
  border-left: 4rpx dashed #f00;
  height: 100%;
  z-index: 10;
}
.count-print {
  display: flex;
  justify-content: space-around;
  margin: 40rpx 0;
}
</style>感谢你的阅读,如对你有帮助请收藏+关注!
只分享干货实战 和精品 ,从不啰嗦!!!
如某处不对请留言评论,欢迎指正~
博主可收徒、常玩QQ飞车,可一起来玩玩鸭~