1. 环境
- 下载VMware Workstation Pro17破解版,路径在阿里云盘(/工作/软件/虚拟机)中,安装并破解就行
- 下载Ubuntn系统16.0.4
○ 阿里镜像下载:https://mirrors.aliyun.com/ubuntu-releases/?spm=a2c6h.25603864.0.0.202e3b5epj7LDn
○ 清华大学开源镜像下载:https://mirrors.tuna.tsinghua.edu.cn/ubuntu-releases/ - 安装镜像
○ 我windows是2cpu,1cpu14核,共28核。但我给虚拟机设置成1cpu,12核,够用了
○ 我windows是32G内存,虚拟机我设置成24G内存
○ 我window硬盘直接设置500G,防止后面下载的存储不够,别吝啬
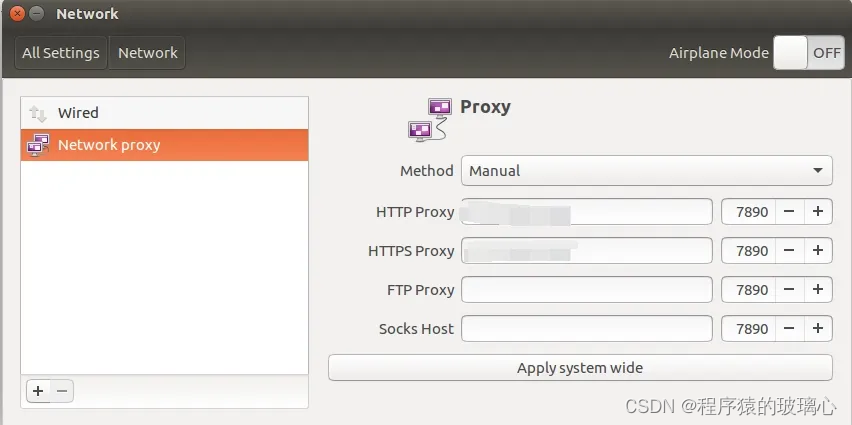
○ 这里有一个问题就是网络,需要让Ubuntn连接VPN外网,虚拟机设置NAT模式,可以访问是否能谷歌,不行的话,百度下如何连接vpn,我是设置网络代理

- 虚拟机的准备结束之后,就是环境的搭建和源码的下载
- 我在下载Ubuntn16的时候发了一个错误,我下载的是i386的一个版本,这个系统版本是32位,但后面很多命令是基于64位运行的,导致我命令运行不成功。
2.操作
- 安装git
shell
sudo apt install git- 安装依赖工具
shell
sudo apt install git-core libssl-dev libffi-dev gnupg flex bison gperf build-essential zip curl zlib1g-dev gcc-multilib g++-multilib libc6-dev-i386 lib32ncurses5-dev x11proto-core-dev libx11-dev libz-dev ccache libgl1-mesa-dev libxml2-utils xsltproc unzip- 设置git身份,添加自己的邮箱和姓名
shell
git config --global user.email "xxx@qq.com"
git config --global user.name "xxx"- 下载Python3:// 至少要安装3.6以上
shell
// sudo apt install python3
// 我下载的Ubuntn16系统,默认安装的是Python2.7,但Android10源码下载的repo需要3.6以上的环境才能运行,所以我安装了Python3.7的环境,运行命令如下:

# 安装依赖
sudo apt-get update
sudo apt-get install -y build-essential zlib1g-dev libncurses5-dev libgdbm-dev libnss3-dev libssl-dev libreadline-dev libffi-dev libsqlite3-dev wget libbz2-dev

# 下载 Python 3.7 源代码
wget https://www.python.org/ftp/python/3.7.12/Python-3.7.12.tgz

# 解压并进入目录
tar xvf Python-3.7.12.tgz
cd Python-3.7.12

# 配置并安装 Python 3.7
./configure --enable-optimizations
sudo make altinstall

// 安装完之后,并没结束,还需要配置好运行指令
//在 Ubuntu 中,可以使用 update-alternatives 来管理系统中的不同 Python 版本。你可以将
// 这里一定要注意,如果要下载的是Android10版本的源码,就不需要将python3指向python,因为Android10的源码在后面编译的时候,需要用到python2的环境
// python3 命令关联到新安装的 Python 3.7。运行以下命令:
sudo update-alternatives --install /usr/bin/python python /usr/local/bin/python3.7 1

// 然后选择默认 Python  版本:
sudo update-alternatives --config python

// 最后查看python的版本
python --version
// 一定要确定是3.7及以上版本- 创建bin文件夹
shell
mkdir ~/bin
PATH=~/bin:$PATH- 安装curl库
shell
sudo apt-get install curl- 下载repo
shell
curl https://storage.googleapis.com/git-repo-downloads/repo > ~/bin/repo
## 如果上述 URL 不可访问,可以用下面的:
## curl -sSL  'https://gerrit-googlesource.proxy.ustclug.org/git-repo/+/master/repo?format=TEXT' |base64 -d > ~/bin/repo
chmod a+x ~/bin/repo
按上面命令操作一番后,会在home文件夹下,生成一个bin/repo。校验一切是否按照正确,
shell
~$ repo --version
<repo not installed>
repo launcher version 2.45
       (from /home/hman/bin/repo)
git 2.7.4
Python 3.7.12 (default, Jun 16 2024, 02:52:41)
[GCC 5.4.0 20160609]
OS Linux 4.15.0-142-generic (#146~16.04.1-Ubuntu SMP Tue Apr 13 09:27:15 UTC 2021)
CPU x86_64 (x86_64)
Bug reports: https://issues.gerritcodereview.com/issues/new?component=1370071- 源码下载,我下载的是Android10的源码
shell
repo init -u https://mirrors.tuna.tsinghua.edu.cn/git/AOSP/platform/manifest -b android-10.0.0_r413. 总结
中间会遇到一些磕磕绊绊,主要是一些python的配置出问题,或者网络,存储不足,或者repo等,都不麻烦,查查资料解决就好了。