本项目旨在利用计算机视觉技术和深度学习算法,实现对停车场车位状态的实时自动识别。通过摄像头监控停车场内部,系统能够高效准确地辨认车位是否被占用,为车主提供实时的空闲车位信息,同时为停车场管理者提供智能化的车位管理工具。该系统结合了OpenCV的强大图像处理能力与Keras的易用性,便于快速构建和部署。
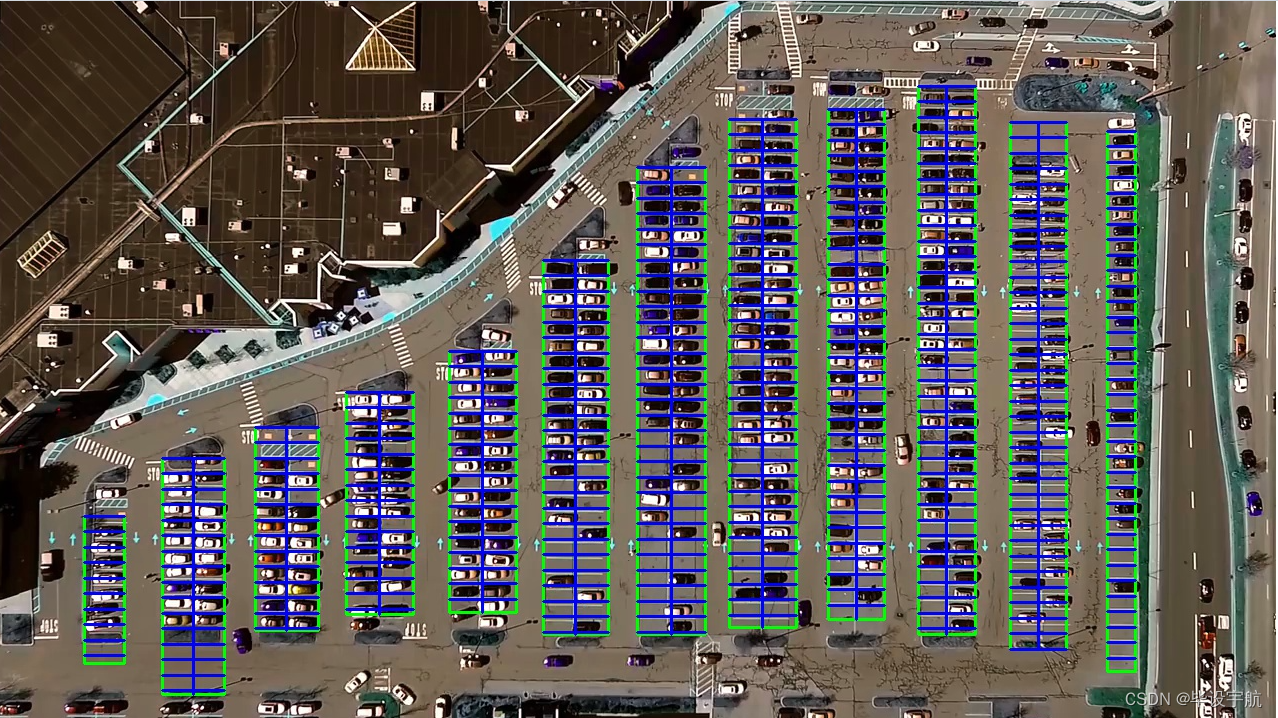
技术栈:
- OpenCV:用于图像的预处理,包括视频捕获、图像处理(如灰度转换、滤波、边缘检测等)以及ROI(感兴趣区域)的选取,为深度学习模型提供高质量的输入。
- Keras:基于TensorFlow的高级API,用于搭建和训练深度学习模型。项目中,可能采用预训练模型(如VGGNet、ResNet等)进行迁移学习,通过微调模型来适应车位识别任务,或者从零开始构建卷积神经网络(CNN)模型进行车位状态分类。
项目流程:
-
数据收集与预处理:首先,通过摄像头录制停车场视频,从中截取包含车位的画面,人工标注车位状态(如空闲或占用)。接着,对图像进行归一化、增强等预处理,创建训练和验证数据集。
-
模型训练:使用Keras构建深度学习模型,加载预处理后的数据集进行训练。训练过程中,可能涉及调整超参数、优化器选择、损失函数配置等,以达到理想的分类性能。
-
模型验证与优化:在验证集上评估模型性能,根据准确率、召回率等指标调整模型结构或参数,进行模型优化。
-
实时检测与应用:将训练好的模型集成到OpenCV中,实现实时视频流处理。系统不断捕获停车场的视频帧,进行图像处理后,通过模型预测车位状态。识别结果以可视化方式展示,如在视频流中标记车位为空闲或占用,并可进一步集成到停车场管理系统,实现车位引导、计费等功能。
特色与优势:
- 实时性:系统能够实时监控车位状态,及时更新信息,提高停车场的运营效率。
- 准确性:深度学习模型具有强大的特征学习能力,即使在复杂光照、遮挡等条件下也能保持较高识别准确率。
- 易部署与扩展:基于OpenCV和Keras的方案易于开发和调试,且模型可根据新数据持续优化,便于后续维护和功能升级。
- 智能化管理:为停车场管理者提供精准的车位占用情况,有助于优化停车资源分配,提升用户体验。
总结: 此项目通过融合OpenCV的图像处理能力和Keras构建的深度学习模型,实现了对停车场车位状态的自动识别,是智能交通系统和智慧城市应用中的一个重要组成部分,具有广泛的应用前景和社会价值。
from __future__ import division # 改变 Python 2 中除法操作符 / 的默认行为,使其表现得像 Python 3 中的除法操作符,结果会保留小数部分
import  matplotlib.pyplot as plt # 用于创建图表和可视化数据的 Python 库
import cv2
import os, glob # glob文件名匹配的模块
import numpy as np
from PIL import Image
from keras.applications.imagenet_utils import preprocess_input
from keras.models import load_model
from keras.preprocessing import image
from Parking import Parking
import pickle   # 序列化和反序列化对象的标准模块

cwd = os.getcwd() # 获取当前工作目录

def img_process(test_images, park):
    # 过滤背景,低于lower_red和高于upper_red的部分分别编程0,lower_red~upper_red之间的值编程255
    # map 函数用于将一个函数应用到可迭代对象的每个元素,并返回结果
    # 通过 list 函数将其转换为列表
    white_yellow_images = list(map(park.select_rgb_white_yellow,test_images))
    park.show_images(white_yellow_images)

    # 转灰度图
    gray_images = list(map(park.convert_gray_scale, white_yellow_images))
    park.show_images(gray_images)

    # 进行边缘检测
    edge_images = list(map(lambda image: park.detect_edges(image),gray_images))
    park.show_images(edge_images)

    # 根据需要设定屏蔽区域
    roi_images = list(map(park.select_region, edge_images))
    park.show_images(roi_images)

    # 霍夫变换,得出直线
    list_of_lines= list(map(park.hough_line, roi_images))

    # zip 函数来同时迭代 test_images 和 list_of_lines 中的元素
    line_images = []
    for image,lines in zip(test_images,list_of_lines):
        line_images.append(park.draw_lines(image,lines))
    park.show_images(line_images)

    rect_images = []
    rect_coords = [] # 列矩形
    for image,lines in zip(test_images, list_of_lines):
         # 过滤部分直线,对直线进行排序,得出每一列的起始点和终止点,并将列矩形画出来
        new_image,rects = park.identify_blocks(image,lines)
        rect_images.append(new_image)
        rect_coords.append(rects)

    park.show_images(rect_images)

    delineated = []
    spot_pos = []
    for image,rects in zip(test_images, rect_coords):
        # 在图上将停车位画出来,并返回字典{坐标:车位序号}
        new_image,spot_dict = park.draw_parking(image,rects)
        delineated.append(new_image)
        spot_pos.append(spot_dict)

    park.show_images(delineated)
    final_spot_dict = spot_pos[1]

    print(len(final_spot_dict))

    with open('spot_dict.pickle','wb') as handle:
        pickle.dump(final_spot_dict,handle,property==pickle.HIGHEST_PROTOCOL)

    park.save_images_for_cnn(test_images[0],final_spot_dict)

    return final_spot_dict

def keras_model(weights_path):
    model = load_model(weights_path)
    return model

def img_test(test_image,final_spot_dict,model,class_dictionary):
    for i in range (len(test_images)):
        predicted_images = park.predict_on_image(test_images[i],final_spot_dict,model,class_dictionary)

def video_test(video_name,final_spot_dict,model,class_dictionary):
    name = video_name
    cap = cv2.VideoCapture(name)
    park.predict_on_video(name,final_spot_dict,model,class_dictionary,ret=True)

if __name__ == '__main__':
    test_images = [plt.imread(path) for path in glob.glob('test_images/*.jpg')]
    weights_path = 'car1.h5'
    video_name = 'parking_video.mp4'
    class_dictionary = {}
    class_dictionary[0] = 'empty'
    class_dictionary[1] = 'occupied'
    park = Parking()
    park.show_image(test_images)
    final_spot_dict = img_process(test_images, park)
    model = keras_model(weights_path)
    img_test(test_images,final_spot_dict,model,class_dictionary)
    video_test(video_name,final_spot_dict,model,class_dictionary)
parking py
import matplotlib.pyplot as plt
import cv2
import os,glob
import numpy as np

class Parking:

    def show_images(self, images, cmap=None):
        cols = 2
        rows = (len(images) + 1)//cols # //为整除运算符

        plt.figure(figsize=(15,12)) # 创建一个图形窗口,并指定其大小为 15x12 英寸
        for i,image in enumerate(images):
            plt.subplot(rows, cols, i+1) # 在当前图形窗口中创建一个子图,i+1 是因为子图的编号是从 1 开始的
            # 检查图像的维度,如果图像是二维的(灰度图像),则将颜色映射设置为灰度,否则保持传入的 cmap 参数不变
            cmap = 'gray' if len(image.shape)==2 else cmap
            plt.imshow(image, cmap=cmap)
            plt.xticks([]) # 去除 x 轴和 y 轴的刻度标签
            plt.yticks([])
        plt.tight_layout(pad=0,h_pad=0,w_pad=0) # 调整子图之间的间距
        plt.show()

    def cv_show(self, name, img):
        cv2.imshow(name, img)
        cv2.waitKey(0)
        cv2.destroyAllWindows()

    def select_rgb_white_yellow(self,image):
        # 过滤掉背景
        lower = np.uint8([120,120,120])
        upper = np.uint8([255,255,255])

        # 低于lower_red和高于upper_red的部分分别编程0,lower_red~upper_red之间的值编程255,相当于过滤背景
        white_mask = cv2.inRange(image,lower,upper)
        self.cv_show('white_mask',white_mask)

        # 与操作
        masked = cv2.bitwise_and(image, image, mask=white_mask)
        self.cv_show('masked',masked)
        return masked

    def convert_gray_scale(selfself,image):
        return cv2.cvtColor(image, cv2.COLOR_BGR2GRAY)

    # 提取图像中的边缘信息
    # 返回的是一个二值图像,其中边缘点被标记为白色(255),而非边缘点被标记为黑色(0)
    def detect_edges(self, image, low_threshole=50, high_threshold=200):
        return cv2.Canny(image, low_threshole, high_threshold)

    def filter_region(self, image, vertices):
        # 剔除掉不需要的地方
        mask = np.zeros_like(image) # 创建和原图一样大的图,置零
        if len(mask.shape)==2: # 是否为一张灰度图
            cv2.fillPoly(mask, vertices, 255) # 使用顶点vertices在mask上填充多边形,并置为255白色
            self.cv_show('mask',mask)
        return  cv2.bitwise_and(image,mask)

    def select_region(self, image):
        # 手动选择区域
        # 首先,通过顶点定义多边形。
        rows, cols = image.shape[:2] # h和w
        pt_1 = [cols*0.05, rows*0.09]
        pt_2 = [cols*0.05, rows*0.70]
        pt_3 = [cols*0.30, rows*0.55]
        pt_4 = [cols*0.6,  rows*0.15]
        pt_5 = [cols*0.90, rows*0.15]
        pt_6 = [cols*0.90, rows*0.90]

        vertices = np.array([[pt_1, pt_2, pt_3, pt_4, pt_5, pt_6]],dtype=np.int32)
        point_img = image.copy()
        point_img = cv2.cvtColor(point_img, cv2.COLOR_BGR2GRAY)
        for point in vertices[0]:
            cv2.circle(point_img,(point[0], point[1]), 10, (0,0,255), 4)
        self.cv_show('point_img',point_img)

        return self.filter_region(image, vertices)

    # 霍夫变换,得出直线
    def hough_line(self,image):
        # 检测输入图像中的直线,并返回检测到的直线的端点坐标
        # 输入的图像需要是边缘检测后的结果
        # minLineLength(线的最短长度,比这个短的都被忽略)和MaxLineCap(两条直线之间的最大间隔,小于辞职,认为是一条直线)
        # rho以像素为单位的距离分辨率,通常设置为 1 像素
        # thrta角度精度
        # threshod直线交点数量阈值。只有累加器中某个点的投票数高于此阈值,才被认为是一条直线。
        return cv2.HoughLinesP(image, rho=0.1, thrta=np.pi/10, threshold=15,minLineLength=9,maxLineGap=4)

    # 过滤霍夫变换检测到的直线
    def draw_lines(self, image, lines, color=[255,0,0], thickness=2, make_copy=True):
        if make_copy:
            image = np.copy(image)
        cleaned = []
        for line in lines:
            for x1,y1,x2,y2 in line:
                if abs(y2-y1) <= 1 and abs(x2-x1) >= 25 and abs(x2-x1) <= 55:
                    cleaned.append((x1,y1,x2,y2))
                    cv2.line(image, (x1,y1), (x2,y2), color, thickness)
        print(" No lines detected: ", len(cleaned))
        return image

    # 过滤部分直线,对直线进行排序,得出每一列的起始点和终止点,并将列矩形画出来
    def identify_blocks(self, image, lines, make_copy=True):
        if make_copy:
            new_image = np.copy(image)

        # step1: 过滤部分直线
        cleaned = []
        for line in lines:
            for x1,y1,x2,y2 in line:
                if abs(y2-y1) <= 1 and abs(x2-x1) >= 25 and abs(x2-x1)<= 55:
                    cleaned.append((x1,y1,x2,y2))

        # step2: 对直线按照 起始点的x和y坐标 进行排序
        import operator # 可以使用其中的各种函数来进行操作,例如比较、算术
        list1 = sorted(cleaned, key=operator.itemgetter(0,1)) # 从列表的每个元素中获取索引为0和1的值,然后将这些值用作排序的依据

        # step3: 找到多个列,相当于每列是一排车
        clusters = {} # 列数:对应该列有哪些车位线
        dIndex = 0
        clus_dist = 10

        for i in range(len(list1) - 1):
            distance = abs(list1[i+1][0] - list1[i][0]) # 根据前后两组车位线的x1距离
            if distance <= clus_dist:
                if not dIndex in clusters.keys(): clusters[dIndex] = []
                clusters[dIndex].append(list1[i])
                clusters[dIndex].append(list1[i + 1])
            else:
                dIndex += 1

        # step4: 得到每一列的四个坐标
        rects = {} # 每一列的四个角的坐标
        i = 0
        for key in clusters:
            all_list = clusters[key]
            # 将列表 all_list 转换为一个集合set,去重
            # {(10, 20, 30, 40), (20, 30, 40, 50)} 转为 [(10, 20, 30, 40), (20, 30, 40, 50)]
            cleaned = list(set(all_list))
            if len(cleaned) > 5:
                cleaned = sorted(cleaned, key=lambda tup: tup[1]) # 按y1进行排序
                avg_y1 = cleaned[0][1]  # 第一条线段的起始点 y 坐标
                avg_y2 = cleaned[-1][1] # 最后一条线段的起始点 y 坐标,即整个区域的上下边界
                avg_x1 = 0
                avg_x2 = 0
                for tup in cleaned: # 累加起始点和结束点的 x 坐标
                    avg_x1 += tup[0]
                    avg_x2 += tup[2]
                avg_x1 = avg_x1/len(cleaned) # 取平均起始点和结束点x坐标值
                avg_x2 = avg_x2/len(cleaned)
                rects[i] = (avg_x1, avg_y1,avg_x2,avg_y2)
                i += 1
        print("Num Parking Lanes:", len(rects))

        # step5: 把列矩形画出来
        buff = 7
        for key in rects:
            tup_topLeft = (int(rects[key][0] - buff), int(rects[key][1])) # x1-buff, y1
            tup_botRight = (int(rects[key][2] + buff), int(rects[key][3])) # x2+buff, y2
            cv2.rectangle(new_image, tup_topLeft, tup_botRight,(0,255,0),3)
        return new_image,rects

    # 在图上将停车位画出来,并返回字典{坐标:车位序号}
    def draw_parking(self, image, rects, make_copy=True, color=[255,0,0], thickness=2, save=True):
        if make_copy:
            new_image = np.copy(image)
        gap = 15.5 # 一个车位大致高度
        spot_dict = {} # 字典:一个车位对应一个位置
        tot_spots = 0 # 总车位

        # 微调
        adj_y1 = {0: 20, 1: -10, 2: 0, 3: -11, 4: 28, 5: 5, 6: -15, 7: -15, 8: -10, 9: -30, 10: 9, 11: -32}
        adj_y2 = {0: 30, 1: 50, 2: 15, 3: 10, 4: -15, 5: 15, 6: 15, 7: -20, 8: 15, 9: 15, 10: 0, 11: 30}

        adj_x1 = {0: -8, 1: -15, 2: -15, 3: -15, 4: -15, 5: -15, 6: -15, 7: -15, 8: -10, 9: -10, 10: -10, 11: 0}
        adj_x2 = {0: 0, 1: 15, 2: 15, 3: 15, 4: 15, 5: 15, 6: 15, 7: 15, 8: 10, 9: 10, 10: 10, 11: 0}

        for key in rects:
            tup = rects[key]
            x1 = int(tup[0] + adj_x1[key])
            x2 = int(tup[2] + adj_x2[key])
            y1 = int(tup[1] + adj_y1[key])
            y2 = int(tup[3] + adj_y2[key])
            cv2.rectangle(new_image,(x1,y1), (x2,y2), (0,255,0), 2)
            num_splits = int(abs(y2-y1)//gap) # 一列总共有多少个车位
            for i in range (0,num_splits+1):   # 画车位框
                y = int(y1 + i*gap)
                cv2.rectangle(new_image, (x1,y), (x2,y2), (0,255,0), 2)
            if key > 0 and key < len(rects)-1:
                # 竖直线
                x = int((x1+x2)/2)
                cv2.line(new_image,(x,y1),(x,y2),color,thickness)

            # 计算数量
            if key == 0 or key == (len(rects) - 1): # 对于第一列和最后一列(只有一排车位)
                tot_spots += num_splits + 1
            else:
                tot_spots += 2*(num_splits + 1)     # 一列有两排车位

            # 字典对应好
            if key == 0 or key == (len(rects) - 1): # 对于第一列和最后一列(只有一排车位)
                for i in range(0, num_splits+1):
                    cur_len = len(spot_dict)
                    y = int(y1 + i*gap)
                    spot_dict[(x1,y,x2,y+gap)] = cur_len + 1
            else:
                for i in range(0, num_splits+1):
                    cur_len = len(spot_dict)
                    y = int(y1 + i*gap)
                    x = int((x1+x2)/2)
                    spot_dict[(x1,y,x,y+gap)] = cur_len + 1
                    spot_dict[(x,y,x2,y+gap)] = cur_len + 2

        print("total parking spaces: ", tot_spots, cur_len)
        if save:
            filename = 'with_parking.jpg'
            cv2.imwrite(filename, new_image)
        return new_image, spot_dict

    # 根据传入的起始点和终止点坐标列表画框
    def assign_spots_map(self, image, spot_dict, make_copy= True, color=[255,0,0], thickness=2):
        if make_copy:
            new_image = np.copy(image)
        for spot in spot_dict.keys():
            (x1,y1,x2,y2) = spot
            cv2.rectangle(new_image,(int(x1),int(y1)), (int(x2),int(y2)), color, thickness)
        return new_image

    # 遍历字典{坐标,车位号}在图片中截取对应坐标的图像,按车位号保存下来
    def save_images_for_cnn(self, image, spot_dict, folder_name= 'cnn_data'):
        for spot in spot_dict.keys():
            (x1,y1,x2,y2) = spot
            (x1,y1,x2,y2) = (int(x1),int(y1),int(x2),int(y2))

            # 裁剪
            spot_img= image[y1:y2, x1:x2]
            spot_img = cv2.resize(spot_img, (0,0), fx=2.0, fy=2.0)
            spot_id = spot_dict[spot]

            filename = 'spot' + str(spot_id) + '.jpg'
            print(spot_img.shape, filename, (x1,x2,y1,y2))

            cv2.imwrite(os.path.join(folder_name, filename), spot_img)

    # 将图像进行归一化,并将其转换成一个符合深度学习模型输入要求的四维张量,进行训练
    def make_prediction(self, image, model, class_dictionary):
        # 预处理
        img = image/255. # 将图像的像素值归一化到 [0, 1] 的范围内

        # 将图像转换成一个四维张量
        image = np.expend_dims(img, axis = 0)

        # 将图片调用keras算法进行预测
        class_predicted = model.predict(image) # 得出预测结果
        inID = np.argmax(class_predicted[0]) # 找到数组中最大值所在的索引
        label = class_dictionary[inID]
        return label

    def predict_on_image(self, image, spot_dict, model, class_dictionary,
                         make_copy=True, color=[0,255,0], alpha=0.5):
        if make_copy:
            new_image = np.copy(image)
            overlay = np.copy(image)
        self.cv_show('new_image',new_image)
        cnt_empty = 0
        all_spots = 0
        for spot in spot_dict.keys():
            all_spots += 1
            (x1, y1, x2, y2) = spot
            (x1, y1, x2, y2) = (int(x1), int(y1), int(x2), int(y2))
            spot_img = image[y1:y2, x1:x2]
            spot_img = cv2.resize(spot_img, (48,48))

            label = self.make_prediction(spot_img, model, class_dictionary)
            if label== 'empty':
                cv2.rectangle(overlay, (int(x1), int(y1)), (int(x2), int(y2)), color, -1)
                cnt_empty += 1
            cv2.addWeighted(overlay, alpha, new_image, 1-alpha, 0, new_image)

            cv2.putText(new_image, "Available: %d spots" %cnt_empty, (30,95),
                        cv2.FONT_HERSHEY_SIMPLEX,0.7,(255,255,255),2)

            cv2.putText(new_image, "Total: %d spots" %all_spots, (30,125),
                        cv2.FONT_HERSHEY_SIMPLEX, 0.7,(255,255,255),2)
            save = False

            if save:
                filename = 'with_parking.jpg'
                cv2.imwrite(filename, new_image)
            self.cv_show('new_image',new_image)

            return new_image

    def predict_on_video(self, video_name, final_spot_dict, model, class_dictionary, ret=True):
            cap= cv2.VideoCapture(video_name)
            count = 0
            while ret:
                ret, image = cap.read()
                count += 1
                if count == 5:
                    count == 0

                    new_image = np.copy(image)
                    overlay = np.copy(image)
                    cnt_empty = 0
                    all_spots = 0
                    color = [0,255,0]
                    alpha = 0.5
                    for spot in final_spot_dict.keys():
                        all_spots += 1
                        (x1,y1,x2,y2) = spot
                        (x1,y1,x2,y2) = (int(x1), int(y1), int(x2), int(y2))
                        spot_img = image[y1:y2, x1:x2]
                        spot_img = cv2.resize(spot_img, (48,48))

                        label = self.make_prediction(spot_img, model, class_dictionary)
                        if label == 'empty':
                            cv2.rectangle(overlay, (int(x1),int(y1)), (int(x2),int(y2)), color, -1)
                            cnt_empty += 1
                    cv2.addWeighted(overlay, alpha, new_image, 1-alpha, 0, new_image)

                    cv2.putText(new_image,"Available: %d spots" % cnt_empty,(30,95),
                                cv2.FONT_HERSHEY_SIMPLEX, 0.7, (255,255,255),2)

                    cv2.putText(new_image, "Total: %d spots" %all_spots, (30,125),
                                cv2.FONT_HERSHEY_SIMPLEX, 0.7, (255,255,255), 2)
                    cv2.imshow('frame',new_image)
                    # 检测用户是否按下了 'q' 键
                    if cv2.waitKey(10) & 0xFF == ord('q'): # 通过 & 0xFF 操作,可以确保只获取ASCII码的最后一个字节
                        break
            cv2.destroyWindow()
            cap.release()