目录
[2.1 python环境](#2.1 python环境)
[2.2 Visual Studio Code编译](#2.2 Visual Studio Code编译)
[3.1 代码构思](#3.1 代码构思)
[3.2 代码实例](#3.2 代码实例)
[3.3 运行结果](#3.3 运行结果)
1.认识Python
Python 是一个高层次的结合了解释性、编译性、互动性和面向对象的脚本语言。
Python 的设计具有很强的可读性,相比其他语言经常使用英文关键字或标点符号,它具有比其他语言更有特色的语法结构。
2.环境与工具
2.1 python环境
在Windows上使用命令行窗口查看所安装的python版本
python --version
2.2 Visual Studio Code编译
Visual Studio Code是一款由微软开发且跨平台的免费源代码编辑器。该软件以扩展的方式支持语法高亮、代码自动补全、代码重构功能,并且内置了命令行工具和Git 版本控制系统。

3.制作一个绘图板
3.1 代码构思
使用tkinter模块,利用canvas控件进行绘制,然后使用画布控件,获取鼠标按键、移动、释放的操作。
3.2 代码实例
import tkinter as tk
from tkinter import colorchooser, filedialog, messagebox
from PIL import Image, ImageTk, ImageDraw
import os
class SimplePaint:
def __init__(self, root):
# 初始化
self.root = root
self.root.title("Simple Paint-简单绘图板-Zucker")
self.root.geometry("800x600")
# 创建画布
self.canvas = tk.Canvas(root, bg="white", width=800, height=600)
self.canvas.pack(fill=tk.BOTH, expand=True)
# 初始化变量
self.old_x = None
self.old_y = None
self.color = "black"
self.eraser_on = False
# 设置菜单和绑定事件
self.setup_menu()
self.setup_bindings()
def setup_menu(self):
# 设置菜单
menu = tk.Menu(self.root)
self.root.config(menu=menu)
# 文件菜单
file_menu = tk.Menu(menu, tearoff=0)
menu.add_cascade(label="File", menu=file_menu)
file_menu.add_command(label="Open", command=self.open_image)
file_menu.add_command(label="Save", command=self.save_image)
file_menu.add_separator()
file_menu.add_command(label="Exit", command=self.root.quit)
# 编辑菜单
edit_menu = tk.Menu(menu, tearoff=0)
menu.add_cascade(label="Edit", menu=edit_menu)
edit_menu.add_command(label="Clear All", command=self.clear_canvas)
edit_menu.add_command(label="Erase", command=self.use_eraser)
edit_menu.add_command(label="Insert Text", command=self.insert_text)
edit_menu.add_command(label="Insert Image", command=self.insert_image)
# 形状菜单
shape_menu = tk.Menu(menu, tearoff=0)
menu.add_cascade(label="Shapes", menu=shape_menu)
shape_menu.add_command(label="Draw Line", command=self.draw_line)
shape_menu.add_command(label="Draw Circle", command=self.draw_circle)
# 颜色菜单
color_menu = tk.Menu(menu, tearoff=0)
menu.add_cascade(label="Color", menu=color_menu)
color_menu.add_command(label="Choose Color", command=self.choose_color)
def setup_bindings(self):
# 绑定画布事件
self.canvas.bind("<ButtonPress-1>", self.on_button_press)
self.canvas.bind("<B1-Motion>", self.on_paint)
self.canvas.bind("<ButtonRelease-1>", self.on_button_release)
def choose_color(self):
# 选择颜色
self.eraser_on = False
self.color = colorchooser.askcolor(color=self.color)[1]
def clear_canvas(self):
# 清除画布
self.canvas.delete("all")
def use_eraser(self):
# 启用橡皮擦
self.eraser_on = True
def insert_text(self):
# 插入文本
self.eraser_on = False
text = tk.simpledialog.askstring("Input", "Enter text to insert:")
if text:
self.canvas.create_text(400, 300, text=text, font=("Arial", 20), fill=self.color)
def insert_image(self):
# 插入图片
self.eraser_on = False
image_path = filedialog.askopenfilename()
if image_path:
img = Image.open(image_path)
img = img.resize((200, 200), Image.ANTIALIAS)
self.img = ImageTk.PhotoImage(img)
self.canvas.create_image(400, 300, image=self.img, anchor=tk.CENTER)
def draw_line(self):
# 画线
self.eraser_on = False
self.draw_shape = "line"
def draw_circle(self):
# 画圆
self.eraser_on = False
self.draw_shape = "circle"
def open_image(self):
# 打开图片
image_path = filedialog.askopenfilename()
if image_path:
img = Image.open(image_path)
self.img = ImageTk.PhotoImage(img)
self.canvas.create_image(0, 0, image=self.img, anchor=tk.NW)
def save_image(self):
# 保存图片
file_path = filedialog.asksaveasfilename(defaultextension=".png", filetypes=[("PNG files", "*.png"), ("All files", "*.*")])
if file_path:
# 保存画布内容为 PNG 图片
self.canvas.postscript(file=file_path + '.eps')
img = Image.open(file_path + '.eps')
img.save(file_path, "png")
os.remove(file_path + '.eps')
def on_button_press(self, event):
# 鼠标按下事件处理
self.old_x = event.x
self.old_y = event.y
def on_paint(self, event):
# 鼠标移动事件处理
paint_color = self.color if not self.eraser_on else "white"
if self.old_x and self.old_y:
self.canvas.create_line(self.old_x, self.old_y, event.x, event.y, fill=paint_color, width=5, capstyle=tk.ROUND, smooth=tk.TRUE)
self.old_x = event.x
self.old_y = event.y
def on_button_release(self, event):
# 鼠标释放事件处理
self.old_x = None
self.old_y = None
if __name__ == "__main__":
root = tk.Tk()
app = SimplePaint(root)
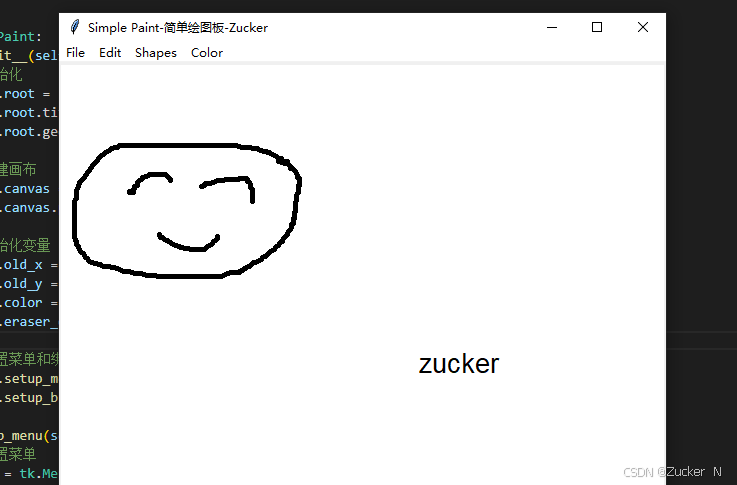
root.mainloop()3.3 运行结果
4.总结
通过定义多个函数来执行命令,并进行可视化操作,你也试试吧!