iOS 练习项目 Landmarks (五):UISwitch 切换展示数据
- [iOS 练习项目 Landmarks (五):UISwitch 切换展示数据](#iOS 练习项目 Landmarks (五):UISwitch 切换展示数据)
-
- [引入 Lookin](#引入 Lookin)
- 优化项目结构
- 纯代码方式重写主界面
- 设置详情页的返回按钮的文本
- Switch切换TableView展示数据
- [更新 PlaceCellDelegate 协议](#更新 PlaceCellDelegate 协议)
- [设置 AppIcon](#设置 AppIcon)
iOS 练习项目 Landmarks (五):UISwitch 切换展示数据
引入 Lookin
新建一个Podfile:
shell
source 'https://xxx.git'
platform :ios, '17.5'
use_frameworks!
target 'Landmarks' do
  pod 'LookinServer', '1.2.2', :configurations => ['Debug']
end
从 source 中引入 LookinServer,版本为 1.2.2。
命令行输入:
shell
pod install编译报错:
Sandbox:rsync.sanba deny(1) file-write-create xxx解决方法:Build Settings-Build Options-User Script Sandboxing 改为 NO。

User Script Sandboxing是一种安全策略,它通过创建一个受限制的执行环境来限制用户脚本的访问权限和资源使用。其主要目的是防止恶意代码或未经授权的用户脚本对系统文件、网络或其他敏感资源造成损害。
应用场景:在Xcode中,User Script Sandboxing可以确保用户自定义的脚本或工具在开发过程中不会意外地修改系统文件或访问敏感数据。在浏览器扩展或用户脚本中,Sandboxing可以确保这些脚本不会访问或修改它们不应该访问的网页内容或用户数据。
优化项目结构
删除 SceneDelegate.h 和 SceneDelegate.m,删除 Main.storyboard,删除项目配置中与 Main.storyboard 相关的东西,删除 Info.plist 的内容。
纯代码方式重写主界面
ViewController.h:
objc
#import <UIKit/UIKit.h>
#import "PlaceCell.h"
#import "DetailViewController.h"

@interface ViewController : UIViewController
    <UITableViewDelegate, UITableViewDataSource, PlaceCellDelegate, DetailViewControllerDelegate>

@property (nonatomic, strong) UILabel *labelTitle;
@property (nonatomic, strong) UIView *dividerView1;
@property (nonatomic, strong) UILabel *labelFavor;
@property (nonatomic, strong) UISwitch *favoriteSwitch;
@property (nonatomic, strong) UIView *dividerView2;
@property (nonatomic, strong) UITableView *placeTable;

@property (nonatomic, strong) NSMutableArray *data; // 完整数据源
@property (nonatomic, strong) NSMutableArray *places; // 过滤数据源

- (void)initPlaces;

@end
界面实现:
objc
- (void)viewDidLoad
{
    [super viewDidLoad];
    // Do any additional setup after loading the view.

    [self.view setBackgroundColor:UIColor.whiteColor];

    CGRect labelTitleFrame = CGRectMake(0, 0, 200, 80);
    CGRect dividerView1Frame = CGRectMake(0, 0, 300, 1);
    CGRect labelFavorFrame = CGRectMake(0, 0, 150, 50);
    CGRect favoriteSwitchFrame = CGRectMake(0, 0, 51, 31);
    CGRect dividerView2Frame = CGRectMake(0, 0, 300, 1);
    CGRect placeTableFrame = CGRectMake(0, 0, 400, 500);

    // 创建并设置 labelTitle
    self.labelTitle = [[UILabel alloc] initWithFrame:labelTitleFrame];
    // 设置应用标题的字体
    UIFont *labelTitleFont = [UIFont fontWithName:@"Helvetica-Bold" size:38];
    [self.labelTitle setFont:labelTitleFont];
    [self.labelTitle setText:@"Landmarks"];
    self.labelTitle.translatesAutoresizingMaskIntoConstraints = NO;

    // 创建并设置 dividerView1
    self.dividerView1 = [[UIView alloc] initWithFrame:dividerView1Frame];
    [self.dividerView1 setBackgroundColor:[[UIColor lightGrayColor] colorWithAlphaComponent:0.5]];
    self.dividerView1.translatesAutoresizingMaskIntoConstraints = NO;

    // 创建并设置 labelFavor
    self.labelFavor = [[UILabel alloc] initWithFrame:labelFavorFrame];
    // 设置标签的字体
    UIFont *labelFavorFont = [UIFont systemFontOfSize:18];
    [self.labelFavor setFont:labelFavorFont];
    [self.labelFavor setText:@"Favorites only"];
    self.labelFavor.translatesAutoresizingMaskIntoConstraints = NO;

    // 创建并设置 favoriteSwitch
    self.favoriteSwitch = [[UISwitch alloc] initWithFrame:favoriteSwitchFrame];
    self.favoriteSwitch.translatesAutoresizingMaskIntoConstraints = NO;
    // 添加目标-动作对
    [self.favoriteSwitch addTarget:self action:@selector(favoriteSwitchValueChanged:) forControlEvents:UIControlEventValueChanged];

    // 创建并设置 dividerView2
    self.dividerView2 = [[UIView alloc] initWithFrame:dividerView2Frame];
    [self.dividerView2 setBackgroundColor:[[UIColor lightGrayColor] colorWithAlphaComponent:0.5]];
    self.dividerView2.translatesAutoresizingMaskIntoConstraints = NO;

    // 创建并设置 placeTable
    self.placeTable = [[UITableView alloc] initWithFrame:placeTableFrame];
    [self.placeTable setSeparatorStyle:UITableViewCellSeparatorStyleSingleLine];
    [self.placeTable setSeparatorColor:UIColor.lightGrayColor];
    self.placeTable.translatesAutoresizingMaskIntoConstraints = NO;
    // 将当前对象设置为 UITableView 对象的 dataSource
    [self.placeTable setDataSource:self];
    // 设置 UITableViewDelegate
    self.placeTable.delegate = self;
    // 需要创建新的单元格时,告诉 UITableView 对象要实例化哪个类
    [self.placeTable registerClass:[PlaceCell class] forCellReuseIdentifier:@"PlaceCellIdentfier"];
    self.placeTable.backgroundColor = [UIColor whiteColor];

    [self initPlaces];
    self.places = [NSMutableArray arrayWithArray:self.data];

    [self.view addSubview:self.labelTitle];
    [self.view addSubview:self.dividerView1];
    [self.view addSubview:self.labelFavor];
    [self.view addSubview:self.favoriteSwitch];
    [self.view addSubview:self.dividerView2];
    [self.view addSubview:self.placeTable];

    /* 添加约束 */
    [NSLayoutConstraint activateConstraints:@[
        [self.labelTitle.topAnchor constraintEqualToAnchor:self.view.topAnchor constant:95],
        [self.labelTitle.leadingAnchor constraintEqualToAnchor:self.view.leadingAnchor constant:20],
    ]];

    [NSLayoutConstraint activateConstraints:@[
        [self.dividerView1.topAnchor constraintEqualToAnchor:self.labelTitle.bottomAnchor constant:10],
        [self.dividerView1.leadingAnchor constraintEqualToAnchor:self.view.leadingAnchor constant:20],
        [self.dividerView1.trailingAnchor constraintEqualToAnchor:self.view.trailingAnchor constant:0],
        [self.dividerView1.heightAnchor constraintEqualToConstant:1]
    ]];

    [NSLayoutConstraint activateConstraints:@[
        [self.labelFavor.topAnchor constraintEqualToAnchor:self.dividerView1.bottomAnchor constant:0],
        [self.labelFavor.leadingAnchor constraintEqualToAnchor:self.view.leadingAnchor constant:20],
        [self.labelFavor.heightAnchor constraintEqualToConstant:50]
    ]];

    [NSLayoutConstraint activateConstraints:@[
        [self.favoriteSwitch.centerYAnchor constraintEqualToAnchor:self.labelFavor.centerYAnchor],
        [self.favoriteSwitch.trailingAnchor constraintEqualToAnchor:self.view.trailingAnchor constant:-20],
    ]];

    [NSLayoutConstraint activateConstraints:@[
        [self.dividerView2.topAnchor constraintEqualToAnchor:self.labelFavor.bottomAnchor constant:0],
        [self.dividerView2.leadingAnchor constraintEqualToAnchor:self.view.leadingAnchor constant:20],
        [self.dividerView2.trailingAnchor constraintEqualToAnchor:self.view.trailingAnchor constant:0],
        [self.dividerView2.heightAnchor constraintEqualToConstant:1]
    ]];

    [NSLayoutConstraint activateConstraints:@[
        [self.placeTable.topAnchor constraintEqualToAnchor:self.dividerView2.bottomAnchor constant:0],
        [self.placeTable.widthAnchor constraintEqualToAnchor:self.view.widthAnchor],
        [self.placeTable.bottomAnchor constraintEqualToAnchor:self.view.bottomAnchor constant:0]
    ]];
}
用 Lookin 去查看各组件的位置,效果比较好:
设置详情页的返回按钮的文本
以前是Back,要改成Landmarks。
实际上这个返回按钮是导航条的 backBarButtonItem,新建一个 UIBarButtonItem,再设置即可:
objc
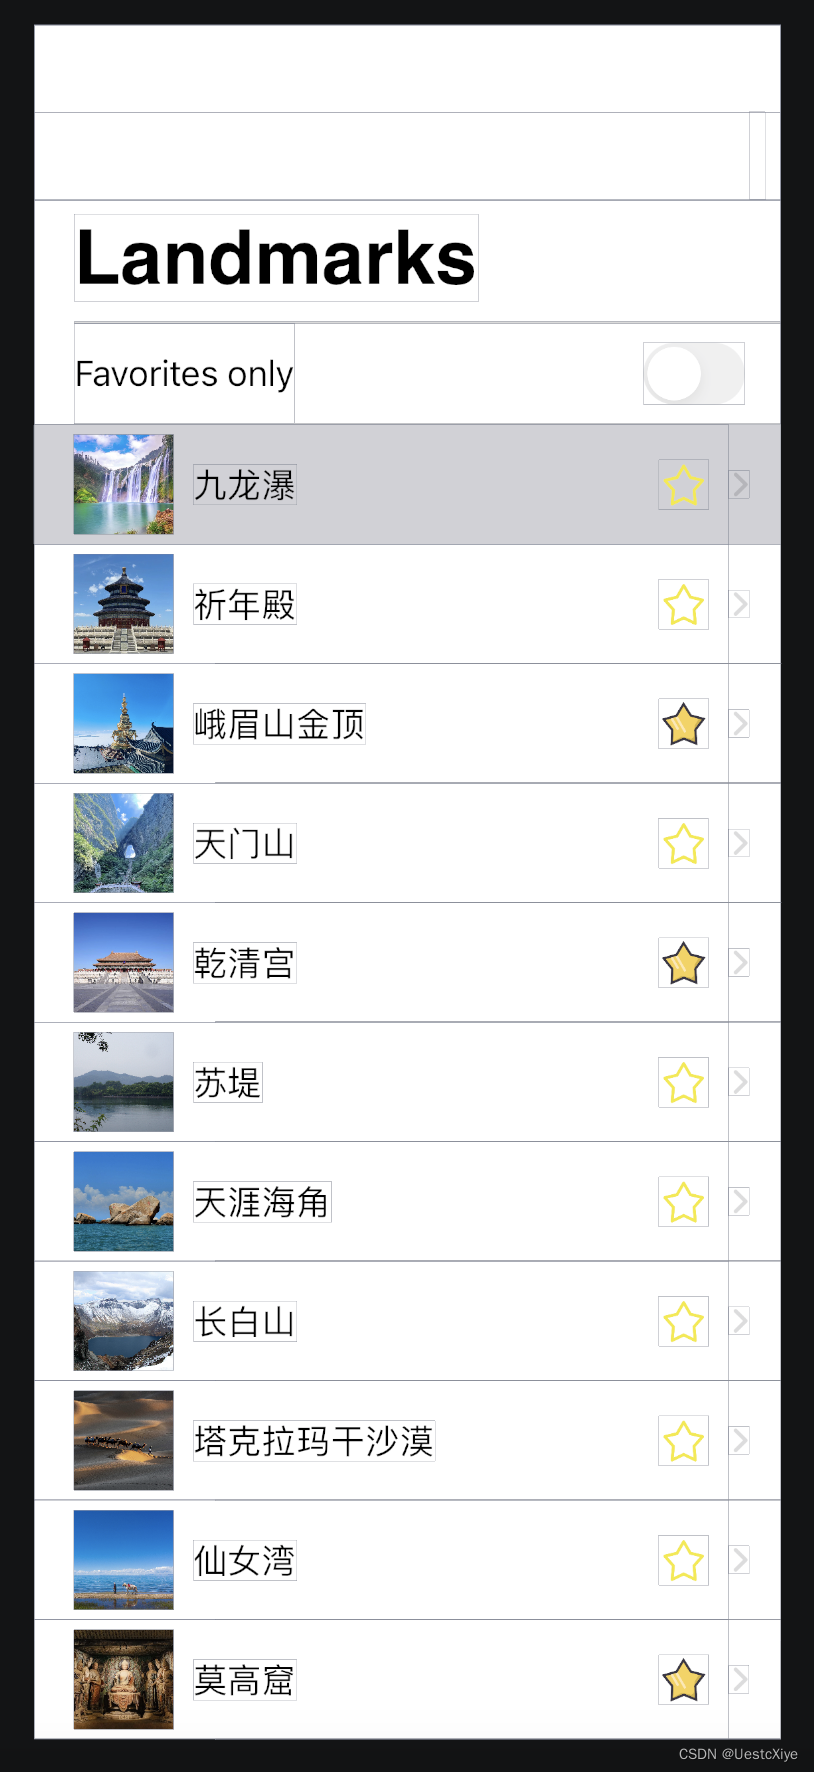
self.navigationItem.backBarButtonItem = [[UIBarButtonItem alloc] initWithTitle:@"Landmarks" style:UIBarButtonItemStylePlain target:nil action:nil];Switch切换TableView展示数据
按 favorite 属性进行筛选,当 Switch 的状态为On时,PlaceTable 只显示收藏的景点,即 favorite=YES 的 Place 对象对应的 PlaceCell。
新增一个 Place 对象数组:data,将其作为完整数据源,而之前的 places 数组作为过滤数据源。修改 initPlaces 方法,从 plist 读的数据不存储在 places 数组里,转而存储在 data 数组里。
在 Switch 的 ValueChange 事件中,如果当前 Switch 的状态为 On,那么遍历 data 数组,将所有 favorite=YES 的 Place 对象插入 places 数组;否则,places = data。还是将 places 作为 PlaceCell 的数据源进行设置,最后别忘了 placeTable 要重新加载数据。
objc
- (void)favoriteSwitchValueChanged:(UISwitch *)sender {
    if ([sender isOn])
    {
        [self.places removeAllObjects];
        for (Place *p in self.data)
        {
            if ([p favorite])
            {
                [self.places addObject:p];
            }
        }
    }
    else
    {
        self.places = [NSMutableArray arrayWithArray:self.data];
    }
    [self.placeTable reloadData];
}
更新 PlaceCellDelegate 协议
删除了 PlaceCellDelegate.h,协议声明放到 PlaceCell.h 里。
将可选方法:
- (void)updateFavorite:(BOOL)newFavorite atPlaceCell:(PlaceCell *)cell;修改成:
objc
- (void)placeCell:(PlaceCell *)cell updateFavorite:(BOOL)favorite;其他相关代码也一起修改。
设置 AppIcon
用 AI 生成一个 1024*1024 分辨率的图片,放到 Assets 的 AppIcon 里即可。