UICollectionView的学习
文章目录
学习导入
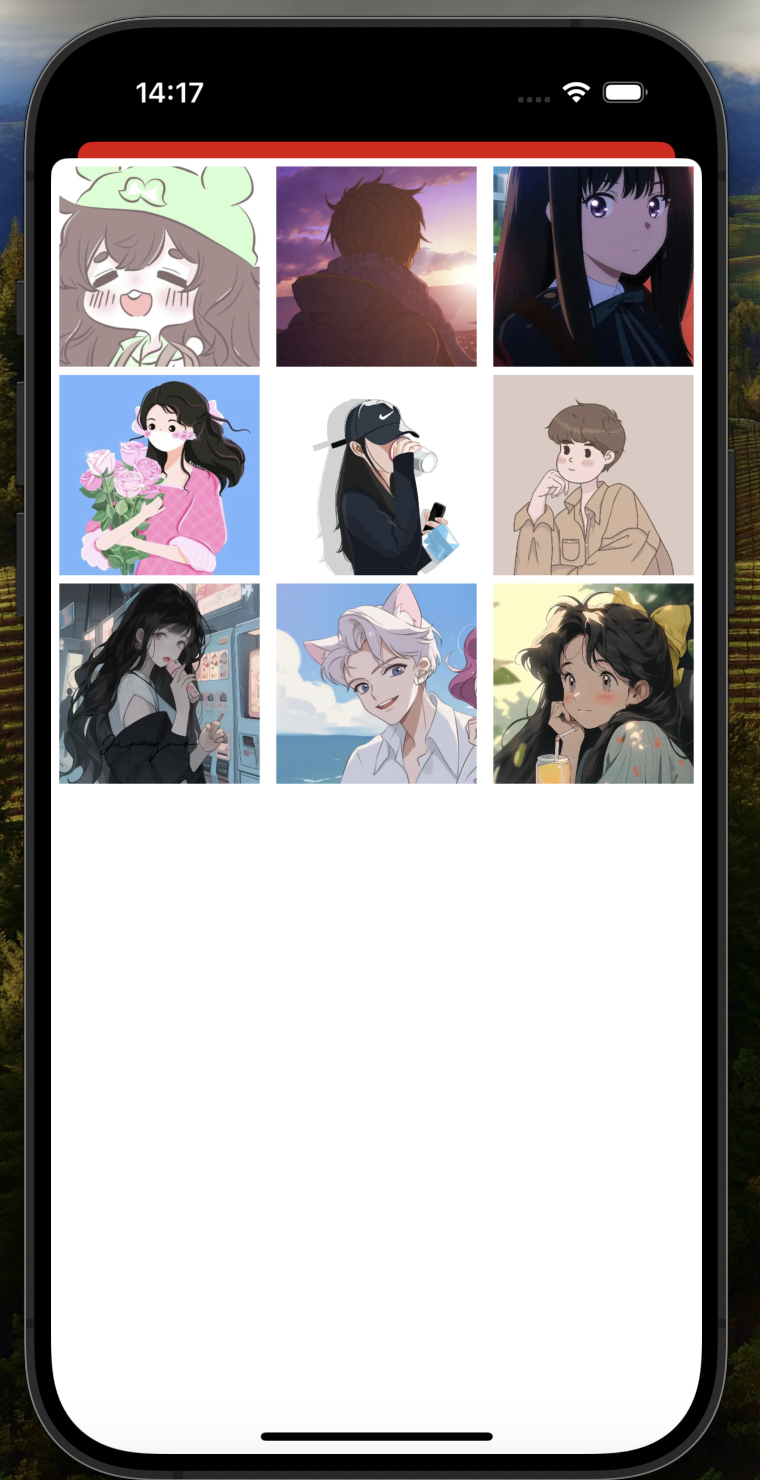
在进行网易云UI仿写的时候,为了实现点击cell之中的图片实现更换头像的效果,我学习了UICollectionView的使用,编写了一个照片墙,用于展示可供选择更换的头像,因此将学习过程做一个介绍
介绍
UICollectionView 是属于scrollView的子类,用于展示集合视图,布局更加灵活,可实现多列布局,集合视图中的数据被组织成单个项目,我们将其分组到部分进行演示。项目是您想要呈现的最小数据单位。但它的用法却很类似于UITableView 类。
使用UICollectionView 有UICollectionViewDataSource,UICollectionViewDelegate,UICollectionViewDelegateFlowLayout这三个协议。
相对于UITableView作为表格来说,使用UICollectionView其实更加方便,在于他的可在每一行添加不止一个cell,还能根据框架布局来自动的进行换行等操作
使用
UICollectionViewFlowLayout
在创建UICollectionView我们要先对UICollectionViewFlowLayout进行初始化,UICollectionViewFlowLayout是苹果内置的一种流式的布局,负责整个视图的布局,通过这个类,可以定制UICollectionView之中每个item的位置,以及表头、脚注和装饰视图的位置,只需简单的配置几个属性就可以完成整个布局的搭建。
UICollectionViewFlowLayout的常用属性如下:
itemSize:设置item尺寸
minimumLineSpacing:设置每行之间的间距
minimumInteritemSpacing:设置每行内部item之间的间距
headerReferenceSize:设置头部size
footerReferenceSize:设置脚注size
scrollDirection:设置滚动方向
sectionHeadersPinToVisibleBounds:设置是否当元素超出屏幕之后固定头部视图位置,默认NO
sectionFootersPinToVisibleBounds:设置是否当元素超出屏幕之后固定尾部视图位置,默认NO
sectionInset:``属性设置每个节(section)的内边距(上、左、下、右)
在使用UICollectionViewFlowLayout的时候可以在放不下足够多的单元格的时候,实现集合视图的自动换行或换列,以适应屏幕大小或者布局限制。
objc
UICollectionViewFlowLayout *layout = [[UICollectionViewFlowLayout alloc] init];
    layout.itemSize = CGSizeMake(self.view.bounds.size.width / 3 - 10, self.view.bounds.size.width / 3 - 10);
    layout.minimumInteritemSpacing = 5;
    layout.minimumLineSpacing = 5;
layout.sectionInset = UIEdgeInsetsMake(5, 5, 5, 5);以上是对item进行批量的修改没有办法,单独定制,要是想要单独定制,那么我们必须在UICollectionViewDelegate以及UICollectionViewDelegateFlowLayout协议,实现以下方法
objc
// 1、单独定制item的尺寸
- (CGSize)collectionView:(UICollectionView *)collectionView layout:(UICollectionViewLayout*)collectionViewLayout sizeForItemAtIndexPath:(NSIndexPath *)indexPath;

// 2、定义每个UICollectionView的margin(间距),对每一个section单独设置边界,即内部cell上下左右距离header和footer的边界(间距)
- (UIEdgeInsets)collectionView:(UICollectionView *)collectionView layout:(UICollectionViewLayout*)collectionViewLayout insetForSectionAtIndex:(NSInteger)section;

// 3、单独定制每行之间的间距
- (CGFloat)collectionView:(UICollectionView *)collectionView layout:(UICollectionViewLayout*)collectionViewLayout minimumLineSpacingForSectionAtIndex:(NSInteger)section;

// 4、单独定制每行item之间的间距
- (CGFloat)collectionView:(UICollectionView *)collectionView layout:(UICollectionViewLayout*)collectionViewLayout minimumInteritemSpacingForSectionAtIndex:(NSInteger)section;

// 5、单独定制头部视图size
- (CGSize)collectionView:(UICollectionView *)collectionView layout:(UICollectionViewLayout*)collectionViewLayout referenceSizeForHeaderInSection:(NSInteger)section;

// 6、单独定制脚注视图size
- (CGSize)collectionView:(UICollectionView *)collectionView layout:(UICollectionViewLayout*)collectionViewLayout referenceSizeForFooterInSection:(NSInteger)section;
但由于照片墙的实现还是较为简单,无需对item进行太多的定制化修改,故我自己就还没进行使用
创建
初始化方法:
objc
- (instancetype)initWithFrame:(CGRect)frame collectionViewLayout:(UICollectionViewLayout *)layout; - delegate:设置代理
- dataSource:设置数据源
- allowsSelection:设置是否可以选中
- allowsMultipleSelection:设置是否可以多选
注册
与自定义cell相似,UICollectionView也要进行注册的操作,注册单元格
objc
- (void)registerClass:(Class)cellClass forCellWithReuseIdentifier:(NSString *)identifier;注册头尾视图
objc
// @param elementKind
// UICollectionElementKindSectionHeader:头部
// UICollectionElementKindSectionFooter:尾部

- (void)registerClass:(Class)viewClass forSupplementaryViewOfKind:(NSString *)elementKind withReuseIdentifier:(NSString *)identifier;
实现数据源协议的方法
objectivec
//设置分区数(必须实现)
- (NSInteger)numberOfSectionsInCollectionView:(UICollectionView *)collectionView {
    return 1;
}

//设置每个分区的item个数
- (NSInteger)collectionView:(UICollectionView *)collectionView numberOfItemsInSection:(NSInteger)section{
    return 5;
}

//设置返回每个item的属性必须实现)
- (UICollectionViewCell *)collectionView:(UICollectionView *)collectionView cellForItemAtIndexPath:(NSIndexPath *)indexPath
{
    UICollectionViewCell *cell = [self.collection dequeueReusableCellWithReuseIdentifier:ID forIndexPath:indexPath];
    return cell;
}

//对头视图或者尾视图进行设置
- (UICollectionReusableView *)collectionView:(UICollectionView *)collectionView viewForSupplementaryElementOfKind:(NSString *)kind atIndexPath:(NSIndexPath *)indexPath {
    NSString *identifier;

    if ([kind isEqualToString:UICollectionElementKindSectionHeader]) {
        identifier = @"headerView";
    } else {
        identifier = @"footerView";
    }
    UICollectionReusableView *view = [collectionView dequeueReusableSupplementaryViewOfKind:kind withReuseIdentifier:identifier forIndexPath:indexPath];
    UILabel *label = [[UILabel alloc] initWithFrame:CGRectMake(0, 10, 120, 30)];
    [view addSubview:label];

    if (indexPath.section == 0) {
        label.text = @"section1";
    }else {
        label.text = @"section2";
    }
    if ([kind isEqualToString:UICollectionElementKindSectionHeader]) {
        view.backgroundColor = [UIColor redColor];
    } else {
        view.backgroundColor = [UIColor purpleColor];

    }
    return view;
}

//是否允许移动Item
- (BOOL)collectionView:(UICollectionView *)collectionView canMoveItemAtIndexPath:(NSIndexPath *)indexPath NS_AVAILABLE_IOS(9_0){
    return YES;
}

//移动Item时触发的方法
- (void)collectionView:(UICollectionView *)collectionView moveItemAtIndexPath:(NSIndexPath *)sourceIndexPath toIndexPath:(NSIndexPath*)destinationIndexPath NS_AVAILABLE_IOS(9_0); {

}
对单元格的设置必须完成以下方法
- 使用
dequeueCell(withIdentifier:for:)获取集合视图中项目的单元格。 - 使用
dequeueReusableView(ofKind:withIdentifier:for:)方法获取布局对象请求的补充视图。
以下给出各个协议之中的方法
UIScrollViewDelegate
objc
// 1、设置是否允许选中
- (BOOL)collectionView:(UICollectionView *)collectionView shouldSelectItemAtIndexPath:(NSIndexPath *)indexPath;

// 2、设置是否允许取消选中
- (BOOL)collectionView:(UICollectionView *)collectionView shouldDeselectItemAtIndexPath:(NSIndexPath *)indexPath;

// 3、选中
- (void)collectionView:(UICollectionView *)collectionView didSelectItemAtIndexPath:(NSIndexPath *)indexPath;

// 4、取消选中
- (void)collectionView:(UICollectionView *)collectionView didDeselectItemAtIndexPath:(NSIndexPath *)indexPath;
UICollectionViewDataSource
objc
// 1、设置section组数
- (NSInteger)numberOfSectionsInCollectionView:(UICollectionView *)collectionView;

// 2、设置item个数
- (NSInteger)collectionView:(UICollectionView *)collectionView numberOfItemsInSection:(NSInteger)section;

// 3、配置cell
- (UICollectionViewCell *)collectionView:(UICollectionView *)collectionView cellForItemAtIndexPath:(NSIndexPath *)indexPath;

// 4、自定义头部、脚注视图
- (UICollectionReusableView *)collectionView:(UICollectionView *)collectionView viewForSupplementaryElementOfKind:(NSString *)kind atIndexPath:(NSIndexPath *)indexPath;
UICollectionViewDelegateFlowLayout
objc
//设置指定indexPath的单元格的大小
- (CGSize)collectionView:(UICollectionView *)collectionView layout:(UICollectionViewLayout*)collectionViewLayout sizeForItemAtIndexPath:(NSIndexPath *)indexPath;

//设置分组中的每一个单元格的上下左右的空白距离,
- (UIEdgeInsets)collectionView:(UICollectionView *)collectionView layout:(UICollectionViewLayout*)collectionViewLayout insetForSectionAtIndex:(NSInteger)section;

//设置分组中的单元格的行间距
- (CGFloat)collectionView:(UICollectionView *)collectionView layout:(UICollectionViewLayout*)collectionViewLayout minimumLineSpacingForSectionAtIndex:(NSInteger)section;

//设置每行中的cell的间距
- (CGFloat)collectionView:(UICollectionView *)collectionView layout:(UICollectionViewLayout*)collectionViewLayout minimumInteritemSpacingForSectionAtIndex:(NSInteger)section;


//分组的头部视图的size大小
-(CGSize)collectionView:(UICollectionView *)collectionView layout:(UICollectionViewLayout*)collectionViewLayout referenceSizeForHeaderInSection:(NSInteger)section;

//分组的尾部视图的size大小
- (CGSize)collectionView:(UICollectionView *)collectionView layout:(UICollectionViewLayout*)collectionViewLayout referenceSizeForFooterInSection:(NSInteger)section;
实现照片墙的点击更换的方法
要实现点击更换的方法,其实很简单,我们使用- (void)collectionView:(UICollectionView *)collectionView didSelectItemAtIndexPath:(NSIndexPath *)indexPath;这个方法即可,但选中之后,通过协议将选中的图片传给上一个视图,用于更换头像,实现的控制器代码如下:
objc
#import "JCFourth.h"
#import "JCThird.h"
#import "UserInfoTableViewCell.h"

@interface JCFourth () <UICollectionViewDataSource, UICollectionViewDelegate>


@end

@implementation JCFourth


- (void)viewDidLoad {
    [super viewDidLoad];

    // 初始化图片数组
    self.images = @[
        [UIImage imageNamed:@"头像1.jpeg"], [UIImage imageNamed:@"头像2.jpeg"], [UIImage imageNamed:@"头像3.jpeg"],
        [UIImage imageNamed:@"头像4.jpeg"], [UIImage imageNamed:@"头像5.jpeg"], [UIImage imageNamed:@"头像6.jpeg"],
        [UIImage imageNamed:@"头像7.jpeg"], [UIImage imageNamed:@"头像8.jpeg"], [UIImage imageNamed:@"头像9.jpeg"]
    ];

    UICollectionViewFlowLayout *layout = [[UICollectionViewFlowLayout alloc] init];
    layout.itemSize = CGSizeMake(self.view.bounds.size.width / 3 - 10, self.view.bounds.size.width / 3 - 10);
    layout.minimumInteritemSpacing = 5;
    layout.minimumLineSpacing = 5;
    layout.sectionInset = UIEdgeInsetsMake(5, 5, 5, 5);

    self.collectionView = [[UICollectionView alloc] initWithFrame:self.view.bounds collectionViewLayout:layout];
    self.collectionView.dataSource = self;
    self.collectionView.delegate = self;
    self.collectionView.backgroundColor = [UIColor clearColor];
    [self.collectionView registerClass:[UICollectionViewCell class] forCellWithReuseIdentifier:@"cell"];
    [self.view addSubview:self.collectionView];
}

- (NSInteger)collectionView:(UICollectionView *)collectionView numberOfItemsInSection:(NSInteger)section {
    return self.images.count;
}

- (UICollectionViewCell *)collectionView:(UICollectionView *)collectionView cellForItemAtIndexPath:(NSIndexPath *)indexPath {
    UICollectionViewCell *cell = [collectionView dequeueReusableCellWithReuseIdentifier:@"cell" forIndexPath:indexPath];
    UIImageView *imageView = [[UIImageView alloc] initWithImage:self.images[indexPath.item]];
    imageView.contentMode = UIViewContentModeScaleAspectFill;
    imageView.clipsToBounds = YES;
    cell.backgroundView = imageView;
    return cell;
}

- (void)collectionView:(UICollectionView *)collectionView didSelectItemAtIndexPath:(NSIndexPath *)indexPath {
    UIImage *selectedImage = self.images[indexPath.item];
    [self.delegate viewController:self didSelectImage:selectedImage];
    [self dismissViewControllerAnimated:YES completion:nil];
}


@end
参差瀑布流的布局
我看到的参考文章,对于实现参差瀑布流的方式,是自定义一个UICollectionViewFlowLayout的子类,存储数组在子类之中调用方法,调整视图的布局。我就想着使用UICollectionViewDelegateFlowLayout这个协议之中的方法,更加方便的实现瀑布流
- (CGSize)collectionView:(UICollectionView *)collectionView layout:(UICollectionViewLayout *)collectionViewLayout sizeForItemAtIndexPath:(NSIndexPath *)indexPath我直接使用这个方法,在每个照片的原有比例之中,在保持宽度不变的情况下添加了随机的高度,算是勉强完成了参差瀑布流,完整代码如下
objc
#import "JCFourth.h"
#import "JCThird.h"
#import "UserInfoTableViewCell.h"

@interface JCFourth () <UICollectionViewDataSource, UICollectionViewDelegate, UICollectionViewDelegateFlowLayout>


@end

@implementation JCFourth


- (void)viewDidLoad {
    [super viewDidLoad];

    self.images = @[
        [UIImage imageNamed:@"头像1.jpeg"], [UIImage imageNamed:@"头像2.jpeg"], [UIImage imageNamed:@"头像3.jpeg"],
        [UIImage imageNamed:@"头像4.jpeg"], [UIImage imageNamed:@"头像5.jpeg"], [UIImage imageNamed:@"头像6.jpeg"],
        [UIImage imageNamed:@"头像7.jpeg"], [UIImage imageNamed:@"头像8.jpeg"], [UIImage imageNamed:@"头像9.jpeg"]
    ];

    UICollectionViewFlowLayout *layout = [[UICollectionViewFlowLayout alloc] init];
//    layout.itemSize = CGSizeMake(self.view.bounds.size.width / 3 - 10, self.view.bounds.size.width / 3 - 10);
    layout.minimumInteritemSpacing = 5;
    layout.minimumLineSpacing = 5;
    layout.sectionInset = UIEdgeInsetsMake(5, 5, 5, 5);

    self.collectionView = [[UICollectionView alloc] initWithFrame:self.view.bounds collectionViewLayout:layout];
    self.collectionView.dataSource = self;
    self.collectionView.delegate = self;
    self.collectionView.backgroundColor = [UIColor clearColor];
    [self.collectionView registerClass:[UICollectionViewCell class] forCellWithReuseIdentifier:@"cell"];
    [self.view addSubview:self.collectionView];
}

- (NSInteger)collectionView:(UICollectionView *)collectionView numberOfItemsInSection:(NSInteger)section {
    return self.images.count;
}

- (UICollectionViewCell *)collectionView:(UICollectionView *)collectionView cellForItemAtIndexPath:(NSIndexPath *)indexPath {
    UICollectionViewCell *cell = [collectionView dequeueReusableCellWithReuseIdentifier:@"cell" forIndexPath:indexPath];
    UIImageView *imageView = [[UIImageView alloc] initWithImage:self.images[indexPath.item]];
    imageView.contentMode = UIViewContentModeScaleAspectFill;
    imageView.clipsToBounds = YES;
    cell.backgroundView = imageView;
    return cell;
}

- (void)collectionView:(UICollectionView *)collectionView didSelectItemAtIndexPath:(NSIndexPath *)indexPath {
    UIImage *selectedImage = self.images[indexPath.item];
    [self.delegate viewController:self didSelectImage:selectedImage];
    [self dismissViewControllerAnimated:YES completion:nil];
}

#pragma mark - UICollectionViewDelegateFlowLayout 协议中的方法

- (CGSize)collectionView:(UICollectionView *)collectionView layout:(UICollectionViewLayout *)collectionViewLayout sizeForItemAtIndexPath:(NSIndexPath *)indexPath {
//这段主要是实现了等比例缩放
    UIImage *image = self.images[indexPath.item];
    CGFloat aspectRatio = image.size.width / image.size.height;
    CGFloat targetWidth = (CGRectGetWidth(collectionView.bounds) - 20) / 3.0;
    CGFloat targetHeight = targetWidth / aspectRatio;

    CGFloat randomHeightOffset = arc4random_uniform(100);

    return CGSizeMake(targetWidth , targetHeight + randomHeightOffset);
}//设置section的大小


- (UIEdgeInsets)collectionView:(UICollectionView *)collectionView layout:(UICollectionViewLayout *)collectionViewLayout insetForSectionAtIndex:(NSInteger)section {
    return UIEdgeInsetsMake(5, 5, 5, 5); // 设置每个 section 的边距
}

- (CGFloat)collectionView:(UICollectionView *)collectionView layout:(UICollectionViewLayout *)collectionViewLayout minimumLineSpacingForSectionAtIndex:(NSInteger)section {
    return 5.0; // 设置行间距
}

- (CGFloat)collectionView:(UICollectionView *)collectionView layout:(UICollectionViewLayout *)collectionViewLayout minimumInteritemSpacingForSectionAtIndex:(NSInteger)section {
    return 5.0; // 设置列间距
}

@end
参考文章
UICollectionView\](https://developer.apple.com/documentation/uikit/uicollectionview [【iOS】UICollectionView使用](https://blog.csdn.net/XY_Mckevince/article/details/135734252?ops_request_misc=%257B%2522request%255Fid%2522%253A%2522172111003416800188567330%2522%252C%2522scm%2522%253A%252220140713.130102334.pc%255Fblog.%2522%257D&request_id=172111003416800188567330&biz_id=0&utm_medium=distribute.pc_search_result.none-task-blog-2~blog~first_rank_ecpm_v1~rank_v31_ecpm-1-135734252-null-null.nonecase&utm_term=%20UICollectionView&spm=1018.2226.3001.4450)