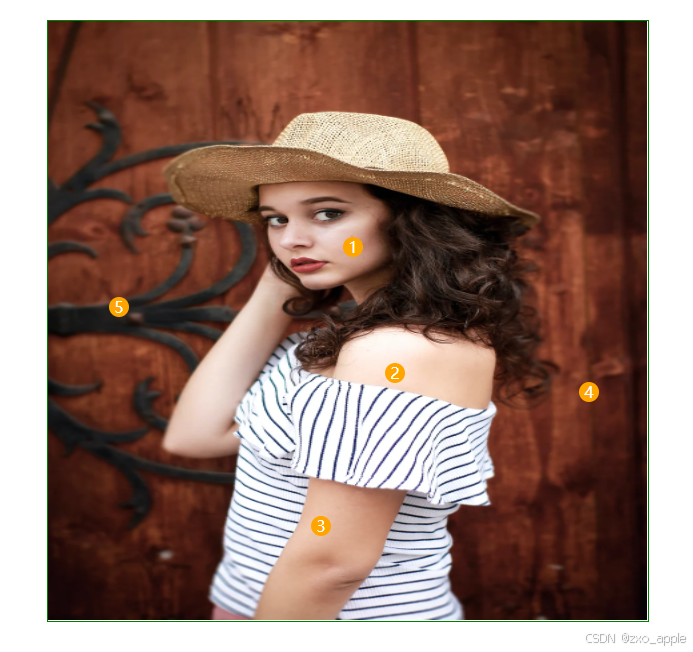
效果图
第一种:通过动态添加dom元素实现标记
代码如下
cpp
// index.tsx
import React from "react";
import "./index.less";

export default function index() {
  const parentRef = React.useRef<any>(null);
  const ulRef = React.useRef<any>(null);
  let count = 0;

  const generateMark = (x: number, y: number) => {
    const li = document.createElement("li");
    li.innerHTML = count.toString();
    li.style.left = x + "px";
    li.style.top = y + "px";
    ulRef.current.appendChild(li);
  };

  const onClick = (e) => {
    const rect = ulRef.current.getBoundingClientRect();
    const x = e.clientX - rect.left - 10; // 减去li宽度一半、居中
    const y = e.clientY - rect.top - 10;
    count += 1;
    generateMark(x, y);
  };
  return (
    <div ref={parentRef} className="wrap" onClick={onClick}>
      <img
        src="https://gw.alipayobjects.com/zos/antfincdn/LlvErxo8H9/photo-1503185912284-5271ff81b9a8.webp"
        alt=""
      />
      <ul ref={ulRef}></ul>
    </div>
  );
}
cpp
// index.less
.wrap {
  width: 600px;
  height: 600px;
  margin: auto;
  position: relative;
  img {
    width: 100%;
    height: 100%;
  }
  ul {
    position: absolute;
    top: 0;
    border: 1px solid green;
    width: 100%;
    height: 100%;
    margin: 0;
    cursor: pointer;
    li {
      position: absolute;
      width: 20px;
      height: 20px;
      line-height: 20px;
      border-radius: 50%;
      background-color: orange;
      text-align: center;
      color: white;
    }
  }
}
第二种:通过canvas实现标记
cpp
import React, { useEffect } from "react";
import "./index.less";

export default function index() {
  const parentRef = React.useRef<any>(null);
  const imgRef = React.useRef<any>(null);
  const canvasRef = React.useRef<any>(null);
  let count = 0;

  const drawMark = (ctx, x: number, y: number) => {
    const textWidth = ctx.measureText(count).width;
    ctx.strokeStyle = "#FFFFFF";
    ctx.fillStyle = "orange";
    ctx.lineWidth = 2;
    ctx.shadowOffsetX = 2;
    ctx.shadowBlur = 2;
    ctx.shadowColor = "rgba(10, 18, 28, 0.20)";
    ctx.beginPath();
    ctx.arc(x, y, 15, 0, Math.PI * 2);
    ctx.fill();
    ctx.stroke();
    ctx.font = "16px IBM Plex Sans";
    ctx.fillStyle = "#FFFFFF";
    ctx?.fillText(count, x - textWidth / 2, y + 5);
    ctx.closePath();
  };

  const onClick = (e) => {
    const canvas = canvasRef.current;
    const rect = canvas.getBoundingClientRect();
    const ctx = canvas.getContext("2d");
    const x = e.clientX - rect.left; // 减去li宽度一半、居中
    const y = e.clientY - rect.top;
    count += 1;
    console.log("ctx", ctx);
    if (ctx) {
      drawMark(ctx, x, y);
    }
  };

  useEffect(() => {
    // 动态赋值canvas宽高
    canvasRef.current.width = imgRef.current.width;
    canvasRef.current.height = imgRef.current.height;
  }, [imgRef]);
  return (
    <div ref={parentRef} className="wrap" onClick={onClick}>
      <img
        ref={imgRef}
        src="https://gw.alipayobjects.com/zos/antfincdn/LlvErxo8H9/photo-1503185912284-5271ff81b9a8.webp"
        alt=""
      />
      <canvas ref={canvasRef}></canvas>
    </div>
  );
}
c
.wrap {
  width: 600px;
  height: 600px;
  margin: auto;
  position: relative;
  img {
    width: 100%;
    height: 100%;
  }
  canvas {
    position: absolute;
    left: 0;
    border: 1px solid green;
    width: 100%;
    height: 100%;
    margin: 0;
    cursor: pointer;
  }
}