目录
- 前言
- 一、UI准备
-
- [Step1. 创建窗体控件](#Step1. 创建窗体控件)
- [Step2. 设置FormAlert的属性](#Step2. 设置FormAlert的属性)
- [Step3. 增加Label](#Step3. 增加Label)
- [Step4. 增加Button](#Step4. 增加Button)
- [Step1~4 效果展示:](#Step1~4 效果展示:)
- 二、Icon和Timer准备
-
- [Step5. 准备相应的icon](#Step5. 准备相应的icon)
- [Step6. 添加PictureBox](#Step6. 添加PictureBox)
- [Step7. 添加定时器Timer](#Step7. 添加定时器Timer)
- 三、代码编写
- 四、代码调用
-
- [Step8. 创建Button](#Step8. 创建Button)
- [Step9. Form中调用](#Step9. Form中调用)
- 五、效果展示
- 更新时间
前言
想实现:点击相应按钮会出现相应的信息提示,在显示几秒后自动消失。
这个功能还是需要自己写个组件来实现比较方便,属于一劳永逸了。

一、UI准备
Step1. 创建窗体控件
- 新建一个FormAlert的窗体控件【如下图,下面的名字写错了哈,应该是FormAlert】

Step2. 设置FormAlert的属性
- Font:Century Gothic, 14pt
- FormBordeStyle:None
- BackColor:Highlight
如下图:

Step3. 增加Label
- FontColor:White
- Text:MessageText
Step4. 增加Button
- Name:lblMsg
- FlatStyle:Flat
- FontColor:White 【这里没想到,会影响Button边框,使其也变为White】
- FlatAppearance中的BorderSize:0
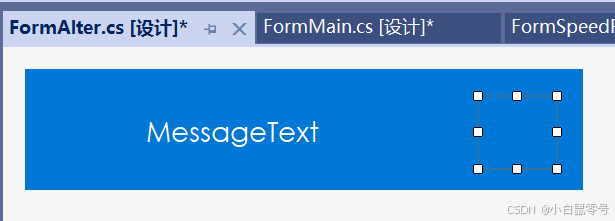
Step1~4 效果展示:

二、Icon和Timer准备
Step5. 准备相应的icon
- 这边处于管理的考虑,建立了Icons资源文件,将该FormAlter所用的Icons进行了管控。【如下图】


对刚才的Button中的Image属性添加"closeMsg.png"图片,效果如下:

Step6. 添加PictureBox
- 将属性中的图片模式设置为Zoom,如下图

- 添加图片 ,效果如下:

Step7. 添加定时器Timer
- Name:timerAlert
三、代码编写
FormAlert中的代码如下:
csharp
using System;
using System.Collections.Generic;
using System.ComponentModel;
using System.Data;
using System.Drawing;
using System.Linq;
using System.Text;
using System.Threading.Tasks;
using System.Windows.Forms;
using ZHCH_winform_2.Properties;


namespace ZHCH_winform_2.manager
{
    /// <summary>
    /// 自定义的提示窗口控件
    /// </summary>
    public partial class FormAlert : Form
    {
        public FormAlert()
        {
            InitializeComponent();
        }
        public enum enmAction
        {
            wait,
            start,
            close
        }
        public enum enmType
        {
            Success,
            Warning,
            Error,
            Info
        }
        private FormAlert.enmAction action;
        private int x, y;

        private void btnClose_Click(object sender, EventArgs e)
        {
            timerAlert.Interval = 1;
            action = enmAction.close;
        }

        private void timerAlert_Tick(object sender, EventArgs e)
        {
            switch (this.action)
            {
                case enmAction.wait:
                    timerAlert.Interval = 5000;
                    action = enmAction.close;
                    break;
                case enmAction.start:
                    timerAlert.Interval = 1;
                    this.Opacity += 0.1;
                    if(this.x < this.Location.X)
                    {
                        this.Left--;
                    }
                    else
                    {
                        if (this.Opacity == 1.0)
                        {
                            action = enmAction.wait;
                        }
                    }
                    break;
                case enmAction.close:
                    timerAlert.Interval = 1;
                    this.Opacity -= 0.1;
                    this.Left -= 3;
                    if (base.Opacity == 0.0)
                    {
                        base.Close();
                    }
                    break;
            }
        }

        public void showAlert(string msg, enmType type )
        {
            this.Opacity = 0.0;
            this.StartPosition = FormStartPosition.Manual;
            string fname;
            for(int i = 0; i < 3; i++)
            {
                fname = "提示:" + i.ToString();
                FormAlert frm = (FormAlert)Application.OpenForms[fname];
                if(frm == null)
                {
                    this.Name = fname;
                    this.x = Screen.PrimaryScreen.WorkingArea.Width - this.Width + 15;
                    this.y = Screen.PrimaryScreen.WorkingArea.Height/9 - this.Height * i;
                    this.Location = new Point(this.x,this.y);
                    break;
                }
            }
            this.x = Screen.PrimaryScreen.WorkingArea.Width - base.Width - 5;

            switch (type)
            {
                case enmType.Success:
                    this.picBoxAlert.Image = Resources.success;
                    this.BackColor = Color.SeaGreen;
                    break;
                case enmType.Error:
                    this.picBoxAlert.Image = Resources.error;
                    this.BackColor = Color.DarkRed;
                    break;
                case enmType.Info:
                    this.picBoxAlert.Image = Resources.info;
                    this.BackColor = Color.RoyalBlue;
                    break;
                case enmType.Warning:
                    this.picBoxAlert.Image = Resources.warning;
                    this.BackColor = Color.DarkOrange;
                    break;

            }

            this.lblMsg.Text = msg;
            this.Show();
            this.action = enmAction.start;
            this.timerAlert.Interval = 1;
            timerAlert.Start();
        }

    }
}- 注意,需要将Icon图片全部导入到Resource资源中,这样才能在编写Resources.success时才能调用到图片【如下所示】

四、代码调用
Step8. 创建Button
- 创建个按钮,去检验其是否能重新调用
- Name:altSubmit

- 创建Button的点击事件,代码如下:
csharp
        private void btnSubmit_Click(object sender, EventArgs e)
        {
         this.Alert("成功调用",FormAlert.enmType.Success);
         }
Step9. Form中调用
- 创建 Alert方法函数,代码如下:
csharp
        public void Alert(string msg,FormAlert.enmType type)
        {
            FormAlert frm = new FormAlert();
            frm.showAlert(msg,type);
        }
五、效果展示

更新时间
- 2024.08.29:创建+验证通过。