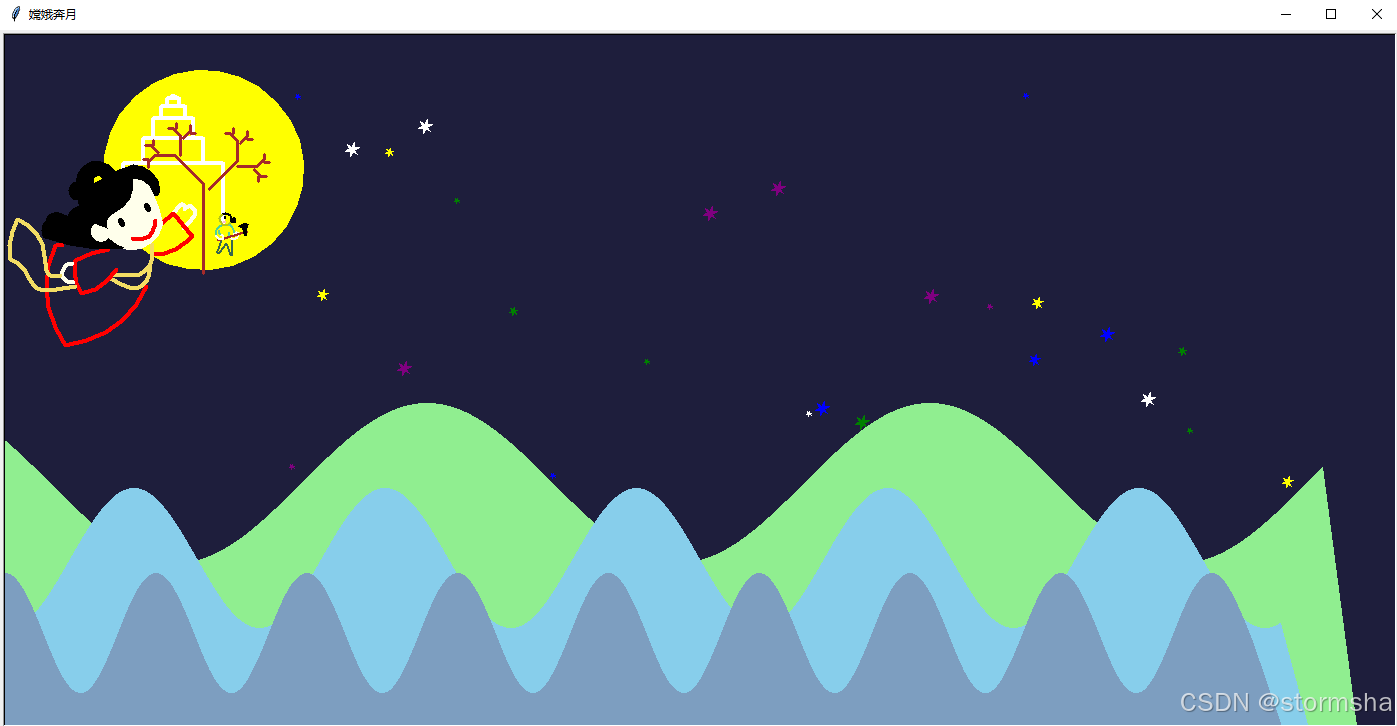
嫦娥奔月是中国民间传说中的一个经典故事,许多人都对这个故事耳熟能详。今天,我们将使用 Python 的 Turtle 图形库来绘制这个美丽的故事画面。在这篇博文中,我们将详细介绍代码的每一部分,并深入探讨如何使用 Turtle 图形库实现复杂的图形绘制。
1. 环境设置
首先,我们需要导入必要的库,并定义一些常量。这些常量包括画布的宽度和高度、背景颜色、山的颜色、皮肤颜色以及星星的颜色。
python
import turtle as t
import time
import random as r
import math

# 常量定义
WIDTH, HEIGHT = 1400, 700  # 画布的宽度和高度
BACKGROUND_COLOR = (30, 30, 60)  # 背景颜色
MOUNTAIN_COLORS = ['#90EE90', '#87CEEB', '#7D9EC0']  # 山的颜色
SKIN_COLOR = '#ffffeb'  # 皮肤颜色
STAR_COLORS = ['purple', 'green', 'yellow', 'white', 'blue']  # 星星的颜色

skin = '#ffffeb'
2. 绘制嫦娥
我们将定义一个函数 draw_change 来绘制嫦娥的图像。这个函数使用了 Turtle 的基本绘图命令,如 penup、pendown、goto 和 circle 等,来逐步绘制嫦娥的各个部分,包括手、衣服、脸和头发等。
python
def draw_change():
    lx, ly = -530, 170
    # 左手
    t.penup()
    t.color(skin)
    t.width(4)
    t.goto(lx, ly)
    t.seth(50)
    t.pendown()
    t.fd(10)
    t.circle(-3, 180)
    t.right(170)
    t.circle(-6, 180)
    t.circle(-50, 20)
    # 左袖
    t.penup()
    t.color('red')
    t.goto(lx, ly)
    t.seth(-140)
    t.pendown()
    t.fd(16)
    t.penup()
    t.goto(lx, ly)
    t.seth(-50)
    t.pendown()
    t.fd(30)
    t.right(90)
    t.fd(10)
    t.circle(-50, 40)
    # 衣服
    t.color('#f3dd64')
    t.penup()
    t.right(90)
    t.fd(10)
    t.right(180)
    t.pendown()
    t.circle(-100, 8)
    t.circle(-20, 80)
    t.circle(-100, 11)
    # 衣服2
    t.penup()
    t.circle(-100, -11)
    t.circle(-20, -80)
    t.fd(8)
    t.pendown()
    t.circle(-100, 6)
    t.circle(-15, 82)
    t.circle(-40, 35)
    # 衣服-裙
    t.color('red')
    t.penup()
    t.circle(-40, -35)
    t.circle(-15, -82)
    t.fd(10)
    t.right(10)
    t.pendown()
    t.circle(-100, 60)
    t.right(60)
    t.circle(-100, 60)
    t.right(60)
    t.circle(-200, 2)
    # 右袖
    t.penup()
    t.circle(-200, -2)
    t.right(-60)
    t.circle(-100, -60)
    t.right(-60)
    t.circle(-100, -60)
    t.right(-10)
    t.fd(-6)
    t.circle(-100, -6)
    t.fd(-8)
    t.circle(-20, 80)
    t.circle(-100, 12)
    t.right(110)
    t.fd(10)
    t.right(180)
    t.pendown()
    t.circle(-50, 50)
    t.right(70)
    t.circle(-50, 40)
    t.right(57)
    t.circle(-200, 10)
    # 右手
    t.penup()
    t.circle(-200, -10)
    t.right(-57)
    t.circle(-50, -4)
    t.color(skin)
    t.left(80)
    t.circle(10, 15)
    t.pendown()
    t.circle(10, 190)
    # 下方飘带
    t.penup()
    t.circle(10, -90)
    t.seth(-140)
    t.color('#f3dd64')
    t.circle(-10, 10)
    t.pendown()
    t.circle(-10, 100)
    t.circle(-40, 20)
    t.circle(40, 70)
    t.left(80)
    t.circle(60, 40)
    t.left(60)
    t.circle(-30, 50)
    t.circle(20, 80)
    t.fd(25)
    # 脸
    t.penup()
    t.goto(lx, ly)
    t.seth(-140)
    t.fd(16)
    t.seth(-100)
    t.color(skin)
    t.pendown()
    t.circle(-30, 100)
    t.color('black')
    t.begin_fill()
    t.circle(-30, 30)
    # 耳朵
    t.left(100)
    t.circle(-10, 180)
    t.circle(-2, 60)
    t.circle(-40, 20)
    # 头发
    t.left(150)
    t.circle(-10, 90)
    t.circle(80, 10)
    t.circle(30, 60)
    t.right(100)
    t.circle(-20, 70)
    t.circle(3, 160)
    t.circle(25, 90)
    t.left(20)
    t.fd(20)
    t.right(80)
    t.circle(20, 150)
    t.right(80)
    t.circle(8, 180)
    t.right(90)
    t.fd(10)
    t.right(110)
    t.circle(10, 100)
    t.right(110)
    t.fd(12)
    t.circle(8, 110)
    t.right(50)
    t.circle(12, 70)
    t.circle(2, 50)
    t.circle(180, 25)
    t.end_fill()
    # 发髻
    t.penup()
    t.circle(180, -25)
    t.circle(2, -50)
    t.circle(12, -70)
    t.right(-50)
    t.circle(8, -110)
    t.fd(-12)
    t.right(-110)
    t.circle(10, -100)
    t.right(-110)
    t.fd(-10)
    t.right(-90)
    t.circle(8, -180)
    t.fd(-25)
    t.left(20)
    t.color('yellow')
    t.width(1)
    t.pendown()
    t.begin_fill()
    t.fd(8)
    t.right(90)
    t.circle(-4, 180)
    t.end_fill()
    # 脸
    t.penup()
    t.width(1)
    t.goto(lx, ly)
    t.seth(-140)
    t.fd(16)
    t.seth(-100)
    t.color(skin)
    t.pendown()
    t.begin_fill()
    t.circle(-30, 130)
    t.left(100)
    t.circle(-10, 180)
    t.circle(-2, 60)
    t.circle(-40, 20)
    t.left(150)
    t.circle(-10, 90)
    t.circle(80, 10)
    t.circle(30, 60)
    t.right(100)
    t.circle(-20, 70)
    t.left(3)
    t.circle(-200, 9)
    t.end_fill()
    # 眼睛
    t.penup()
    t.width(6)
    t.goto(lx, ly)
    t.color('black')
    t.seth(170)
    t.fd(25)
    t.pendown()
    t.seth(120)
    t.fd(4)
    t.penup()
    t.left(90)
    t.fd(30)
    t.left(90)
    t.pendown()
    t.fd(4)
    # 嘴
    t.penup()
    t.circle(100, 10)
    t.width(4)
    t.left(40)
    t.color('red')
    t.pendown()
    t.circle(100, 3)
    t.circle(15, 90)
    t.circle(100, 3)
3. 绘制背景
接下来,我们将定义一个函数 draw_background 来绘制背景。这个函数将画布填充为指定的背景颜色。
python
def draw_background():
    """绘制背景"""
    t.penup()
    t.goto(-700, -350)  # 移动到左下角
    t.pendown()
    t.color(BACKGROUND_COLOR, BACKGROUND_COLOR)  # 设置背景颜色
    t.begin_fill()  # 开始填充
    for _ in range(2):
        t.forward(WIDTH)  # 向前绘制指定宽度
        t.left(90)  # 向左转90度
        t.forward(HEIGHT)  # 向前绘制指定高度
        t.left(90)  # 向左转90度
    t.end_fill()  # 结束填充
    t.penup()  # 提起画笔
4. 初始化画布
在初始化画布时,我们需要设置画布的尺寸和颜色模式,并调用 draw_background 函数来绘制背景。
python
def init_draw():
    """初始化画布"""
    t.setup(WIDTH, HEIGHT)  # 设置画布尺寸
    t.colormode(255)  # 设置颜色模式为RGB
    draw_background()  # 调用绘制背景函数
5. 绘制月亮
月亮是这个故事画面中的重要元素之一。我们将定义一个函数 draw_moon 来绘制月亮。
python
def draw_moon():
    """绘制月亮"""
    t.penup()
    t.goto(-550, 300)  # 移动到月亮位置
    t.pendown()
    t.color('yellow', 'yellow')  # 设置月亮颜色为黄色
    t.begin_fill()  # 开始填充
    t.circle(-100)  # 绘制一个半径为100的圆
    t.end_fill()  # 结束填充
    t.penup()  # 提起画笔
6. 绘制星星
星星可以为画面增添一些额外的美感。我们将定义两个函数:draw_star 来绘制单颗星星,以及 draw_stars 来绘制多颗星星。
python
def draw_star(size):
    """绘制一颗星星"""
    t.begin_fill()  # 开始填充
    for _ in range(6):
        t.forward(size)  # 向前绘制指定尺寸
        t.right(270)  # 向右转270度
        t.forward(size)  # 向前绘制指定尺寸
        t.right(150)  # 向右转150度
    t.end_fill()  # 结束填充

def draw_stars(count):
    """绘制多颗星星"""
    for _ in range(count):
        t.penup()
        t.goto(r.randint(-500, 600), r.randint(-100, 300))  # 随机位置
        t.pendown()
        color = r.choice(STAR_COLORS)  # 随机颜色
        t.color(color, color)
        t.setheading(30)  # 设置初始角度
        draw_star(r.randint(2, 5))  # 随机大小绘制星星
    t.penup()  # 提起画笔
7. 绘制山脉
山脉是背景中的重要元素。我们将定义两个函数:draw_mountain 来绘制单座山,和 draw_mountains 来绘制多座山。
python
def draw_mountain(d, a):
    """绘制单座山"""
    t.penup()
    t.goto(-699 - a * d, math.cos(a * (-699 + 699) / d) * d - 100 * a)  # 移动到山的起点
    t.pendown()
    t.begin_fill()  # 开始填充
    for x in range(-700, 700):
        t.goto(x - a * d, math.cos(a * (x + 699) / d) * d - 100 * a)  # 绘制山的轮廓
    t.goto(700, -700)  # 移动到右下角
    t.goto(-700, -700)  # 移动到左下角
    t.end_fill()  # 结束填充
    t.penup()  # 提起画笔

def draw_mountains():
    """绘制多座山"""
    for color, (d, a) in zip(MOUNTAIN_COLORS, [(80, 1), (70, 1.75), (60, 2.5)]):
        t.color(color, color)  # 设置山的颜色
        draw_mountain(d, a)  # 调用绘制单座山的函数
8. 绘制树
树的绘制可以使用递归算法。我们将定义一个函数 draw_tree,它使用递归来绘制树的各个部分。
python
def draw_tree(size, level=5, angle=90):
    """递归绘制树"""
    if level == 0:  # 递归终止条件
        return
    t.pendown()
    t.setheading(angle)  # 设置绘制方向
    t.forward(size + 10 if level == 5 else size)  # 绘制树干
    draw_tree(size // 2, level - 1, angle + 45)  # 绘制右侧枝干
    t.penup()
    t.setheading(angle + 225)  # 调整方向
    t.forward(size // 2)  # 返回到树干顶部
    draw_tree(size // 2, level - 1, angle - 45)  # 绘制左侧枝干
    t.penup()
    t.setheading(angle - 225)  # 调整方向
    t.forward(size // 2)  # 返回到树干顶部
9. 绘制月宫
月宫是这个故事中的重要场景。我们将定义一个函数 draw_palace 来绘制月宫。
python
def draw_house(y, j, w, h):
    """绘制房子"""
    t.penup()
    t.goto(y, j)  # 移动到房子位置
    t.pendown()
    for dx, dy in [(0, h), (-w, h), (-w, 0)]:
        t.goto(y + dx, j + dy)  # 绘制房子的轮廓

def draw_palace():
    """绘制月宫"""
    t.color('white')
    t.width(4)  # 设置线宽
    draw_house(-480, 160, 100, 60)
    draw_house(-500, 220, 60, 25)
    draw_house(-510, 245, 40, 20)
    draw_house(-518, 265, 24, 12)
    draw_house(-524, 277, 12, 8)
    draw_house(-528, 285, 4, 2)
10. 综合绘制
最后,我们将把所有的绘制函数组合在一起,形成完整的嫦娥奔月图像。
python
def add_moon_palace():
    """添加月宫"""
    draw_palace()  # 绘制月宫
    t.penup()
    t.color('brown')
    t.goto(-500, 110)
    t.width(3)
    draw_tree(80)  # 绘制树
    draw_wugang()  # 绘制吴刚
    draw_change()  # 绘制嫦娥

def save_drawing():
    """保存绘图"""
    t.getcanvas().postscript(file='o.eps')  # 保存为eps文件

if __name__ == '__main__':
    t.title("嫦娥奔月")  # 设置窗口标题
    t.speed(100)  # 设置绘图速度
    init_draw()  # 初始化画布
    t.speed(10)  # 设置绘图速度
    draw_stars(30)  # 绘制30颗星星
    t.speed(100)  # 设置绘图速度
    draw_mountains()  # 绘制山
    t.speed(10)  # 设置绘图速度
    draw_moon()  # 绘制月亮
    t.speed(100)  # 设置绘图速度
    add_moon_palace()  # 添加月宫
    t.penup()
    t.speed(100)
    t.goto(0, -700)  # 移动到画布外
    save_drawing()  # 保存绘图
    time.sleep(9)  # 延迟9秒
    t.mainloop()  # 进入主循环
完整代码
python
import turtle as t
import time
import random as r
import math

# 常量定义
WIDTH, HEIGHT = 1400, 700  # 画布的宽度和高度
BACKGROUND_COLOR = (30, 30, 60)  # 背景颜色
MOUNTAIN_COLORS = ['#90EE90', '#87CEEB', '#7D9EC0']  # 山的颜色
SKIN_COLOR = '#ffffeb'  # 皮肤颜色
STAR_COLORS = ['purple', 'green', 'yellow', 'white', 'blue']  # 星星的颜色

skin = '#ffffeb'


def draw_change():
    lx, ly = -530, 170
    # 左手
    t.penup()
    t.color(skin)
    t.width(4)
    t.goto(lx, ly)
    t.seth(50)
    t.pendown()
    t.fd(10)
    t.circle(-3, 180)
    t.right(170)
    t.circle(-6, 180)
    t.circle(-50, 20)
    # 左袖
    t.penup()
    t.color('red')
    t.goto(lx, ly)
    t.seth(-140)
    t.pendown()
    t.fd(16)
    t.penup()
    t.goto(lx, ly)
    t.seth(-50)
    t.pendown()
    t.fd(30)
    t.right(90)
    t.fd(10)
    t.circle(-50, 40)
    # 衣服
    t.color('#f3dd64')
    t.penup()
    t.right(90)
    t.fd(10)
    t.right(180)
    t.pendown()
    t.circle(-100, 8)
    t.circle(-20, 80)
    t.circle(-100, 11)
    # 衣服2
    t.penup()
    t.circle(-100, -11)
    t.circle(-20, -80)
    t.fd(8)
    t.pendown()
    t.circle(-100, 6)
    t.circle(-15, 82)
    t.circle(-40, 35)
    # 衣服-裙
    t.color('red')
    t.penup()
    t.circle(-40, -35)
    t.circle(-15, -82)
    t.fd(10)
    t.right(10)
    t.pendown()
    t.circle(-100, 60)
    t.right(60)
    t.circle(-100, 60)
    t.right(60)
    t.circle(-200, 2)
    # 右袖
    t.penup()
    t.circle(-200, -2)
    t.right(-60)
    t.circle(-100, -60)
    t.right(-60)
    t.circle(-100, -60)
    t.right(-10)
    t.fd(-6)
    t.circle(-100, -6)
    t.fd(-8)
    t.circle(-20, 80)
    t.circle(-100, 12)
    t.right(110)
    t.fd(10)
    t.right(180)
    t.pendown()
    t.circle(-50, 50)
    t.right(70)
    t.circle(-50, 40)
    t.right(57)
    t.circle(-200, 10)
    # 右手
    t.penup()
    t.circle(-200, -10)
    t.right(-57)
    t.circle(-50, -4)
    t.color(skin)
    t.left(80)
    t.circle(10, 15)
    t.pendown()
    t.circle(10, 190)
    # 下方飘带
    t.penup()
    t.circle(10, -90)
    t.seth(-140)
    t.color('#f3dd64')
    t.circle(-10, 10)
    t.pendown()
    t.circle(-10, 100)
    t.circle(-40, 20)
    t.circle(40, 70)
    t.left(80)
    t.circle(60, 40)
    t.left(60)
    t.circle(-30, 50)
    t.circle(20, 80)
    t.fd(25)
    # 脸
    t.penup()
    t.goto(lx, ly)
    t.seth(-140)
    t.fd(16)
    t.seth(-100)
    t.color(skin)
    t.pendown()
    t.circle(-30, 100)
    t.color('black')
    t.begin_fill()
    t.circle(-30, 30)
    # 耳朵
    t.left(100)
    t.circle(-10, 180)
    t.circle(-2, 60)
    t.circle(-40, 20)
    # 头发
    t.left(150)
    t.circle(-10, 90)
    t.circle(80, 10)
    t.circle(30, 60)
    t.right(100)
    t.circle(-20, 70)
    t.circle(3, 160)
    t.circle(25, 90)
    t.left(20)
    t.fd(20)
    t.right(80)
    t.circle(20, 150)
    t.right(80)
    t.circle(8, 180)
    t.right(90)
    t.fd(10)
    t.right(110)
    t.circle(10, 100)
    t.right(110)
    t.fd(12)
    t.circle(8, 110)
    t.right(50)
    t.circle(12, 70)
    t.circle(2, 50)
    t.circle(180, 25)
    t.end_fill()
    # 发髻
    t.penup()
    t.circle(180, -25)
    t.circle(2, -50)
    t.circle(12, -70)
    t.right(-50)
    t.circle(8, -110)
    t.fd(-12)
    t.right(-110)
    t.circle(10, -100)
    t.right(-110)
    t.fd(-10)
    t.right(-90)
    t.circle(8, -180)
    t.fd(-25)
    t.left(20)
    t.color('yellow')
    t.width(1)
    t.pendown()
    t.begin_fill()
    t.fd(8)
    t.right(90)
    t.circle(-4, 180)
    t.end_fill()
    # 脸
    t.penup()
    t.width(1)
    t.goto(lx, ly)
    t.seth(-140)
    t.fd(16)
    t.seth(-100)
    t.color(skin)
    t.pendown()
    t.begin_fill()
    t.circle(-30, 130)
    t.left(100)
    t.circle(-10, 180)
    t.circle(-2, 60)
    t.circle(-40, 20)
    t.left(150)
    t.circle(-10, 90)
    t.circle(80, 10)
    t.circle(30, 60)
    t.right(100)
    t.circle(-20, 70)
    t.left(3)
    t.circle(-200, 9)
    t.end_fill()
    # 眼睛
    t.penup()
    t.width(6)
    t.goto(lx, ly)
    t.color('black')
    t.seth(170)
    t.fd(25)
    t.pendown()
    t.seth(120)
    t.fd(4)
    t.penup()
    t.left(90)
    t.fd(30)
    t.left(90)
    t.pendown()
    t.fd(4)
    # 嘴
    t.penup()
    t.circle(100, 10)
    t.width(4)
    t.left(40)
    t.color('red')
    t.pendown()
    t.circle(100, 3)
    t.circle(15, 90)
    t.circle(100, 3)


def draw_background():
    """绘制背景"""
    t.penup()
    t.goto(-700, -350)  # 移动到左下角
    t.pendown()
    t.color(BACKGROUND_COLOR, BACKGROUND_COLOR)  # 设置背景颜色
    t.begin_fill()  # 开始填充
    for _ in range(2):
        t.forward(WIDTH)  # 向前绘制指定宽度
        t.left(90)  # 向左转90度
        t.forward(HEIGHT)  # 向前绘制指定高度
        t.left(90)  # 向左转90度
    t.end_fill()  # 结束填充
    t.penup()  # 提起画笔


def init_draw():
    """初始化画布"""
    t.setup(WIDTH, HEIGHT)  # 设置画布尺寸
    t.colormode(255)  # 设置颜色模式为RGB
    draw_background()  # 调用绘制背景函数


def draw_moon():
    """绘制月亮"""
    t.penup()
    t.goto(-550, 300)  # 移动到月亮位置
    t.pendown()
    t.color('yellow', 'yellow')  # 设置月亮颜色为黄色
    t.begin_fill()  # 开始填充
    t.circle(-100)  # 绘制一个半径为100的圆
    t.end_fill()  # 结束填充
    t.penup()  # 提起画笔


def draw_star(size):
    """绘制一颗星星"""
    t.begin_fill()  # 开始填充
    for _ in range(6):
        t.forward(size)  # 向前绘制指定尺寸
        t.right(270)  # 向右转270度
        t.forward(size)  # 向前绘制指定尺寸
        t.right(150)  # 向右转150度
    t.end_fill()  # 结束填充


def draw_stars(count):
    """绘制多颗星星"""
    for _ in range(count):
        t.penup()
        t.goto(r.randint(-500, 600), r.randint(-100, 300))  # 随机位置
        t.pendown()
        color = r.choice(STAR_COLORS)  # 随机颜色
        t.color(color, color)
        t.setheading(30)  # 设置初始角度
        draw_star(r.randint(2, 5))  # 随机大小绘制星星
    t.penup()  # 提起画笔


def draw_mountain(d, a):
    """绘制单座山"""
    t.penup()
    t.goto(-699 - a * d, math.cos(a * (-699 + 699) / d) * d - 100 * a)  # 移动到山的起点
    t.pendown()
    t.begin_fill()  # 开始填充
    for x in range(-700, 700):
        t.goto(x - a * d, math.cos(a * (x + 699) / d) * d - 100 * a)  # 绘制山的轮廓
    t.goto(700, -700)  # 移动到右下角
    t.goto(-700, -700)  # 移动到左下角
    t.end_fill()  # 结束填充
    t.penup()  # 提起画笔


def draw_mountains():
    """绘制多座山"""
    for color, (d, a) in zip(MOUNTAIN_COLORS, [(80, 1), (70, 1.75), (60, 2.5)]):
        t.color(color, color)  # 设置山的颜色
        draw_mountain(d, a)  # 调用绘制单座山的函数


def draw_tree(size, level=5, angle=90):
    """递归绘制树"""
    if level == 0:  # 递归终止条件
        return
    t.pendown()
    t.setheading(angle)  # 设置绘制方向
    t.forward(size + 10 if level == 5 else size)  # 绘制树干
    draw_tree(size // 2, level - 1, angle + 45)  # 绘制右侧枝干
    t.penup()
    t.setheading(angle + 225)  # 调整方向
    t.forward(size // 2)  # 返回到树干顶部
    draw_tree(size // 2, level - 1, angle - 45)  # 绘制左侧枝干
    t.penup()
    t.setheading(angle - 225)  # 调整方向
    t.forward(size // 2)  # 返回到树干顶部


def draw_character(x, y, parts):
    """通用绘制角色部分"""
    t.penup()
    t.goto(x, y)  # 移动到角色位置
    for part in parts:
        color, width, command = part  # 解包颜色、宽度和命令
        t.color(color)  # 设置颜色
        t.width(width)  # 设置线宽
        command()  # 执行绘制命令


def draw_wugang():
    t.width(2)
    # 头
    # 脸
    t.penup()
    t.goto(-472, 162)
    t.seth(70)
    t.pendown()
    t.color('black')
    t.circle(6, 140)
    t.color('#b3c518')
    t.circle(6, 220)
    # 发髻
    t.penup()
    t.circle(6, 10)
    t.pendown()
    t.color('black')
    t.begin_fill()
    t.circle(-2)
    t.end_fill()
    # 眼
    t.penup()
    t.goto(-478, 165)
    t.seth(90)
    t.pendown()
    t.fd(2)
    # 嘴
    t.penup()
    t.goto(-481, 161)
    t.seth(-30)
    t.pendown()
    t.color('pink')
    t.circle(3, 50)
    # 身体
    # 腰
    t.penup()
    t.color('#386650', '#386650')
    t.goto(-482, 143)
    t.pendown()
    t.seth(-110)
    t.fd(12)
    t.circle(1, 160)
    t.fd(12)
    t.right(120)
    t.fd(12)
    t.circle(1, 160)
    t.fd(14)
    # 右肩
    t.penup()
    t.color('#5cd29b')
    t.seth(-1)
    t.goto(-475, 158)
    t.pendown()
    t.circle(-6, 90)
    # 右手
    t.fd(3)
    t.color(skin)
    t.left(149)
    t.fd(1)
    t.circle(-2, 180)
    t.fd(2)
    t.circle(-4, 150)
    t.color('#4cd29b')
    t.fd(3)
    # 身体中插入一个斧子 #
    # 斧子把
    t.penup()
    t.goto(-486, 143)
    t.color('brown')
    t.pendown()
    t.goto(-456, 152)
    # 斧子头
    t.penup()
    t.width(1)
    t.goto(-458, 148)
    t.color('black', 'black')
    t.pendown()
    t.begin_fill()
    t.seth(190)
    t.fd(1)
    t.right(90)
    t.fd(3)
    t.circle(8, 60)
    t.right(110)
    t.circle(-8, 80)
    t.right(110)
    t.circle(8, 60)
    t.fd(4)
    t.end_fill()
    # 左肩
    t.penup()
    t.width(2)
    t.color('#4cd29b')
    t.seth(180)
    t.goto(-482, 158)
    t.pendown()
    t.circle(5, 90)
    # 左手
    t.fd(5)
    t.color(skin)
    t.circle(2, 60)
    t.fd(4)
    t.circle(2, 180)
    t.fd(3)
    t.color('#5cd29b')
    t.circle(-1, 60)
    t.fd(3)


def draw_house(y, j, w, h):
    """绘制房子"""
    t.penup()
    t.goto(y, j)  # 移动到房子位置
    t.pendown()
    for dx, dy in [(0, h), (-w, h), (-w, 0)]:
        t.goto(y + dx, j + dy)  # 绘制房子的轮廓


def draw_palace():
    """绘制月宫"""
    t.color('white')
    t.width(4)  # 设置线宽
    draw_house(-480, 160, 100, 60)
    draw_house(-500, 220, 60, 25)
    draw_house(-510, 245, 40, 20)
    draw_house(-518, 265, 24, 12)
    draw_house(-524, 277, 12, 8)
    draw_house(-528, 285, 4, 2)


def add_moon_palace():
    """添加月宫"""
    draw_palace()  # 绘制月宫
    t.penup()
    t.color('brown')
    t.goto(-500, 110)
    t.width(3)
    draw_tree(80)  # 绘制树
    draw_wugang()  # 绘制吴刚
    draw_change()  # 绘制嫦娥


def save_drawing():
    """保存绘图"""
    t.getcanvas().postscript(file='o.eps')  # 保存为eps文件


if __name__ == '__main__':
    t.title("嫦娥奔月")  # 设置窗口标题
    t.speed(100)  # 设置绘图速度
    init_draw()  # 初始化画布
    t.speed(10)  # 设置绘图速度
    draw_stars(30)  # 绘制30颗星星
    t.speed(100)  # 设置绘图速度
    draw_mountains()  # 绘制山
    t.speed(10)  # 设置绘图速度
    draw_moon()  # 绘制月亮
    t.speed(100)  # 设置绘图速度
    add_moon_palace()  # 添加月宫
    t.penup()
    t.speed(100)
    t.goto(0, -700)  # 移动到画布外
    save_drawing()  # 保存绘图
    time.sleep(9)  # 延迟9秒
    t.mainloop()  # 进入主循环
通过以上步骤,我们使用 Python 的 Turtle 图形库成功绘制出了嫦娥奔月的美丽画面。这不仅展示了嫦娥奔月的美丽故事,也展示了如何使用编程语言和图形库实现复杂的图形绘制。希望这篇博文对你有所帮助,让你在使用 Turtle 图形库时更加得心应手。