系列文章目录
HarmonyOS Next 系列之省市区弹窗选择器实现(一)
HarmonyOS Next 系列之验证码输入组件实现(二)
HarmonyOS Next 系列之底部标签栏TabBar实现(三)
HarmonyOS Next 系列之HTTP请求封装和Token持久化存储(四)
HarmonyOS Next 系列之从手机选择图片或拍照上传功能实现(五)
HarmonyOS Next 系列之可移动悬浮按钮实现(六)
HarmonyOS Next 系列之沉浸式状态实现的多种方式(七)
HarmonyOS Next系列之Echarts图表组件(折线图、柱状图、饼图等)实现(八)
HarmonyOS Next系列之地图组件(Map Kit)使用(九)
HarmonyOS Next系列之半圆环进度条实现(十)
HarmonyOS Next 系列之列表下拉刷新和触底加载更多数据实现(十一)
HarmonyOS Next系列之实现一个左右露出中间大两边小带缩放动画的轮播图(十二)
文章目录
前言
HarmonyOS Next(基于API12)实现一个左右露出中间大两边小带缩放动画的轮播图。

一、实现原理
难点解析:通过轮播图自定义动画属性customContentTransition,在滑动切换页面过程中根据回调参数获取页面相对选中页的起始位置移动比例,动态设置图片缩放比例。
二、Swiper组件使用回顾
1、入参
唯一入参(controller?: SwiperController)轮播图控制器,通过控制器可以控制翻页
javascript
private swiperController: SwiperController = new SwiperController()
......
.....
//控制翻到下一页
 this.swiperController.showNext()

//控制翻到上一页
 this.swiperController.showPrevious()
 ......
 ......
 build{
   Swiper(this.swiperController) {
      ......
      ......
  }
}
2、常用属性
index
设置当前在容器中显示的子组件的索引值。支持$$双向绑定变量
autoPlay
设置子组件是否自动播放。默认false
interval
设置使用自动播放时播放的时间间隔,默认3000ms
loop
设置是否开启循环,也即播放最后一张完后会自动回到第一张。,默认true
itemSpace
设置子组件与子组件之间间隙,默认0,单位vp
prevMargin
设置前边距,用于露出前一项的一小部分,默认0,单位vp
nextMargin
设置后边距,用于露出后一项的一小部分,默认0,单位vp
DotIndicator
圆点指示器属性,继承自Indicator,constructor()构造器
eg:
javascript
Swiper(){}
 .indicator( // 设置圆点导航点样式
        new DotIndicator()
          .itemWidth(15)//圆点宽
          .itemHeight(15)//圆点高
          .selectedItemWidth(15)//选中圆点宽
          .selectedItemHeight(15)//选中圆点高
          .color(Color.Gray)//圆点颜色
          .selectedColor(Color.Blue)//选中圆点颜色
          )
3.常用事件
onChange
onChange(event: (index: number) => void)
当前显示的子组件索引变化时触发该事件,返回值为当前显示的子组件的索引值
通过上面属性很容易实现一个左右露出的轮播图
示例代码如下:
javascript
@Entry
@Component
struct Index {
  @State currentIndex: number = 0//当前显示索引
  controller: SwiperController = new SwiperController()//控制器
  //图片
  imageList: string[] = ['https://img0.baidu.com/it/u=891057047,2511666354&fm=253&fmt=auto&app=120&f=JPEG?w=500&h=667',
    'https://img2.baidu.com/it/u=2162972920,3759823780&fm=253&fmt=auto&app=120&f=JPEG?w=500&h=664',
    'https://img1.baidu.com/it/u=1377826580,1094847210&fm=253&fmt=auto&app=120&f=JPEG?w=500&h=750',
    'https://img2.baidu.com/it/u=3233674257,3277114296&fm=253&fmt=auto&app=120&f=JPEG?w=667&h=500',
    'https://img0.baidu.com/it/u=3948329438,2482580265&fm=253&fmt=auto&app=120&f=JPEG?w=500&h=1082'
  ]


  build() {
    Column() {
      Swiper(this.controller) {
        ForEach(this.imageList, (item: string, index: number) => {
          Image(item).draggable(false).height(200).borderRadius(10)
        }, (index: number) => index.toString())
      }
      .width('100%')
      .autoPlay(true)//自动播放
      .itemSpace(20)//每张图片之间间距
      .prevMargin(30)//前一张图片露出宽度
      .nextMargin(30)//后一张图片露出宽度
      .indicator(new DotIndicator().color(Color.Gray).selectedColor(Color.White)) //指示器样式
      .onChange((index:number) => {
        //切换图片监听
        this.currentIndex = index
      })

    }
    .width('100%')
    .height('100%')
    .padding({top:10})
  }
}
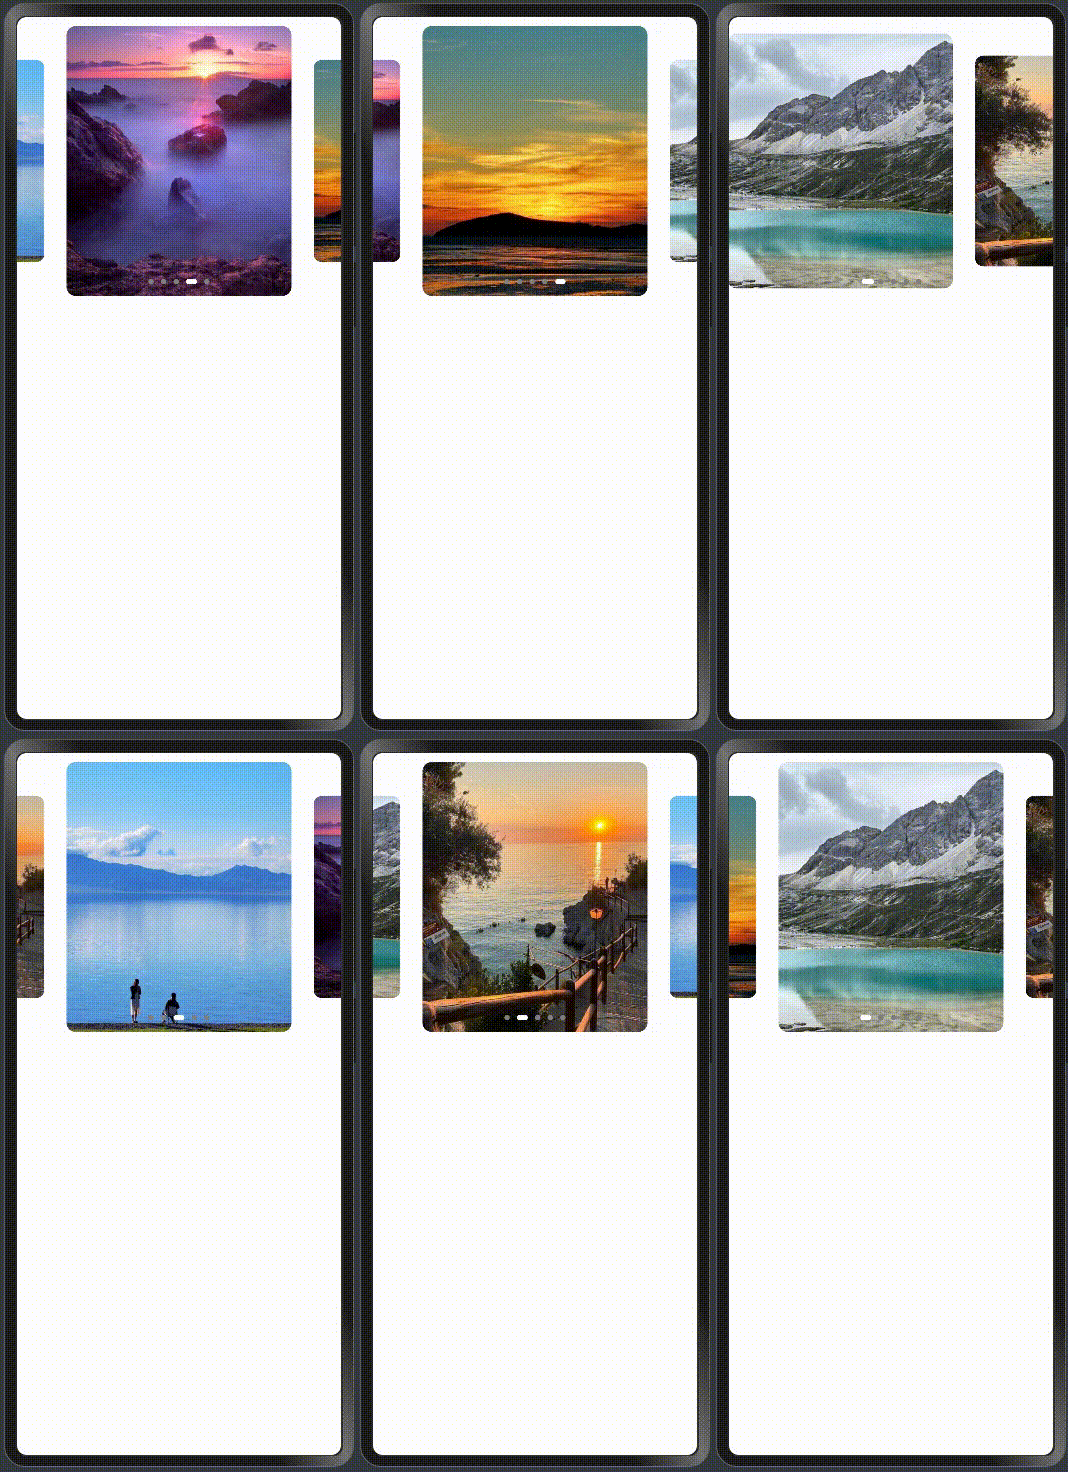
运行效果:

4、事件customContentTransition
customContentTransition(transition: SwiperContentAnimatedTransition)
自定义Swiper页面切换动画,也是本次实现切换缩放动画轮播图的关键事件,
在轮播滑动切换过程中,在视窗内(可视区域)所有页面逐帧触发回调
SwiperContentAnimatedTransition内置属性:
| 名称 | 说明 |
|---|---|
| timeout | Swiper自定义切换动画超时时间,默认0,单位ms |
| transition | 自定义切换动画具体内容,类型Callback < SwiperContentTransitionProxy> |
SwiperContentTransitionProxy内置属性
| 名称 | 说明 |
|---|---|
| selectedIndex | 当前选中索引 |
| index | 轮播图索引 |
| position | index页面相对于(selectedIndex对应页面的起始位置)的移动比例。 |
| mainAxisLength | index对应页面在主轴方向上的长度 |
说明:触发事件的条件是出现可视区域内的图片都会逐张触发,例如从索引为0图片切换到索引为1过程,0和1两张图片都会出现在可视区域内,所以2张图片都会触发该事件,该事件会随着移动比例变化而多次触发直到图片移出可视区域。
position:表示当前页面相对选中页面(selectedIndex对应页面)的移动比例,啥意思呢,通过打印数据来理解:
示例:
javascript
Swiper(this.controller) {
        ForEach(this.imageList, (item: string, index: number) => {
          Image(item).draggable(false).height(200).borderRadius(10)
        }, (index: number) => index.toString())
      }
      .width('100%')
      .autoPlay(false)//自动播放
      .indicator(new DotIndicator().color(Color.Gray).selectedColor(Color.White)) //指示器样式
      .onChange((index:number) => {
        //切换图片监听
        this.currentIndex = index
      })
      .customContentTransition({
        timeout:1000,
        //自定义动画
        transition:(proxy: SwiperContentTransitionProxy)=>{
         if(proxy.index===0){
         //打印第一张的position值变化情况
           console.log(proxy.position.toString(),'position')
         }
        }
      })
测试:
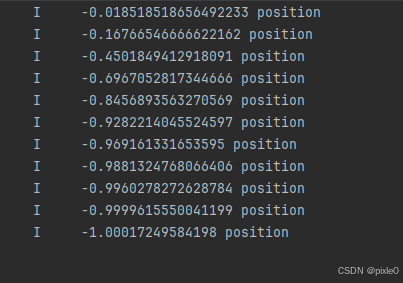
(1)从第一张切换到第二张过程(向左滑)观察第一张图片postition值变化:


可以看到这个过程 position值趋近0到-1变化,
在开始滑动那一刻,selectedIndex为0也即第一张自己,自己和自己初始位置移动比例为0,所以position开始值为0。
滑动完成那一刻,selectedIndex为1也即第二张图片,自己和下一张图片(selectedIndex为1图片)距离为图片本身宽度,这个比例为1,因为是往左滑动所以比例为负数也即-1。index在selectedIndedx左边为负数,右边为正数
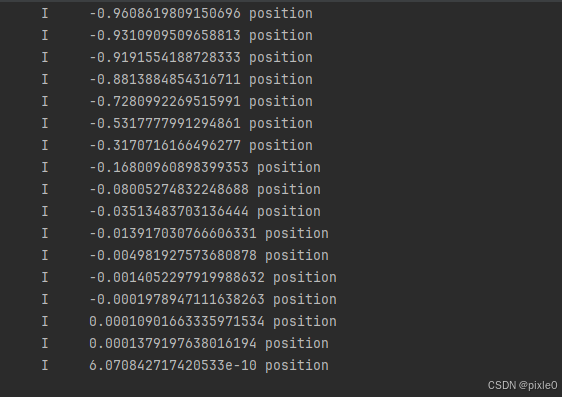
(2)从第二张切换到第一张过程(向右滑)第一张图片postition值变化:


可以看到这个过程index为0(第一张图片)的 position值趋近-1到0变化,(也就是上一步逆过程)。
观察第二张情况:
(1)从第一张切换到第二张过程(向左滑)观察第二张图片postition值变化:

趋近从1到0变化过程
(2)从第二张切换到第一张过程(向右滑)第一张图片postition值变化:

趋近从0到1变化过程
总结:图片在最中间position=0,往两边趋近-1和1,左负右正,取绝对值就是形成1-0-1顺序。
我们想要实现的轮播图效果缩放比例刚好相反,中间图片缩放比例1,两边比较小假设0.8,形成图片缩放顺序0.8-1-0.8
很容易得出移动过程中图片缩放比例计算公式为: 1-0.2*Math.abs( position)
完整代码:
javascript
@Entry
@Component
struct Index {
  //图表实例
  @State currentIndex: number = 0
  controller: SwiperController = new SwiperController()
  imageList: string[] = [
    'https://img0.baidu.com/it/u=891057047,2511666354&fm=253&fmt=auto&app=120&f=JPEG?w=500&h=667',
    'https://img2.baidu.com/it/u=2162972920,3759823780&fm=253&fmt=auto&app=120&f=JPEG?w=500&h=664',
    'https://img1.baidu.com/it/u=1377826580,1094847210&fm=253&fmt=auto&app=120&f=JPEG?w=500&h=750',
    'https://img2.baidu.com/it/u=3233674257,3277114296&fm=253&fmt=auto&app=120&f=JPEG?w=667&h=500',
    'https://img0.baidu.com/it/u=3948329438,2482580265&fm=253&fmt=auto&app=120&f=JPEG?w=500&h=1082'
  ]
  @State scaleList: number[] = [] //所有图片缩放比
  @State imgMargin: number = 30 //左右图片露出宽度
  @State itemSpace: number = 25 //每张图表间距
  private scaleRatio = 0.75 //缩放系数,其他图片比例和最中间选中图片比例

  aboutToAppear(): void {
    this.scaleList = this.imageList.map((item: string, index: number) => {
      //初始化时候第二张和最后一张设置缩小,loop为true时候最后一张会在初始化的最左边显示
      return index === 1 || index === this.imageList.length - 1 ? this.scaleRatio : 1
    })
  }

  build() {
    Column() {
      Swiper(this.controller) {
        ForEach(this.imageList, (item: string, index: number) => {
          Image(item).draggable(false).height(300).scale({
            y: this.scaleList[index],
          }).borderRadius(10)
        }, (index: number) => index.toString())
      }
      .width('100%')
      .autoPlay(true)
      .index(this.currentIndex)
      .itemSpace(this.itemSpace)
      .prevMargin(this.imgMargin)
      .nextMargin(this.imgMargin)
      .indicator(new DotIndicator().color(Color.Gray).selectedColor(Color.White))
      .customContentTransition({//自定义动画
        timeout: 1000,
        transition: (proxy: SwiperContentTransitionProxy) => {
          let scale= 1 - Math.min(Math.max(Math.abs(proxy.position), 0), 1) * (1 - this.scaleRatio)
          this.scaleList[proxy.index] = scale

        }
      })
      .onChange((i) => this.currentIndex = i)

    }
    .width('100%')
    .height('100%')
    .padding({ top: 10 })
  }
}
运行效果:

说明:定义一个数组参数scaleList保存每张图片缩放比例,滑动过程通过动态计算更新对应图片缩放比例,首次渲染,两边缩小的图片分别对应第二张和最后一张,初始渲染需设置好2张缩放后的比例。为了itemSpace设置的精准性,这边只设置了图片y方向(高度)的缩放,在缩放比例不是很大情况下看不出图片变形。当然也可以根据实际需要设置x方向也缩放,设置完两张图片间隙会比 itemSpace大些因为图片宽度被缩放,往图片中心变小,间隙就变大。