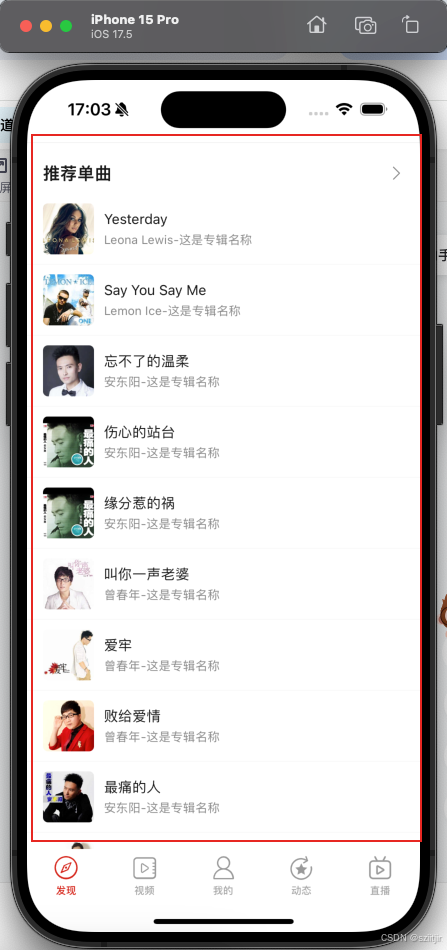
发现界面完整效果


本文实现歌单列表效果

文章基于IOS 20 发现界面(UITableView)歌单列表(UICollectionView)实现 继续实现发现界面单曲列表效果
单曲列表Cell实现
实现流程:
1.创建Cell,及在使用UITableView的Controller控制器上注册Cell;
2.获取data列表数据,并调用UITableView的reloadData(),将数据更新到列表;
3.将data的Item数据绑定UITableView的每一个Cell。
1)创建和注册Cell
从效果图上面可以看出,单曲列表Cell由一个title + UITableView来实现的,如果看了前面的文章UITableView应该已经很熟悉了,这里需要注意的是,把UITableView内嵌到UITableView中,且需要显示UITableView的全部Item;那么就需要设置内嵌的UITableView高度 == 行数*Item行高。
下面通过懒加载创建ItemTitleView 和 UITableView,自定义ItemTitleView,就是TGRelativeLayout包含title和右边的icon。
Swift
    /// 标题控件
    lazy var titleView: ItemTitleView = {
        let r = ItemTitleView()
        r.titleView.text = R.string.localizable.recommendSong()
        return r
    }()

    lazy var tableView: UITableView = {
        let result=ViewFactoryUtil.tableView()
        result.separatorStyle = .singleLine

        //分割线颜色
        result.separatorColor = .colorDivider
        result.delegate = self
        result.dataSource = self

        //注册cell
        result.register(SongCell.self, forCellReuseIdentifier: Constant.CELL)

        return result
    }()
Swift
//
//  ItemTitleView.swift
//  首页-发现界面-歌单组/推荐单曲组 标题view
//
//  Created by jin on 2024/8/29.
//

import UIKit

import TangramKit

class ItemTitleView : TGRelativeLayout{

    init(){
        super.init(frame: CGRect.zero)
        initViews()
    }

    required init?(coder: NSCoder) {
        super.init(coder: coder)
        initViews()
    }

    func initViews(){
        tg_width.equal(.fill)
        tg_height.equal(.wrap)
        tg_padding = UIEdgeInsets(top: PADDING_MEDDLE, left: PADDING_OUTER, bottom: PADDING_MEDDLE, right: PADDING_OUTER)

        addSubview(titleView)
        addSubview(moreIconView)
    }

    lazy var titleView: UILabel = {
        let r = UILabel()
        r.tg_width.equal(.wrap)
        r.tg_height.equal(.wrap)
        r.tg_centerY.equal(0)
        r.numberOfLines = 1
        r.font = UIFont.boldSystemFont(ofSize: TEXT_LARGE2)
        r.textColor = .colorOnSurface
        return r
    }()

    lazy var moreIconView: UIImageView = {
        let r = UIImageView()
        r.tg_width.equal(15)
        r.tg_height.equal(15)
        r.image = R.image.superChevronRight()?.withTintColor()
        r.tintColor = .black80
        r.tg_right.equal(0)
        r.tg_centerY.equal(0)

        //图片完全显示到控件里面
        r.contentMode = .scaleAspectFit
        return r
    }()
}
重写,添加ItemTitleView 和 UITableView到SongGroupCell
Swift
class SongGroupCell:BaseTableViewCell{

    static let NAME = "SongGroupCell"

    var datum:Array<Song> = []

    //发现界面每个单曲cell高度,51:图片高度,10*2:上下两个边距
    static let HEIGHT_DISCOVERY_SONG:CGFloat = 51+10*2

    override func initViews() {
        super.initViews()

        //分割线
        container.addSubview(ViewFactoryUtil.smallDivider())

        //标题
        container.addSubview(titleView)

        container.addSubview(tableView)
    }

    override func getContainerOrientation() -> TGOrientation {
        return .vert
    }
}
绑定列表数据,动态计算内嵌的UITableView的高。
Swift
    func bind(_ data:SongData){
        datum.removeAll()
        datum = data.datum

        //高度等于,行数*行高
        let viewHeight = CGFloat(data.datum.count) * SongGroupCell.HEIGHT_DISCOVERY_SONG
        tableView.tg_height.equal(viewHeight)

        tableView.reloadData()
    }
注册SongGroupCell
Swift
class DiscoveryController: BaseLogicController {

    override func initViews() {
        super.initViews()
        setBackgroundColor(.colorBackgroundLight)

        //初始化TableView结构
        initTableViewSafeArea()

        //注册cell
        tableView.register(BannerCell.self, forCellReuseIdentifier: Constant.CELL)
        tableView.register(ButtonCell.self, forCellReuseIdentifier: ButtonCell.NAME)
        tableView.register(SheetGroupCell.self, forCellReuseIdentifier: SheetGroupCell.NAME)
        tableView.register(SongGroupCell.self, forCellReuseIdentifier: SongGroupCell.NAME)
    }
}
2)获取data列表数据
定义列表数据模型SongData
Swift
//
//  SongData.swift
//  发现界面音乐数据
//
//  Created by jin on 2024/9/2.
//

import Foundation

class SongData{
    var datum:[Song]!

    init(_ datum: [Song]!) {
        self.datum = datum
    }
}
请求接口获取单曲列表数据,更新tableView.reloadData()
Swift
class DiscoveryController: BaseLogicController {

    override func initViews() {
        super.initViews()
        setBackgroundColor(.colorBackgroundLight)

        //初始化TableView结构
        initTableViewSafeArea()

        //注册cell
        tableView.register(BannerCell.self, forCellReuseIdentifier: Constant.CELL)
        tableView.register(ButtonCell.self, forCellReuseIdentifier: ButtonCell.NAME)
        tableView.register(SheetGroupCell.self, forCellReuseIdentifier: SheetGroupCell.NAME)
    }

    override func initDatum() {
        super.initDatum()
        loadData()
    }

    func loadData() {
        DefaultRepository.shared.bannerAds().subscribeSuccess { [weak self] data in
            //清除原来的数据
            self?.datum.removeAll()

            //添加轮播图
            self?.datum.append(BannerData(data:data.data!.data!))

            //添加快捷按钮
            self?.datum.append(ButtonData())

            //请求歌单数据
            self?.loadSheetsData()
        }.disposed(by: rx.disposeBag)
    }

    /// 请求歌单数据
    func loadSheetsData() {
        DefaultRepository.shared.sheets(size: VALUE12).subscribeSuccess { [weak self] data in
            //添加歌单数据
            self?.datum.append(SheetData(data.data!.data!))

            // 请求音乐数据
            self?.loadSongsData()
        }.disposed(by: rx.disposeBag)
    }

    /// 请求音乐数据
    func loadSongsData() {
        DefaultRepository.shared.songs().subscribeSuccess { [weak self] data in
            self?.endRefresh()

            //添加音乐数据
            self?.datum.append(SongData(data.data!.data!))

            self?.tableView.reloadData()
        }.disposed(by: rx.disposeBag)
    }
}
3)Item数据绑定Cell
DiscoveryController控制器重写父类的扩展 cellForRowAt方法,创建对应的Cell,并将Item数据绑定到Cell。
Swift
extension DiscoveryController{

    // 返回当前位置cell
    /// - Parameters:
    ///   - tableView: <#tableView description#>
    ///   - indexPath: <#indexPath description#>
    /// - Returns: <#description#>
    override func tableView(_ tableView: UITableView, cellForRowAt indexPath: IndexPath) -> UITableViewCell {
        let data = datum[indexPath.row]

        //获取当前Cell的类型
        let type = typeForItemAtData(data)

        switch(type){
        case .button:
            //按钮
            let cell = tableView.dequeueReusableCell(withIdentifier:  ButtonCell.NAME, for: indexPath) as! ButtonCell
            cell.bind(data as! ButtonData)
            return cell
        case .sheet:
            //歌单
            let cell = tableView.dequeueReusableCell(withIdentifier:  SheetGroupCell.NAME, for: indexPath) as! SheetGroupCell
            cell.bind(data as! SheetData)
            return cell
        case .song:
            //音乐
            let cell = tableView.dequeueReusableCell(withIdentifier:  SongGroupCell.NAME, for: indexPath) as! SongGroupCell
            cell.bind(data as! SongData)
            return cell
        default:
            //banner

            //取出一个Cell
            let cell = tableView.dequeueReusableCell(withIdentifier:  Constant.CELL, for: indexPath) as! BannerCell

            //绑定数据
            cell.bind(data as! BannerData)

            cell.bannerClick = {[weak self] data in
                    print("bannerClick \(data)")
            }

            return cell
        }
    }
}
单曲UITableView Cell实现
实现流程:
1.创建Cell,及在使用UITableView的View上注册Cell;
2.获取data列表数据,并调用UITableView的reloadData(),将数据更新到列表;
3.将data的Item数据绑定UITableView的每一个Cell;

1)创建和注册Cell
从效果图上面可以看出,单曲列表Item的Cell由一个水平TGLinearLayout包含UIImageView + 垂直TGLinearLayout(垂直TGLinearLayout包含两个UILabel)来实现的。布局比较简单,实现代码如下:
Swift
//
//  SongCell.swift
//  发现界面单曲cell
//
//  Created by jin on 2024/9/2.
//

import UIKit
import TangramKit

class SongCell:BaseTableViewCell{

    static let NAME = "SongCell"

    override func initViews() {
        super.initViews()

        container.tg_space = PADDING_MEDDLE
        container.tg_gravity = TGGravity.vert.center

        container.addSubview(iconView)
        container.addSubview(rightContainer)

        rightContainer.addSubview(titleView)
        rightContainer.addSubview(infoView)
    }

    func bind(_ data:Song) {
        //TODO Bug用这个框架显示,会导致Item高度不正确,暂时还不知道具体是什么问题
//        iconView.show(data.icon)

        iconView.sd_setImage(with: URL(string: data.icon!.absoluteUri()), placeholderImage: R.image.placeholder())

        titleView.text = data.title

        //专辑和歌单差不多,这里就不在实现了
        infoView.text = "\(data.singer.nickname!)-这是专辑名称"
    }

    lazy var iconView: UIImageView = {
        let result=UIImageView()
        result.tg_width.equal(51)
        result.tg_height.equal(51)
        result.image = R.image.dayRecommend()
        result.clipsToBounds=true

        result.contentMode = .scaleAspectFill

        result.smallCorner()
        return result
    }()

    lazy var rightContainer: TGLinearLayout = {
        let result=TGLinearLayout(.vert)
        result.tg_width.equal(.fill)
        result.tg_height.equal(.wrap)

        result.tg_space = PADDING_SMALL
        return result
    }()

    /// 标题控件
    lazy var titleView: UILabel = {
        let result=UILabel()
        result.tg_width.equal(.fill)
        result.tg_height.equal(.wrap)
        result.numberOfLines = 2
        result.font = UIFont.systemFont(ofSize: 14)
        result.textColor = .colorOnSurface
        return result
    }()

    lazy var infoView: UILabel = {
        let result=UILabel()
        result.tg_width.equal(.fill)
        result.tg_height.equal(.wrap)
        result.font = UIFont.systemFont(ofSize: 12)
        result.textColor = .black80
        return result
    }()
}
2)获取data列表数据
定义列表Item数据模型Song
Swift
//
//  Song.swift
//  音乐对象
//
//  Created by jin on 2024/9/2.
//

import Foundation

//导入JSON解析框架
import HandyJSON

class Song : BaseCommon{
    // 标题
    var title:String!

    /// 封面
    var icon:String?

    /// 音乐地址
    var uri:String!

    /// 点击数
    var clicksCount:Int = 0

    /// 评论数
    var commentsCount:Int = 0

    /// 创建该音乐的人
    var user:User!

    /// 歌手
    var singer:User!

    override func mapping(mapper: HelpingMapper) {
        super.mapping(mapper: mapper)
        mapper <<< self.clicksCount <-- "clicks_count"
        mapper <<< self.commentsCount <-- "comments_count"
    }
}
从SongGroupCell bind()中获取单曲列表Item数据,更新tableView.reloadData()
Swift
class SongGroupCell:BaseTableViewCell{

    static let NAME = "SongGroupCell"

    var datum:Array<Song> = []

    //发现界面每个单曲cell高度,51:图片高度,10*2:上下两个边距
    static let HEIGHT_DISCOVERY_SONG:CGFloat = 51+10*2

    override func initViews() {
        super.initViews()

        //分割线
        container.addSubview(ViewFactoryUtil.smallDivider())

        //标题
        container.addSubview(titleView)

        container.addSubview(tableView)
    }

    override func getContainerOrientation() -> TGOrientation {
        return .vert
    }

    func bind(_ data:SongData){
        datum.removeAll()
        datum = data.datum

        //高度等于,行数*行高
        let viewHeight = CGFloat(data.datum.count) * SongGroupCell.HEIGHT_DISCOVERY_SONG
        tableView.tg_height.equal(viewHeight)

        tableView.reloadData()
    }
}
3)Item数据绑定Cell
SongGroupCell 重写父类的扩展 cellForRowAt方法,创建对应的Cell,并将Item数据绑定到Cell。
Swift
/// 数据源和代理
extension SongGroupCell:QMUITableViewDelegate,QMUITableViewDataSource{
    /// 有多少个
    func tableView(_ tableView: UITableView, numberOfRowsInSection section: Int) -> Int {
        return datum.count
    }

    /// 返回cell
    func tableView(_ tableView: UITableView, cellForRowAt indexPath: IndexPath) -> UITableViewCell {
        let data = datum[indexPath.row]

        let cell = tableView.dequeueReusableCell(withIdentifier: Constant.CELL, for: indexPath) as! SongCell

        if indexPath.row == 0 {
            cell.container.tg_padding = UIEdgeInsets(top: 0, left: PADDING_OUTER, bottom: PADDING_MEDDLE, right: PADDING_OUTER)
        } else {
            cell.container.tg_padding = UIEdgeInsets(top: PADDING_MEDDLE, left: PADDING_OUTER, bottom: PADDING_MEDDLE, right: PADDING_OUTER)
        }

        cell.bind(data)

        return cell
    }

    /// 点击了cell
    func tableView(_ tableView: UITableView, didSelectRowAt indexPath: IndexPath) {
        SwiftEventBus.post(Constant.EVENT_SONG_CLICK, sender: datum[indexPath.row])
    }
}
至此完成单曲列表的实现。