本节演示发布/订阅(publish-subscribe)模式的消息发送的 Spring + ActiveMQ 代码。
1、生产者代码
- spring 关键代码:springContext-activemq.xml
xml
<?xml version="1.0" encoding="UTF-8"?>
<beans xmlns="http://www.springframework.org/schema/beans"
  xmlns:xsi="http://www.w3.org/2001/XMLSchema-instance"
  xsi:schemaLocation="http://www.springframework.org/schema/beans
        http://www.springframework.org/schema/beans/spring-beans.xsd">


  <!-- 创建一个ConnectionFactory,为了提升性能用了连接池 -->
  <bean id="connectionFactory" class="org.apache.activemq.pool.PooledConnectionFactory"
    destroy-method="stop">
    <property name="connectionFactory">
      <bean class="org.apache.activemq.ActiveMQConnectionFactory">
        <property name="brokerURL">
          <value>tcp://localhost:61616</value>
        </property>
      </bean>
    </property>
    <property name="maxConnections" value="50" />
  </bean>


  <!-- 创建消息目的地,constructor-arg是目的地的名称,此处为spring-topic -->
  <bean id="destinationTopic" class="org.apache.activemq.command.ActiveMQTopic">
    <constructor-arg index="0" value="spring-topic" />
  </bean>


  <!-- 构建JmsTemplate -->
  <bean id="jmsTemplate" class="org.springframework.jms.core.JmsTemplate">
    <property name="connectionFactory" ref="connectionFactory" />
    <property name="defaultDestination" ref="destinationTopic" />
    <property name="messageConverter">
      <bean
        class="org.springframework.jms.support.converter.SimpleMessageConverter" />
    </property>
  </bean>


</beans>
生产者关键代码:SpringTopicSender
swift
package producer;
import javax.jms.JMSException;
import javax.jms.Message;
import javax.jms.Session;
import javax.jms.TextMessage;
import org.springframework.context.support.ClassPathXmlApplicationContext;
import org.springframework.jms.core.JmsTemplate;
import org.springframework.jms.core.MessageCreator;
/**
* 发布/订阅(publish-subscribe)消息发送,spring整合
*
* @author JPM
*/
public class SpringTopicSender {
public static void main(String[] args) {
ClassPathXmlApplicationContext context = new ClassPathXmlApplicationContext(
"classpath:spring/springContext-activemq.xml");
JmsTemplate jmsTemplate = (JmsTemplate) context.getBean("jmsTemplate");
jmsTemplate.send(new MessageCreator() {
public Message createMessage(Session session) throws JMSException {
TextMessage message = session.createTextMessage();
message.setText("hello,spring-topic!");
return message;
}
});
context.close();
}
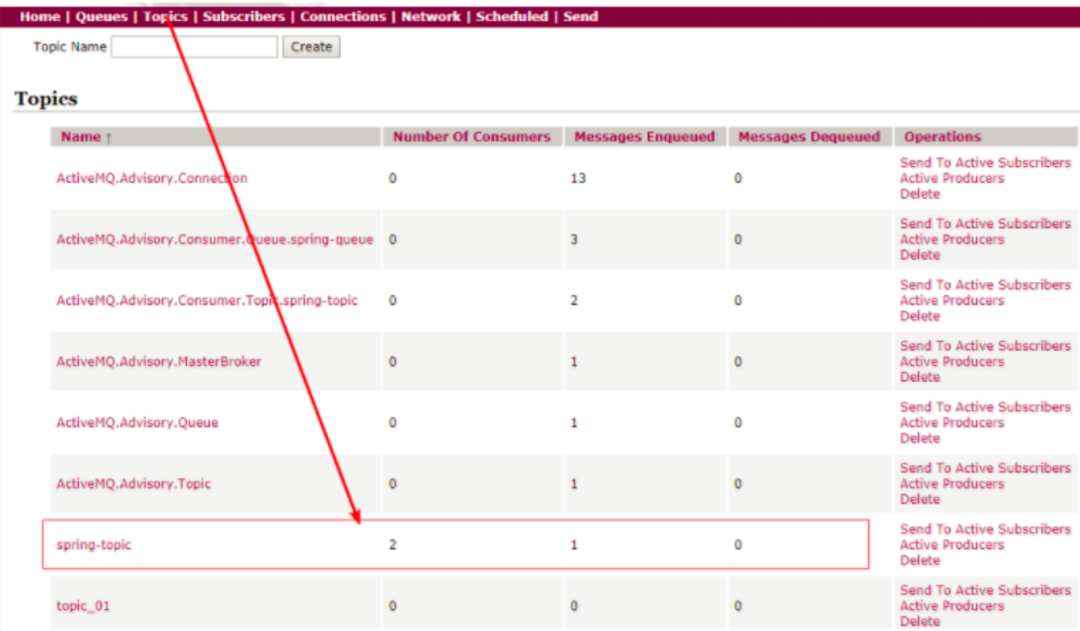
}运行 SpringTopicSender 类,查看 ActiveMQ 管理界面
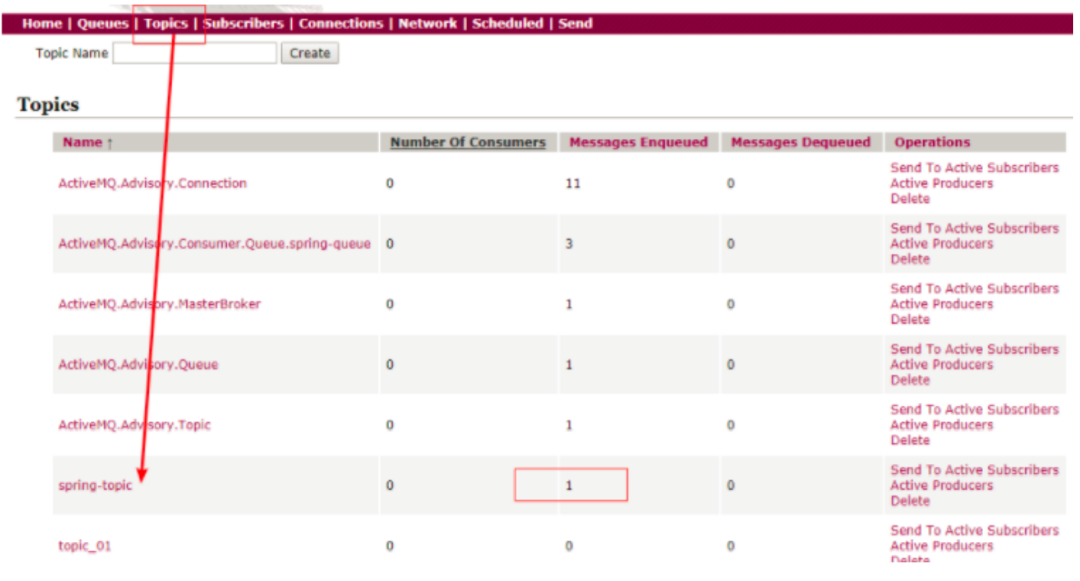
说明已经发布了一个主题消息。
2、消费者代码(receive 方法获取消息)
- spring 关键代码:springContext-activemq.xml
xml
<?xml version="1.0" encoding="UTF-8"?>
<beans xmlns="http://www.springframework.org/schema/beans"
  xmlns:xsi="http://www.w3.org/2001/XMLSchema-instance"
  xsi:schemaLocation="http://www.springframework.org/schema/beans
        http://www.springframework.org/schema/beans/spring-beans.xsd">


  <bean id="connectionFactory" class="org.apache.activemq.pool.PooledConnectionFactory"
    destroy-method="stop">
    <property name="connectionFactory">
      <bean class="org.apache.activemq.ActiveMQConnectionFactory">
        <property name="brokerURL">
          <value>tcp://localhost:61616</value>
        </property>
      </bean>
    </property>
    <property name="maxConnections" value="50" />
  </bean>


  <bean id="destinationTopic" class="org.apache.activemq.command.ActiveMQTopic">
    <constructor-arg index="0" value="spring-topic" />
  </bean>


  <bean id="jmsTemplate" class="org.springframework.jms.core.JmsTemplate">
    <property name="connectionFactory" ref="connectionFactory" />
    <property name="defaultDestination" ref="destinationTopic" />
    <property name="messageConverter">
      <bean
        class="org.springframework.jms.support.converter.SimpleMessageConverter" />
    </property>
  </bean>


</beans>
消费者关键代码:SpringTopicReceiver1 和 SpringTopicReceiver2
typescript
package consumer;


import org.springframework.context.support.ClassPathXmlApplicationContext;
import org.springframework.jms.core.JmsTemplate;


/**
 * 发布/订阅(publish-subscribe)消息接收1,spring整合
 *
 * @author JPM
 */
public class SpringTopicReceiver1 {


  public static void main(String[] args) {
    ClassPathXmlApplicationContext context = new ClassPathXmlApplicationContext(
        "classpath:spring/springContext-activemq.xml");
    JmsTemplate jmsTemplate = (JmsTemplate) context.getBean("jmsTemplate");
    String message = (String) jmsTemplate.receiveAndConvert();
    System.out.println("SpringTopicReceiver1--->" + message);
    context.close();
  }
}
typescript
package consumer;
import org.springframework.context.support.ClassPathXmlApplicationContext;
import org.springframework.jms.core.JmsTemplate;
/**
* 发布/订阅(publish-subscribe)消息接收2,spring整合
*
* @author JPM
*/
public class SpringTopicReceiver2 {
public static void main(String[] args) {
ClassPathXmlApplicationContext context = new ClassPathXmlApplicationContext(
"classpath:spring/springContext-activemq.xml");
JmsTemplate jmsTemplate = (JmsTemplate) context.getBean("jmsTemplate");
String message = (String) jmsTemplate.receiveAndConvert();
System.out.println("SpringTopicReceiver2--->" + message);
context.close();
}
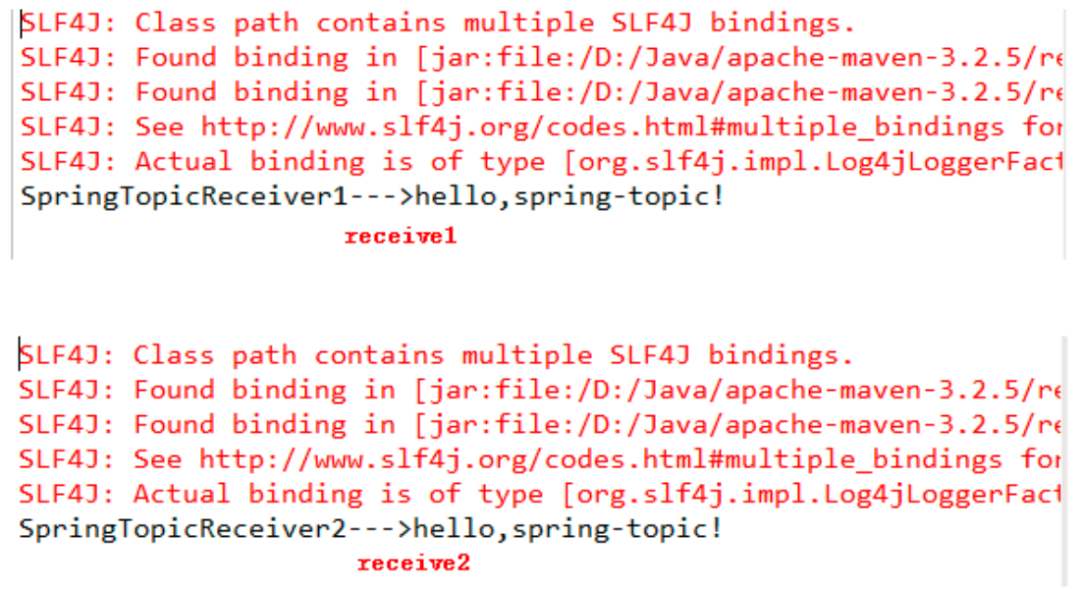
}运行 SpringTopicReceiver1 和 SpringTopicReceiver2 类,查看控制台和 ActiveMQ 管理界面
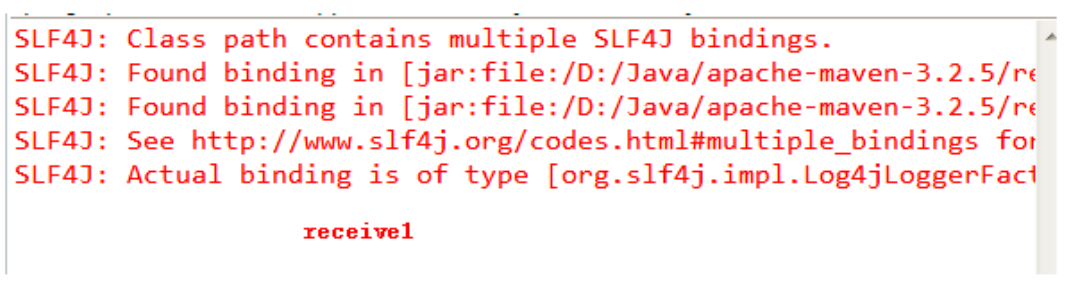
说明2个消费者已经启动,但是看控制台输出都是空的,说明没有消费到消息,原因是对于 topic 消息来说,消费者必须先启动,订阅了主题,然后才能收到主题发来的消息。我们刚才是先发送的主题消息,后启动的消费者,因此2个消费者都没有输出。
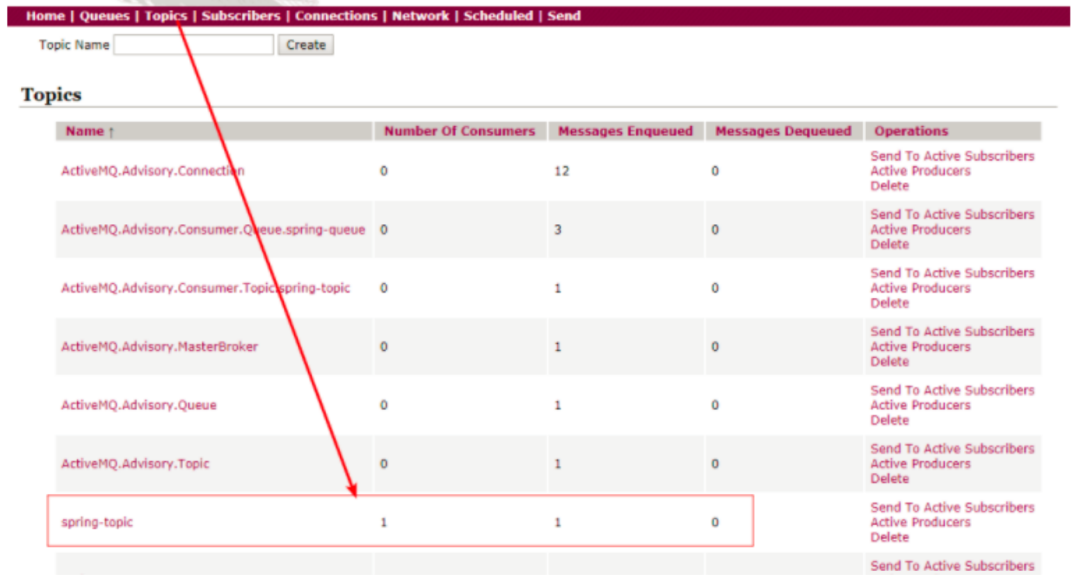
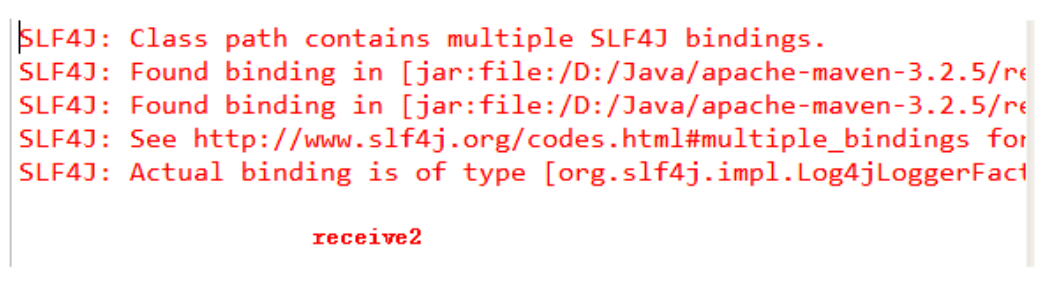
下面我们再通过刚才的生产者 SpringTopicSender 类发送一个主题消息,观察消费者的控制台和 ActiveMQ 管理界面的变化
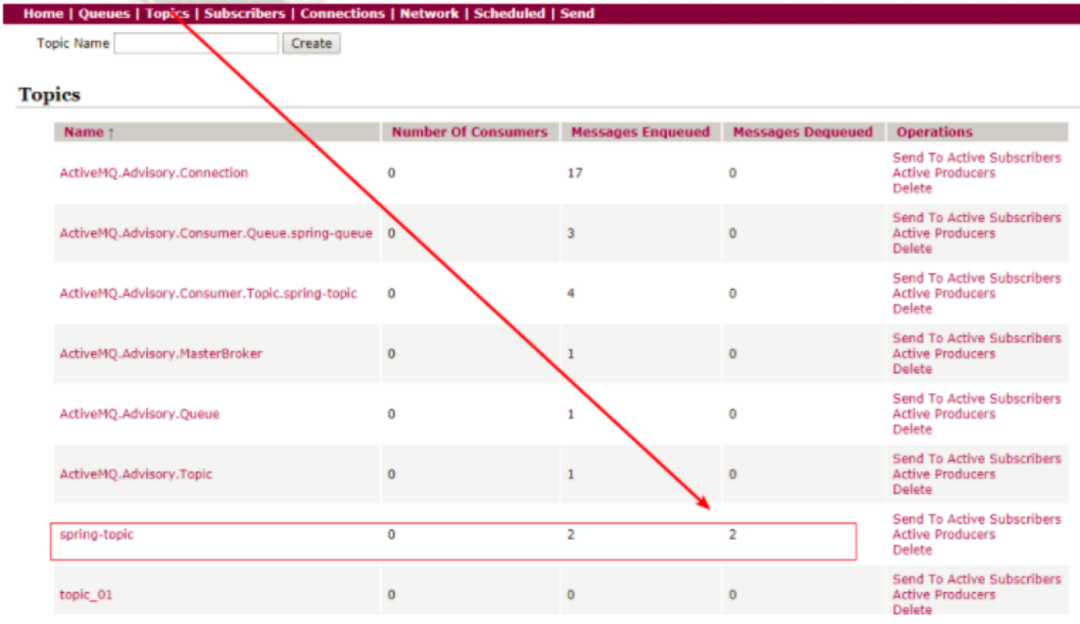
说明,2个消费者都获取到了主题消息。
3、消费者代码(使用消息监听器获取消息)
spring 关键代码 springContext-activemq1.xml
xml
<?xml version="1.0" encoding="UTF-8"?>
<beans xmlns="http://www.springframework.org/schema/beans"
  xmlns:xsi="http://www.w3.org/2001/XMLSchema-instance"
  xsi:schemaLocation="http://www.springframework.org/schema/beans
        http://www.springframework.org/schema/beans/spring-beans.xsd">


  <bean id="connectionFactory" class="org.apache.activemq.pool.PooledConnectionFactory"
    destroy-method="stop">
    <property name="connectionFactory">
      <bean class="org.apache.activemq.ActiveMQConnectionFactory">
        <property name="brokerURL">
          <value>tcp://localhost:61616</value>
        </property>
      </bean>
    </property>
    <property name="maxConnections" value="50" />
  </bean>


  <bean id="destinationTopic" class="org.apache.activemq.command.ActiveMQTopic">
    <constructor-arg index="0" value="spring-topic" />
  </bean>


  <bean id="jmsContainer1"
    class="org.springframework.jms.listener.DefaultMessageListenerContainer">
    <property name="connectionFactory" ref="connectionFactory" />
    <property name="destination" ref="destinationTopic" />
    <property name="messageListener" ref="messageListener1" />
  </bean>


  <bean id="messageListener1" class="consumer.SpringTopicListener1" />


</beans>
springContext-activemq2.xml
xml
<?xml version="1.0" encoding="UTF-8"?>
<beans xmlns="http://www.springframework.org/schema/beans"
  xmlns:xsi="http://www.w3.org/2001/XMLSchema-instance"
  xsi:schemaLocation="http://www.springframework.org/schema/beans
        http://www.springframework.org/schema/beans/spring-beans.xsd">


  <bean id="connectionFactory" class="org.apache.activemq.pool.PooledConnectionFactory"
    destroy-method="stop">
    <property name="connectionFactory">
      <bean class="org.apache.activemq.ActiveMQConnectionFactory">
        <property name="brokerURL">
          <value>tcp://localhost:61616</value>
        </property>
      </bean>
    </property>
    <property name="maxConnections" value="50" />
  </bean>


  <bean id="destinationTopic" class="org.apache.activemq.command.ActiveMQTopic">
    <constructor-arg index="0" value="spring-topic" />
  </bean>


  <bean id="jmsContainer2"
    class="org.springframework.jms.listener.DefaultMessageListenerContainer">
    <property name="connectionFactory" ref="connectionFactory" />
    <property name="destination" ref="destinationTopic" />
    <property name="messageListener" ref="messageListener2" />
  </bean>


  <bean id="messageListener2" class="consumer.SpringTopicListener2" />


</beans>
消费者关键代码 SpringTopicListener1
java
package consumer;


import java.io.IOException;


import javax.jms.JMSException;
import javax.jms.Message;
import javax.jms.MessageListener;
import javax.jms.TextMessage;


import org.springframework.context.support.ClassPathXmlApplicationContext;


/**
 * 发布/订阅(publish-subscribe)消息接收1,spring整合,使用Listener
 *
 * @author JPM
 */
public class SpringTopicListener1 implements MessageListener {


  public void onMessage(Message message) {
    String msg = null;
    try {
      msg = ((TextMessage) message).getText();
    } catch (JMSException e) {
      e.printStackTrace();
    }
    System.out.println("SpringTopicListener1--->" + msg);
  }


  public static void main(String[] args) {
    ClassPathXmlApplicationContext context = new ClassPathXmlApplicationContext(
        "classpath:spring/springContext-activemq1  .xml");
    try {
      System.in.read();
    } catch (IOException e) {
      e.printStackTrace();
    }
    context.close();
  }


}
SpringTopicListener2
java
package consumer;


import java.io.IOException;


import javax.jms.JMSException;
import javax.jms.Message;
import javax.jms.MessageListener;
import javax.jms.TextMessage;


import org.springframework.context.support.ClassPathXmlApplicationContext;


/**
 * 发布/订阅(publish-subscribe)消息接收2,spring整合,使用Listener
 *
 * @author JPM
 */
public class SpringTopicListener2 implements MessageListener {


  public void onMessage(Message message) {
    String msg = null;
    try {
      msg = ((TextMessage) message).getText();
    } catch (JMSException e) {
      e.printStackTrace();
    }
    System.out.println("SpringTopicListener2--->" + msg);
  }


  public static void main(String[] args) {
    ClassPathXmlApplicationContext context = new ClassPathXmlApplicationContext(
        "classpath:spring/springContext-activemq2.xml");
    try {
      System.in.read();
    } catch (IOException e) {
      e.printStackTrace();
    }
    context.close();
  }


}
运行 SpringTopicListener1 和 SpringTopicListener2 类,查看 ActiveMQ 管理界面

成功启动一个消费者

成功启动第二个消费者。
首先运行刚才的生产者 SpringTopicSender 类发送一条主题消息,查看 ActiveMQ 管理界面
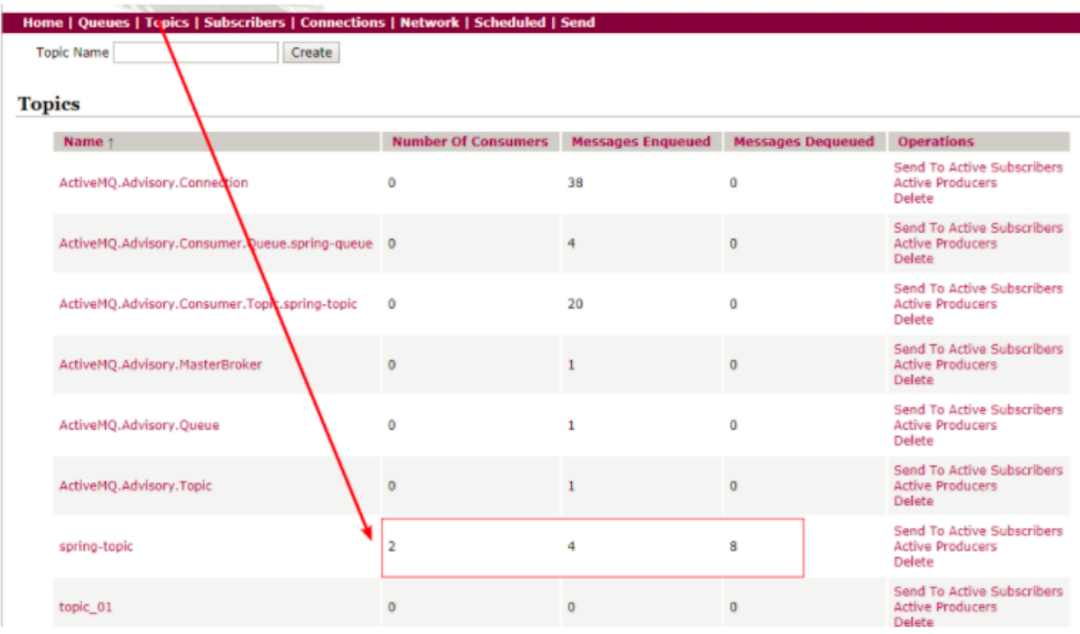
说明消费了主题消息。
查看 SpringTopicListener1 和 SpringTopicListener2 的控制台
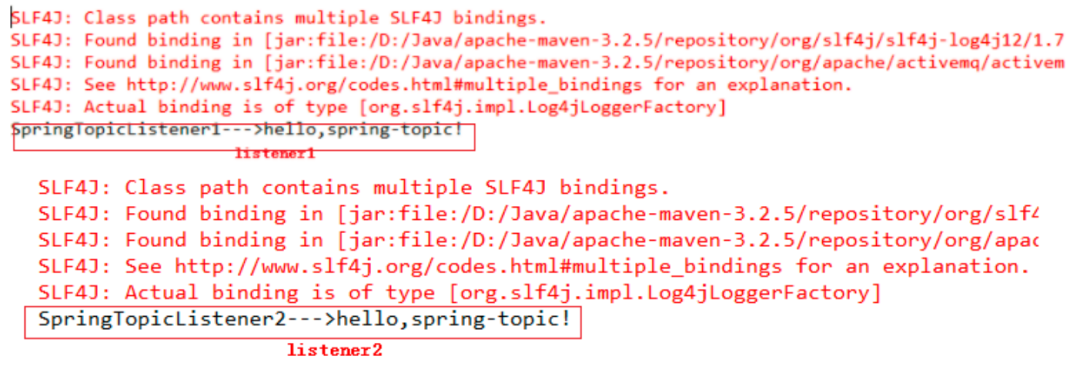
从控制台来看,两个订阅者都获取到了生产者发布的消息。