Spring中文网 https://springdoc.cn/spring-cloud-gateway/
Spring官网 https://spring.io/projects/spring-cloud-gateway
网关简介
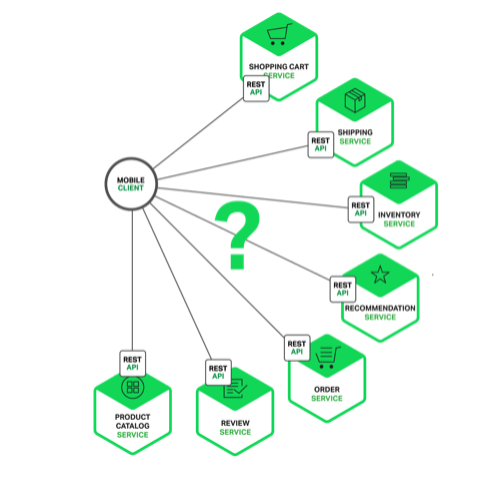
大家都都知道在微服务架构中,一个系统会被拆分为很多个微服务。那么作为客户端要如何去调用这么多的微服务呢?
如果没有网关的存在,我们只能`在客户端记录每个微服务的地址,然后分别去用。
这样的架构,会存在着诸多的问题:
- 每个业务都会需要鉴权、限流、权限校验、跨域等逻辑,如果每个业务都各自为战,自己造轮子实现一遍,会
很蛋疼,完全可以抽出来,放到一个统一的地方去做。
- 如果业务量比较简单的话,这种方式前期不会有什么问题,但随着业务越来越复杂,比如淘宝、亚马逊打开一
个页面可能会涉及到数百个微服务协同工作,如果每一个微服务都分配一个域名的话,一方面客户端代码会很难维
护,涉及到数百个域名,另一方面是连接数的瓶颈,想象一下你打开一个APP,通过抓包发现涉及到了数百个远程
调用,这在移动端下会显得非常低效。
- 后期如果需要对微服务进行重构的话,也会变的非常麻烦,需要客户端配合你一起进行改造,比如商品服务,
随着业务变的越来越复杂,后期需要进行拆分成多个微服务,这个时候对外提供的服务也需要拆分成多个,同时需
要客户端配合你进行改造,非常蛋疼。
上面的这些问题可以借助API网关来解决。
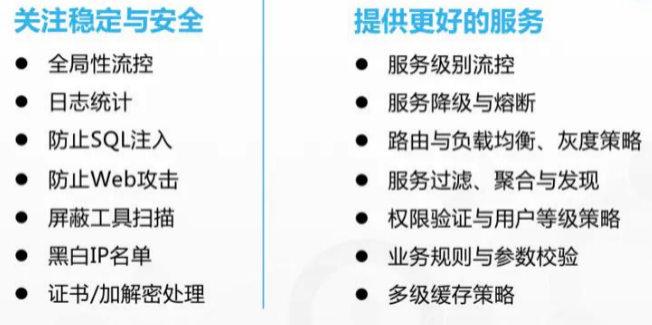
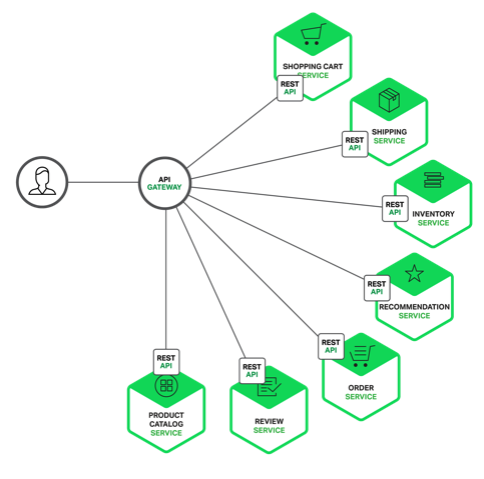
所谓的API网关,就是指系统的统一入口,它封装了应用程序的内部结构,为客户端提供统一服务,一些与业务本身功能无关的公共逻辑可以在这里实现,诸如认证、鉴权、监控、路由转发等等。
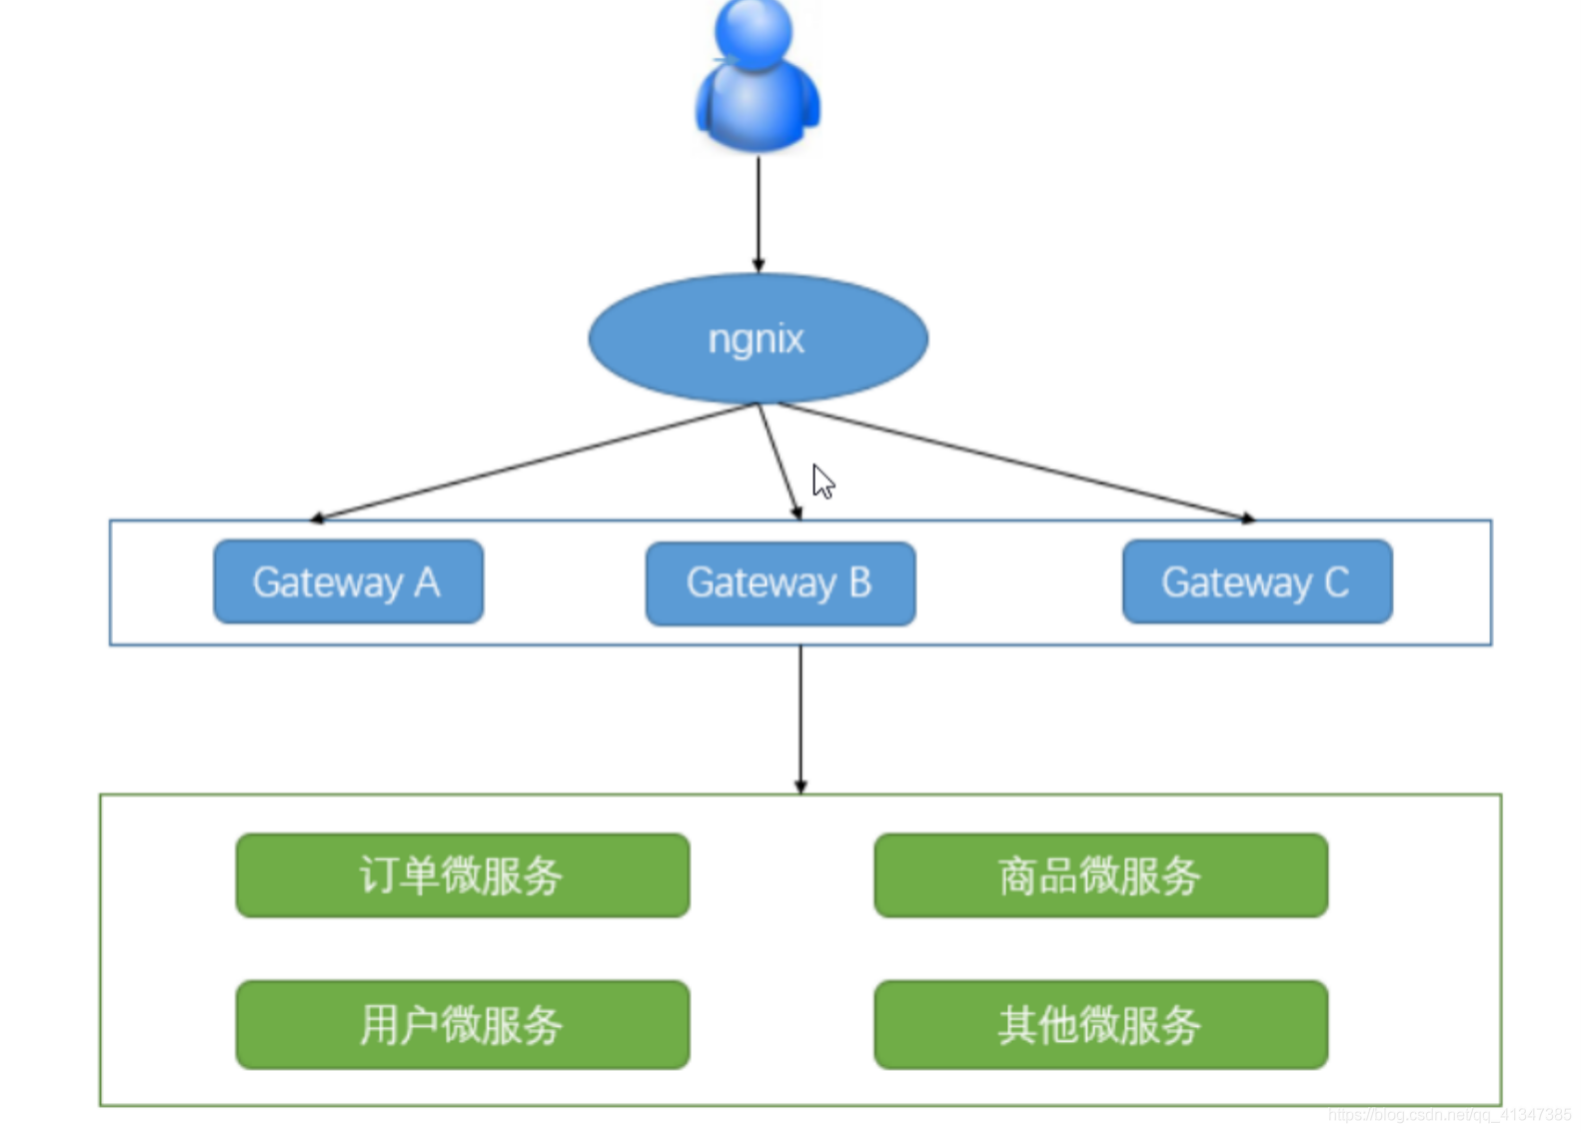
添加上API网关之后,系统的架构图变成了如下所示:
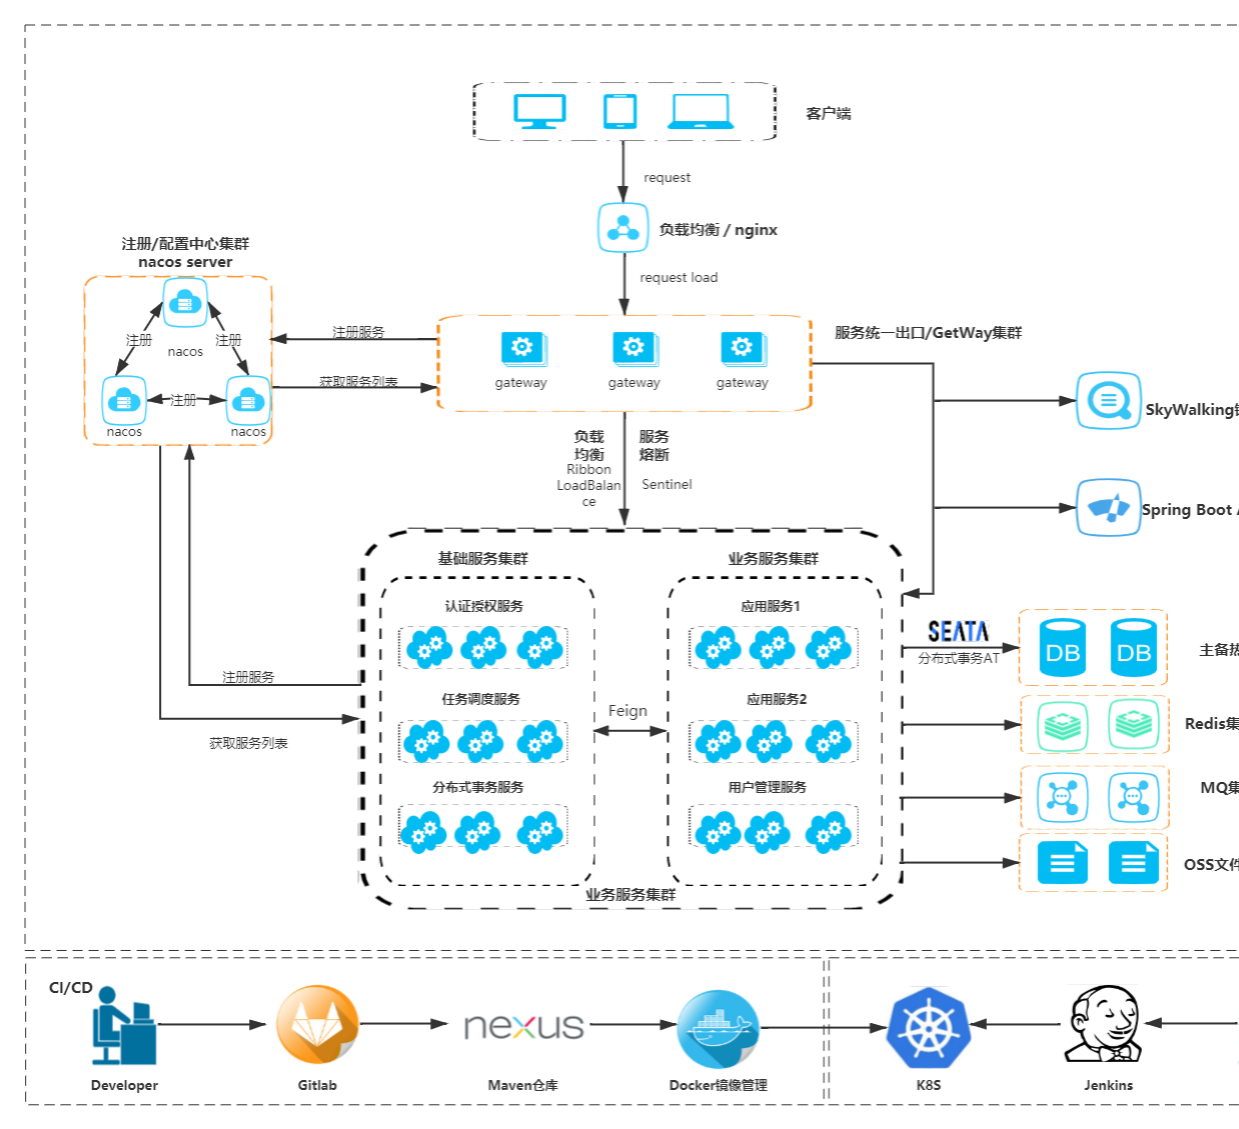
我们也可以观察下,我们现在的整体架构图:
1. 什么是Spring Cloud Gateway
网关作为流量的入口,常用的功能包括路由转发,权限校验,限流等。
Spring Cloud Gateway 是Spring Cloud官方推出的第二代网关框架,定位于取代 Netflix Zuul1.0。相比 Zuul 来说,Spring CloudGateway 提供更优秀的性能,更强大的有功能。
Spring Cloud Gateway 是由 WebFlux + Netty + Reactor 实现的响应式的 API 网关。它不能在传统的 servlet 容器中工作,也不能构建成 war 包。
Spring Cloud Gateway 旨在为微服务架构提供一种简单且有效的 API 路由的管理方式,并基于 Filter 的方式提供网关的基本功能,例如说安全认证、监控、限流等等。
其他的网关组件:
在SpringCloud微服务体系中,有个很重要的组件就是网关 ,在1.x版本中都是采用的Zuul网关;但在2.x版本中,zuul的升级一直跳票,SpringCloud最后自己研发了一个网关替代Zuul ,那就是SpringCloud Gateway
网上很多地方都说Zuul是阻塞的,Gateway是非阻塞的,这么说是不严谨的,准确的讲Zuul1.x是阻塞的,而在2.x的版本中,Zuul也是基于Netty,也是非阻塞的,如果一定要说性能,其实这个真没多大差距。
而官方出过一个测试项目,创建了一个benchmark的测试项目:spring-cloud-gateway-bench,其中对比了:
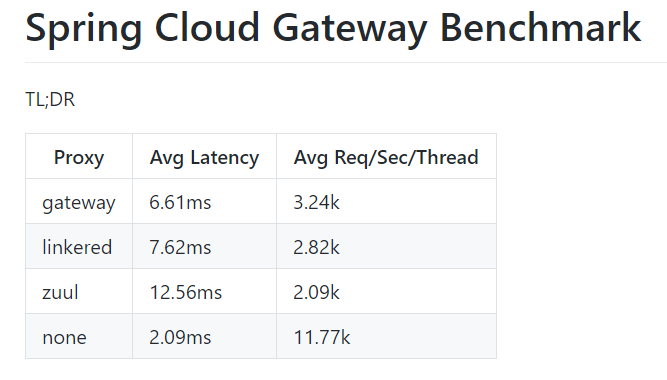
性能强劲:是第一代网关Zuul的1.6倍
Spring Cloud Gateway 功能特征
- 基于Spring Framework 5, Project Reactor 和 Spring Boot 2.0 进行构建;
- 动态路由:能够匹配任何请求属性;
- 支持路径重写;
- 集成 Spring Cloud 服务发现功能(Nacos、Eruka);
- 可集成流控降级功能(Sentinel、Hystrix);
- 可以对路由指定易于编写的 Predicate(断言)和 Filter(过滤器);
1.1 核心概念
- 路由(route)
路由是网关中最基础的部分,路由信息包括一个ID、一个目的URI、一组断言工厂、一组Filter组成。如果断言为真,则说明请求的URL和
配置的路由匹配。
- 断言(predicates)
Java8中的断言函数,SpringCloud Gateway中的断言函数类型是Spring5.0框架中的ServerWebExchange。断言函数允许开发者去定义
匹配Http request中的任何信息,比如请求头和参数等。
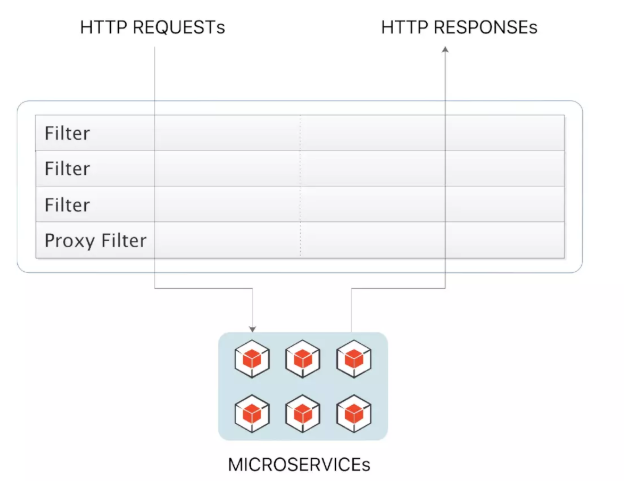
- 过滤器(Filter)
SpringCloud Gateway中的filter分为Gateway FilIer和Global Filter。Filter可以对请求和响应进行处理。
1.2 工作原理
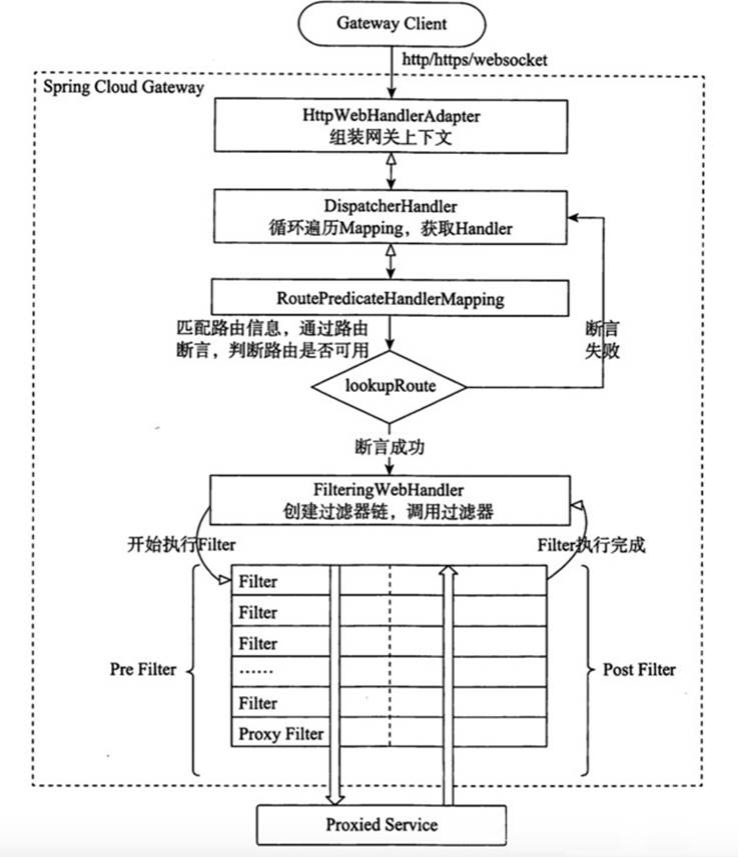
执行流程大体如下:
- Gateway Client向Gateway Server发送请求
- 请求首先会被HttpWebHandlerAdapter进行提取组装成网关上下文
- 然后网关的上下文会传递到DispatcherHandler,它负责将请求分发给RoutePredicateHandlerMapping
- RoutePredicateHandlerMapping负责路由查找,并根据路由断言判断路由是否可用
- 如果过断言成功,由FilteringWebHandler创建过滤器链并调用
- 请求会一次经过PreFilter--微服务--PostFilter的方法,最终返回响应
2. Spring Cloud Gateway快速开始
2.1 环境搭建
- 引入依赖
java
 <!‐‐ gateway网关 ‐‐>
<dependency>
	<groupId>org.springframework.cloud</groupId>
	<artifactId>spring‐cloud‐starter‐gateway</artifactId>
</dependency>
注意:会和spring-webmvc的依赖冲突,需要排除spring-webmvc
2.编写yml配置文件
yaml
server:
  port: 8888
spring:
  application:
    name: api-gateway
  cloud:
    gateway:
      routes: # 路由数组[路由 就是指定当请求满足什么条件的时候转到哪个微服务]
        - id: product_route # 当前路由的标识, 要求唯一
          uri: http://localhost:8081 # 请求要转发到的地址
          order: 1 # 路由的优先级,数字越小级别越高
          predicates: # 断言(就是路由转发要满足的条件)
            - Path=/product-serv/** # 当请求路径满足Path指定的规则时,才进行路由转发
          filters: # 过滤器,请求在传递过程中可以通过过滤器对其进行一定的修改
            - StripPrefix=1 # 转发之前去掉1层路径.
集成Nacos
现在在配置文件中写死了转发路径的地址, 前面我们已经分析过地址写死带来的问题, 接下来我们从注册中心获取此地址。
- 引入依赖
xml
<!‐‐ nacos服务注册与发现 ‐‐>
<dependency>
  <groupId>com.alibaba.cloud</groupId>
  <artifactId>spring‐cloud‐starter‐alibaba‐nacos‐discovery</artifactId>
</dependency>
编写yml配置文件
yaml
server:
  port: 8888
spring:
  application:
    name: api-gateway
  cloud:
    nacos:
      discovery:
        server-addr: 127.0.0.1:8848
    gateway:
      routes:
        - id: product_route
          uri: lb://service-product # lb指的是从nacos中按照名称获取微服务,并遵循负载均衡策略
          predicates:
            - Path=/product-serve/**
          filters:
            - StripPrefix=1
简写: 去掉关于路由的配置,自动寻找服务
yaml
server:
  port: 8888
spring:
  application:
    name: api-gateway
  cloud:
    nacos:
      discovery:
        server-addr: 127.0.0.1:8848
    gateway:
      discovery:
        locator:
          enabled: true
3)测试
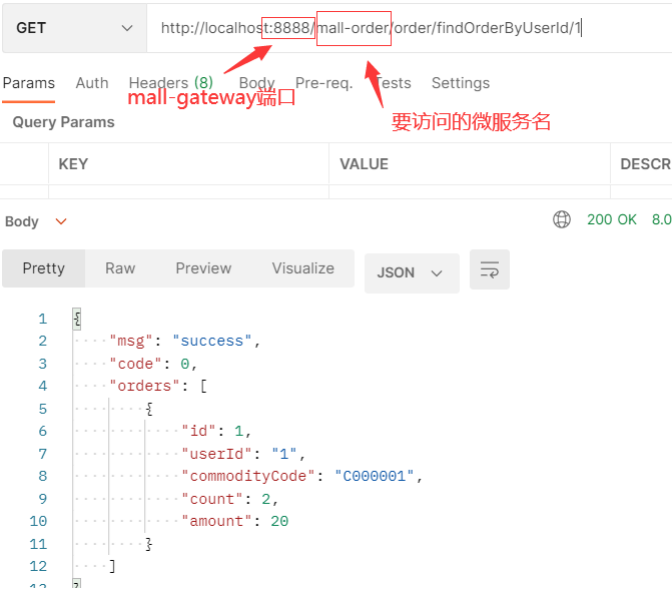
这时候,就发现只要按照网关地址/微服务/接口的格式去访问,就可以得到成功响应。
2.2 路由断言工厂(Route Predicate Factories)配置
作用: 当请求gateway的时候, 使用断言对请求进行匹配, 如果匹配成功就路由转发, 如果匹配失败就返回404
类型:内置,自定义
SpringCloud Gateway包括许多内置的断言工厂,所有这些断言都与HTTP请求的不同属性匹配。具体如下:
- 基于Datetime类型的断言工厂
此类型的断言根据时间做判断,主要有三个:
AfterRoutePredicateFactory: 接收一个日期参数,判断请求日期是否晚于指定日期
BeforeRoutePredicateFactory: 接收一个日期参数,判断请求日期是否早于指定日期
BetweenRoutePredicateFactory: 接收两个日期参数,判断请求日期是否在指定时间段内
ZonedDateTime.now()
yaml
‐ After=2019‐12‐31T23:59:59.789+08:00[Asia/Shanghai]- 基于远程地址的断言工厂
RemoteAddrRoutePredicateFactory:接收一个IP地址段,判断请求主机地址是否在地址段中
yaml
‐ RemoteAddr=192.168.1.1/24- 基于Cookie的断言工厂
CookieRoutePredicateFactory:接收两个参数,cookie 名字和一个正则表达式。 判断请求
cookie是否具有给定名称且值与正则表达式匹配。
yaml
‐Cookie=chocolate, ch.- 基于Header的断言工厂
HeaderRoutePredicateFactory:接收两个参数,标题名称和正则表达式。 判断请求Header是否具有给定名称且值与正则表达式匹配。
yaml
‐Header=X‐Request‐Id, \d+- 基于Host的断言工厂
HostRoutePredicateFactory:接收一个参数,主机名模式。判断请求的Host是否满足匹配规则。
yaml
‐Host=**.testhost.org- 基于Method请求方法的断言工厂
MethodRoutePredicateFactory:接收一个参数,判断请求类型是否跟指定的类型匹配。
yaml
‐Method=GET- 基于Path请求路径的断言工厂
PathRoutePredicateFactory:接收一个参数,判断请求的URI部分是否满足路径规则。
yaml
‐Path=/foo/{segment}- 基于Query请求参数的断言工厂
QueryRoutePredicateFactory :接收两个参数,请求param和正则表达式, 判断请求参数是否具有给定名称且值与正则表达式匹配。
yaml
‐Query=baz, ba.- 基于路由权重的断言工厂
WeightRoutePredicateFactory:接收一个组名,权重, 然后对于同一个组内的路由按照权重转发
yaml
routes:
 ‐id: weight_route1
 uri: host1
 predicates:
 ‐Path=/product/**
 ‐Weight=group3, 1
 ‐id: weight_route2
 uri: host2
 predicates:
 ‐Path=/product/**
 ‐Weight= group3, 9
2.2.5 自定义路由断言工厂
自定义路由断言工厂需要继承 AbstractRoutePredicateFactory 类,重写 apply 方法的逻辑。在 apply 方法中可以通过
exchange.getRequest() 拿到 ServerHttpRequest 对象,从而可以获取到请求的参数、请求方式、请求头等信息。
必须spring组件 bean
类必须加上**RoutePredicateFactory**作为结尾
必须继承**AbstractRoutePredicateFactory**
必须声明静态内部类 声明属性来接收 配置文件中对应的断言的信息
需要结合**shortcutFieldOrder**进行绑定
通过apply进行逻辑判断 true就是匹配成功 false匹配失败
注意: 命名需要以 RoutePredicateFactory 结尾
java
@Component
@Slf4j
public class CheckAuthRoutePredicateFactory extends AbstractRoutePredicateFactory<CheckAuthRoutePredicateFactory.Config> {
    public CheckAuthRoutePredicateFactory() {
        super(Config.class);
    }

    @Override
    public Predicate<ServerWebExchange> apply(Config config) {
        return new GatewayPredicate() {

            @Override
            public boolean test(ServerWebExchange serverWebExchange) {
                log.info("调用CheckAuthRoutePredicateFactory" + config.getName());
                if (config.getName().equals("xushu")) {
                    return true;
                }
                return false;
            }
        };
    }

    /**
     * 快捷配置
     * @return
     */
    @Override
    public List<String> shortcutFieldOrder() {
        return Collections.singletonList("name");
    }

    public static class Config {

        private String name;

        public String getName() {
            return name;
        }

        public void setName(String name) {
            this.name = name;
        }
    }
}
yml中配置
yaml
spring:
  cloud:
    gateway:
      #设置路由:路由id、路由到微服务的uri、断言
      routes:
        - id: order_route #路由ID,全局唯一
          uri: http://localhost:8020 #目标微服务的请求地址和端口
          predicates:
          	# 测试:http://localhost:8888/order/findOrderByUserId/1
            - Path=/order/** #Path路径匹配
            #自定义CheckAuth断言工厂
            - CheckAuth=xushu
2.3 过滤器工厂( GatewayFilter Factories)配置
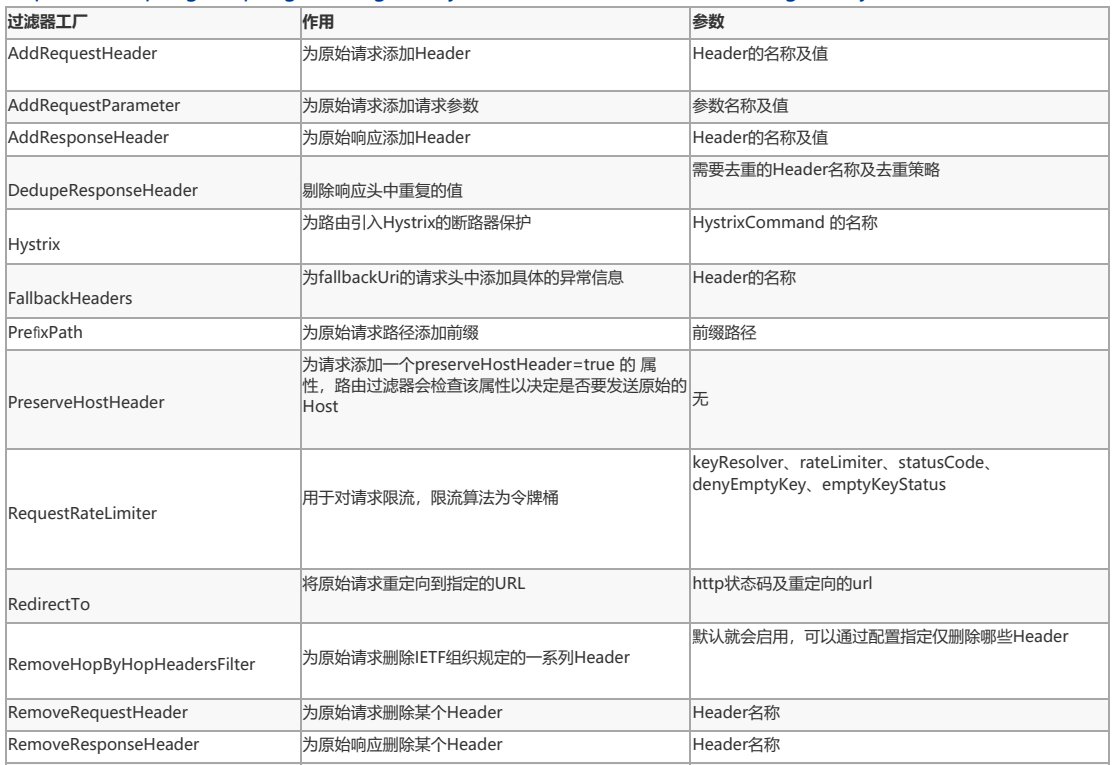
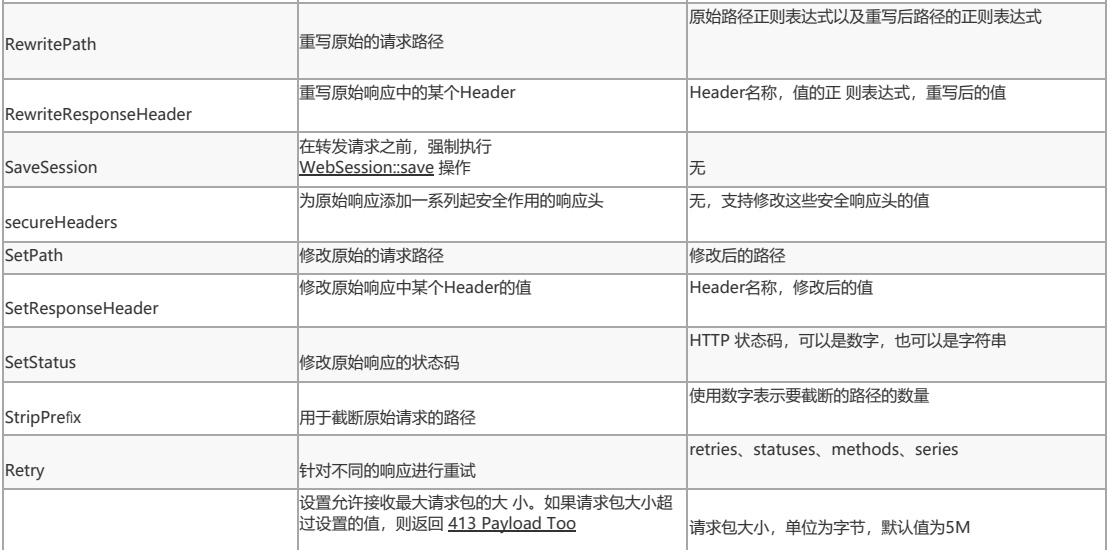
Gateway 内置了很多的过滤器工厂,我们通过一些过滤器工厂可以进行一些业务逻辑处理器,比如添加剔除响应头,添加去除参数等
https://docs.spring.io/spring-cloud-gateway/docs/current/reference/html/#gatewayfilter-factories

2.3.1 添加请求头
java
spring:
  cloud:
    gateway:
      #设置路由:路由id、路由到微服务的uri、断言
      routes:
        - id: order_route #路由ID,全局唯一
          uri: http://localhost:8020 #目标微服务的请求地址和端口
          #配置过滤器工厂
          filters:
- AddRequestHeader=X-Request-color, red #添加请求头测试http://localhost:8888/order/testgateway
java
@GetMapping("/testgateway")
public String testGateway(HttpServletRequest request) throws Exception {
    log.info("gateWay获取请求头X-Request-color:" + request.getHeader("X-Request-color"));
    return "success";
}

@GetMapping("/testgateway2")
public String testGateway(@RequestHeader("X-Request-color") String color) throws Exception {
    log.info("gateWay获取请求头X-Request-color:" + color);
    return "success";
}
2.3.2 添加请求参数
yaml
spring:
  cloud:
    gateway:
      #设置路由:路由id、路由到微服务的uri、断言
      routes:
        - id: order_route #路由ID,全局唯一
          uri: http://localhost:8020 #目标微服务的请求地址和端口
          #配置过滤器工厂
          filters:
- AddRequestParameter=color, blue # 添加请求参数测试http://localhost:8888/order/testgateway3
java
@GetMapping("/testgateway3")
public String testGateway3(@RequestParam("color") String color) throws Exception {
    log.info("gateWay获取请求参数color:" + color);
    return "success";
}
2.3.3 为匹配的路由统一添加前缀
yaml
spring:
  cloud:
    gateway:
      #设置路由:路由id、路由到微服务的uri、断言
      routes:
        - id: order_route #路由ID,全局唯一
          uri: http://localhost:8020 #目标微服务的请求地址和端口
          #配置过滤器工厂
          filters:
            - PrefixPath=/mall-order # 添加前缀 对应微服务需要配置context-path
mall-order中需要配置
yaml
server:
  servlet:
context-path: /mall-order测试:http://localhost:8888/order/findOrderByUserId/1 ====》 http://localhost:8020/mallorder/order/findOrderByUserId/1
2.3.4 重定向操作
yaml
spring:
  cloud:
    gateway:
      #设置路由:路由id、路由到微服务的uri、断言
      routes:
        - id: order_route #路由ID,全局唯一
          uri: http://localhost:8020 #目标微服务的请求地址和端口
          #配置过滤器工厂
          filters:
- RedirectTo=302, https://www.baidu.com/ #重定向到百度测试:http://localhost:8888/order/findOrderByUserId/1
2.3.5 自定义过滤器工厂
继承AbstractNameValueGatewayFilterFactory且我们的自定义名称必须要以GatewayFilterFactory结尾并交给spring管理。
java
@Component
@Slf4j
public class CheckAuthGatewayFilterFactory extends AbstractNameValueGatewayFilterFactory<NameValueConfig> {

    @Override
    public GatewayFilter apply(NameValueConfig config) {
        return (exchange, chain) -> {
            log.info("调用CheckAuthGatewayFilterFactory===" + config.getName() + ":" + config.getValue());
            return chain.filter(exchange);
        };
    }
}
配置自定义的过滤器工厂
yaml
spring:
  cloud:
    gateway:
      #设置路由:路由id、路由到微服务的uri、断言
      routes:
        - id: order_route #路由ID,全局唯一
          uri: http://localhost:8020 #目标微服务的请求地址和端口
          #配置过滤器工厂
          filters:
            - CheckAuth=fox,男
测试

2.4 全局过滤器(Global Filters)配置
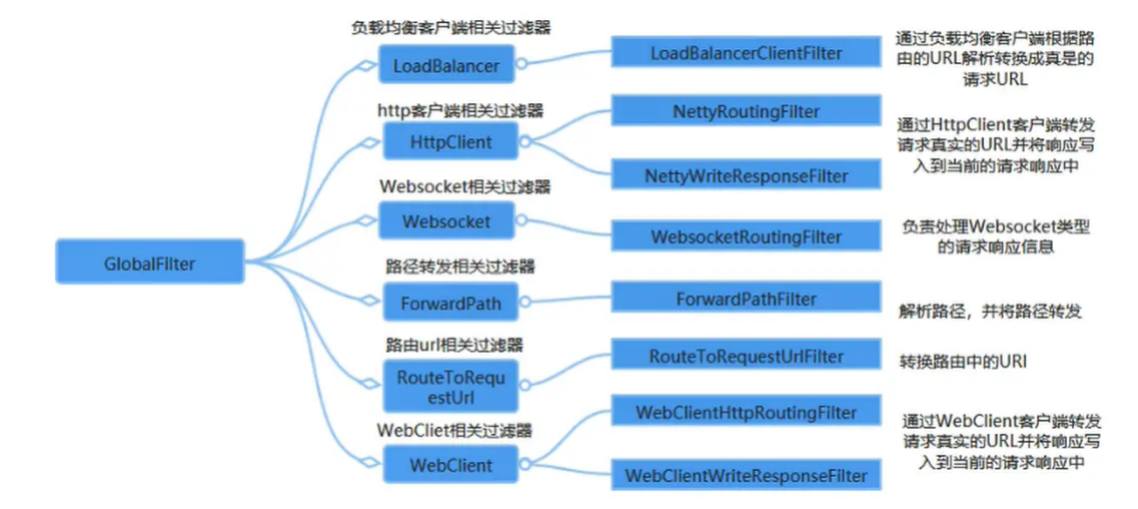
局部过滤器和全局过滤器区别:
局部:局部针对某个路由, 需要在路由中进行配置
全局:针对所有路由请求, 一旦定义就会投入使用
GlobalFilter 接口和 GatewayFilter 有一样的接口定义,只不过, GlobalFilter 会作用于所有路由。
2.4.1 LoadBalancerClientFilter
LoadBalancerClientFilter 会查看exchange的属性 ServerWebExchangeUtils.GATEWAY_REQUEST_URL_ATTR 的值(一个
URI),如果该值的scheme是 lb,比如:lb://myservice ,它将会使用Spring Cloud的LoadBalancerClient 来将 myservice 解析成实
际的host和port,并替换掉 ServerWebExchangeUtils.GATEWAY_REQUEST_URL_ATTR 的内容。
其实就是用来整合负载均衡器Ribbon的
yaml
spring:
  cloud:
    gateway:
      routes:
        - id: order_route
          uri: lb://mall-order
          predicates:
            - Path=/order/**
2.4.2 自定义全局过滤器
java
@Component
public class LogFilter implements GlobalFilter {
    Logger log = LoggerFactory.getLogger(this.getClass());

    @Override
    public Mono<Void> filter(ServerWebExchange exchange, GatewayFilterChain chain) {
        log.info(exchange.getRequest().getPath().value());
        return chain.filter(exchange);
    }
}
Reactor Netty 访问日志
要启用 Reactor Netty 访问日志,请设置Dreactor.netty.http.server.accessLogEnabled=true.
它必须是 Java 系统属性,而不是 Spring Boot 属性。
您可以将日志记录系统配置为具有单独的访问日志文件。以下示例创建一个 Logback 配置:
例 67.logback.xml
xml
<appender name="accessLog" class="ch.qos.logback.core.FileAppender">
  <file>access_log.log</file>
  <encoder>
    <pattern>%msg%n</pattern>
  </encoder>
</appender>
<appender name="async" class="ch.qos.logback.classic.AsyncAppender">
  <appender-ref ref="accessLog" />
</appender>

<logger name="reactor.netty.http.server.AccessLog" level="INFO" additivity="false">
  <appender-ref ref="async"/>
</logger>
2.5 Gateway跨域配置(CORS Configuration)

通过yml配置的方式
https://docs.spring.io/spring-cloud-gateway/docs/current/reference/html/#cors-configuration
yaml
spring:
  cloud:
    gateway:
      globalcors:
        cors-configurations:
          '[/**]':
            allowedOrigins: "*"
            allowedMethods:
              - GET
              - POST
              - DELETE
              - PUT
              - OPTION
通过java配置的方式
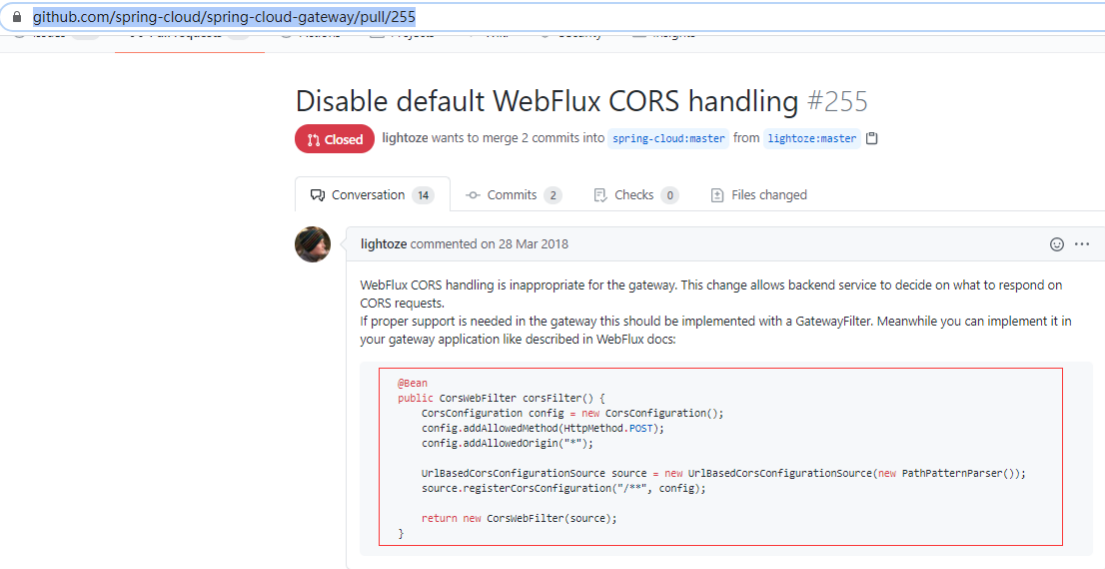
java
@Configuration
public class CorsConfig {
    @Bean
    public CorsWebFilter corsFilter() {
        CorsConfiguration config = new CorsConfiguration();
        config.addAllowedMethod("*");
        config.addAllowedOrigin("*");
        config.addAllowedHeader("*");

        UrlBasedCorsConfigurationSource source = new UrlBasedCorsConfigurationSource(new PathPatternParser());
        source.registerCorsConfiguration("/**", config);

        return new CorsWebFilter(source);
    }
}
2.6 gateway整合sentinel流控降级
网关作为内部系统外的一层屏障, 对内起到一定的保护作用, 限流便是其中之一. 网关层的限流可以简单地针对不同路由进行限流,
也可针对业务的接口进行限流,或者根据接口的特征分组限流。
https://github.com/alibaba/Sentinel/wiki/网关限流
1. 添加依赖
xml
<dependency>
  <groupId>com.alibaba.cloud</groupId>
  <artifactId>spring-cloud-alibaba-sentinel-gateway</artifactId>
</dependency>

<dependency>
  <groupId>com.alibaba.cloud</groupId>
  <artifactId>spring-cloud-starter-alibaba-sentinel</artifactId>
</dependency>
2.添加配置
yaml
sentinel:
  transport:
    # 添加sentinel的控制台地址
    dashboard: 127.0.0.1:8080
2.6.1 控制台实现方式:
Sentinel 1.6.3 引入了网关流控控制台的支持,用户可以直接在 Sentinel 控制台上查看 API Gateway 实时的 route 和自
定义 API 分组监控,管理网关规则和 API 分组配置。
从 1.6.0 版本开始,Sentinel 提供了 Spring Cloud Gateway 的适配模块,可以提供两种资源维度的限流:
- route 维度:即在 Spring 配置文件中配置的路由条目,资源名为对应的 routeId
- 自定义 API 维度:用户可以利用 Sentinel 提供的 API 来自定义一些 API 分组
自定义异常方式:
1.通过yml
yaml
spring:cloud.sentinel.scg.fallback.mode = response
spring.cloud.sentinel.scg.fallback.response‐body = '{"code":403,"mes":"限流了"}'
2.通过GatewayCallbackManager
yaml
@Configuration
public class GatewayConfig {

    @PostConstruct
    public void init() {
        BlockRequestHandler blockRequestHandler = new BlockRequestHandler() {
            @Override
            public Mono<ServerResponse> handleRequest(ServerWebExchange exchange, Throwable throwable) {
                return ServerResponse.status(HttpStatus.OK)
                        .contentType(MediaType.APPLICATION_JSON)
                        .body(BodyInserters.fromValue("降级了!"));
            }
        };

        GatewayCallbackManager.setBlockHandler(blockRequestHandler);
    }
}
2.6.2 代码实现方式:(了解)
用户可以通过 GatewayRuleManager.loadRules(rules) 手动加载网关规则
GatewayConfiguration中添加
java
@PostConstruct
public void doInit() {
//初始化网关限流规则
initGatewayRules();
//自定义限流异常处理器
initBlockRequestHandler();
}
private void initGatewayRules() {
Set<GatewayFlowRule> rules = new HashSet<>();
//resource:资源名称,可以是网关中的 route 名称或者用户自定义的 API 分组名称。
//count:限流阈值
//intervalSec:统计时间窗口,单位是秒,默认是 1 秒。
rules.add(new GatewayFlowRule("order_route")
.setCount(2)
.setIntervalSec(1)
);
rules.add(new GatewayFlowRule("user_service_api")
.setCount(2)
.setIntervalSec(1)
);
// 加载网关规则
GatewayRuleManager.loadRules(rules);
}
private void initBlockRequestHandler() {
BlockRequestHandler blockRequestHandler = new BlockRequestHandler() {
@Override
public Mono<ServerResponse> handleRequest(ServerWebExchange exchange, Throwable t) {
HashMap<String, String> result = new HashMap<>();
result.put("code",String.valueOf(HttpStatus.TOO_MANY_REQUESTS.value()));
result.put("msg", HttpStatus.TOO_MANY_REQUESTS.getReasonPhrase());
return ServerResponse.status(HttpStatus.TOO_MANY_REQUESTS)
.contentType(MediaType.APPLICATION_JSON)
.body(BodyInserters.fromValue(result));
}
};
//设置自定义异常处理器
GatewayCallbackManager.setBlockHandler(blockRequestHandler);
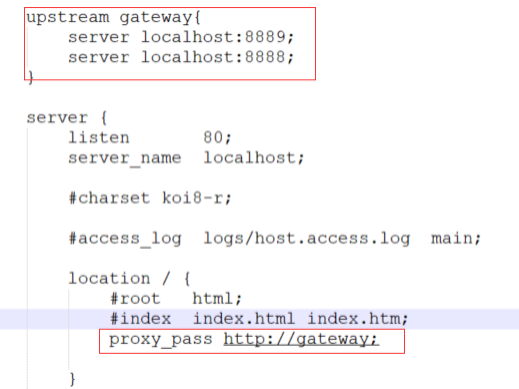
}2.7 网关高可用
为了保证 Gateway 的高可用性,可以同时启动多个 Gateway 实例进行负载,在 Gateway 的上游使用 Nginx 或者 F5 进行负载转发以达到高可用。