目录
[1.1 持续集成(Continuous Integration)](#1.1 持续集成(Continuous Integration))
[1.2 持续部署(Continuous Deployment)](#1.2 持续部署(Continuous Deployment))
[1.3 持续交付(Continuous Delivery)](#1.3 持续交付(Continuous Delivery))
[CI/CD 的好处包括:](#CI/CD 的好处包括:)
一:CI/CD是什么?
CI/CD 是指持续集成(Continuous Integration)和持续部署(Continuous Deployment)或持续交付(Continuous Delivery)
1.1 持续集成(Continuous Integration)
持续集成是一种软件开发实践,团队成员频繁地将他们的工作集成到共享的代码仓库中。其主要特点包括:
-
频繁提交代码:开发人员可以每天多次提交代码,确保代码库始终保持最新状态。
-
自动化构建:每次提交后,自动触发构建过程,包括编译、测试、静态分析等。
-
快速反馈:如果构建失败或测试不通过,能够快速地向开发人员提供反馈,以便及时修复问题。
1.2 持续部署(Continuous Deployment)
持续部署是在持续集成的基础上,将通过所有测试的代码自动部署到生产环境中。其特点如下:
-
自动化流程:从代码提交到生产环境的部署完全自动化,无需人工干预。
-
高频率部署:可以实现频繁的部署,使得新功能能够快速地提供给用户。
-
风险控制:需要有强大的测试和监控体系来确保部署的稳定性和可靠性。
1.3 持续交付(Continuous Delivery)
持续交付与持续部署类似,但不一定自动部署到生产环境,而是随时可以部署。其重点在于确保软件随时处于可发布状态。
CI/CD 的好处包括:
-
提高开发效率:减少手动操作和等待时间,加快开发周期。
-
尽早发现问题:通过频繁的集成和测试,问题能够在早期被发现和解决。
-
降低风险:减少了大规模部署时可能出现的问题,提高了软件的质量和稳定性。
-
增强团队协作:促进团队成员之间的沟通和协作,提高团队的整体效率。
常见的 CI/CD 工具包括 Jenkins、GitLab CI/CD、Travis CI 等。这些工具可以帮助团队实现自动化的构建、测试和部署流程。
CI/CD 的好处包括:
-
1.提高开发效率:减少手动操作和等待时间,加快开发周期。
-
2.尽早发现问题:通过频繁的集成和测试,问题能够在早期被发现和解决。
-
3.降低风险:减少了大规模部署时可能出现的问题,提高了软件的质量和稳定性。
-
4.增强团队协作:促进团队成员之间的沟通和协作,提高团队的整体效率。
常见的 CI/CD 工具包括Jenkins、GitLab 、CI/CD、Travis Cl等。这些工具可以帮助团队实现自动化的构建、测试和部署流程。
二:git工具
git简介
Git 是一个分布式版本控制系统,被广泛用于软件开发中,以管理代码的版本和变更。 主要特点:
-
分布式
-
每个开发者都有完整的代码仓库副本,这使得开发者可以在离线状态下进行工作,并且在网络出现问题时也不会影响开发。
-
即使中央服务器出现故障,开发者仍然可以在本地进行开发和查看项目历史。
-
-
高效的分支管理
-
Git 中的分支创建和切换非常快速和简单。开发人员可以轻松地创建新的分支来进行新功能的开发或修复 bug,而不会影响主分支。
-
合并分支也相对容易,可以使用多种合并策略来满足不同的需求,
-
-
快速的版本回退
-
如果发现某个版本存在问题,可以快速回退到之前的版本
-
可以查看每个版本的详细变更记录,方便了解代码的演进过程。
-
-
强大的提交管理
-
每个提交都有一个唯一的标识符,可以方便地引用和查看特定的提交。
-
提交可以包含详细的提交信息,描述本次提交的更改内容。
-
-
支持协作开发
-
开发者可以将自己的更改推送到远程仓库,供其他开发者拉取和合并。
-
可以处理多个开发者同时对同一文件进行修改的情况,通过合并冲突解决机制来确保代码的完整性。
-
Git必看秘籍:https://git-scm.com/book/zh/v2
git工作流程
工作区---->暂存区---->代码库
每一步都可以撤销
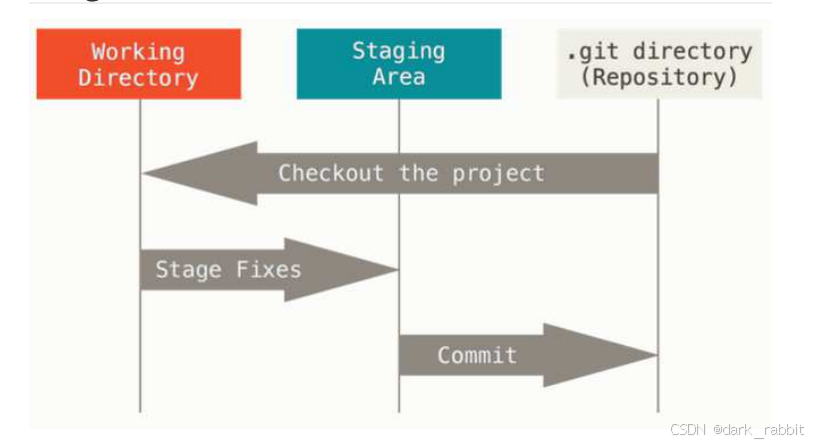
Git 有三种状态:已提交(committed)、已修改(modified)和已暂存(staged)
-
已修改表示修改了文件,但还没保存到数据库中。
-
已暂存表示对一个已修改文件的当前版本做了标记,使之包含在下次提交的快照中。
-
已提交表示数据已经安全地保存在本地数据库中。
这会让我们的 Git 项目拥有三个阶段:工作区、暂存区以及 Git 目录。
三:部署git
bash
#rhel9自带,直接下载
[root@gitlab ~]# dnf install git -y
[root@gitlab ~]# mkdir example
[root@gitlab ~]# cd example/

#初始化命令
[root@gitlab example]# git init
hint: Using 'master' as the name for the initial branch. This default branch name
hint: is subject to change. To configure the initial branch name to use in all
hint: of your new repositories, which will suppress this warning, call:
hint:
hint: 	git config --global init.defaultBranch <name>
hint:
hint: Names commonly chosen instead of 'master' are 'main', 'trunk' and
hint: 'development'. The just-created branch can be renamed via this command:
hint:
hint: 	git branch -m <name>
Initialized empty Git repository in /root/example/.git/

#在 Git 中全局设置你的电子邮件地址的。这里的"全局"意味着这个设置会应用于你机器上所有的 Git 仓库,直到你更改它为止。
#git config:这是 Git 中用来配置 Git 设置的命令。通过它可以设置各种 Git 相关的参数,比如用户信息、仓库的默认行为等。
#--global:这个选项指定了接下来的设置应该被应用到全局配置文件中,而不是当前仓库的配置文件。全局配置文件通常位于你的用户主目录下的
#user.email:这是你想要设置的配置项的名称。Git 使用这个配置项来记录你的电子邮件地址,这个地址会出现在你提交(commit)到仓库的每一次更改的记录中。这对于多人协作的项目非常有用,因为它帮助识别是谁做了哪些更改。
[root@gitlab example]# git config --global user.email "lee@example.org"


#不要随便修改这个隐藏文件
[root@gitlab example]# ls -a
.  ..  .git
[root@gitlab example]# ls .git/
branches  config  description  HEAD  hooks  info  objects  refs

#在工作区域开始工作
[root@gitlab example]# echo example > README.md
[root@gitlab example]# git status
On branch master

No commits yet               #没有需要提交的东西

Untracked files:
  (use "git add <file>..." to include in what will be committed)
	README.md

nothing added to commit but untracked files present (use "git add" to track)

# ??表示这个项目库里没有这个项目
[root@gitlab example]# git status -s
?? README.md
#添加这个项目
[root@gitlab example]# git add README.md
#查看状态  左A:添加到暂存区  右A
[root@gitlab example]# git status -s
A  README.md

#git commit表示把代码提交到代码库    -m表示说明
[root@gitlab example]# git commit -m "add README.md"
[master (root-commit) 0e71d1c] add README.md
 1 file changed, 1 insertion(+)
 create mode 100644 README.md
 #没有信息,表示提交成功
[root@gitlab example]# git status -s

#修改代码
[root@gitlab example]# echo >> README.md
#查看状态   右A:修改但是没有提交
[root@gitlab example]# git status -s
 M README.md
[root@gitlab example]# git add README.md
#左A:提交到暂存区
[root@gitlab example]# git status -s
M  README.md
#提交 备注v2
[root@gitlab example]# git commit -m "README.md v2"
[master 23525ab] README.md v2
 1 file changed, 2 insertions(+)
 #没有信息,表示提交成功
[root@gitlab example]# git status -s
撤销 工作区 内容 checkout
bash
[root@gitlab example]# vim README.md
[root@gitlab example]# git status -s
 M README.md
 #撤销这次工作内容的修改
[root@gitlab example]# git checkout -- README.md
[root@gitlab example]# cat README.md
example
撤回 暂存区 内容 git restore --staged
bash
[root@gitlab example]# echo example >> README.md
[root@gitlab example]# git add README.md
[root@gitlab example]# git status -s
M  README.md

[root@gitlab example]# git restore --staged README.md
[root@gitlab example]# git status -s
 M README.md
[root@gitlab example]#
[root@gitlab example]# git add README.md
[root@gitlab example]# git status -s
M  README.md
版本回溯
bash
[root@gitlab example]# git rm -f  README.md
rm 'README.md'
[root@gitlab example]# git status -s
D  README.md
[root@gitlab example]# git commit -m "delete README.md"
[master 4250726] delete README.md
 1 file changed, 3 deletions(-)
 delete mode 100644 README.md

#查看日志
[root@gitlab example]# git log
commit 4250726ca77c7bfc24028491b2da511936c15cd1 (HEAD -> master)
Author: root <lee@example.org>
Date:   Fri Sep 13 09:57:03 2024 +0800

    delete README.md

commit 23525ab2207ff7942a7e183736d086b70861e725
Author: root <lee@example.org>
Date:   Fri Sep 13 00:54:08 2024 +0800

    README.md v2

commit 0e71d1ca06d09728360d1f5a96ee0b21f5cda5a6
Author: root <lee@example.org>
Date:   Thu Sep 12 11:29:20 2024 +0800

    add README.md

#显示历史记录
[root@gitlab example]# git reflog
4250726 (HEAD -> master) HEAD@{0}: commit: delete README.md
23525ab HEAD@{1}: commit: README.md v2
0e71d1c HEAD@{2}: commit (initial): add README.md

#回溯历史版本,用于将当前分支的 HEAD 指针重置到指定状态,同时重置暂存区和工作目录以匹配该状态。
[root@gitlab example]# git reset --hard 23525ab
HEAD is now at 23525ab README.md v2
[root@gitlab example]# ls
README.md
编译文件
bash
[root@gitlab example]# cd /mnt
[root@gitlab mnt]# vim hello.c
#include<stdio.h>
main()
{
  print("hello example\n");
}
[root@gitlab mnt]# dnf install gcc -y

#编译文件
[root@gitlab mnt]# gcc hello.c -o hello
hello.c:2:1: warning: return type defaults to 'int' [-Wimplicit-int]
    2 | main()
      | ^~~~
[root@gitlab mnt]# ./hello
hello example
git对文件如何忽略
bash
[root@gitlab mnt]# cd /root/example/
[root@gitlab example]# ls
README.md
[root@gitlab example]# touch .lee
[root@gitlab example]# ls
README.md
[root@gitlab example]# mkdir lee
[root@gitlab example]# touch lee/.lee
[root@gitlab example]# ls
lee  README.md
[root@gitlab example]# git status -s
?? .lee
?? lee/
[root@gitlab example]# ls
lee  README.md

#开始编写忽略文件
[root@gitlab example]# vim .gitignore
.*
#没有了
[root@gitlab example]# git status -s
四:gitlab的部署搭建
gitlab简介
-
Gitlab 是一个用于仓库管理系统的开源项目,使用 Git 作为代码管理工具,并在此基础上搭建起来的 web 服务。
-
GitLab 具有很多功能,比如代码托管、持续集成和持续部署(CI/CD)、问题跟踪、合并请求管理等。它可以帮助开发团队更好地协作开发软件项目,提高开发效率和代码质量。
官网:https://about.gitlab.com/install/ 中文站点:GitLab下载安装_GitLab安装和配置_GitLab最新中文官网免费版下载-极狐GitLab 官方包地址:gitlab/gitlab-ce - Packages · packages.gitlab.com
部署gitlab
[root@gitlab ~]# yum install curl policycoreutils-python-utils openssh-server perl -y
[root@gitlab ~]# dnf instal1 gitlab-ce-17.1.6-ce.0.e19.x86_64.rpm -y
配置gitlab
bash
[root@gitlab ~]# cd /etc/gitlab/
#修改一下,不做解析
[root@gitlab gitlab]# vim gitlab.rb
external_url 'http://172.25.254.80'

#修改配置文件后需利用gitlab-crt来生效
#执行命令成功后会把所有组件全部启动起来
[root@gitlab ~]# gitlab-ctl reconfigure

#查看密码
[root@gitlab gitlab]# cat initial_root_password
# WARNING: This value is valid only in the following conditions
#          1. If provided manually (either via `GITLAB_ROOT_PASSWORD` environment variable or via `gitlab_rails['initial_root_password']` setting in `gitlab.rb`, it was provided before database was seeded for the first time (usually, the first reconfigure run).
#          2. Password hasn't been changed manually, either via UI or via command line.
#
#          If the password shown here doesn't work, you must reset the admin password following https://docs.gitlab.com/ee/security/reset_user_password.html#reset-your-root-password.

Password: p1FAEMCwl8xBElqh43cqJpwpfHHwl6DfCEkbKqzfCj0=

# NOTE: This file will be automatically deleted in the first reconfigure run after 24 hours.
bash
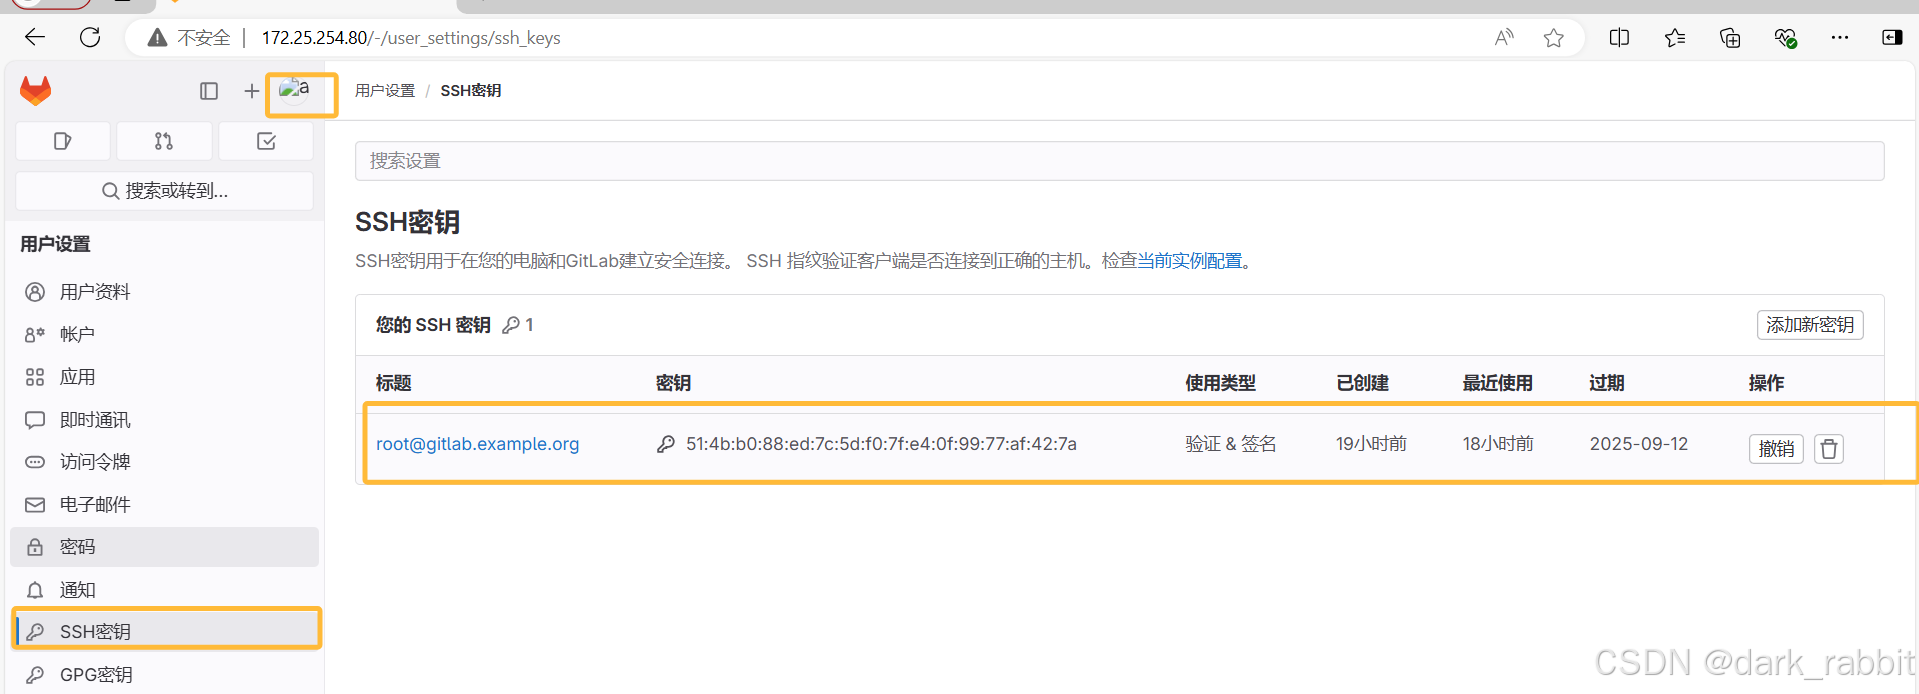
#添加key
[root@gitlab ~]# ssh-keygen

#查看密钥
[root@gitlab ~]# cd .ssh/
[root@gitlab .ssh]# ls
id_rsa  id_rsa.pub  known_hosts  known_hosts.old
[root@gitlab .ssh]# cat id_rsa.pub
ssh-rsa AAAAB3NzaC1yc2EAAAADAQABAAABgQCrlTBBQW1QOipFBrAbsF5fek1hYM1xetMMln4tWVOtOeAY2lvd1HEwfbjBE4e8DACyC14Soowl4djs42TvelxYyiwyOkkB5uTtIhZxmju9hsj8e1fHOrbIgQ5l5cy8M2YCgBnWEAYYyDuf11t3aWYvdr4rM13lyMR9TeH51lI1ls5iI3Q9l/TfV9h4NvOolpDvxBPeRTVg6bvj0ukqn0lOiKtZ5jgCqsU4Tf6xIc2p+JKEt2xVltSpAJsFTFXFjba4aX/7W4vMbIdX6Yn+nBYnWRtho+7FG2AneCGQVtkyfadEDqJxnGcXXWO8ElZ2rzlimD9HSNJqz1MQDjyBKbAeqM1FNbzSIU+WhuDs4YuDnf0ahXrXgaYoD/RxrQLxNaFh1oD5ECR1YkZu3GKE2FXC5R+DXQOKjK8ti5T7OYGCKw813GE/29xdoffWMFJgRsw9z4NS8skZ+QDVRq3HkfJ3Hu7MlwMHSlaeezS5r6e2udVbyhzAfzWCvunYv7BYKOM= root@gitlab.example.org
添加密钥
#克隆
[root@gitlab ~]# git clone git@172.25.254.80:root/example.git
Cloning into 'example'...
remote: Enumerating objects: 3, done.
remote: Counting objects: 100% (3/3), done.
remote: Compressing objects: 100% (2/2), done.
remote: Total 3 (delta 0), reused 0 (delta 0), pack-reused 0 (from 0)
Receiving objects: 100% (3/3), done.
[root@gitlab ~]# #添加文件
[root@gitlab ~]# cd example/
[root@gitlab example]# ls
README.md
[root@gitlab example]# echo example > example
[root@gitlab example]# ls
example README.md
[root@gitlab example]# git add example
[root@gitlab example]# git commit -m "add example"
[main 3667b4d] add example
1 file changed, 1 insertion(+)
create mode 100644 example
[root@gitlab example]# git push -u origin main
Enumerating objects: 4, done.
Counting objects: 100% (4/4), done.
Delta compression using up to 4 threads
Compressing objects: 100% (2/2), done.
Writing objects: 100% (3/3), 270 bytes | 270.00 KiB/s, done.
Total 3 (delta 0), reused 0 (delta 0), pack-reused 0
To 172.25.254.80:root/example.git
7a85c1b..3667b4d main -> main
branch 'main' set up to track 'origin/main'.
 jenkins
部署jenkins
[root@jenkins ~]# cat /etc/hosts
172.25.254.90 jenkins.example.org
172.25.254.80 gitlab.example.org
#安装依赖包
[root@jenkins ~]# yum install fontconfig java-17-openjdk git -y
#安装软件
[root@jenkins ~]# dnf install jenkins-2.462.2-1.1.noarch.rpm
#启动jenkins
[root@jenkins ~]# systemctl enable --now jenkins.service
#查看原始密码
[root@jenkins ~]# cat /var/lib/jenkins/secrets/initialAdminPassword删除jenkins
[root@jenkins ~]# systemctl stop jenkins.service
[root@jenkins ~]# rm -rf /var/lib/jenkins/*
[root@jenkins ~]# systemctl start jenkins.service
jenkins和gitlab的整合方法
大致思路:
在jenkins里面新建一个项目,然后复制git仓库的地址
在jenkins主机里面创建密钥,添加到gitlab里面
在jenkins添加密钥凭据,把本机的sshd的私钥加入 id_isa
#依旧存在报错:地址解析  以及ssh首次链接主机需要签名认证,手动输入yes
[root@jenkins ~]# vim /etc/ssh/ssh_config
Host *
        StrictHostKeyChecking no