目录
- 指令概念
- 内容渲染指令
-
- [**{{ }}**](#{{ }})
- **v-text**
- **v-html**
- [属性绑定指令 v-bind](#属性绑定指令 v-bind)
- [事件绑定指令 v-on](#事件绑定指令 v-on)
-
- [v-on 基础](#v-on 基础)
- event
- [**event\*\*](#**event**)
- [双向绑定指令 v-model](#双向绑定指令 v-model)
-
- [v-model 基础](#v-model 基础)
- [v-model 值绑定](#v-model 值绑定)
- [**v-model 指令的修饰符**](#v-model 指令的修饰符)
- [条件渲染指令 v-if/show](#条件渲染指令 v-if/show)
- [列表渲染指令 v-for](#列表渲染指令 v-for)
- 指令修饰符
- 综合案例
指令概念
指令(Directives)是 vue 为开发者提供的模板语法,用于辅助开发者渲染页面的基本结构。
vue 中的指令按照不同的用途可以分为如下 6 大类:
① 内容渲染指令 ② 属性绑定指令 ③ 事件绑定指令
④ 双向绑定指令 ⑤ 条件渲染指令 ⑥ 列表渲染指令
注意:指令是 vue 开发中最基础、最常用、最简单的知识点。
内容渲染指令
内容渲染指令用来辅助开发者渲染 DOM 元素的文本内容。常用的内容渲染指令有如下 3 个:
{{ }} 、 v-text 、 v-html
案例:
jsx
<body>
<div id="app">
<!-- <p v-text="username"></p>
<p v-text="gender">性别</p> -->
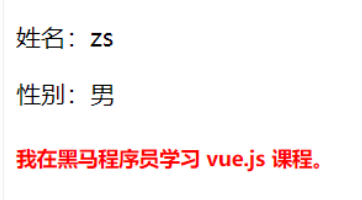
<p>姓名:{{username}}</p>
<p>性别:{{gender}}</p>
<p>---------</p>
<p v-text="desc"></p>
<p>{{desc}}</p>
<p v-html="desc"></p>
</div>
<script src="./lib/vue-2.6.12.js"></script>
<script>
const vm = new Vue({
el: '#app',
data: {
username: 'zs',
gender: '男',
desc: '<i style="color:red;">abc<i>'
}
})
</script>
</body>{{ }}
vue 提供的 {{ }} 语法,专门用来解决 v-text 会覆盖默认文本内容的问题。这种 {{ }} 语法的专业名称是插值表达式(英文名为:Mustache)。
语法:
jsx
<!-- 使用 {{}} 插值表达式,  -->
<!-- 同时保留元素自身的默认值 -->
<p>姓名:{{username}}</p>
<p>性别:{{gender}}</p>
注意点:
-
使用的数据要存在
-
支持的是表达式,不是语句 if for
-
不能在标签属性中使用 {{ }}
比如<img src="{{ imgUrl }">这样写会报错
案例:
-
Code:
jsx<!DOCTYPE html> <html lang="en"> <head> <meta charset="UTF-8"> <meta http-equiv="X-UA-Compatible" content="IE=edge"> <meta name="viewport" content="width=device-width, initial-scale=1.0"> <title>Document</title> </head> <body> <!-- 插值表达式:Vue的一种模板语法 作用:利用 表达式 进行插值渲染 语法:{{ 表达式 }} 注意点: 1. 使用的数据要存在 2. 支持的是表达式,不是语句 if for 3. 不能在标签属性中使用 {{ }} --> <div id="app"> <p>{{ nickname }}</p> <p>{{ nickname.toUpperCase() }}</p> <p>{{ nickname + '你好' }}</p> <p>{{ age >= 18 ? '成年' : '未成年' }}</p> <p>{{ friend.name }}</p> <p>{{ friend.desc }}</p> <!-- ----------------------- --> <!-- <p>{{ hobby }}</p> --> <!-- <p>{{ if }}</p> --> <!-- <p title="{{ nickname }}">我是p标签</p> --> </div> <script src="https://cdn.jsdelivr.net/npm/vue@2.7.14/dist/vue.js"></script> <script> const app = new Vue({ el: '#app', data: { nickname: 'tony', age: 18, friend: { name: 'jepson', desc: '热爱学习 Vue' } } }) </script> </body> </html>
注意:相对于 v-text 来说,插值表达式在开发中更常用,因为它不会覆盖元素中默认的文本内容
v-text
用法示例:
jsx
<!-- 把 username 对应的值,渲染到第一个 p 标签中 -->
<p v-text="username"></p>
<!-- 把 gender 对应的值,渲染到第二个 p 标签中 -->
<p v-text="gender">性别</p>
<!-- 注意: 第二个 p 标签中,默认的文本"性别"会被 gender 的值覆盖 -->
注意:v-text 指令会覆盖元素内默认的值。
v-html
作用:设置元素的 InnerHTML, 把包含 HTML 标签的字符串渲染为页面的 HTML 元素
注:v-text 指令和插值表达式只能渲染纯文本内容。
语法:
jsx
<!-- 假设 data 中定义了名为 description 的数据,数据的值为包含 HTML 标签的字符串: -->
<!-- '<h5 style="color: red;">我在黑马程序员学习 vue.js/ 课程。</h5>' -->

<p v-html="description"></p>
最终渲染的结果为:
-
Code:
jsx<!DOCTYPE html> <html lang="en"> <head> <meta charset="UTF-8"> <meta name="viewport" content="width=device-width, initial-scale=1.0"> <title>Document</title> </head> <body> <div id="app"> <!-- <p v-text="username"></p> <p v-text="gender">性别</p> --> <p>姓名:{{username}}</p> <p>性别:{{gender}}</p> <p>---------</p> <p v-text="desc"></p> <p>{{desc}}</p> <p v-html="desc"></p> </div> <script src="./lib/vue-2.6.12.js"></script> <script> const vm = new Vue({ el: '#app', data: { username: 'zs', gender: '男', desc: '<i style="color:red;">abc<i>' } }) </script> </body> </html>
属性绑定指令 v-bind
绑定属性
作用:为元素的属性动态绑定属性值
语法:
v-bind:属性名 = "data中的属性" 或者 简写 :属性名 = "data中的属性"
jsx
<img v-bind:src="imgUrl" v-bind:title="msg" alt="">
<img :src="imgUrl" :title="msg" alt="">
注意:原生 DOM 对象有 onclick、oninput、onkeyup 等原生事件,替换为 vue 的事件绑定形式后,分别为:v-on:click、v-on:input、v-on:keyup、v-on:mouseenter
案例:综合应用
-
Code:
jsx<html lang="en"> <head> <meta charset="UTF-8"> <meta http-equiv="X-UA-Compatible" content="IE=edge"> <meta name="viewport" content="width=device-width, initial-scale=1.0"> <title>Document</title> </head> <body> <div id="app"> <div> <button @click="switchImage">切换图片</button> </div> <!-- 1.绑定img的src属性 --> <img v-bind:src="showImgUrl" alt=""> <!-- 语法糖: v-bind -> : --> <img :src="showImgUrl" alt=""> <!-- 2.绑定a的href属性 --> <a :href="href">百度一下</a> </div> <script src="../lib/vue.js"></script> <script> // 1.创建app const app = Vue.createApp({ // data: option api data: function() { return { imgUrl1: "http://p1.music.126.net/agGc1qkogHtJQzjjyS-kAA==/109951167643767467.jpg", imgUrl2: "http://p1.music.126.net/_Q2zGH5wNR9xmY1aY7VmUw==/109951167643791745.jpg", showImgUrl: "http://p1.music.126.net/_Q2zGH5wNR9xmY1aY7VmUw==/109951167643791745.jpg", href: "http://www.baidu.com" } }, methods: { switchImage: function() { this.showImgUrl = this.showImgUrl === this.imgUrl1 ? this.imgUrl2: this.imgUrl1 } } }) // 2.挂载app app.mount("#app") </script> </body> </html>
案例(Vue2):更改data中的图片URL,网页中的图片会同步更改

-
Code:
jsx<!DOCTYPE html> <html lang="en"> <head> <meta charset="UTF-8"> <meta http-equiv="X-UA-Compatible" content="IE=edge"> <meta name="viewport" content="width=device-width, initial-scale=1.0"> <title>Document</title> </head> <body> <div id="app"> <!-- v-bind:src => :src --> <img v-bind:src="imgUrl" v-bind:title="msg" alt=""> <img :src="imgUrl" :title="msg" alt=""> </div> <script src="https://cdn.jsdelivr.net/npm/vue@2/dist/vue.js"></script> <script> const app = new Vue({ el: '#app', data: { imgUrl: './imgs/10-02.png', msg: 'hello 波仔' } }) </script> </body> </html>
绑定class
语法:
jsx
<div> :class = "对象/数组">这是一个div</div>对象语法:
当class动态绑定的是对象 时,键就是类名,值就是布尔值 ,如果值是true,就有这个类,否则没有这个类
jsx
<div class="box" :class="{ 类名1: 布尔值, 类名2: 布尔值 }"></div>适用场景:一个类名,来回切换,比如这种tab栏的切换

数组语法(用的较少):
当class动态绑定的是数组时 → 数组中所有的类,都会添加到盒子上,本质就是一个 class 列表
jsx
<div class="box" :class="[ 类名1, 类名2, 类名3 ]"> </div>适用场景:批量添加或删除类
案例:综合案例
注意:这个案例综合应用对象和数组语法
-
Code:
jsx<html lang="en"> <head> <meta charset="UTF-8"> <meta http-equiv="X-UA-Compatible" content="IE=edge"> <meta name="viewport" content="width=device-width, initial-scale=1.0"> <title>Document</title> <style> .active { color: red; } </style> </head> <body> <div id="app"> <!-- 1.基本绑定class --> <h2 :class="classes">Hello World</h2> <!-- 2.动态class可以写对象语法 --> <button :class=" isActive ? 'active': '' " @click="btnClick">我是按钮</button> <!-- 2.1.对象语法的基本使用(掌握) --> <button :class="{ active: isActive }" @click="btnClick">我是按钮</button> <!-- 2.2.对象语法的多个键值对 --> <button :class="{ active: isActive, why: true, kobe: false }" @click="btnClick">我是按钮</button> <!-- 2.3.动态绑定的class是可以和普通的class同时的使用 --> <button class="abc cba" :class="{ active: isActive, why: true, kobe: false }" @click="btnClick">我是按钮</button> <!-- 2.4.动态绑定的class是可以和普通的class同时的使用 --> <button class="abc cba" :class="getDynamicClasses()" @click="btnClick">我是按钮</button> <!-- 3.动态class可以写数组语法(了解) --> <h2 :class="['abc', 'cba']">Hello Array</h2> <h2 :class="['abc', className]">Hello Array</h2> <h2 :class="['abc', className, isActive? 'active': '']">Hello Array</h2> <h2 :class="['abc', className, { active: isActive }]">Hello Array</h2> </div> <script src="../lib/vue.js"></script> <script> // 1.创建app const app = Vue.createApp({ // data: option api data: function() { return { classes: "abc cba nba", isActive: false, className: "why" } }, methods: { btnClick: function() { this.isActive = !this.isActive }, getDynamicClasses: function() { return { active: this.isActive, why: true, kobe: false } } } }) // 2.挂载app app.mount("#app") </script> </body> </html>
案例(Vue2):对于样式的控制

-
Code:
jsx<!DOCTYPE html> <html lang="en"> <head> <meta charset="UTF-8"> <meta http-equiv="X-UA-Compatible" content="IE=edge"> <meta name="viewport" content="width=device-width, initial-scale=1.0"> <title>Document</title> <style> .box { width: 200px; height: 200px; border: 3px solid #000; font-size: 30px; margin-top: 10px; } .pink { background-color: pink; } .big { width: 300px; height: 300px; } </style> </head> <body> <div id="app"> <div class="box" :class="{ pink: true, big: true}">test</div> <div class="box" :class="['pink', 'big']">test</div> </div> <script src="https://cdn.jsdelivr.net/npm/vue@2/dist/vue.js"></script> <script> const app = new Vue({ el: '#app', data: { } }) </script> </body> </html>
案例(Vue2):京东秒杀tab导航高亮
需求:当我们点击哪个tab页签时,哪个tab页签就高亮

思路:
1.基于数据,动态渲染tab(v-for)
2.准备一个下标 记录高亮的是哪一个 tab
3.基于下标动态切换class的类名
-
Code:
jsx<!DOCTYPE html> <html lang="en"> <head> <meta charset="UTF-8"> <meta http-equiv="X-UA-Compatible" content="IE=edge"> <meta name="viewport" content="width=device-width, initial-scale=1.0"> <title>Document</title> <style> * { margin: 0; padding: 0; } ul { display: flex; border-bottom: 2px solid #e01222; padding: 0 10px; } li { width: 100px; height: 50px; line-height: 50px; list-style: none; text-align: center; } li a { display: block; text-decoration: none; font-weight: bold; color: #333333; } li a.active { background-color: #e01222; color: #fff; } </style> </head> <body> <div id="app"> <ul> <li v-for="(item, index) in list" :key="item.id" @click="activeIndex = index"> <a :class="{ active: index === activeIndex}" href="#">{{ item.name }}</a> </li> </ul> </div> <script src="https://cdn.jsdelivr.net/npm/vue@2/dist/vue.js"></script> <script> const app = new Vue({ el: '#app', data: { activeIndex: 0, list: [ { id: 1, name: '京东秒杀' }, { id: 2, name: '每日特价' }, { id: 3, name: '品类秒杀' } ] } }) </script> </body> </html>
绑定style
语法::style="样式对象"
jsx
<div class="box" :style="{ CSS属性名1: CSS属性值, CSS属性名2: CSS属性值 }"></div>注意:
1-样式对象属性内不包含单横线,若要包含需要双引号,或者驼峰写法
2-样式对象属性单位为像 30px 一样的,需要双引号
jsx
<h2 v-bind:style="{ color: fontColor, fontSize: '30px'}">哈哈哈哈</h2>
<h2 v-bind:style="{ color: fontColor, 'font-Size': '30px'}">哈哈哈哈</h2>
**案例:**综合应用
-
Code:
jsx<html lang="en"> <head> <meta charset="UTF-8"> <meta http-equiv="X-UA-Compatible" content="IE=edge"> <meta name="viewport" content="width=device-width, initial-scale=1.0"> <title>Document</title> </head> <body> <div id="app"> <!-- 1.普通的html写法 --> <h2 style="color: red; font-size: 30px;">哈哈哈哈</h2> <!-- 2.style中的某些值, 来自data中 --> <!-- 2.1.动态绑定style, 在后面跟上 对象类型 (重要)--> <h2 v-bind:style="{ color: fontColor, fontSize: fontSize + 'px' }">哈哈哈哈</h2> <!-- 2.2.动态的绑定属性, 这个属性是一个对象 --> <h2 :style="objStyle">呵呵呵呵</h2> <!-- 3.style的数组语法 --> <h2 :style="[objStyle, { backgroundColor: 'purple' }]">嘿嘿嘿嘿</h2> </div> <script src="../lib/vue.js"></script> <script> // 1.创建app const app = Vue.createApp({ // data: option api data: function() { return { fontColor: "blue", fontSize: 30, objStyle: { fontSize: '50px', color: "green" } } }, }) // 2.挂载app app.mount("#app") </script> </body> </html>
案例(Vue2) :将左边的图通过 :style="样式对象" 改成右边的
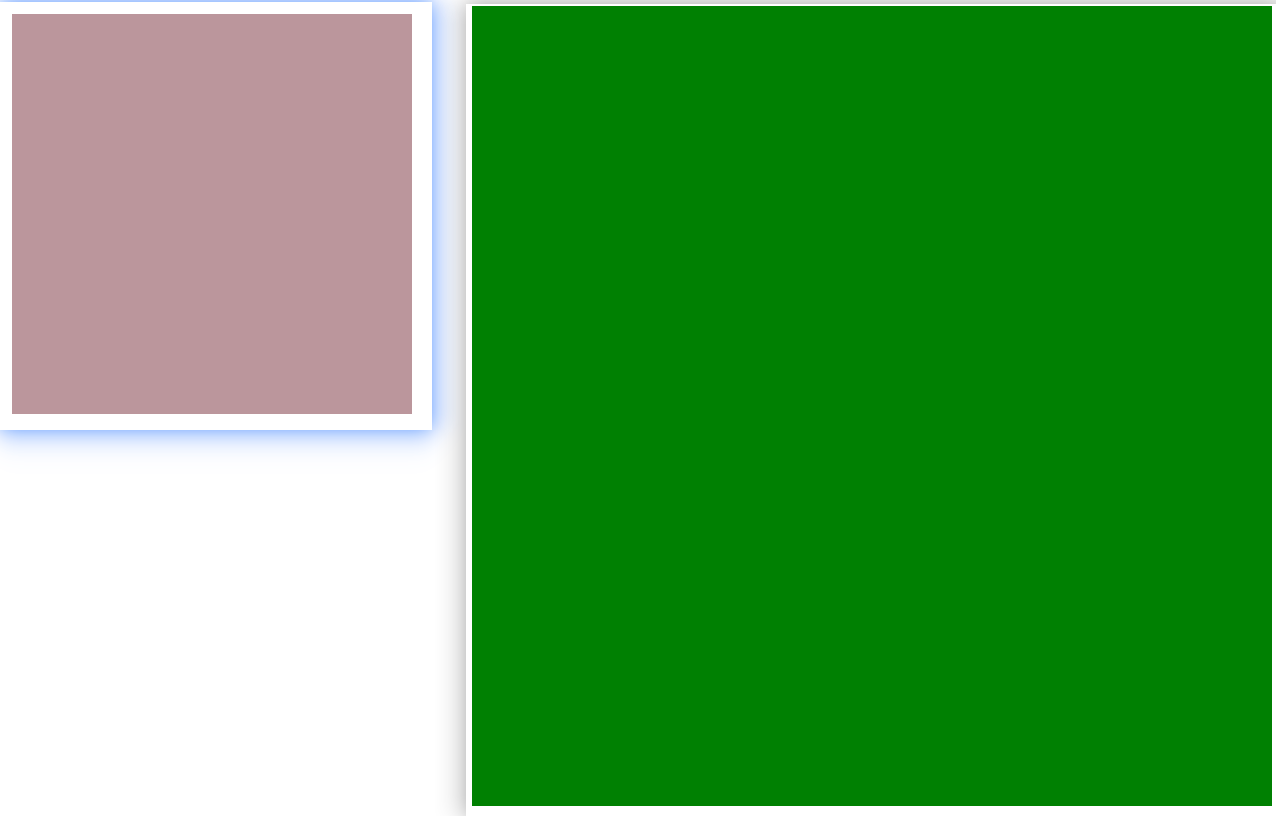
-
Code:
jsx<!DOCTYPE html> <html lang="en"> <head> <meta charset="UTF-8"> <meta http-equiv="X-UA-Compatible" content="IE=edge"> <meta name="viewport" content="width=device-width, initial-scale=1.0"> <title>Document</title> <style> .box { width: 200px; height: 200px; background-color: rgb(187, 150, 156); } </style> </head> <body> <div id="app"> <div class="box" :style="{width: '400px', height: '400px', 'background-color': 'green'}"></div> </div> <script src="https://cdn.jsdelivr.net/npm/vue@2/dist/vue.js"></script> <script> const app = new Vue({ el: '#app', data: { } }) </script> </body> </html>
案例(Vue2):进度条
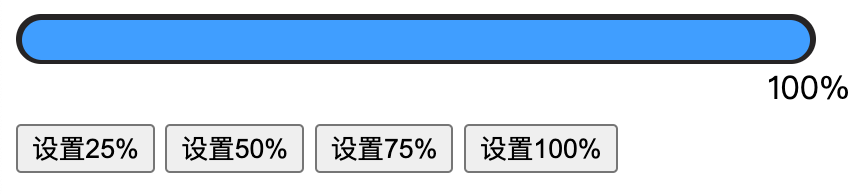
-
Code:
jsx<!DOCTYPE html> <html lang="en"> <head> <meta charset="UTF-8"> <meta http-equiv="X-UA-Compatible" content="IE=edge"> <meta name="viewport" content="width=device-width, initial-scale=1.0"> <title>Document</title> <style> .progress { height: 25px; width: 400px; border-radius: 15px; background-color: #272425; border: 3px solid #272425; box-sizing: border-box; margin-bottom: 30px; } .inner { width: 50%; height: 20px; border-radius: 10px; text-align: right; position: relative; background-color: #409eff; background-size: 20px 20px; box-sizing: border-box; transition: all 1s; } .inner span { position: absolute; right: -20px; bottom: -25px; } </style> </head> <body> <div id="app"> <div class="progress"> <div class="inner" :style="{width: percent + '%'}"> <span>{{ percent }}%</span> </div> </div> <button @click="percent = 25">设置25%</button> <button @click="percent = 50">设置50%</button> <button @click="percent = 75">设置75%</button> <button @click="percent = 100">设置100%</button> </div> <script src="https://cdn.jsdelivr.net/npm/vue@2/dist/vue.js"></script> <script> const app = new Vue({ el: '#app', data: { percent: 30, } }) </script> </body> </html>
动态绑定属性
在某些情况下,我们属性的名称可能也不是固定的:
前端我们无论绑定src、href、class、style,属性名称都是固定的;
如果属性名称不是固定的,我们可以使用 :[属性名]="值" 的格式来定义;
这种绑定的方式,我们称之为动态绑定属性;
jsx
<div id="app">
  <h2 :[name]="'aaaa'">Hello World</h2>
</div>-
Code:
jsx<html lang="en"> <head> <meta charset="UTF-8"> <meta http-equiv="X-UA-Compatible" content="IE=edge"> <meta name="viewport" content="width=device-width, initial-scale=1.0"> <title>Document</title> </head> <body> <div id="app"> <h2 :[name]="'aaaa'">Hello World</h2> </div> <script src="../lib/vue.js"></script> <script> // 1.创建app const app = Vue.createApp({ // data: option api data: function() { return { name: "class" } }, }) // 2.挂载app app.mount("#app") </script> </body> </html>
绑定对象
如果我们希望将一个对象的所有属性,绑定到元素上的所有属性,应该怎么做呢?
非常简单,我们可以直接使用 v-bind 绑定一个 对象;
jsx
<!-- 原本写法 -->
<h2 :name="name" :age="age" :height="height">Hello World</h2>

<!-- v-bind绑定对象: 给组件传递参数 -->
<h2 v-bind="infos">Hello Bind</h2>
案例:info对象会被拆解成div的各个属性
-
Code:
jsx<html lang="en"> <head> <meta charset="UTF-8"> <meta http-equiv="X-UA-Compatible" content="IE=edge"> <meta name="viewport" content="width=device-width, initial-scale=1.0"> <title>Document</title> </head> <body> <div id="app"> <h2 :name="name" :age="age" :height="height">Hello World</h2> <!-- v-bind绑定对象: 给组件传递参数 --> <h2 v-bind="infos">Hello Bind</h2> </div> <script src="../lib/vue.js"></script> <script> // 1.创建app const app = Vue.createApp({ // data: option api data: function() { return { infos: { name: "why", age: 18, height: 1.88, address: "广州市" }, name: "why", age: 18, height: 1.88 } }, }) // 2.挂载app app.mount("#app") </script> </body> </html>
事件绑定指令 v-on
v-on 基础
功能:为 DOM 元素绑定事件监听
语法:
1- v-on:事件名 = "内联语句" 或者 简写 @事件名 = "内联语句"
2-v-on:事件名 = "methods中的函数名"
jsx
//1-
<button v-on:click="count++">+1</button>
<button @click="count+=1">+1</button>
//2-
<button @click="addCount">+1</button>
注意:原生 DOM 对象有 onclick、oninput、onkeyup 等原生事件,替换为 vue 的事件绑定形式后,分别为:v-on:click、v-on:input、v-on:keyup、v-on:mouseenter
案例:基本使用
-
Code:
jsx<html lang="en"> <head> <meta charset="UTF-8"> <meta http-equiv="X-UA-Compatible" content="IE=edge"> <meta name="viewport" content="width=device-width, initial-scale=1.0"> <title>Document</title> <style> .box { width: 100px; height: 100px; background-color: orange; margin-top: 10px; } </style> </head> <body> <div id="app"> <!-- 1.基本的写法 --> <div class="box" v-on:click="divClick"></div> <!-- 2.语法糖写法(重点掌握) --> <div class="box" @click="divClick"></div> <!-- 3.绑定的方法位置, 也可以写成一个表达式(不常用, 不推荐) --> <h2>{{ counter }}</h2> <button @click="increment">+1</button> <button @click="counter++">+1</button> <!-- 4.绑定其他方法(掌握) --> <div class="box" @mousemove="divMousemove"></div> <!-- 5.元素绑定多个事件(掌握) --> <div class="box" @click="divClick" @mousemove="divMousemove"></div> <!-- <div class="box" v-on="{ click: divClick, mousemove: divMousemove }"></div> --> <!-- <div class="box" @="{ click: divClick, mousemove: divMousemove }"></div> --> </div> <script src="../lib/vue.js"></script> <script> // 1.创建app const app = Vue.createApp({ // data: option api data: function() { return { counter: 0 } }, methods: { divClick() { console.log("divClick") }, increment() { this.counter++ }, divMousemove() { console.log("divMousemove") } } }) // 2.挂载app app.mount("#app") </script> </body> </html>
v-on参数传递
操作:
jsx
<button @click="buy(5)">可乐5元</button>
----------------------------------------
methods: {
  buy (price) {
    this.money -= price
  }
}Case:小黑自动售货机
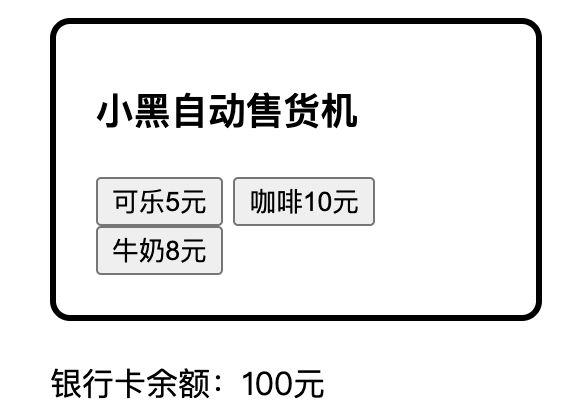
-
Code:
jsx<!DOCTYPE html> <html lang="en"> <head> <meta charset="UTF-8"> <meta http-equiv="X-UA-Compatible" content="IE=edge"> <meta name="viewport" content="width=device-width, initial-scale=1.0"> <title>Document</title> <style> .box { border: 3px solid #000000; border-radius: 10px; padding: 20px; margin: 20px; width: 200px; } h3 { margin: 10px 0 20px 0; } p { margin: 20px; } </style> </head> <body> <div id="app"> <div class="box"> <h3>小黑自动售货机</h3> <button @click="buy(5)">可乐5元</button> <button @click="buy(10)">咖啡10元</button> <button @click="buy(8)">牛奶8元</button> </div> <p>银行卡余额:{{ money }}元</p> </div> <script src="https://cdn.jsdelivr.net/npm/vue@2/dist/vue.js"></script> <script> const app = new Vue({ el: '#app', data: { money: 100 }, methods: { buy (price) { this.money -= price } } }) </script> </body> </html>
event
事件对象 event
在原生的 DOM 事件绑定中,可以在事件处理函数的形参处,接收事件对象 event。
同理,在 v-on 指令(简写为 @ )所绑定的事件处理函数中,同样可以接收到事件对象 event。
Demo:
jsx
<h3>count 的值为:{{count}}</h3>
<button v-on:click="addCount">+1</button>

// ----------------------------------------

methods: {
  // 点击按钮,让 count 自增 +1
  addCount(e) { // 接受事件参数对象 event,简写为 e
    const nowBgColor = e.target.style.backgroundColor
    e.target.style.backgroundColor = nowBgColor === 'red' ? '' : 'red'
    this.count += 1
  },
},
Case:综合案例
-
Code:
jsx<html lang="en"> <head> <meta charset="UTF-8"> <meta http-equiv="X-UA-Compatible" content="IE=edge"> <meta name="viewport" content="width=device-width, initial-scale=1.0"> <title>Document</title> <style> .box { width: 100px; height: 100px; background-color: orange; margin-top: 10px; } </style> </head> <body> <div id="app"> <!-- 1.基本的写法 --> <div class="box" v-on:click="divClick"></div> <!-- 2.语法糖写法(重点掌握) --> <div class="box" @click="divClick"></div> <!-- 3.绑定的方法位置, 也可以写成一个表达式(不常用, 不推荐) --> <h2>{{ counter }}</h2> <button @click="increment">+1</button> <button @click="counter++">+1</button> <!-- 4.绑定其他方法(掌握) --> <div class="box" @mousemove="divMousemove"></div> <!-- 5.元素绑定多个事件(掌握) --> <div class="box" @click="divClick" @mousemove="divMousemove"></div> <!-- <div class="box" v-on="{ click: divClick, mousemove: divMousemove }"></div> --> <!-- <div class="box" @="{ click: divClick, mousemove: divMousemove }"></div> --> </div> <script src="../lib/vue.js"></script> <script> // 1.创建app const app = Vue.createApp({ // data: option api data: function() { return { counter: 0 } }, methods: { divClick() { console.log("divClick") }, increment() { this.counter++ }, divMousemove() { console.log("divMousemove") } } }) // 2.挂载app app.mount("#app") </script> </body> </html>
$event
$event 是 vue 提供的特殊变量,用来表示原生的事件参数对象 event。
$event 可以解决事件参数对象 event 被覆盖的问题。
Demo:
jsx
<h3>count 的值为:{{count}}</h3>
<button @click="addCount(2, $event)">+2</button>
// ---------------
methods: {
  addCount(step, e) {
    const bgColor = e.target.style.backgroundColor
    e.target.style.backgroundColor = bgColor === 'red' ? '' : 'red'
    this.count += step
  },
},
理解:
jsx
举个例子,addNewCount(2)中的会覆盖掉原本的event,即原本为
<button @click="addCount()">+1</button>
methods中的事件处理函数可以为addCount()
methods中的事件处理函数也可以为addCount(e),即我们需要接收事件对象。

现在变成:
<button @click="addCount(2)">+1</button>
而methods中的事件处理函数为addCount(step),我们无法接收事件对象。
**Case:**基础案例
-
Code:
jsx<!DOCTYPE html> <html lang="en"> <head> <meta charset="UTF-8" /> <meta name="viewport" content="width=device-width, initial-scale=1.0" /> <title>Document</title> </head> <body> <!-- vue 实例要控制的 DOM 区域 --> <div id="app"> <h3>count 的值为:{{count}}</h3> <button @click="addCount(2, $event)">+2</button> </div> <!-- 导入 vue 脚本文件 --> <script src="./lib/vue-2.6.12.js"></script> <script> // 创建 VM 实例对象 const vm = new Vue({ // 指定当前 VM 要控制的区域 el: '#app', // 数据源 data: { // 计数器的值 count: 0, }, methods: { addCount(step, e) { const bgColor = e.target.style.backgroundColor e.target.style.backgroundColor = bgColor === 'red' ? '' : 'red' this.count += step }, }, }) </script> </body> </html>
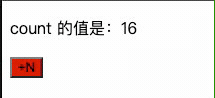
Case: 事件对象$event
需求:点击按钮数字不断增加,同时按钮背景色不断变化
效果:
-
Code:
jsx<!DOCTYPE html> <html lang="en"> <head> <meta charset="UTF-8"> <meta http-equiv="X-UA-Compatible" content="IE=edge"> <meta name="viewport" content="width=device-width, initial-scale=1.0"> <title>Document</title> </head> <body> <!-- 希望 Vue 能够控制下面的这个 div,帮我们在把数据填充到 div 内部 --> <div id="app"> <p>count 的值是:{{ count }}</p> <!-- 如果 count 是偶数,则 按钮背景变成红色,否则,取消背景颜色 --> <!-- <button @click="add">+N</button> --> <!-- vue 提供了内置变量,名字叫做 $event,它就是原生 DOM 的事件对象 e --> <button @click="add($event, 1)">+N</button> </div> <!-- 1. 导入 Vue 的库文件,在 window 全局就有了 Vue 这个构造函数 --> <script src="./lib/vue-2.6.12.js"></script> <!-- 2. 创建 Vue 的实例对象 --> <script> // 创建 Vue 的实例对象 const vm = new Vue({ // el 属性是固定的写法,表示当前 vm 实例要控制页面上的哪个区域,接收的值是一个选择器 el: '#app', // data 对象就是要渲染到页面上的数据 data: { count: 0 }, methods: { add(e, n) { this.count += n console.log(e) // 判断 this.count 的值是否为偶数 if (this.count % 2 === 0) { // 偶数 e.target.style.backgroundColor = 'red' } else { // 奇数 e.target.style.backgroundColor = '' } } }, }) </script> </body> </html>
双向绑定指令 v-model
v-model 基础
作用:辅助开发者在不操作 DOM 的前提下,快速获取表单的数据。可以让数据与视图同步更新 。
举例:比如表单中的用户名修改了,那么data中的也会同步修改。

语法 :v-model='变量'
v-model绑定textarea:
-
Code:
jsx<html lang="en"> <head> <meta charset="UTF-8"> <meta http-equiv="X-UA-Compatible" content="IE=edge"> <meta name="viewport" content="width=device-width, initial-scale=1.0"> <title>Document</title> </head> <body> <div id="app"> <textarea cols="30" rows="10" v-model="content"></textarea> <p>输入的内容: {{content}}</p> </div> <script src="../lib/vue.js"></script> <script> // 1.创建app const app = Vue.createApp({ // data: option api data() { return { content: "" } }, }) // 2.挂载app app.mount("#app") </script> </body> </html>
v-model绑定checkbox:
单个勾选框:v-model即为布尔值。此时input的value属性并不影响v-model的值。
多个复选框:
当是多个复选框时,因为可以选中多个,所以对应的data中属性是一个数组。
当选中某一个时,就会将input的value添加到数组中。
-
Code:
jsx<html lang="en"> <head> <meta charset="UTF-8"> <meta http-equiv="X-UA-Compatible" content="IE=edge"> <meta name="viewport" content="width=device-width, initial-scale=1.0"> <title>Document</title> </head> <body> <div id="app"> <!-- 1.checkbox单选框: 绑定到属性中的值是一个Boolean --> <label for="agree"> <input id="agree" type="checkbox" v-model="isAgree"> 同意协议 </label> <h2>单选框: {{isAgree}}</h2> <hr> <!-- 2.checkbox多选框: 绑定到属性中的值是一个Array --> <!-- 注意: 多选框当中, 必须明确的绑定一个value值 --> <div class="hobbies"> <h2>请选择你的爱好:</h2> <label for="sing"> <input id="sing" type="checkbox" v-model="hobbies" value="sing"> 唱 </label> <label for="jump"> <input id="jump" type="checkbox" v-model="hobbies" value="jump"> 跳 </label> <label for="rap"> <input id="rap" type="checkbox" v-model="hobbies" value="rap"> rap </label> <label for="basketball"> <input id="basketball" type="checkbox" v-model="hobbies" value="basketball"> 篮球 </label> <h2>爱好: {{hobbies}}</h2> </div> </div> <script src="../lib/vue.js"></script> <script> // 1.创建app const app = Vue.createApp({ // data: option api data() { return { isAgree: false, hobbies: [] } }, }) // 2.挂载app app.mount("#app") </script> </body> </html>
v-model绑定radio:
-
Code:
jsx<html lang="en"> <head> <meta charset="UTF-8"> <meta http-equiv="X-UA-Compatible" content="IE=edge"> <meta name="viewport" content="width=device-width, initial-scale=1.0"> <title>Document</title> </head> <body> <div id="app"> <div class="gender"> <label for="male"> <input id="male" type="radio" v-model="gender" value="male"> 男 </label> <label for="female"> <input id="female" type="radio" v-model="gender" value="female"> 女 </label> <h2>性别: {{gender}}</h2> </div> </div> <script src="../lib/vue.js"></script> <script> // 1.创建app const app = Vue.createApp({ // data: option api data() { return { gender: "female" } }, }) // 2.挂载app app.mount("#app") </script> </body> </html>
注意:v-model绑定同一个值,在radio中是会产生互斥效果的
而原生的实现是需要同时绑定相同的name来实现选项互斥的效果
jsx
<input id="male" type="radio" name="gender" value="male"> 男
<input id="female" type="radio" value="female"> 女
v-model绑定select:
单选:只能选中一个值
v-model绑定的是一个值;当我们选中option中的一个时,会将它对应的value赋值到fruit中;
多选:可以选中多个值
v-model绑定的是一个数组;当选中多个值时,就会将选中的option对应的value添加到数组fruit中;
<select multiple size="5" v-model="fruits">
属性:
multiple 属性允许用户在下拉框中选择多个选项。
size 定义下拉框中可见选项的数量。
注意:按照 shift 来进行多选
-
Code:
jsx<html lang="en"></html> <head> <meta charset="UTF-8"> <meta http-equiv="X-UA-Compatible" content="IE=edge"> <meta name="viewport" content="width=device-width, initial-scale=1.0"> <title>Document</title> </head> <body> <div id="app"> <div class="gender"> <label for="male"> <input id="male" type="radio" v-model="gender" value="male"> 男 </label> <label for="female"> <input id="female" type="radio" v-model="gender" value="female"> 女 </label> <h2>性别: {{gender}}</h2> </div> </div> <script src="../lib/vue.js"></script> <script> // 1.创建app const app = Vue.createApp({ // data: option api data() { return { gender: "female" } }, }) // 2.挂载app app.mount("#app") </script> </body> </html>
Case: 登陆与密码重置

-
Code:
jsx<!DOCTYPE html> <html lang="en"> <head> <meta charset="UTF-8"> <meta http-equiv="X-UA-Compatible" content="IE=edge"> <meta name="viewport" content="width=device-width, initial-scale=1.0"> <title>Document</title> </head> <body> <div id="app"> <!-- v-model 可以让数据和视图,形成双向数据绑定 (1) 数据变化,视图自动更新 (2) 视图变化,数据自动更新 可以快速[获取]或[设置]表单元素的内容 --> 账户:<input type="text" v-model="username"> <br><br> 密码:<input type="password" v-model="password"> <br><br> <button @click="login">登录</button> <button @click="reset">重置</button> </div> <script src="https://cdn.jsdelivr.net/npm/vue@2/dist/vue.js"></script> <script> const app = new Vue({ el: '#app', data: { username: '', password: '' }, methods: { login () { console.log(this.username, this.password) }, reset () { this.username = '' this.password = '' } } }) </script> </body> </html>
Case: 下拉框选值
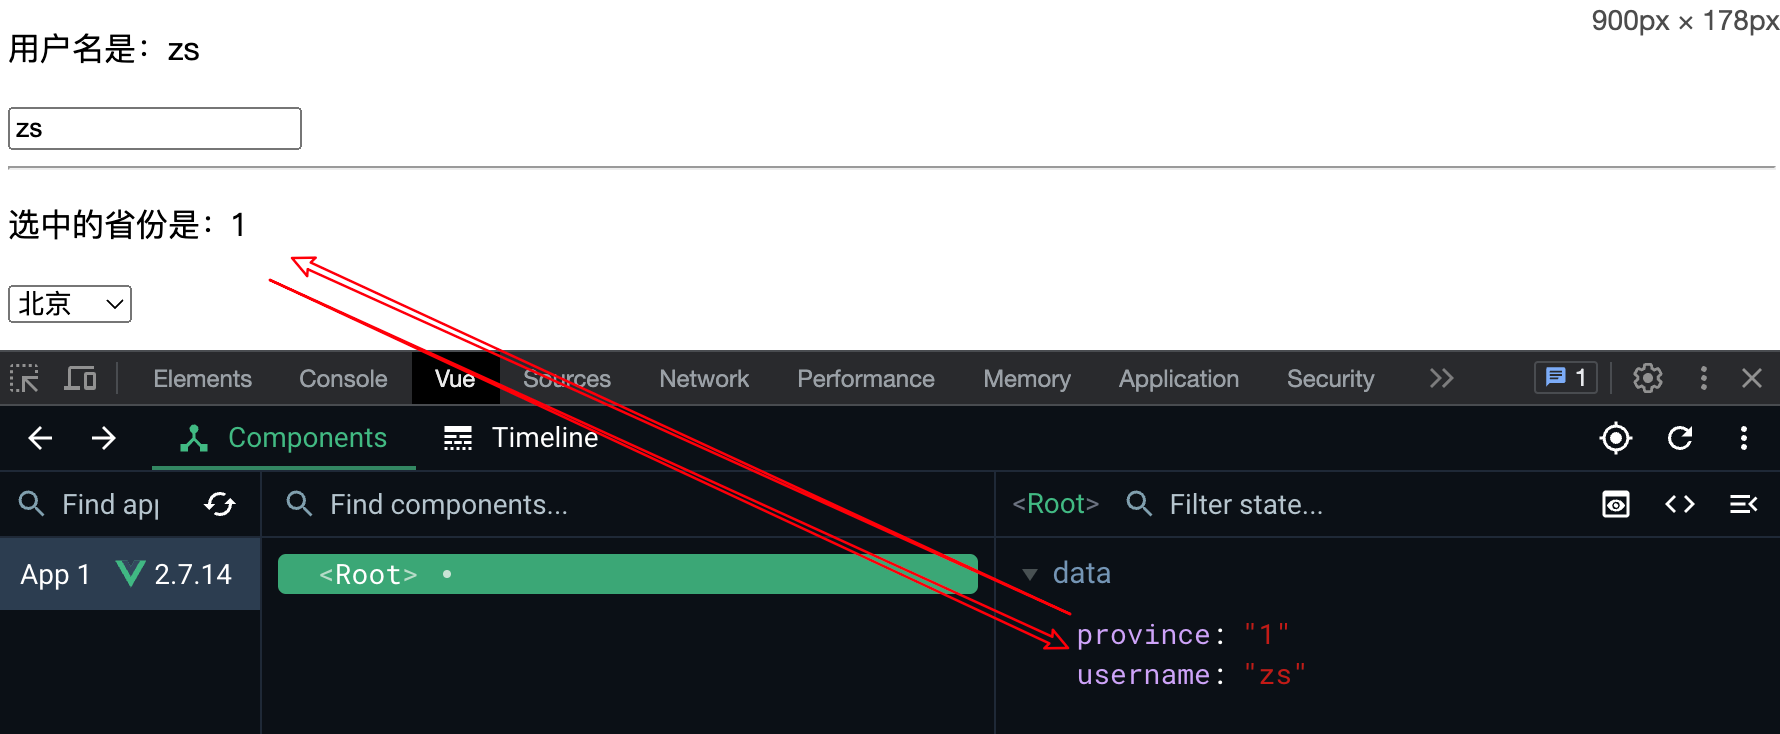
-
Code:
jsx<!DOCTYPE html> <html lang="en"> <head> <meta charset="UTF-8" /> <meta name="viewport" content="width=device-width, initial-scale=1.0" /> <title>Document</title> </head> <body> <div id="app"> <p>用户名是:{{username}}</p> <input type="text" v-model="username" /> <hr /> <p>选中的省份是:{{province}}</p> <select v-model="province"> <option value="">请选择</option> <option value="1">北京</option> <option value="2">河北</option> <option value="3">黑龙江</option> </select> </div> <script src="./lib/vue-2.6.12.js"></script> <script> const vm = new Vue({ el: '#app', data: { // 姓名 username: 'zs', // 省份 province: '1', }, }) </script> </body> </html>
注意:v-model 指令只能配合表单元素一起使用!
v-model 值绑定
目前我们在前面的案例中大部分的值都是在template中固定好的:
比如gender的两个输入框值male、female;
比如hobbies的三个输入框值basketball、football、tennis;
在真实开发中,我们的数据可能是来自服务器的,那么我们就可以先将值请求下来,绑定到data返回的对象中,再通过v-bind来进行值的绑定,这个过程就是值绑定。
**关键实现:**通过 <option v-for="item in allFruits" ... > 来实现目的
jsx
<select multiple size="3" v-model="fruits">
  <option v-for="item in allFruits"
          :key="item.value"
          :value="item.value">
    {{item.text}}
  </option>
</select>

----

allFruits: [
  { value: "apple", text: "苹果" },
  { value: "orange", text: "橘子" },
  { value: "banana", text: "香蕉" },
],-
Code:
html<html lang="en"> <head> <meta charset="UTF-8"> <meta http-equiv="X-UA-Compatible" content="IE=edge"> <meta name="viewport" content="width=device-width, initial-scale=1.0"> <title>Document</title> </head> <body> <div id="app"> <!-- 1.select的值绑定 --> <select multiple size="3" v-model="fruits"> <option v-for="item in allFruits" :key="item.value" :value="item.value"> {{item.text}} </option> </select> <h2>多选: {{fruits}}</h2> <hr> <!-- 2.checkbox的值绑定 --> <div class="hobbies"> <h2>请选择你的爱好:</h2> <template v-for="item in allHobbies" :key="item.value"> <label :for="item.value"> <input :id="item.value" type="checkbox" v-model="hobbies" :value="item.value"> {{item.text}} </label> </template> <h2>爱好: {{hobbies}}</h2> </div> </div> <script src="../lib/vue.js"></script> <script> // 1.创建app const app = Vue.createApp({ // data: option api data() { return { // 水果 allFruits: [ { value: "apple", text: "苹果" }, { value: "orange", text: "橘子" }, { value: "banana", text: "香蕉" }, ], fruits: [], // 爱好 allHobbies: [ { value: "sing", text: "唱" }, { value: "jump", text: "跳" }, { value: "rap", text: "rap" }, { value: "basketball", text: "篮球" } ], hobbies: [] } } }) // 2.挂载app app.mount("#app") </script> </body> </html>
v-model 指令的修饰符
为了方便对用户输入的内容进行处理,vue 为 v-model 指令提供了 3 个修饰符,分别是:
| 修饰符 | 作用 | 示例 |
|---|---|---|
| .lazy | 在"change"时而非"input"时更新 |
理解:
String 的 trim() 方法会从字符串的两端移除空白字符,并返回一个新的字符串,而不会修改原始字符串。
-
Code:
jsx<html lang="en"> <head> <meta charset="UTF-8"> <meta http-equiv="X-UA-Compatible" content="IE=edge"> <meta name="viewport" content="width=device-width, initial-scale=1.0"> <title>Document</title> </head> <body> <div id="app"> <!-- 1.lazy: 绑定change事件 --> <input type="text" v-model.lazy="message"> <h2>message: {{message}}</h2> <hr> <!-- 2.number: 自动将内容转换成数字 --> <input type="text" v-model.number="counter"> <h2>counter:{{counter}}-{{typeof counter}}</h2> <input type="number" v-model="counter2"> <h2>counter2:{{counter2}}-{{typeof counter2}}</h2> <hr> <!-- 3.trim: 去除收尾的空格 --> <input type="text" v-model.trim="content"> <h2>content: {{content}}</h2> <hr> <!-- 4.使用多个修饰符 --> <input type="text" v-model.lazy.trim="content"> <h2>content: {{content}}</h2> </div> <script src="../lib/vue.js"></script> <script> // 1.创建app const app = Vue.createApp({ // data: option api data() { return { message: "Hello Vue", counter: 0, counter2: 0, content: "" } }, watch: { content(newValue) { console.log("content:", newValue) } } }) // 2.挂载app app.mount("#app") </script> </body> </html>
v-model应用于其他表单元素
常见的表单元素都可以用 v-model 绑定关联 → 快速 获取 或 设置 表单元素的值
它会根据 控件类型 自动选取 正确的方法 来更新元素
jsx
输入框 input:text ------> value
文本域 textarea ------> value
复选框 input:checkbox ------> checked
单选框 input:radio ------> checked
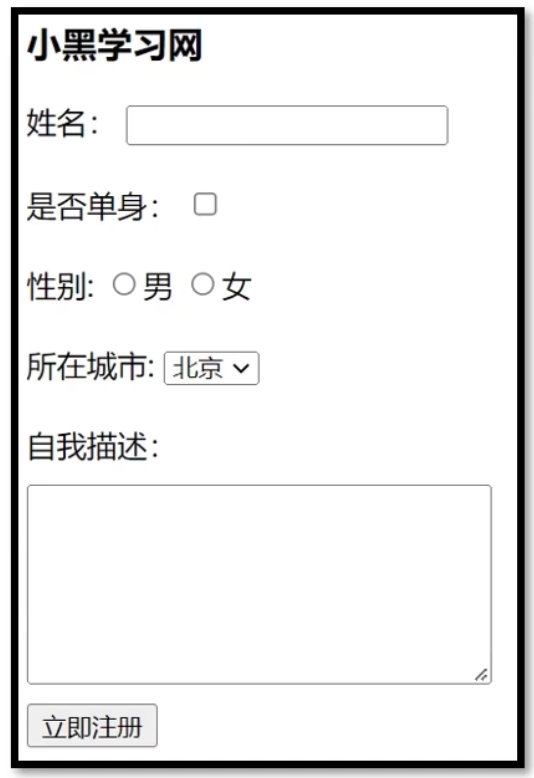
下拉菜单 select ------> valueCase:小黑学习网
**需求:**获取以上表单中所有的数据
-
Code:
jsx<!DOCTYPE html> <html lang="en"> <head> <meta charset="UTF-8"> <meta http-equiv="X-UA-Compatible" content="IE=edge"> <meta name="viewport" content="width=device-width, initial-scale=1.0"> <title>Document</title> <style> textarea { display: block; width: 240px; height: 100px; margin: 10px 0; } </style> </head> <body> <div id="app"> <h3>小黑学习网</h3> 姓名: <input type="text" v-model="username"> <br><br> 是否单身: <input type="checkbox" v-model="isSingle"> <br><br> <!-- 前置理解: 1. name: 给单选框加上 name 属性 可以分组 → 同一组互相会互斥 2. value: 给单选框加上 value 属性,用于提交给后台的数据 结合 Vue 使用 → v-model --> 性别: <input v-model="gender" type="radio" name="gender" value="1">男 <input v-model="gender" type="radio" name="gender" value="2">女 <br><br> <!-- 前置理解: 1. option 需要设置 value 值,提交给后台 2. select 的 value 值,关联了选中的 option 的 value 值 结合 Vue 使用 → v-model --> 所在城市: <select v-model="cityId"> <option value="101">北京</option> <option value="102">上海</option> <option value="103">成都</option> <option value="104">南京</option> </select> <br><br> 自我描述: <textarea v-model="desc"></textarea> <button>立即注册</button> </div> <script src="https://cdn.jsdelivr.net/npm/vue@2/dist/vue.js"></script> <script> const app = new Vue({ el: '#app', data: { username: '', isSingle: false, gender: "2", cityId: '102', desc: "" } }) </script> </body> </html>
注:v-model原理见后面组件高级
条件渲染指令 v-if/show
**功能:**辅助开发者按需控制 DOM 的显示与隐藏。
条件渲染指令有如下两个,分别是:v-if v-show
实现原理:
v-if 指令:基于条件判断,是否创建或移除 DOM 元素
v-show 指令:切换 style="display: none;" 样式控制元素的显示与隐藏;
性能消耗:
v-if 有更高的切换开销,而 v-show 有更高的初始渲染开销。
v-if总是会动态地创建和移除元素,性能开销较大。
v-show可能会额外渲染一个不需要被展示的元素,因此有更高的初始渲染开销。
使用场景:
v-if :如果下面有登录框,登陆之后不再显示,最好使用 v-if
v-show: 右上角有购物车,鼠标移上去会在下面显示购物车,这样就适合 v-show

对于v-show的拓展理解:
如果我采用v-show去处理上面的登陆框的问题,那么即使我登录了,那个请求登陆框仍然在那,它只是通过css的样式隐藏了,会额外占据DOM的资源
建议:
如果需要非常频繁地切换,则使用 v-show 较好
如果在运行时条件很少改变,则使用 v-if 较好
-
Code:
jsx<!DOCTYPE html> <html lang="en"> <head> <meta charset="UTF-8" /> <meta name="viewport" content="width=device-width, initial-scale=1.0" /> <title>Document</title> </head> <body> <div id="app"> <button @click="flag = !flag">Toggle Flag</button> <p v-if="flag">请求成功 --- 被 v-if 控制</p> <p v-show="flag">请求成功 --- 被 v-show 控制</p> </div> <script src="./lib/vue-2.6.12.js"></script> <script> const vm = new Vue({ el: '#app', data: { // flag 用来控制元素的显示与隐藏 // 值为 true 时显示元素 // 值为 false 时隐藏元素 flag: false, }, }) </script> </body> </html>
总结:
v-if和v-show的区别?
先介绍一下二者运行的基本原理,
v-if会动态地创建或移除DOM元素,从而控制元素在页面上的显示与隐藏。
v-show则会动态地为元素添加或移除 style="display:none;"的样式,从而控制元素的显示与隐藏。
再结合上述例子讲讲
v-else:
v-if 可以单独使用,或配合 v-else 指令一起使用:
jsx
<div v-if="Math.random() > 0.5">
	随机数大于0.5
</div>
<div v-else>
	随机数小于或等于 0.5
</div>
v-else-if
v-else-if 指令,顾名思义,充当 v-if 的"else-if 块",可以连续使用:
jsx
<p v-if="type === 'A'">优秀</p>
<p v-else-if="type === 'B'">良好</p>
<p v-else-if="type === 'C'">一般</p>
<p v-else>差</p>-
Code:
jsx<!DOCTYPE html> <html lang="en"> <head> <meta charset="UTF-8" /> <meta name="viewport" content="width=device-width, initial-scale=1.0" /> <title>Document</title> </head> <body> <div id="app"> <p v-if="num > 0.5">随机数 > 0.5</p> <p v-else>随机数 ≤ 0.5</p> <hr /> <p v-if="type === 'A'">优秀</p> <p v-else-if="type === 'B'">良好</p> <p v-else-if="type === 'C'">一般</p> <p v-else>差</p> </div> <script src="./lib/vue-2.6.12.js"></script> <script> const vm = new Vue({ el: '#app', data: { // 生成 1 以内的随机数 num: Math.random(), // 类型 type: 'A' }, }) </script> </body> </html>
拓展知识点:
Boolean({}) 的值为 true。因此,如果 v-if 接收的是空对象,则表示为 true
jsx
<div v-if="info"></div>

data() {
	return {
		info: {}
	}
}
列表渲染指令 v-for
v-for 基础
作用:基于一个数组来循环渲染相似的 UI 结构。
语法 :v-for 指令需要使用(item, index) in arr 形式的特殊语法,其中:
- item 是数组中的每一项
- index 是每一项的索引,不需要的话可以省略
- arr 是被遍历的数组
举例:
jsx
<ul>
	<li v-for="(item, index) in list">索引是:{{index}}, 姓名是:{{item.name}}</li>
</ul>
//------------------------------------
data: {
  // 用户列表的数据
  list: [
    { id: 1, name: 'zs' },
    { id: 2, name: 'ls' },
  ],
},
注意:v-for 指令中的 item 项和 index 索引都是形参,可进行重命名,例如 (user, i) in userlist
**Case:**通过 v-for="(value, key, index) in list" 来对对象进行遍历
-
Code:
jsx<html lang="en"> <head> <meta charset="UTF-8"> <meta http-equiv="X-UA-Compatible" content="IE=edge"> <meta name="viewport" content="width=device-width, initial-scale=1.0"> <title>Document</title> </head> <body> <div id="app"> <!-- 1.遍历数组 --> <!-- 2.遍历对象 --> <ul> <li v-for="(value, key, index) in info">{{value}}-{{key}}-{{index}}</li> </ul> <!-- 3.遍历字符串(iterable) --> <ul> <li v-for="item in message">{{item}}</li> </ul> <!-- 4.遍历数字 --> <ul> <li v-for="item in 100">{{item}}</li> </ul> </div> <script src="../lib/vue.js"></script> <script> // 1.创建app const app = Vue.createApp({ // data: option api data() { return { message: "Hello Vue", movies: [], info: { name: "why", age: 18, height: 1.88 } } }, }) // 2.挂载app app.mount("#app") </script> </body> </html>
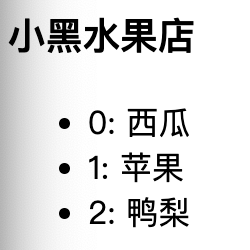
**Case(Vue2):**小黑水果店
-
Code:
jsx<!DOCTYPE html> <html lang="en"> <head> <meta charset="UTF-8"> <meta http-equiv="X-UA-Compatible" content="IE=edge"> <meta name="viewport" content="width=device-width, initial-scale=1.0"> <title>Document</title> </head> <body> <div id="app"> <h3>小黑水果店</h3> <ul> <li v-for="(item, index) in list">{{index}}: {{ item }}</li> </ul> </div> <script src="./vue.js"></script> <script> const app = new Vue({ el: '#app', data: { list: ['西瓜', '苹果', '鸭梨'] } }) </script> </body> </html>
key 的作用
问题:
当列表的数据变化时,默认情况下,vue 会尽可能的复用 已存在的 DOM 元素,从而提升渲染的性能。但这种默认的性能优化策略,会导致有状态的列表无法被正确更新。
举例:
比如我们勾选ls,然后在输入框中输入新的选项aaa,那么勾选的状态就会转移到zs上。因此,状态就会发生一定到紊乱。
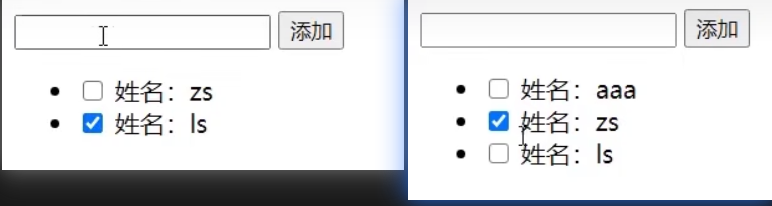
为了给 vue 一个提示,以便它能跟踪每个节点的身份,从而在保证有状态的列表被正确更新 的前提下,提升渲染的性能 。此时,需要为每项提供一个唯一的 key 属性:
jsx
<!-- 用户列表区域 -->
<ul>
  <li v-for="(user, index) in userlist" :key="user.id">
    <input type="checkbox" />
    姓名:{{user.name}}
  </li>
</ul>
key作用:
- 给元素添加唯一标识,正确维护列表的状态
- 复用现有的DOM元素,提升渲染的性能
-
Code:
jsx<!DOCTYPE html> <html lang="en"> <head> <meta charset="UTF-8"> <meta name="viewport" content="width=device-width, initial-scale=1.0"> <title>Document</title> </head> <body> <!-- 在页面中声明一个将要被 vue 所控制的 DOM 区域 --> <div id="app"> <!-- 添加用户的区域 --> <div> <input type="text" v-model="name"> <button @click="addNewUser">添加</button> </div> <!-- 用户列表区域 --> <ul> <li v-for="(user, index) in userlist" :key="user.id"> <input type="checkbox" /> 姓名:{{user.name}} </li> </ul> </div> <script src="https://cdn.jsdelivr.net/npm/vue@2/dist/vue.js"></script> <script> const vm = new Vue({ el: '#app', data: { // 用户列表 userlist: [ { id: 1, name: 'zs' }, { id: 2, name: 'ls' } ], // 输入的用户名 name: '', // 下一个可用的 id 值 nextId: 3 }, methods: { // 点击了添加按钮 addNewUser() { this.userlist.unshift({ id: this.nextId, name: this.name }) this.name = '' this.nextId++ } }, }) </script> </body> </html>
key 的注意事项:
① key 的值只能是字符串或数字类型
② key 的值必须具有唯一性(即:key 的值不能重复)
③ 建议把数据项 id 属性的值作为 key 的值(因为 id 属性的值具有唯一性)
④ 使用 index 的值当作 key 的值没有任何意义(因为 index 的值不具有唯一性)
index不具有确定性,举例来说,会随着列表的增加而改变
⑤ 建议使用 v-for 指令时一定要指定 key 的值(既提升性能、又防止列表状态紊乱)
key 和 diff 算法
VNode
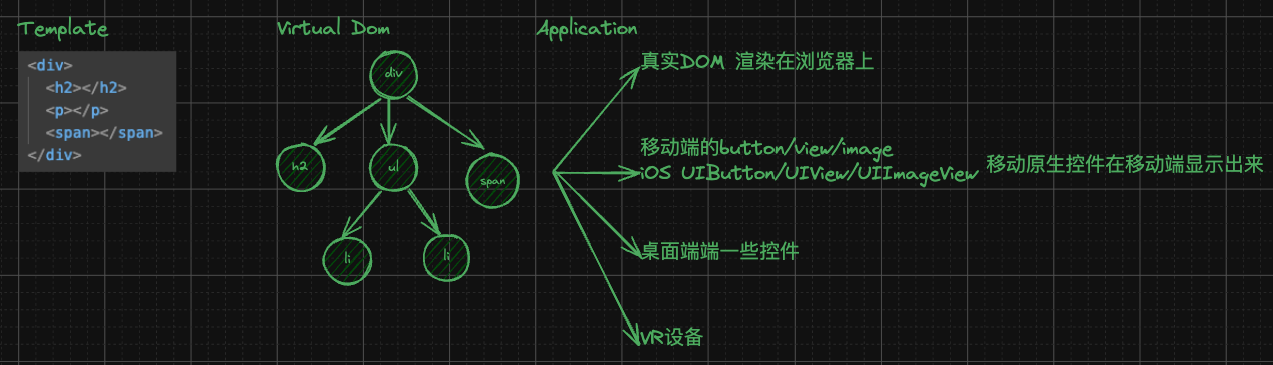
**概念:**VNode的全称是Virtual Node,也就是虚拟节点
**本质:**VNode本质是一个 JavaScript 对象
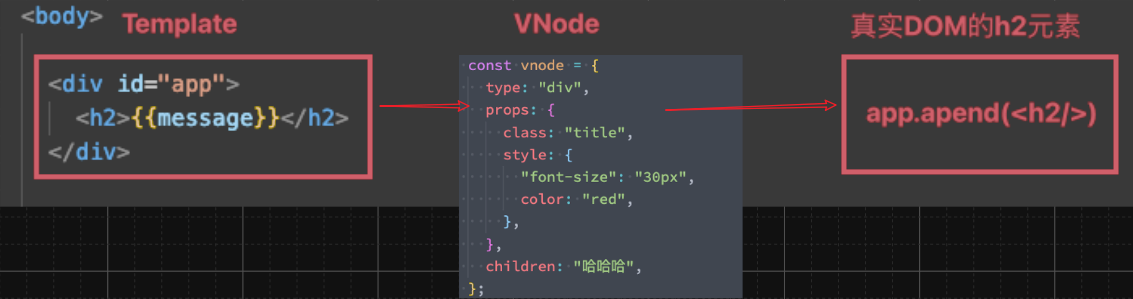
注意:事实上,无论是组件还是元素,它们最终在Vue中表示出来的都是一个个VNode;
虚拟DOM
如果我们不只是一个简单的div,而是有一大堆的元素,那么它们应该会形成一个VNode Tree:
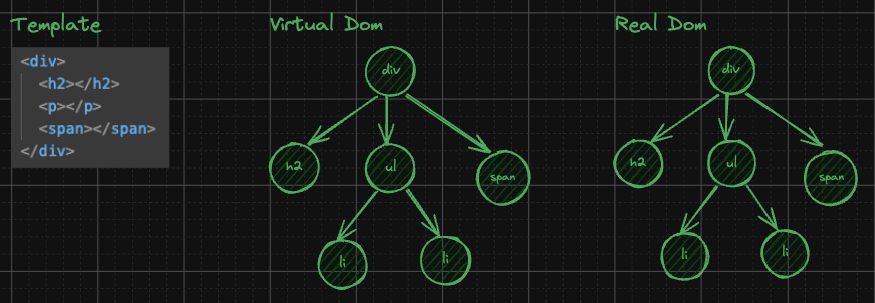
虚拟DOM的作用:
1-跨平台:一套代码经过虚拟DOM的处理,可以转换为移动端、桌面端、VR等多个平台的应用组件
2-Diff算法
diff 算法
**需求:**往 abcde 的b后面插入f节点
理解:我们一般会通过 v-for 来实现,但是对 li 是否绑定key,会导致实现结果的算法不同,如下:
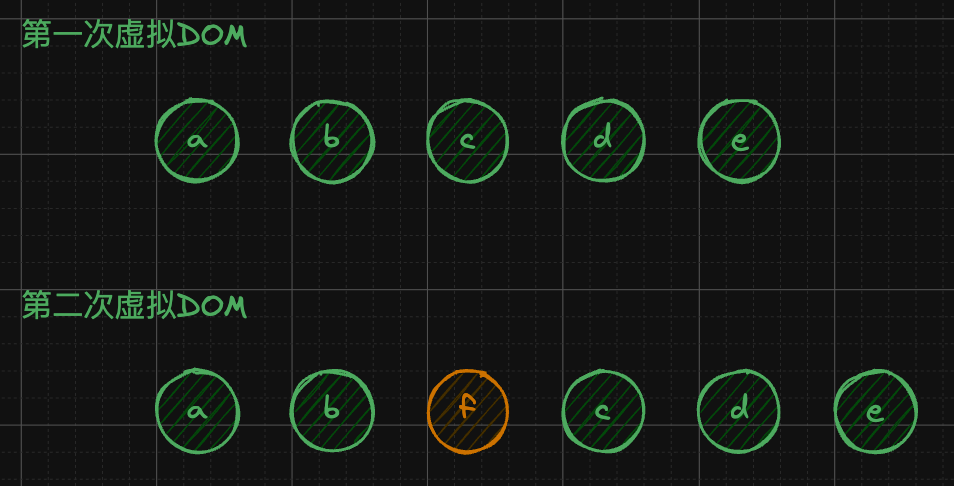
两种插入方式,会采用不同的算法:
1-没有设定key:采用 patchUnkeyedChildren 算法
将原本的c的位置中填入f,d的位置填入c,e的位置填入d,最后创建一个li,里面填入f
2-设定key:采用 patchKeyedChildren 算法
直接在b和c的位置间插入f
-
Code:
jsx<html lang="en"> <head> <meta charset="UTF-8"> <meta http-equiv="X-UA-Compatible" content="IE=edge"> <meta name="viewport" content="width=device-width, initial-scale=1.0"> <title>Document</title> </head> <body> <div id="app"> <button @click="insertF">插入f</button> <ul> <!-- key要求是唯一: id --> <li v-for="item in letters" :key="item">{{item}}</li> </ul> </div> <script src="../lib/vue.js"></script> <script> // 1.创建app const app = Vue.createApp({ // data: option api data() { return { letters: ["a", "b", "c", "d", "e"] } }, methods: { insertF() { this.letters.splice(2, 0, "f") this.letters.splice() } } }) // 2.挂载app app.mount("#app") </script> </body> </html>
指令修饰符
概念:通过"."指明一些指令后缀 不同的后缀封装了不同的处理操作 ---> 简化代码
v-model修饰符:
| 按键修饰符 | 说明 |
|---|---|
| v-model.trim | 去除首尾空格 |
| v-model.number | 转数字 |
按键修饰符如下:
| 按键修饰符 | 说明 |
|---|---|
| @keyup.enter | 键盘回车监听 |
| @keyup.esc | 键盘esc键听 |
事件修饰符如下:
| 事件修饰符 | 说明 |
|---|---|
| .prevent | 阻止默认行为(比如:阻止a连接的跳转、阻止表单的提交等) |
| .stop | 阻止事件冒泡 |
| .capture | 以捕获模式触发当前的事件处理函数 |
| .once | 绑定的事件只触发一次 |
| .self | 只有在 event.target 是当前元素自身时触发事件处理函数 |
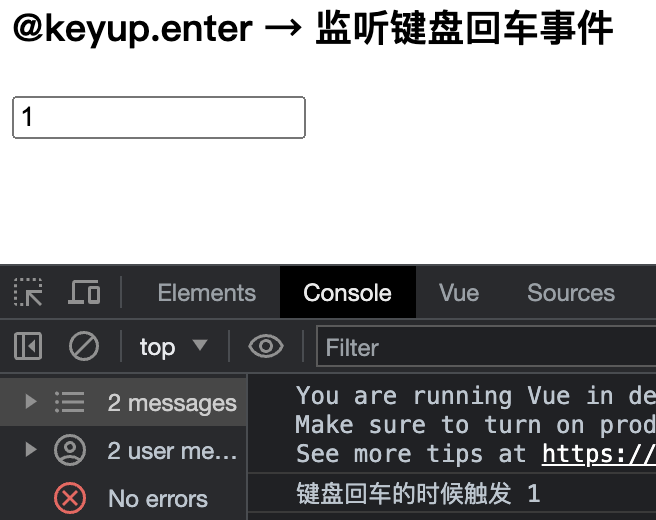
**案例:**监听键盘回车事件
-
Code:
jsx<!DOCTYPE html> <html lang="en"> <head> <meta charset="UTF-8"> <meta http-equiv="X-UA-Compatible" content="IE=edge"> <meta name="viewport" content="width=device-width, initial-scale=1.0"> <title>Document</title> </head> <body> <div id="app"> <h3>@keyup.enter → 监听键盘回车事件</h3> <input @keyup.enter="fn" v-model="username" type="text"> </div> <script src="https://cdn.jsdelivr.net/npm/vue@2/dist/vue.js"></script> <script> const app = new Vue({ el: '#app', data: { username: '' }, methods: { fn (e) { // if (e.key === 'Enter') { // console.log('键盘回车的时候触发', this.username) // } console.log('键盘回车的时候触发', this.username) } } }) </script> </body> </html> -
Code: 补充esc的案例
jsx<!DOCTYPE html> <html lang="en"> <head> <meta charset="UTF-8" /> <meta name="viewport" content="width=device-width, initial-scale=1.0" /> <title>Document</title> </head> <body> <div id="app"> <input type="text" @keyup.enter="submit" @keyup.esc="clearInput" /> </div> <script src="./lib/vue-2.6.12.js"></script> <script> const vm = new Vue({ el: '#app', data: {}, methods: { // 获取文本框最新的值 submit(e) { console.log('摁下了 enter 键,最新的值是:' + e.target.value) }, // 清空文本框的值 clearInput(e) { e.target.value = '' }, }, }) </script> </body> </html>
**案例:**事件修饰符阻止冒泡
实现方式:
1-通过事件对象进行阻止冒泡
jsx
btnClick(event) {
	event.stopPropagation()
},2-@click.stop
jsx
<button @click.stop="btnClick">按钮</button>-
Code:
html<html lang="en"> <head> <meta charset="UTF-8"> <meta http-equiv="X-UA-Compatible" content="IE=edge"> <meta name="viewport" content="width=device-width, initial-scale=1.0"> <title>Document</title> <style> .box { width: 100px; height: 100px; background-color: orange; } </style> </head> <body> <div id="app"> <div class="box" @click="divClick"> <button @click.stop="btnClick">按钮</button> <!-- <button @click="btnClick">按钮</button> --> </div> </div> <script src="../lib/vue.js"></script> <script> // 1.创建app const app = Vue.createApp({ // data: option api data: function() { return { message: "Hello Vue" } }, methods: { btnClick(event) { // Plan2: // event.stopPropagation() console.log("btnClick") }, divClick() { console.log("divClick") } } }) // 2.挂载app app.mount("#app") </script> </body> </html>
v-model事件修饰符
.trim .number 与 阻止a链接的默认行为
-
Code:
jsx<!DOCTYPE html> <html lang="en"> <head> <meta charset="UTF-8"> <meta http-equiv="X-UA-Compatible" content="IE=edge"> <meta name="viewport" content="width=device-width, initial-scale=1.0"> <title>Document</title> <style> .father { width: 200px; height: 200px; background-color: pink; margin-top: 20px; } .son { width: 100px; height: 100px; background-color: skyblue; } </style> </head> <body> <div id="app"> <h3>v-model修饰符 .trim .number</h3> 姓名:<input v-model.trim="username" type="text"><br> 年纪:<input v-model.number="age" type="text"><br> <h3>@事件名.stop → 阻止冒泡</h3> <div @click="fatherFn" class="father"> <div @click.stop="sonFn" class="son">儿子</div> </div> <h3>@事件名.prevent → 阻止默认行为</h3> <a @click.prevent href="http://www.baidu.com">阻止默认行为</a> </div> <script src="https://cdn.jsdelivr.net/npm/vue@2/dist/vue.js"></script> <script> const app = new Vue({ el: '#app', data: { username: '', age: '', }, methods: { fatherFn () { alert('老父亲被点击了') }, sonFn (e) { // e.stopPropagation() alert('儿子被点击了') } } }) </script> </body> </html>
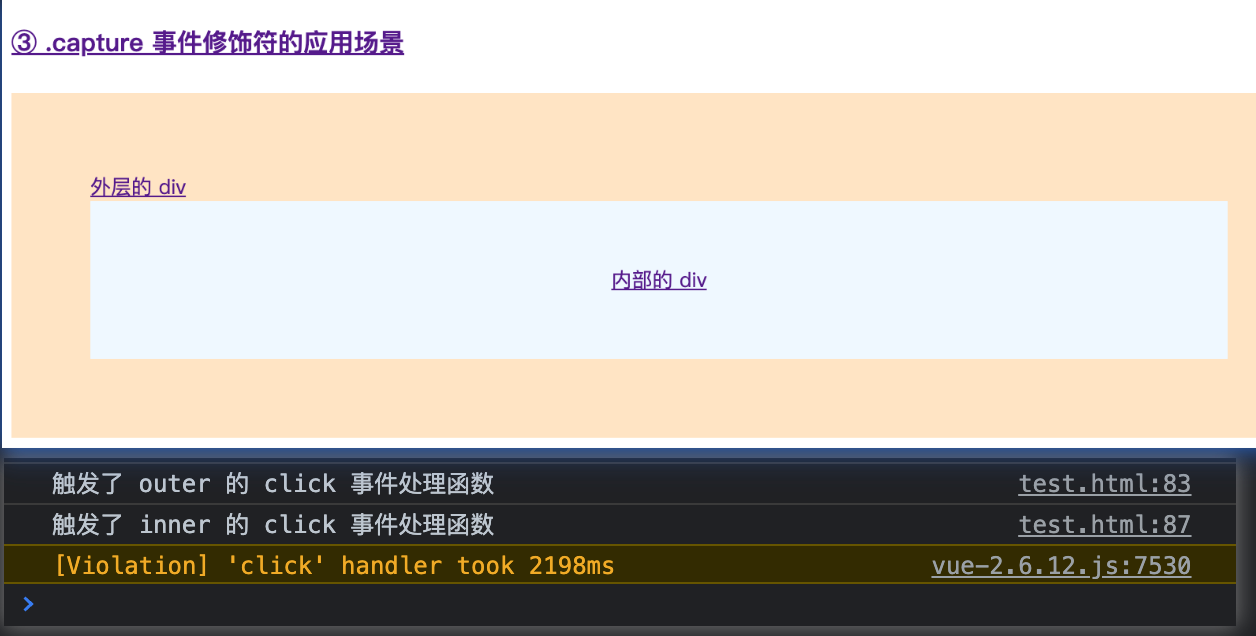
.capture:
.capture: 捕获模式。结合例子理解,<div class="outer" @click.capture="onOuterClick">
点击内部div,就会出现 先触发外部div,再触发内部div的情况。
.self:
.self结合例子理解,比如我给中间的div绑定了<div class="outer"@click.self="onOuterClick">
那么当我点击内部的div, 只会触发内部和外部的事件处理函数,而不会触发中间的。
而当我点击中间的div,则会触发中间和外部的事件处理函数。

-
Code:
jsx<!DOCTYPE html> <html lang="en"> <head> <meta charset="UTF-8"> <meta name="viewport" content="width=device-width, initial-scale=1.0"> <title>Document</title> <style> .inner { line-height: 100px; background-color: aliceblue; font-size: 13px; text-align: center; } .outer { background-color: bisque; padding: 50px; font-size: 13px; } .box { background-color: coral; padding: 50px; } </style> </head> <body> <!-- 在页面中声明一个将要被 vue 所控制的 DOM 区域 --> <div id="app"> <h4>① .prevent 事件修饰符的应用场景</h4> <a href="https://www.baidu.com" @click.prevent="onLinkClick">百度首页</a> <hr /> <h4>② .stop 事件修饰符的应用场景</h4> <div class="outer" @click="onOuterClick"> 外层的 div <div class="inner" @click.stop="onInnerClick">内部的 div</div> </div> <hr /> <h4>③ .capture 事件修饰符的应用场景</h4> <div class="outer" @click.capture="onOuterClick"> 外层的 div <div class="inner" @click="onInnerClick">内部的 div</div> </div> <hr /> <h4>④ .once 事件修饰符的应用场景</h4> <div class="inner" @click.once="onInnerClick">内部的 div</div> <hr /> <h4>⑤ .self 事件修饰符的应用场景</h4> <div class="box" @click="onBoxClick"> 最外层的 box <div class="outer" @click.self="onOuterClick"> 中间的 div <div class="inner" @click="onInnerClick">内部的 div</div> </div> </div> <hr /> </div> <script src="./lib/vue-2.6.12.js"></script> <script> const vm = new Vue({ el: '#app', // 声明处理函数的节点 methods: { // 超链接的点击事件处理函数 onLinkClick() { alert('ok') }, // 点击了外层的 div onOuterClick() { console.log('触发了 outer 的 click 事件处理函数') }, // 点击了内部的 div onInnerClick() { console.log('触发了 inner 的 click 事件处理函数') }, onBoxClick() { console.log('触发了 box 的 click 事件处理函数') } }, }) </script> </body> </html>
综合案例
图片循环:
需求:点击上下页切换页面
知识点:v-bind v-on

-
Code: 按钮隐藏
jsx<!DOCTYPE html> <html lang="en"> <head> <meta charset="UTF-8"> <meta http-equiv="X-UA-Compatible" content="IE=edge"> <meta name="viewport" content="width=device-width, initial-scale=1.0"> <title>Document</title> </head> <body> <div id="app"> <button v-show="index > 0" @click="index--">上一页</button> <div> <img :src="list[index]" alt=""> </div> <button v-show="index < list.length - 1" @click="index++">下一页</button> </div> <script src="./vue.js"></script> <script> const app = new Vue({ el: '#app', data: { index: 0, list: [ './imgs/11-00.gif', './imgs/11-01.gif', './imgs/11-02.gif', './imgs/11-03.gif', './imgs/11-04.png', './imgs/11-05.png', ] } }) </script> </body> </html> -
Code: 按钮不隐藏
jsx<!DOCTYPE html> <html lang="en"> <head> <meta charset="UTF-8"> <meta http-equiv="X-UA-Compatible" content="IE=edge"> <meta name="viewport" content="width=device-width, initial-scale=1.0"> <title>Document</title> </head> <body> <div id="app"> <button @click="previous">上一页</button> <div> <img :src="list[imgUrl]" alt=""> </div> <button @click="next">下一页</button> </div> <script src="./vue.js"></script> <script> const app = new Vue({ el: '#app', data: { imgUrl: 0, list: [ './imgs/11-00.gif', './imgs/11-01.gif', './imgs/11-02.gif', './imgs/11-03.gif', './imgs/11-04.png', './imgs/11-05.png', ] }, methods: { previous() { // console.log(this.imgUrl) ; this.imgUrl -= 1 if(this.imgUrl == -1){ // console.log("test"); this.imgUrl = 5 // console.log("test"+this.imgUrl); } // console.log(this.imgUrl); }, next() { // console.log(this.imgUrl); this.imgUrl += 1 if(this.imgUrl == 5){ this.imgUrl = 0 } } } }) </script> </body> </html>
小黑的书架:
需求:1-渲染列表 2-点击删除键删除列
知识点:v-for v-on 数组方法

重点:Vue是数据驱动的,如果data中的数据减少了,那么页面中的li也会减少
-
Code: 采用 filter 方式
jsx<!DOCTYPE html> <html lang="en"> <head> <meta charset="UTF-8"> <meta http-equiv="X-UA-Compatible" content="IE=edge"> <meta name="viewport" content="width=device-width, initial-scale=1.0"> <title>Document</title> </head> <body> <div id="app"> <h3>小黑的书架</h3> <ul> <li v-for="(item, index) in booksList" :key="item.id"> <span>{{ item.name }}</span> <span>{{ item.author }}</span> <!-- 注册点击事件 → 通过 id 进行删除数组中的 对应项 --> <button @click="del(item.id)">删除</button> </li> </ul> </div> <script src="https://cdn.jsdelivr.net/npm/vue@2/dist/vue.js"></script> <script> const app = new Vue({ el: '#app', data: { booksList: [ { id: 1, name: '《红楼梦》', author: '曹雪芹' }, { id: 2, name: '《西游记》', author: '吴承恩' }, { id: 3, name: '《水浒传》', author: '施耐庵' }, { id: 4, name: '《三国演义》', author: '罗贯中' } ] }, methods: { del (id) { // console.log('删除', id) // 通过 id 进行删除数组中的 对应项 → filter(不会改变原数组) // filter: 根据条件,保留满足条件的对应项,得到一个新数组。 // console.log(this.booksList.filter(item => item.id !== id)) this.booksList = this.booksList.filter(item => item.id !== id) } } }) </script> </body> </html> -
Code: 采用 splice 方式
jsx<!DOCTYPE html> <html lang="en"> <head> <meta charset="UTF-8"> <meta http-equiv="X-UA-Compatible" content="IE=edge"> <meta name="viewport" content="width=device-width, initial-scale=1.0"> <title>Document</title> </head> <body> <div id="app"> <h3>小黑的书架</h3> <ul> <li v-for="(item, index) in booksList"> <span>{{ item.name }}</span> <span>{{ item.author }}</span> <button @click="del(index)">删除</button> </li> </ul> </div> <script src="./vue.js"></script> <script> const app = new Vue({ el: '#app', data: { booksList: [ { id: 1, name: '《红楼梦》', author: '曹雪芹' }, { id: 2, name: '《西游记》', author: '吴承恩' }, { id: 3, name: '《水浒传》', author: '施耐庵' }, { id: 4, name: '《三国演义》', author: '罗贯中' } ] }, methods: { // Plan1: splice del(index) { this.booksList.splice(index, 1) } } }) </script> </body> </html>
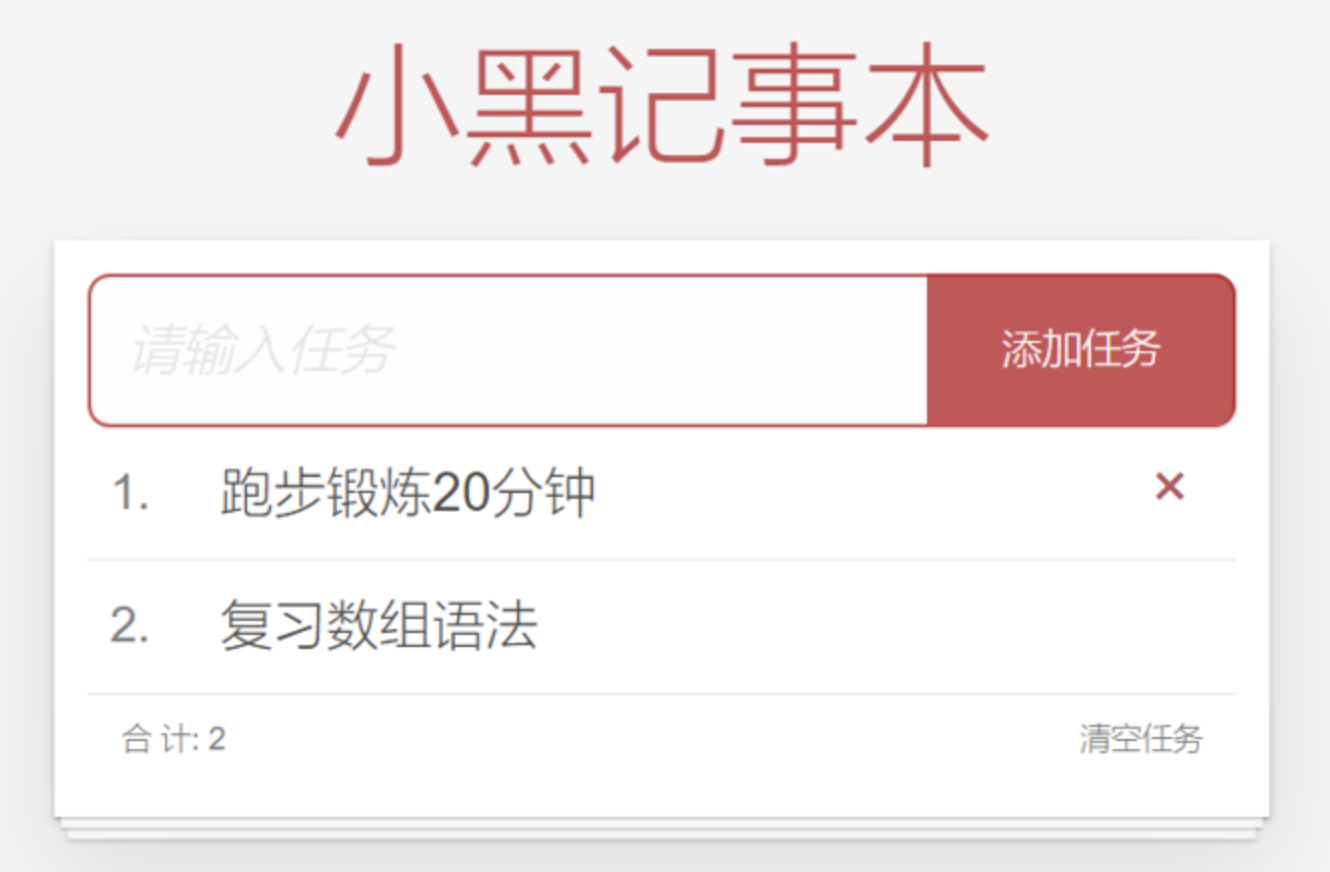
小黑的记事本:
功能需求:
- 列表渲染
- 删除功能
- 添加功能
- 底部统计 和 清空
-
Code: 完成列表的渲染与删除
jsx<!DOCTYPE html> <html lang="en"> <head> <meta charset="UTF-8" /> <meta http-equiv="X-UA-Compatible" content="IE=edge" /> <meta name="viewport" content="width=device-width, initial-scale=1.0" /> <link rel="stylesheet" href="./css/index.css" /> <title>记事本</title> </head> <body> <!-- 主体区域 --> <section id="app"> <!-- 输入框 --> <header class="header"> <h1>小黑记事本</h1> <input placeholder="请输入任务" class="new-todo" /> <button class="add">添加任务</button> </header> <!-- 列表区域 --> <section class="main"> <ul class="todo-list"> <li class="todo" v-for="(item, index) in list" :key="item.id"> <div class="view"> <span class="index">{{ index + 1}}.</span> <label>{{ item.name }}</label> <button class="destroy" @click="del(item.id)"></button> </div> </li> </ul> </section> <!-- 统计和清空 --> <footer class="footer"> <!-- 统计 --> <span class="todo-count">合 计:<strong> 1 </strong></span> <!-- 清空 --> <button class="clear-completed"> 清空任务 </button> </footer> </section> <!-- 底部 --> <script src="https://cdn.jsdelivr.net/npm/vue/dist/vue.js"></script> <script> const app = new Vue({ el: '#app', data: { list: [ {id: 1, name: 'run 1 km'}, {id: 2, name: 'run 2 km'}, {id: 3, name: 'run 3 km'} ] }, methods: { del(id) { console.log(id); this.list = this.list.filter(item => item.id !== id) } } }) </script> </body> </html> -
Code: 完成列表的添加
jsx<!DOCTYPE html> <html lang="en"> <head> <meta charset="UTF-8" /> <meta http-equiv="X-UA-Compatible" content="IE=edge" /> <meta name="viewport" content="width=device-width, initial-scale=1.0" /> <link rel="stylesheet" href="./css/index.css" /> <title>记事本</title> </head> <body> <!-- 主体区域 --> <section id="app"> <!-- 输入框 --> <header class="header"> <h1>小黑记事本</h1> <input v-model="todoName" placeholder="请输入任务" class="new-todo" /> <button class="add" @click="add">添加任务</button> </header> <!-- 列表区域 --> <section class="main"> <ul class="todo-list"> <li class="todo" v-for="(item, index) in list" :key="item.id"> <div class="view"> <span class="index">{{ index + 1}}.</span> <label>{{ item.name }}</label> <button class="destroy" @click="del(item.id)"></button> </div> </li> </ul> </section> <!-- 统计和清空 --> <footer class="footer"> <!-- 统计 --> <span class="todo-count">合 计:<strong> 1 </strong></span> <!-- 清空 --> <button class="clear-completed"> 清空任务 </button> </footer> </section> <!-- 底部 --> <script src="https://cdn.jsdelivr.net/npm/vue/dist/vue.js"></script> <script> const app = new Vue({ el: '#app', data: { todoName: '', list: [ {id: 1, name: 'run 1 km'}, {id: 2, name: 'run 2 km'}, {id: 3, name: 'run 3 km'} ] }, methods: { del(id) { console.log(id); this.list = this.list.filter(item => item.id !== id) }, add() { if(this.todoName.trim() === '') { alert("请输入内容!") return } this.list.unshift({ id: +new Date(), name: this.todoName, }) this.todoName = '' } } }) </script> </body> </html> -
Code: 完成列表的合集与清空
jsx<!DOCTYPE html> <html lang="en"> <head> <meta charset="UTF-8" /> <meta http-equiv="X-UA-Compatible" content="IE=edge" /> <meta name="viewport" content="width=device-width, initial-scale=1.0" /> <link rel="stylesheet" href="./css/index.css" /> <title>记事本</title> </head> <body> <!-- 主体区域 --> <section id="app"> <!-- 输入框 --> <header class="header"> <h1>小黑记事本</h1> <input v-model="todoName" placeholder="请输入任务" class="new-todo" /> <button class="add" @click="add">添加任务</button> </header> <!-- 列表区域 --> <section class="main"> <ul class="todo-list"> <li class="todo" v-for="(item, index) in list" :key="item.id"> <div class="view"> <span class="index">{{ index + 1}}.</span> <label>{{ item.name }}</label> <button class="destroy" @click="del(item.id)"></button> </div> </li> </ul> </section> <!-- 统计和清空 --> <footer class="footer" v-show="list.length > 0"> <!-- 统计 --> <span class="todo-count">合 计:<strong> {{ list.length }} </strong></span> <!-- 清空 --> <button class="clear-completed" @click="clear"> 清空任务 </button> </footer> </section> <!-- 底部 --> <script src="https://cdn.jsdelivr.net/npm/vue/dist/vue.js"></script> <script> const app = new Vue({ el: '#app', data: { todoName: '', list: [ {id: 1, name: 'run 1 km'}, {id: 2, name: 'run 2 km'}, {id: 3, name: 'run 3 km'} ] }, methods: { del(id) { console.log(id); this.list = this.list.filter(item => item.id !== id) }, add() { if(this.todoName.trim() === '') { alert("请输入内容!") return } this.list.unshift({ id: +new Date(), name: this.todoName, }) this.todoName = '' }, clear() { this.list = [] } } }) </script> </body> </html>