【引体向上计数】
本项目使用PaddleHub中的骨骼检测模型human_pose_estimation_resnet50_mpii,进行人体运动分析,实现对引体向上的自动计数。
1. 项目介绍
人体运动分析是近几年许多领域研究的热点问题。在学科的交叉研究上,人体运动分析涉及到计算机科学、运动人体科学、环境行为学和材料科学等。随着研究的深入以及计算机视觉、5G通信的飞速发展,人体运动分析技术已应用于自动驾驶、影视创作、安防异常事件监测和体育竞技分析、康复等实际场景人体运动分析已成为人工智能领域研究的前沿课题。
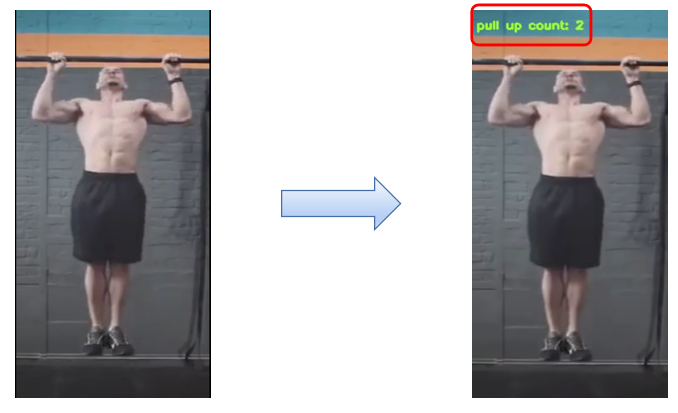
在体育课上,引体向上是一个常规的运动,体育老师有时需要对每位同学做引体向上项目时需要计数,那如何利用AI技术进行人体运动分析可以实现引体向上的自动计数,从而减轻老师的工作量呢?本项目我们就实现AI引体向上计数功能的实现,项目效果如下:

2.项目分析与解决方案设计
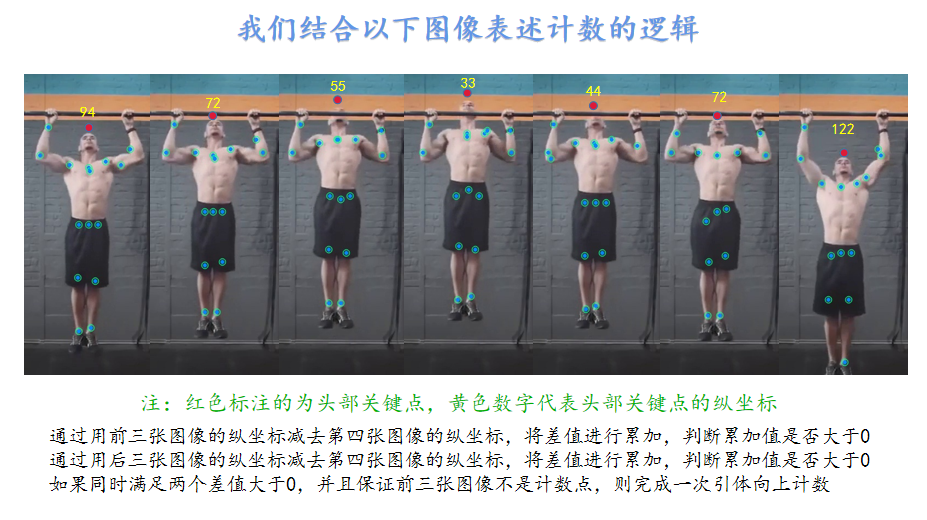
对于引体向上计数任务,首先使用录像设备将每个人的动作录制成视频,然后对视频进行拆帧拆解成多张图像,对每张图像进行人体关键骨骼点检测,然后获取每张图像的头部关键点的纵坐标,以七张图像为一个单位,判断第四张图像的头部关键骨骼关键点的纵坐标是否为七张图像中的最小值f(4)<=f(x),如果是记录为1,如果不是则记录为0,最后将记录的值进行累加,得到的值便是引体向上的数目,最后实现可视化计数,便于我们查看结果。这样我们就实现了引体向上计数!

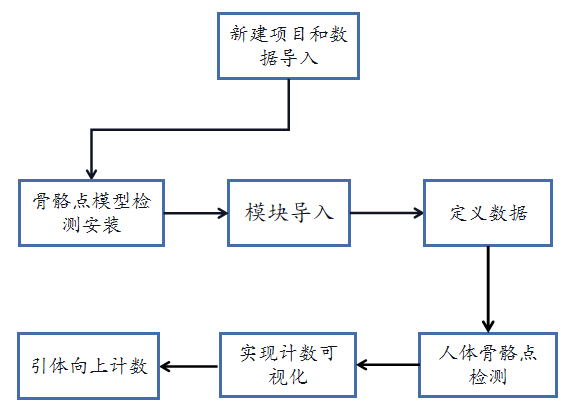
本项目实现基本可以分为7步,分别是新建项目与数据导入、人体骨骼关键点模型的安装、模块导入、定义数据、人体骨骼点检测、将计数过程可视化、最后一步实现引体向上计数,引体向上计数就可以实现了,实现流程如下图所示:

了解了项目实现的基本流程,接下来我们就按顺序完成每一个模块功能的实现。
3.项目准备
我们要完成此项目,该做哪些准备呢? 首先是实验实施环境,本项目我们使用windows系统+nvidia RTX2070 super显卡安装环境:
aiofiles==23.2.1
aiohttp==3.9.1
aiosignal==1.3.1
altair==5.2.0
annotated-types==0.6.0
anyio==4.2.0
astor==0.8.1
async-timeout==4.0.3
attrdict==2.0.1
attrs==23.2.0
Babel==2.14.0
bce-python-sdk==0.9.2
beautifulsoup4==4.12.2
blinker==1.7.0
cachetools==5.3.2
certifi==2023.11.17
charset-normalizer==3.3.2
click==8.1.7
colorama==0.4.6
colorlog==6.8.0
contourpy==1.1.1
cssselect==1.2.0
cssutils==2.9.0
cycler==0.12.1
Cython==3.0.8
datasets==2.16.1
decorator==5.1.1
dill==0.3.4
easydict==1.11
et-xmlfile==1.1.0
exceptiongroup==1.2.0
fastapi==0.109.0
ffmpy==0.3.1
filelock==3.13.1
fire==0.5.0
Flask==3.0.0
Flask-Babel==2.0.0
fonttools==4.47.2
frozenlist==1.4.1
fsspec==2023.10.0
future==0.18.3
gradio==4.14.0
gradio_client==0.8.0
h11==0.14.0
httpcore==1.0.2
httpx==0.26.0
huggingface-hub==0.20.2
idna==3.6
imageio==2.33.1
imgaug==0.4.0
importlib-metadata==7.0.1
importlib-resources==6.1.1
itsdangerous==2.1.2
jieba==0.42.1
Jinja2==3.1.3
joblib==1.3.2
jsonschema==4.20.0
jsonschema-specifications==2023.12.1
kiwisolver==1.4.5
lanms-neo==1.0.2
lap==0.4.0
lazy_loader==0.3
lmdb==1.4.1
lxml==5.1.0
markdown-it-py==3.0.0
MarkupSafe==2.1.3
matplotlib==3.7.4
mdurl==0.1.2
motmetrics==1.4.0
multidict==6.0.4
multiprocess==0.70.12.2
networkx==3.1
numpy==1.23.5
onnx==1.15.0
opencv-contrib-python==4.6.0.66
opencv-python==4.6.0.66
openpyxl==3.1.2
opt-einsum==3.3.0
orjson==3.9.10
packaging==23.2
paddle-bfloat==0.1.7
paddle2onnx==1.0.6
paddledet==2.6.0
paddlefsl==1.1.0
paddlehub==2.4.0
paddlenlp==2.5.2
paddlepaddle-gpu==2.4.2.post117
paddleseg==2.8.0
pafy==0.5.5
pandas==2.0.3
pdf2docx==0.5.7
pillow==10.3.0
pkgutil_resolve_name==1.3.10
Polygon3==3.0.9.1
PPOCRLabel==2.1.3
premailer==3.10.0
prettytable==3.9.0
protobuf==3.20.2
psutil==5.9.7
py-cpuinfo==9.0.0
pyarrow==14.0.2
pyarrow-hotfix==0.6
pyclipper==1.3.0.post5
pycocotools==2.0.7
pycryptodome==3.20.0
pydantic==2.5.3
pydantic_core==2.14.6
pydub==0.25.1
Pygments==2.17.2
PyMuPDF==1.20.2
pyparsing==3.1.1
PyQt5==5.15.10
PyQt5-Qt5==5.15.2
PyQt5-sip==12.13.0
python-dateutil==2.8.2
python-docx==1.1.0
python-multipart==0.0.6
pytz==2023.3.post1
PyWavelets==1.4.1
PyYAML==6.0.1
pyzmq==25.1.2
rapidfuzz==3.6.1
rarfile==4.1
referencing==0.32.1
requests==2.31.0
rich==13.7.0
rpds-py==0.17.1
safetensors==0.4.1
scikit-image==0.21.0
scikit-learn==1.3.2
scipy==1.10.1
seaborn==0.13.2
semantic-version==2.10.0
sentencepiece==0.1.99
seqeval==1.2.2
shapely==2.0.2
shellingham==1.5.4
six==1.16.0
sklearn==0.0
sniffio==1.3.0
soupsieve==2.5
starlette==0.35.1
termcolor==2.4.0
terminaltables==3.1.10
threadpoolctl==3.2.0
tifffile==2023.7.10
tomlkit==0.12.0
toolz==0.12.0
tqdm==4.66.1
typeguard==4.1.5
typer==0.9.0
typing_extensions==4.9.0
tzdata==2023.4
ultralytics==8.2.30
ultralytics-thop==0.2.8
urllib3==2.1.0
uvicorn==0.25.0
visualdl==2.4.2
wcwidth==0.2.13
websockets==11.0.3
Werkzeug==3.0.1
xlrd==1.2.0
xmltodict==0.13.0
xxhash==3.4.1
yarl==1.9.4
youtube-dl==2021.12.17
zipp==3.17.0以上是对项目实现环境的要求,在此基础上还需要准备一个视频,我们将视频命名为引体向上.mp4。
4.代码实现
In [2]
# 导入实验项目需要使用的库
import paddlehub as hub#调用paddlehub中预训练模型的库
import cv2# 能够快速的实现一些图像处理和识别的库
import os#含了很多操作文件和目录的函数的库
import numpy as np#一个由多维数组对象和用于处理数组的例程集合组成的库
from tqdm import tqdm#进度条库,可以帮助我们监测代码进度/opt/conda/envs/python35-paddle120-env/lib/python3.7/site-packages/scipy/sparse/sputils.py:16: DeprecationWarning: `np.typeDict` is a deprecated alias for `np.sctypeDict`.
supported_dtypes = [np.typeDict[x] for x in supported_dtypes]
/opt/conda/envs/python35-paddle120-env/lib/python3.7/site-packages/scipy/special/orthogonal.py:81: DeprecationWarning: `np.int` is a deprecated alias for the builtin `int`. To silence this warning, use `int` by itself. Doing this will not modify any behavior and is safe. When replacing `np.int`, you may wish to use e.g. `np.int64` or `np.int32` to specify the precision. If you wish to review your current use, check the release note link for additional information.
Deprecated in NumPy 1.20; for more details and guidance: https://numpy.org/devdocs/release/1.20.0-notes.html#deprecations
from numpy import (exp, inf, pi, sqrt, floor, sin, cos, around, int,
/opt/conda/envs/python35-paddle120-env/lib/python3.7/site-packages/scipy/linalg/__init__.py:217: DeprecationWarning: The module numpy.dual is deprecated. Instead of using dual, use the functions directly from numpy or scipy.
from numpy.dual import register_func第1步:定义数据
在这一部分需要定义实现引体向上项目需要的数据:
- 定义引体向上视频路径
pull_up_path为引体向上.mp4,用做引体向上计数视频; - 定义一个bool值
visualiztiontomp4,是否将计数结果保存到视频中; - 定义一个窗口
compare_window为3,作为每次引体向上计数窗口大小; - 定义一个视频名称
video_name为count_引体向上.mp4,用于保存视频的名称。
实现方法如下:
In [3]
#定义数据
pull_up_path='引体向上.mp4'#定义引体向上视频路径
visualizationtomp4 = True#是否将结果保存为视频
compare_window=3#定义每次引体向上计数的帧数范围
video_name = "output_count_引体向上.mp4"#定义保存视频名称
第2步:人体骨骼点检测
人体关键骨骼点检测功能一共分为两步:
-
第一步,加载模型
human_pose_estimation_resnet50_mpii,此时model就变成具备人体关键骨骼点检测功能的"检测器",第二步便是利用其keyponit_detection()函数检测输入图片列表中的所有骨骼点的位置。 -
第二步,将骨骼点检测得到的位置坐标信息储存在
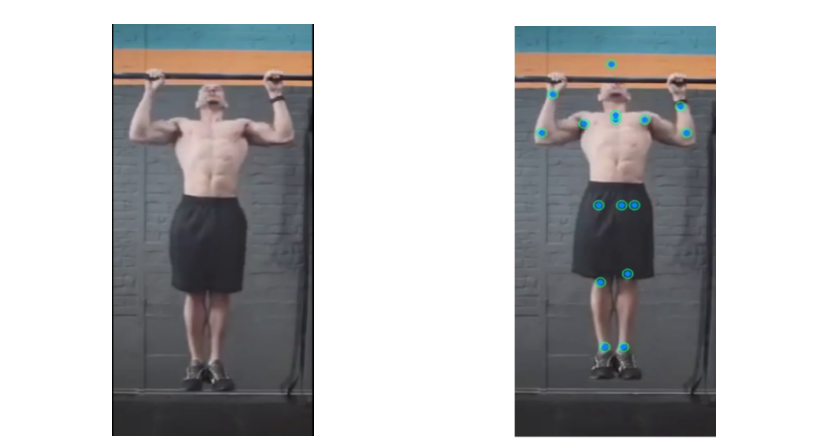
result中,便于下一个环节使用,这里我们将这两步骤封装为point_detection(images)函数,参数images为存放图像的列表,并将检测结果返回,也就是在图片上标出骨骼关键点的位置,如下图所示:

实现代码如下所示:
In [4]
# 定义模型预测函数,实现人体关键骨骼点检测
# 图片数据,ndarray.shape 为 [H, W, C];
def point_detection(images):
    # 初始化module,调用人体关键点检测模型
    model = hub.Module(name="human_pose_estimation_resnet50_mpii")
    # 预测API,识别出人体骨骼关键点
    result = model.keypoint_detection(images,visualization=True)
    return result
第3步:计数过程可视化
经过以上操作我们完成了项目环境的准备,定义了本项目所用到的数据,和获取人体关键骨骼点的函数方法point_detection(images),接下来我们定义一个imagestovideo(images,is_up_list,video_name,fps)函数,该函数的作用是将预测的结果可视化,并且实现计数功能。
Imagestovideo( )函数中一共包含四个函数:
images(list):包含了视频中每一帧的图像;is_up_list(list):用于记录每一帧的位置是否完成依次引体向上;video_name(str):视频保存路径;fps(int):视频的帧率。
具体的实现方法如下:
In [5]
# 将计数过程保存成视频
def imagestovideo(images, #(list): 每一帧视频图片
                  is_up_list, #(list): 视频每一帧的位置是否为引体向上完成一次
                  video_name, #(str): 保存视频路径
                  fps):#(int)保存视频帧率
    size = images[0].shape[:2]  #获取图片格式大小
    #定义视频video,用于存放处理完的视频
    video = cv2.VideoWriter(video_name, cv2.VideoWriter_fourcc('m', 'p', '4', 'v'), fps, size[::-1])
    count = 0#定义count,用于存放引体向上次数
    for i in tqdm(range(len(images))):
        count += is_up_list[i] #累加引体向上次数
        frame = images[i]#读取每一张图像
        #在图像上添加文字,用于记录引体向上次数
        cv2.putText(frame, f'pull up count: {count}', (5, 25), cv2.FONT_HERSHEY_SIMPLEX,
                    0.5, (55,255,155), 2)
        video.write(frame)#将图像写入视频中
    video.release()#释放视频对象
第4步:实现引体向上计数过程
经过上一步骤我们得到了人体关键骨骼点检测的方法point_detection()和将计数过程可视化的方法imagestovideo(),接下里我们具体的实现引体向上计数的过程,实现步骤如下:
In [6]
def countbyhead_with_mp4(
                        mp4_path,#待处理视频路径;
                        video_name,#视频保存名称
                        compare_window=5,#计数窗口;
                        visualizationtomp4=False):#是否可视化计数。
    '''
    第一步:
    我们定义一个列表images,用于存放视频中的每一帧图像,读取视频,
    并且获取视频的帧率fps,具体的实现代码如下:
    '''
    images = []#定义一个列表,用于存放视频中的每一帧图像
    cap = cv2.VideoCapture(mp4_path)#读取已有的视频
    fps = cap.get(cv2.CAP_PROP_FPS)#获取视频的帧率fps,fps=9.538461538461538
    '''
    第二步:
    通过while循环读取视频中的每一帧图像,并将图片信息保存到images列表当中,
    最后释放视频对象空间,具体的实现代码如下:
    '''
    while cap.isOpened():#判断视频对象是否成功读取,成功读取视频对象返回True
        #按帧读取视频,返回值ret是布尔型,正确读取则返回True,
        #读取失败或读取视频结尾则会返回False。
        #frame为每一帧的图像,这里图像是三维矩阵,即frame.shape = (640,480,3),
        #读取的图像为BGR格式。
        ret, frame = cap.read()
        if frame is None:#当读取到空图像时,循环终止
            break
        images.append(frame)#将读取到的每一张图像添加到images列表中
    cap.release()#释放视频对象
    '''
    第三步:
    对每一张图像进行人体关键骨骼点检测,并将结果保存到results中,通过for循环,
    获取每张图像的头部关键点的纵坐标信息,将每张图像的头部关键点的纵坐标信息存储
    到heads列表中,具体实现代码如下:
    '''
    results = point_detection(images)#进行人体关键骨骼点检测
    #获取每张图像的头顶关键点的纵坐标
    heads = [result['data']['head_top'][1] for result in results]
    '''
    第四步:
    定义is_up_list列表,用于记录视频中的每一帧的位置是否完成一次引体向上,通过for循环遍历视频中的图像,以每七张图像为一个单位进行,
    比较头部关键点的纵坐标大小,判断第四张图像的纵坐标是否为这七张图像中的最小值,并且保证前三张图像不是计数点,
    如果满足以上要求is_up_list添加1,如果不满足则添加0,直到循环结束,is_up_list中存储了每一帧图像是否完成一次引体向上,
    最后判断是否将计数过程可视化,如果实现可视化,则调用visualizationtomp4()函数,具体实现代码如下:
    '''
    is_up_list = [0] * compare_window #视频每一帧的位置是否为引体向上完成一次
    #从3到57依次循环遍历
    for idx in range(compare_window, len(heads) - compare_window - 1):
        front_idx = idx - compare_window #定义front_idx第一个图像的索引
        #heads中索引为0到3之间的数转化为数组,定义为front
        front = np.array(heads[front_idx:idx])
        #获取真正的索引3+3+1=7,定义为rear_idx
        rear_idx = idx + compare_window + 1
        #heads中索引为4到7之间的数转化为数组,定义为rear
        rear = np.array(heads[idx+1:rear_idx])
        #将前四张图像的头部关键点纵坐标减去第四张纵坐标,
        # 将大于1的数记为1,小于-1的记为-1,
        #将得到的四个数组求和定义为is_greater_than_the_front
        is_greater_than_the_front = np.sum(np.clip(front - heads[idx],
                                                   a_min=-1,
                                                   a_max=1))
        #将第四张图像到第七张图像的头部关键点纵坐标减去第四张纵坐标,
        # 将大于1的数记为1,小于-1的记为-1,将得到的四个数组求和定义为is_greater_than_the_real
        is_greater_than_the_rear = np.sum(np.clip(rear - heads[idx], a_min=-1, a_max=1))
        #判断是否同时满足以下三个要求:以下条件为是否满足一次引体向上
        if is_greater_than_the_front > 0 and is_greater_than_the_rear > 0 and sum(is_up_list[-compare_window:]) == 0:
            is_up_list.append(1)#满足以上条件is_up_list列表末尾添加1
        else:
            is_up_list.append(0)#如果不满足以上条件is_up_list列表末尾添加0
    is_up_list.extend([0] * (compare_window + 1))#在is_up_list中添加4个0,用于补足视频的帧数
    if visualizationtomp4:#是否将计数过程保存成视频
        imagestovideo(images, is_up_list, video_name, fps)#将计数过程保存成视频
    return results, is_up_list
第5步:运行主函数
In [7]
results, is_up_list = countbyhead_with_mp4(pull_up_path,
                                           video_name,
                                           compare_window=3,
visualizationtomp4=visualizationtomp4)Download https://bj.bcebos.com/paddlehub/paddlehub_dev/human_pose_estimation_resnet50_mpii_1_2_0.zip
[##################################################] 100.00%
Decompress /home/aistudio/.paddlehub/tmp/tmphzw2nbgn/human_pose_estimation_resnet50_mpii_1_2_0.zip
[##################################################] 100.00%[2023-07-21 17:32:55,564] [ INFO] - Successfully installed human_pose_estimation_resnet50_mpii-1.2.0
--- Fused 0 subgraphs into layer_norm op.image saved in output_pose/ndarray_time=1689931976012325.jpg
image saved in output_pose/ndarray_time=1689931976012369.jpg
image saved in output_pose/ndarray_time=1689931976012375.jpg
image saved in output_pose/ndarray_time=1689931976012380.jpg
image saved in output_pose/ndarray_time=1689931976012384.jpg
image saved in output_pose/ndarray_time=1689931976012389.jpg
image saved in output_pose/ndarray_time=1689931976012394.jpg
image saved in output_pose/ndarray_time=1689931976012400.jpg
image saved in output_pose/ndarray_time=1689931976012405.jpg
image saved in output_pose/ndarray_time=1689931976012411.jpg
image saved in output_pose/ndarray_time=1689931976012416.jpg
image saved in output_pose/ndarray_time=1689931976012421.jpg
image saved in output_pose/ndarray_time=1689931976012436.jpg
image saved in output_pose/ndarray_time=1689931976012441.jpg
image saved in output_pose/ndarray_time=1689931976012446.jpg
image saved in output_pose/ndarray_time=1689931976012452.jpg
image saved in output_pose/ndarray_time=1689931976012456.jpg
image saved in output_pose/ndarray_time=1689931976012461.jpg
image saved in output_pose/ndarray_time=1689931976012466.jpg
image saved in output_pose/ndarray_time=1689931976012472.jpg
image saved in output_pose/ndarray_time=1689931976012476.jpg
image saved in output_pose/ndarray_time=1689931976012482.jpg
image saved in output_pose/ndarray_time=1689931976012487.jpg
image saved in output_pose/ndarray_time=1689931976012492.jpg
image saved in output_pose/ndarray_time=1689931976012498.jpg
image saved in output_pose/ndarray_time=1689931976012502.jpg
image saved in output_pose/ndarray_time=1689931976012507.jpg
image saved in output_pose/ndarray_time=1689931976012512.jpg
image saved in output_pose/ndarray_time=1689931976012517.jpg
image saved in output_pose/ndarray_time=1689931976012522.jpg
image saved in output_pose/ndarray_time=1689931976012527.jpg
image saved in output_pose/ndarray_time=1689931976012532.jpg
image saved in output_pose/ndarray_time=1689931976012536.jpg
image saved in output_pose/ndarray_time=1689931976012542.jpg
image saved in output_pose/ndarray_time=1689931976012546.jpg
image saved in output_pose/ndarray_time=1689931976012550.jpg
image saved in output_pose/ndarray_time=1689931976012556.jpg
image saved in output_pose/ndarray_time=1689931976012561.jpg
image saved in output_pose/ndarray_time=1689931976012565.jpg
image saved in output_pose/ndarray_time=1689931976012570.jpg
image saved in output_pose/ndarray_time=1689931976012575.jpg
image saved in output_pose/ndarray_time=1689931976012579.jpg
image saved in output_pose/ndarray_time=1689931976012584.jpg
image saved in output_pose/ndarray_time=1689931976012589.jpg
image saved in output_pose/ndarray_time=1689931976012594.jpg
image saved in output_pose/ndarray_time=1689931976012599.jpg
image saved in output_pose/ndarray_time=1689931976012604.jpg
image saved in output_pose/ndarray_time=1689931976012609.jpg
image saved in output_pose/ndarray_time=1689931976012614.jpg
image saved in output_pose/ndarray_time=1689931976012619.jpg
image saved in output_pose/ndarray_time=1689931976012624.jpg
image saved in output_pose/ndarray_time=1689931976012629.jpg
image saved in output_pose/ndarray_time=1689931976012634.jpg
image saved in output_pose/ndarray_time=1689931976012640.jpg
image saved in output_pose/ndarray_time=1689931976012644.jpg
image saved in output_pose/ndarray_time=1689931976012648.jpg
image saved in output_pose/ndarray_time=1689931976012654.jpg
image saved in output_pose/ndarray_time=1689931976012658.jpg
image saved in output_pose/ndarray_time=1689931976012662.jpg
image saved in output_pose/ndarray_time=1689931976012667.jpg
image saved in output_pose/ndarray_time=1689931976012673.jpg
image saved in output_pose/ndarray_time=1689931976012678.jpg100%|██████████| 62/62 [00:00<00:00, 975.11it/s]完整代码+模型+视频例子+运行结果视频下载地址: