第一步:先直接通过命令安装 Nacos
docker run --name nacos2.2.3 -d -p 8848:8848 -e MODE=standalone f151dab7a111第二步:创建 Docker 挂载目录
# 创建 log 目录
mkdir -p /root/nacos
第三步:将 Docker 容器的文件复制到挂载目录中
docker cp nacos2.2.3:/home/nacos/logs/ /root/nacos
docker cp nacos2.2.3:/home/nacos/conf/ /root/nacos
docker cp nacos2.2.3:/home/nacos/data/ /root/nacos
第四步:删除刚刚创建的容器
docker rm -f nacos2.2.3第五步:已挂载的方式重新创建容器
docker run -d --name nacos2.2.3 \
-p 8848:8848 -p 9848:9848 -p 9849:9849 \
-e JVM_XMS=256m \
-e JVM_XMX=256m \
-e MODE=standalone \
-v /root/hemaTest/nacos/logs:/home/nacos/logs \
-v /root/hemaTest/nacos/conf:/home/nacos/conf \
-v /root/hemaTest/nacos/data:/home/nacos/data \
--restart=always \
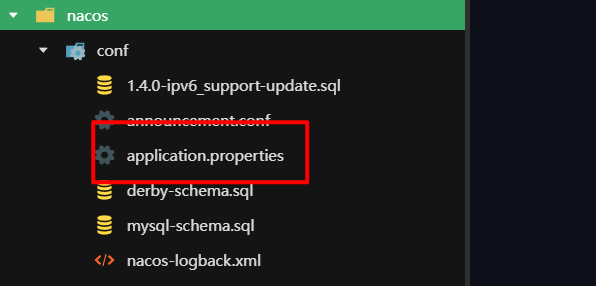
镜像名/镜像ID第六步:更改配置文件
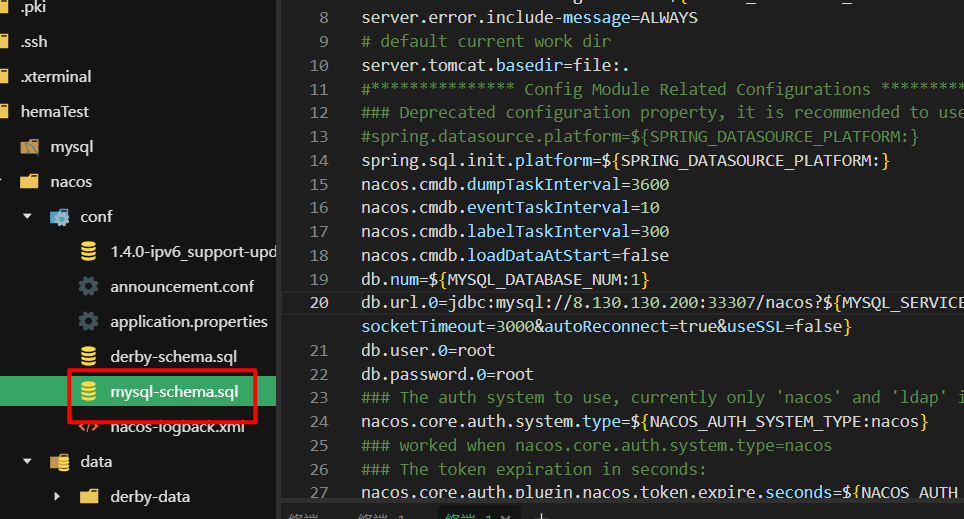
第七步:mysql-schema.sql 导入数据库,连接自己的数据库

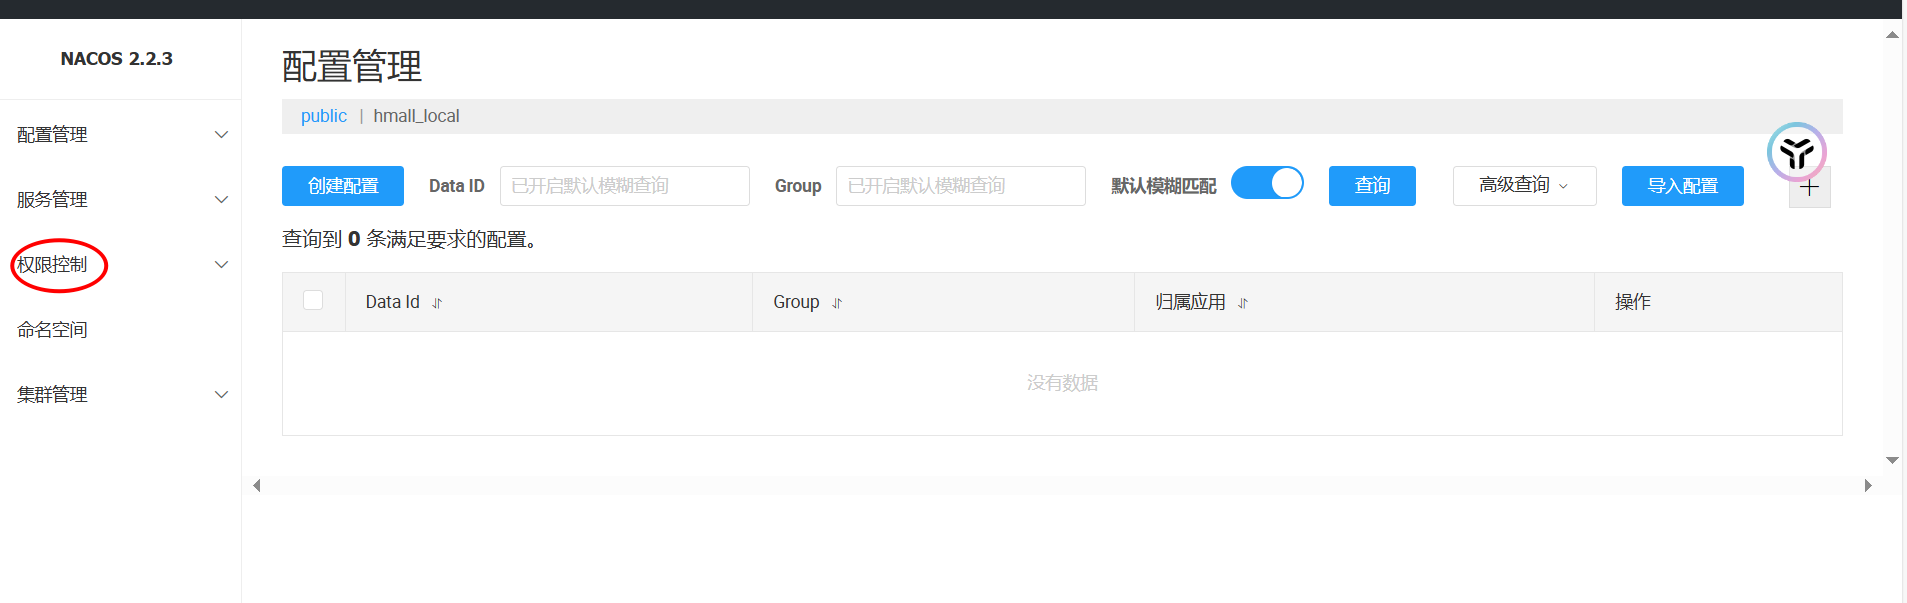
第八步:配置权限

第九步:完整的文档
# spring
server.servlet.contextPath=${SERVER_SERVLET_CONTEXTPATH:/nacos}
server.contextPath=/nacos
server.port=${NACOS_APPLICATION_PORT:8848}
server.tomcat.accesslog.max-days=30
server.tomcat.accesslog.pattern=%h %l %u %t "%r" %s %b %D %{User-Agent}i %{Request-Source}i
server.tomcat.accesslog.enabled=${TOMCAT_ACCESSLOG_ENABLED:false}
server.error.include-message=ALWAYS
# default current work dir
server.tomcat.basedir=file:.
#*************** Config Module Related Configurations ***************#
### Deprecated configuration property, it is recommended to use `spring.sql.init.platform` replaced.
#spring.datasource.platform=${SPRING_DATASOURCE_PLATFORM:}
spring.sql.init.platform=${SPRING_DATASOURCE_PLATFORM:}
nacos.cmdb.dumpTaskInterval=3600
nacos.cmdb.eventTaskInterval=10
nacos.cmdb.labelTaskInterval=300
nacos.cmdb.loadDataAtStart=false
db.num=${MYSQL_DATABASE_NUM:1}
db.url.0=jdbc:mysql://xxxxxxxx:33307/nacos?${MYSQL_SERVICE_DB_PARAM:characterEncoding=utf8&connectTimeout=1000&socketTimeout=3000&autoReconnect=true&useSSL=false}
db.user.0=root
db.password.0=root
### The auth system to use, currently only 'nacos' and 'ldap' is supported:
nacos.core.auth.system.type=${NACOS_AUTH_SYSTEM_TYPE:nacos}
### worked when nacos.core.auth.system.type=nacos
### The token expiration in seconds:
nacos.core.auth.plugin.nacos.token.expire.seconds=${NACOS_AUTH_TOKEN_EXPIRE_SECONDS:18000}
### The default token:
nacos.core.auth.plugin.nacos.token.secret.key=${NACOS_AUTH_TOKEN:SecretKey01234567890123456789012345345678999987654901234567890123456782342349}
### Turn on/off caching of auth information. By turning on this switch, the update of auth information would have a 15 seconds delay.
nacos.core.auth.caching.enabled=${NACOS_AUTH_CACHE_ENABLE:false}
nacos.core.auth.enable.userAgentAuthWhite=${NACOS_AUTH_USER_AGENT_AUTH_WHITE_ENABLE:false}
nacos.core.auth.server.identity.key=${NACOS_AUTH_IDENTITY_KEY:nacos}
nacos.core.auth.server.identity.value=${NACOS_AUTH_IDENTITY_VALUE:nacos}
## spring security config
### turn off security
nacos.security.ignore.urls=${NACOS_SECURITY_IGNORE_URLS:/,/error,/**/*.css,/**/*.js,/**/*.html,/**/*.map,/**/*.svg,/**/*.png,/**/*.ico,/console-fe/public/**,/v1/auth/**,/v1/console/health/**,/actuator/**,/v1/console/server/**}
# metrics for elastic search
management.metrics.export.elastic.enabled=false
management.metrics.export.influx.enabled=false
nacos.naming.distro.taskDispatchThreadCount=10
nacos.naming.distro.taskDispatchPeriod=200
nacos.naming.distro.batchSyncKeyCount=1000
nacos.naming.distro.initDataRatio=0.9
nacos.naming.distro.syncRetryDelay=5000
nacos.naming.data.warmup=true
##Security
nacos.core.auth.enabled=true
nacos.core.auth.enable.userAgentAuthWhite=false