项目介绍
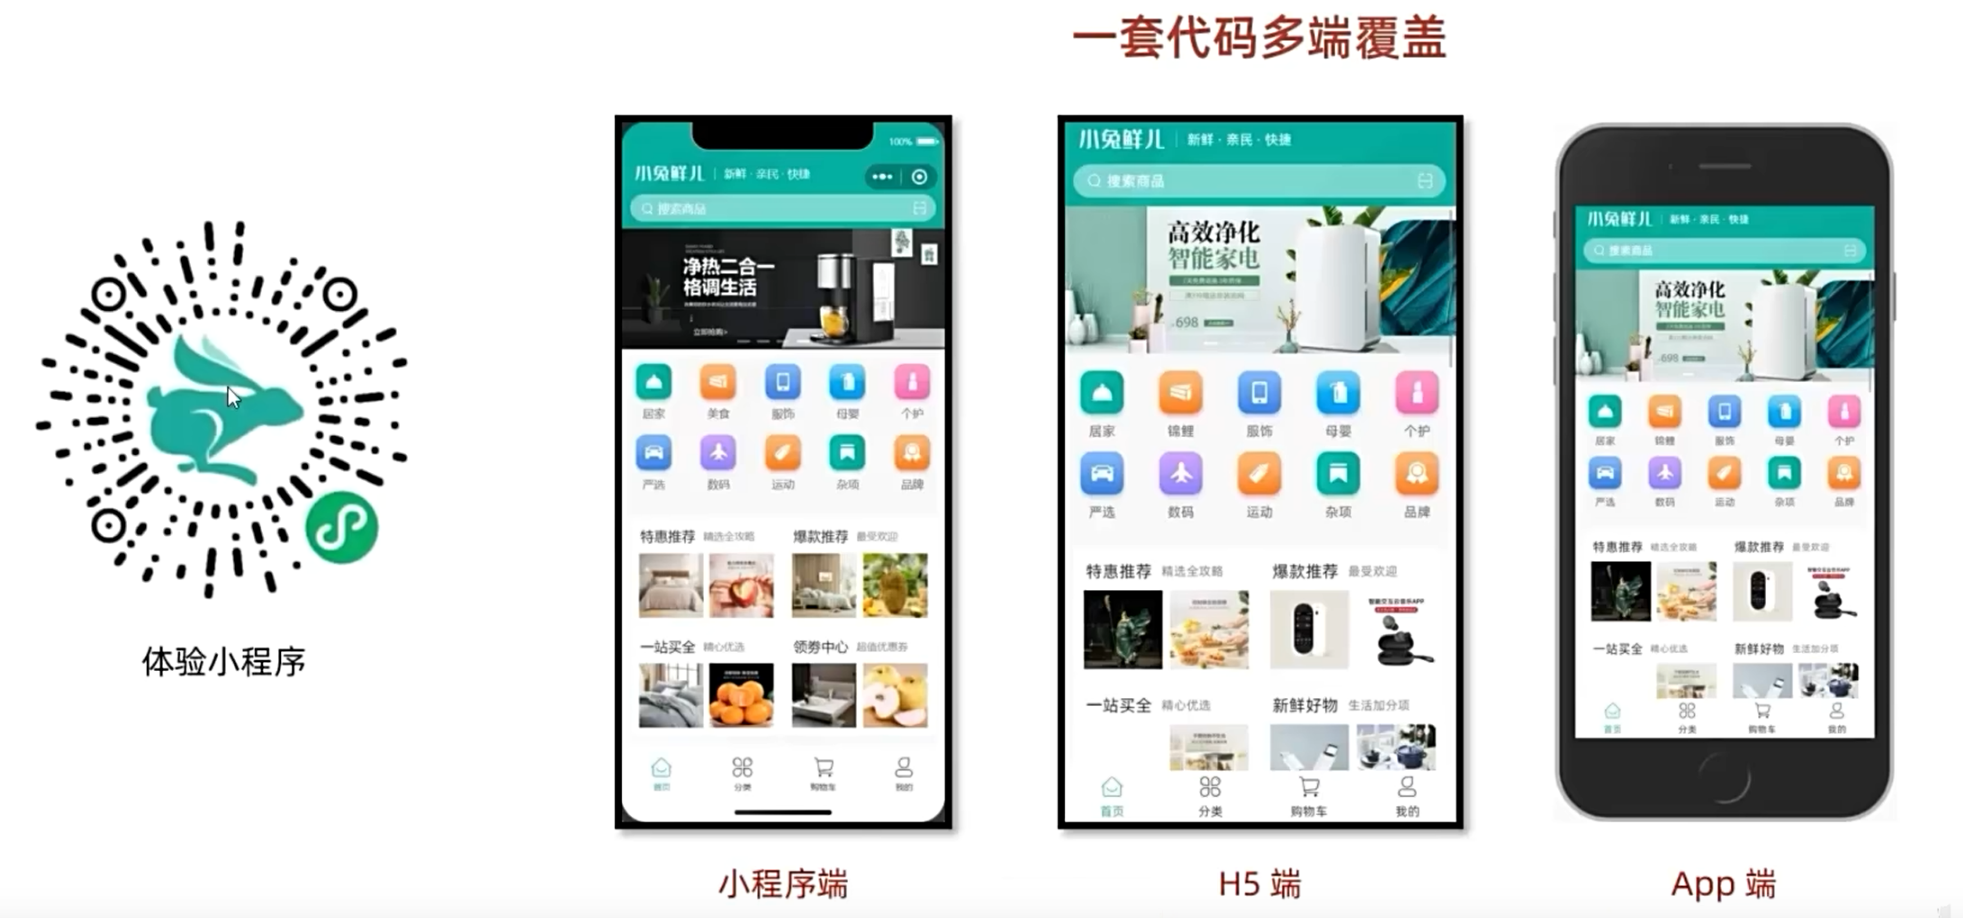
效果演示
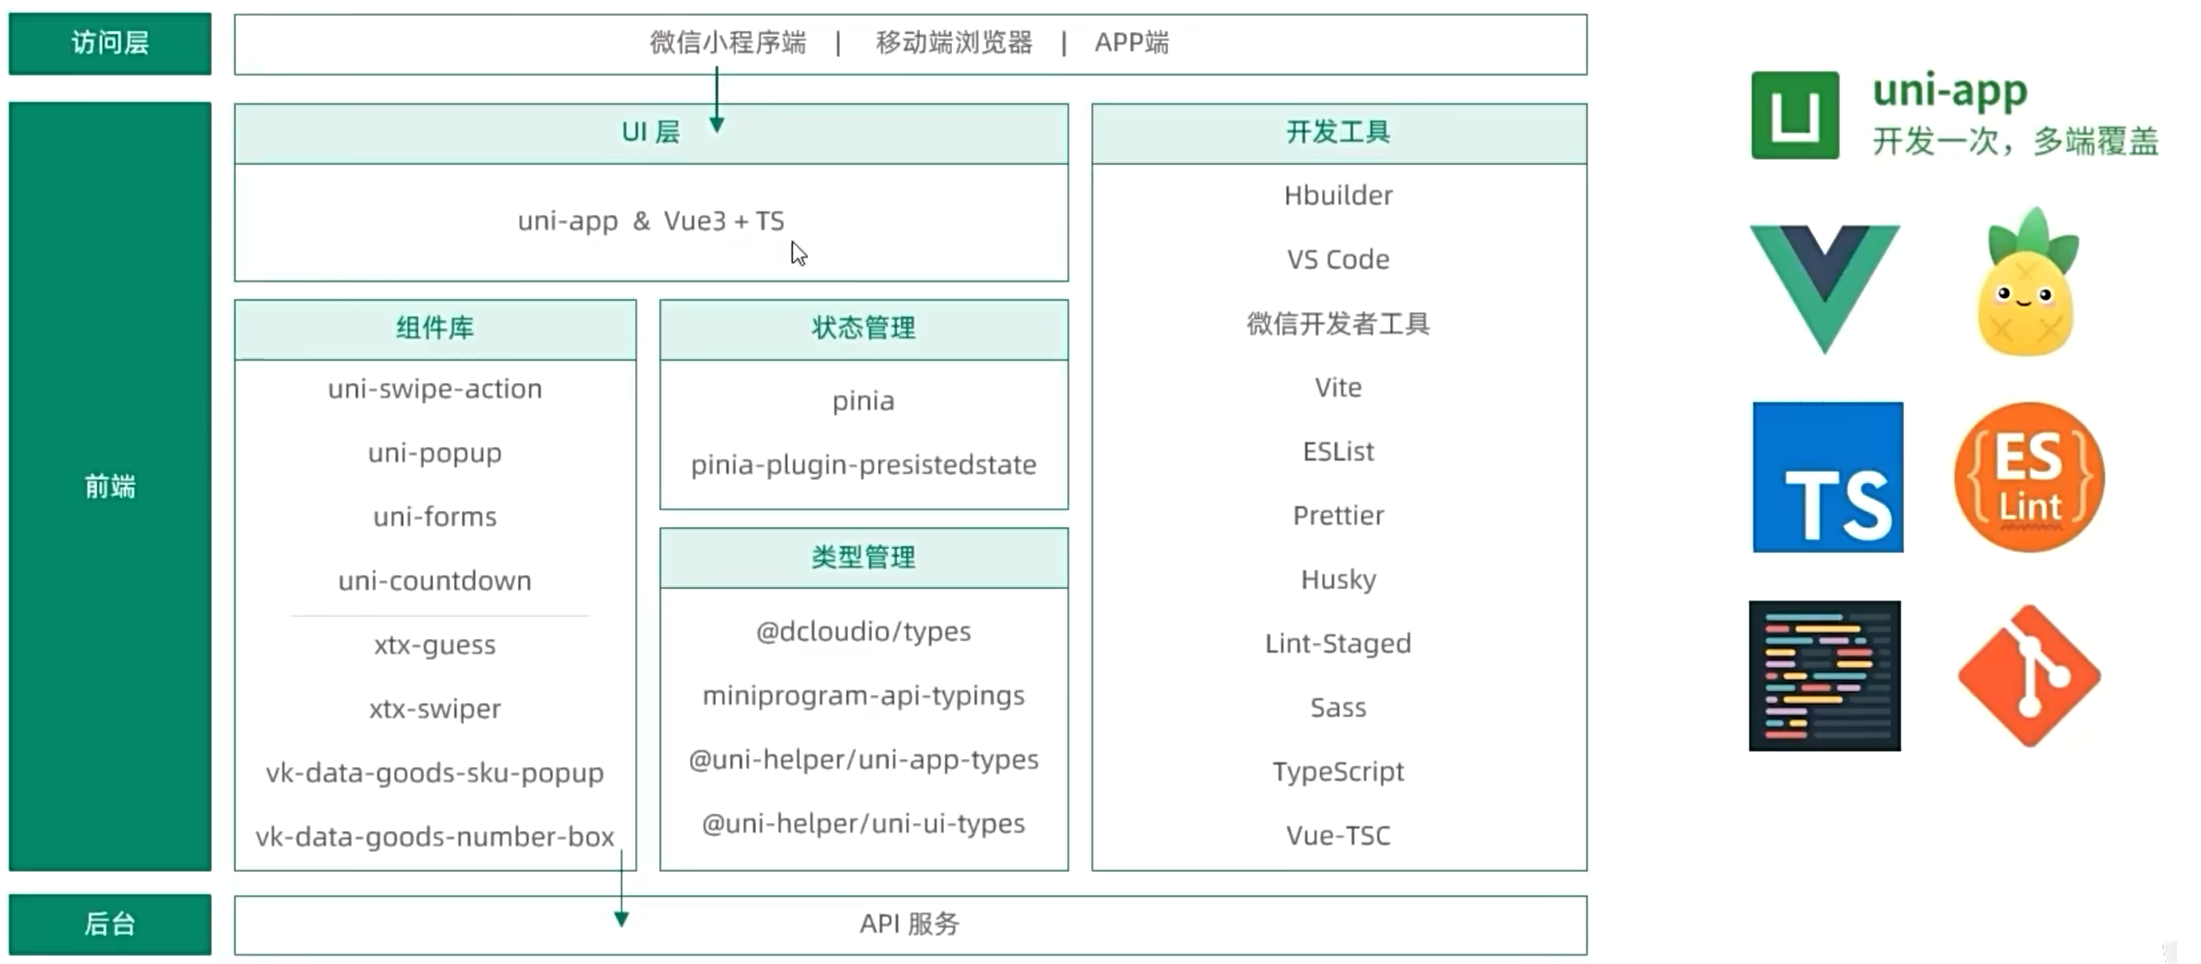
技术架构
创建项目
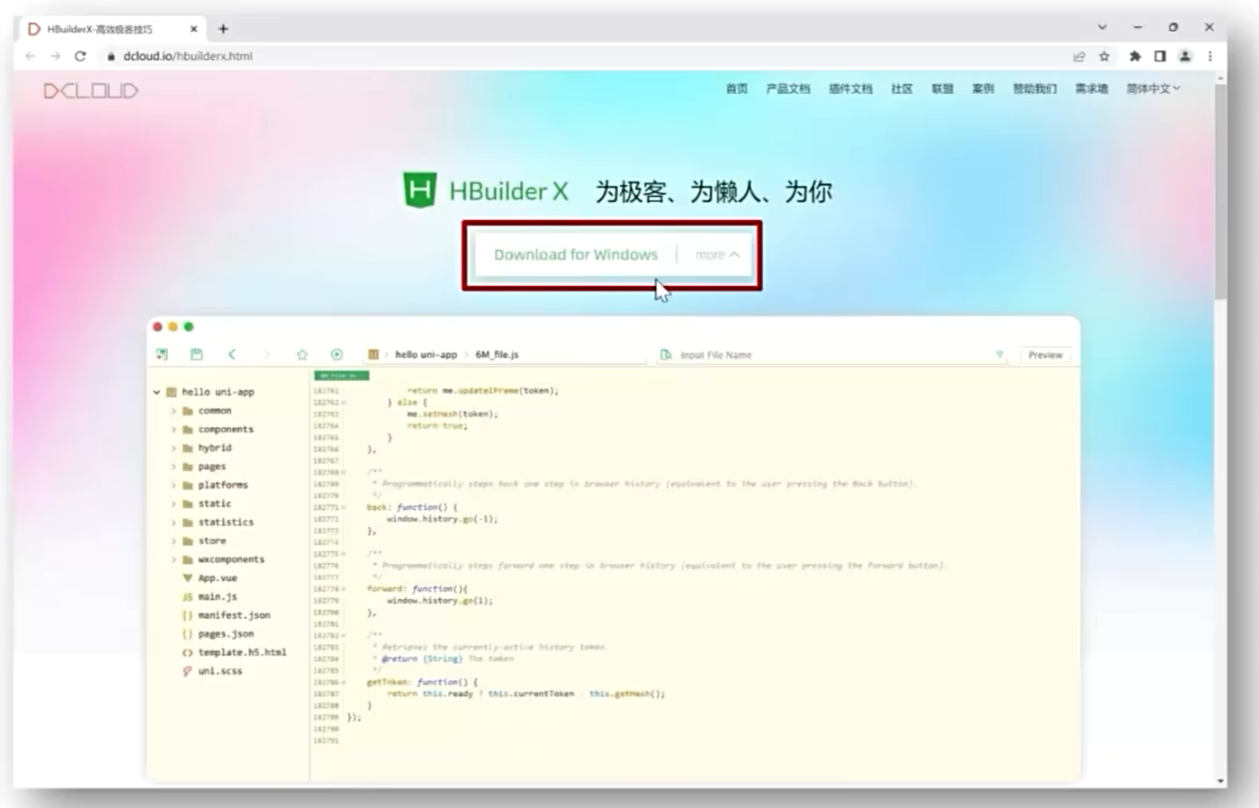
HBuilderX创建
下载HBuilderX编辑器
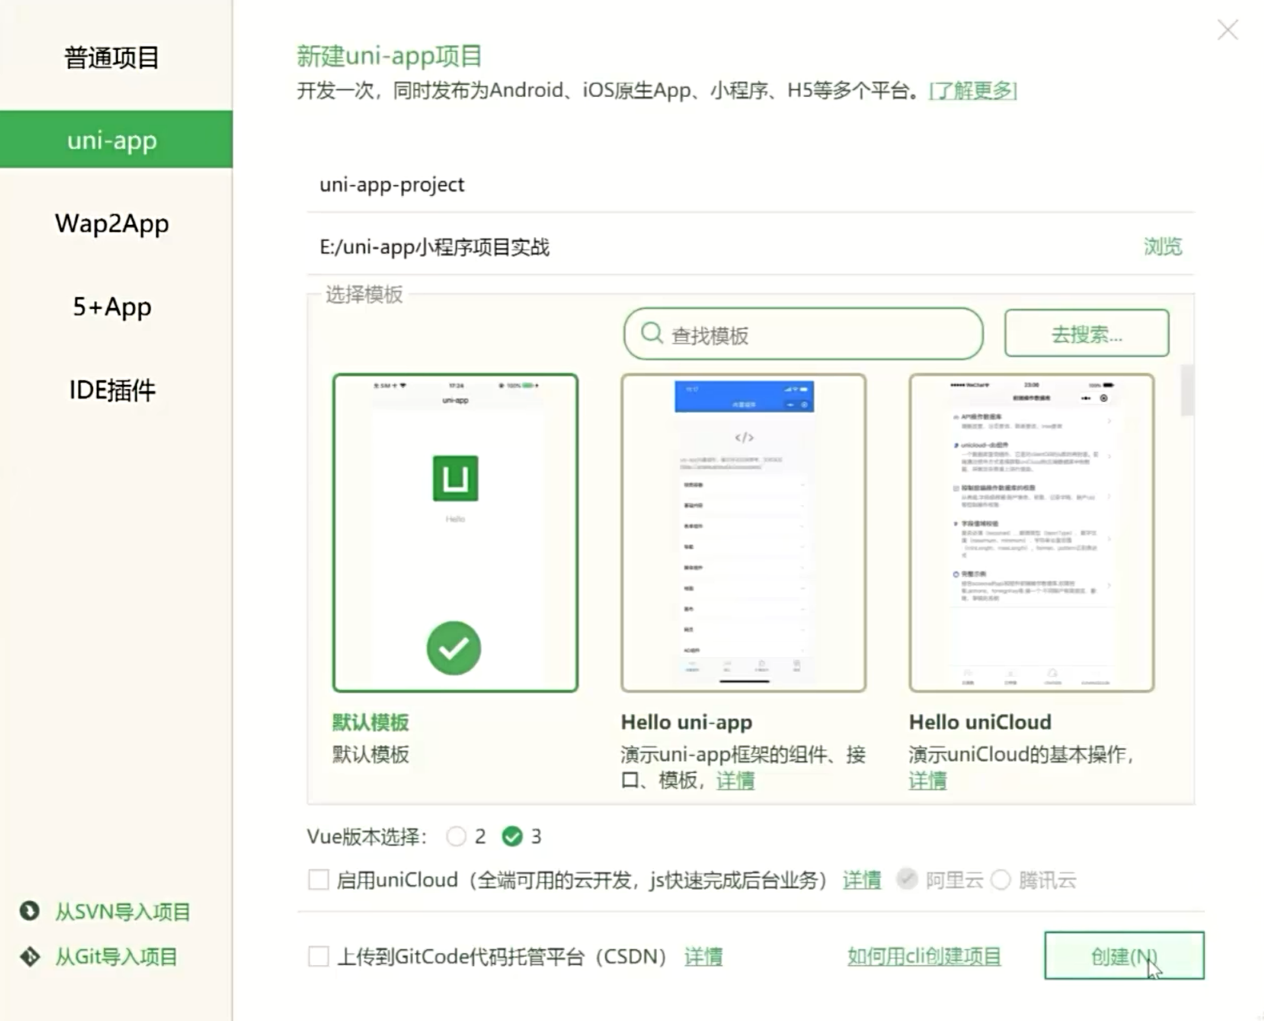
HBuilderX/创建项目: 选择模板/选择Vue版本/创建
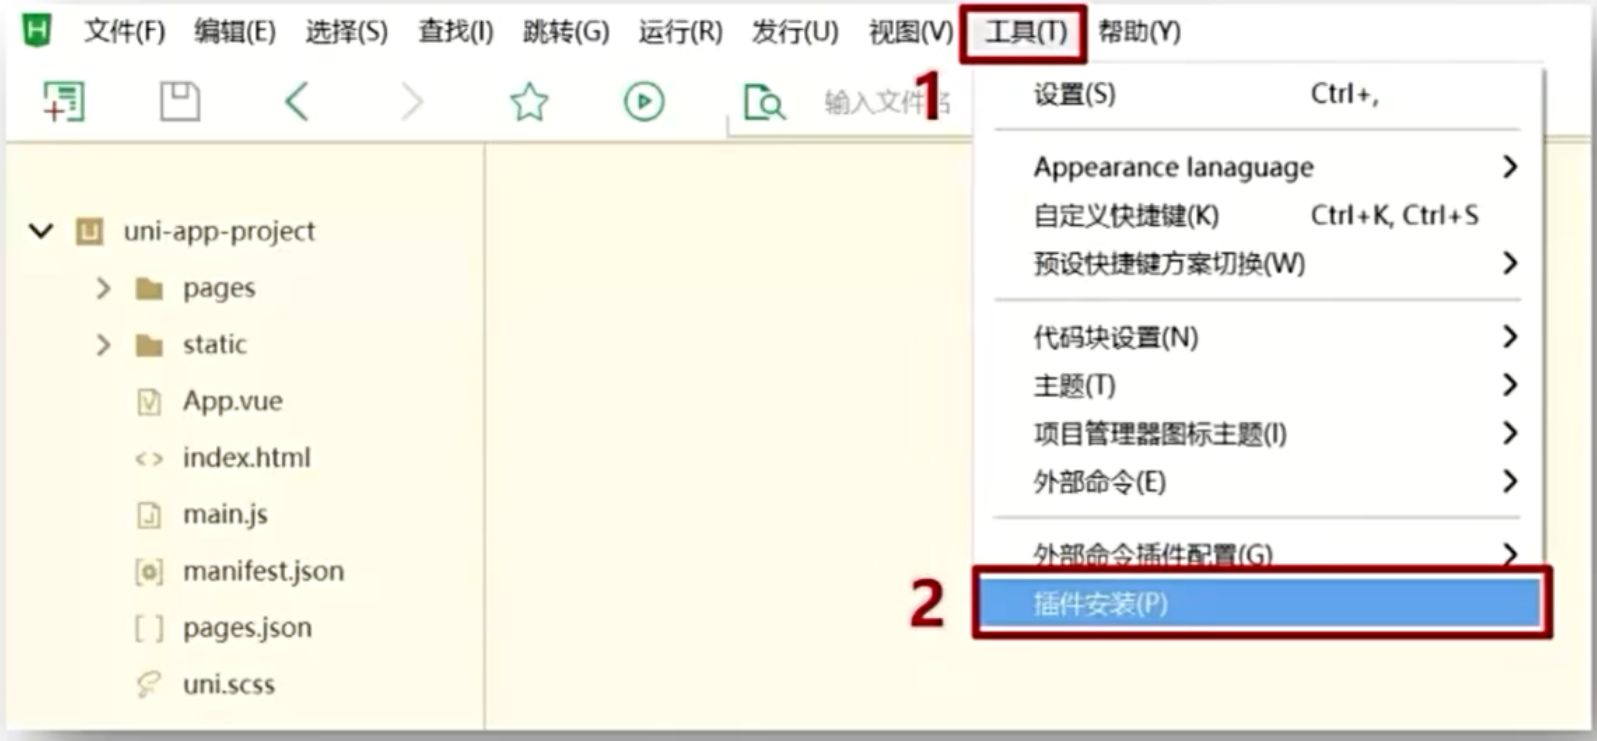
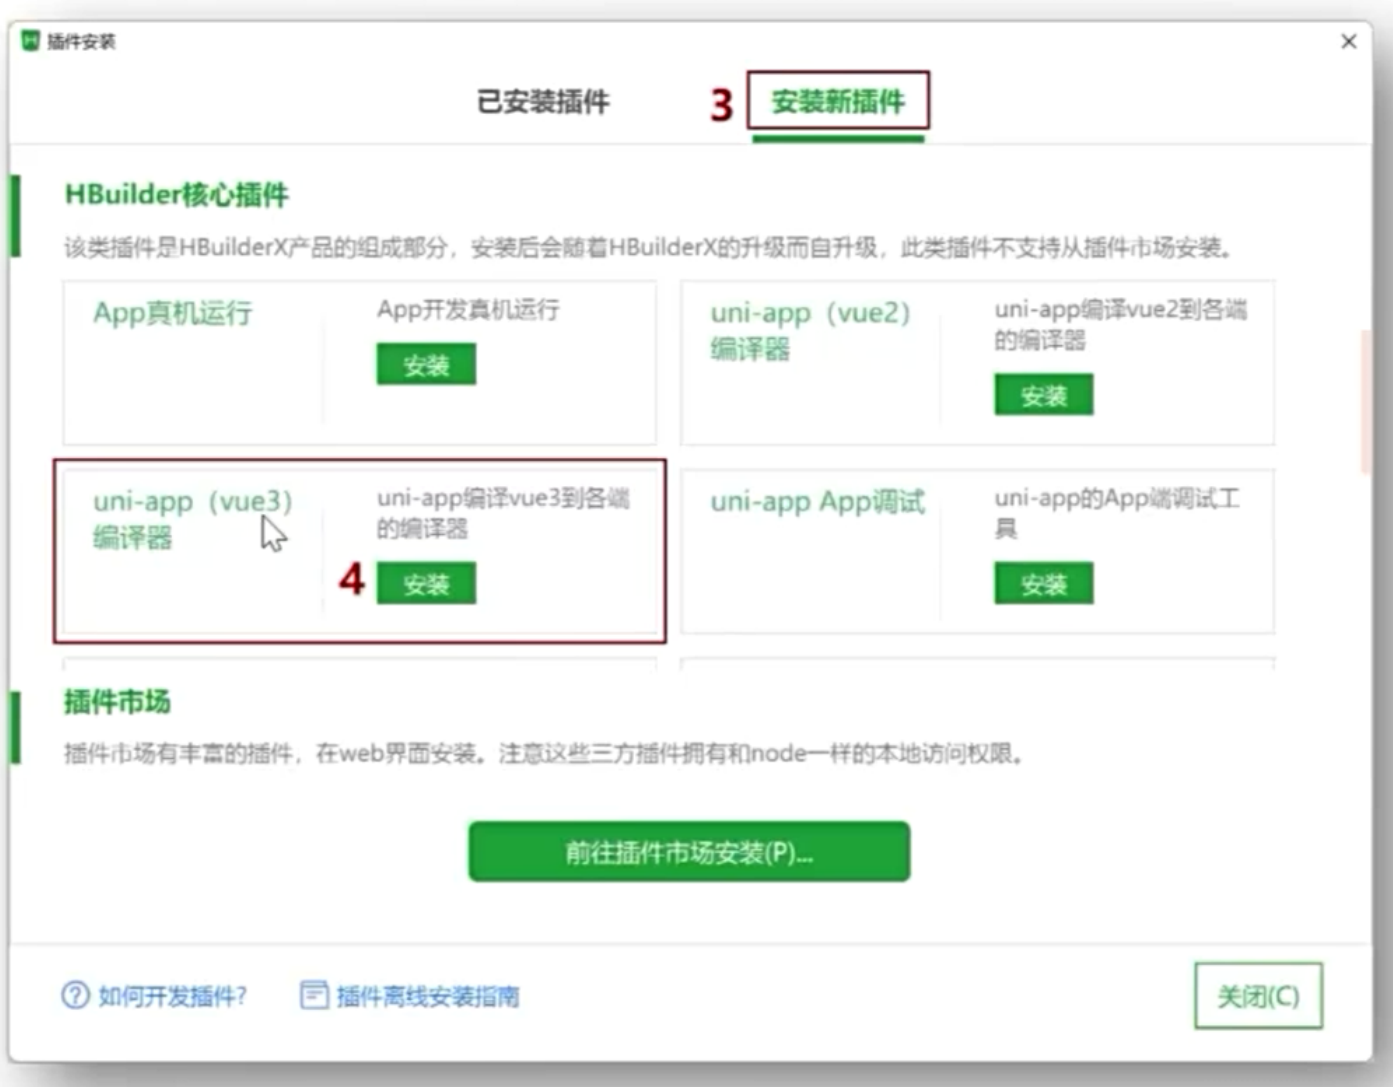
安装插件: 工具/插件安装/uni-app(Vue3)编译器
vue代码不能直接运行在小程序环境, 编译插件帮助我们进行代码转换
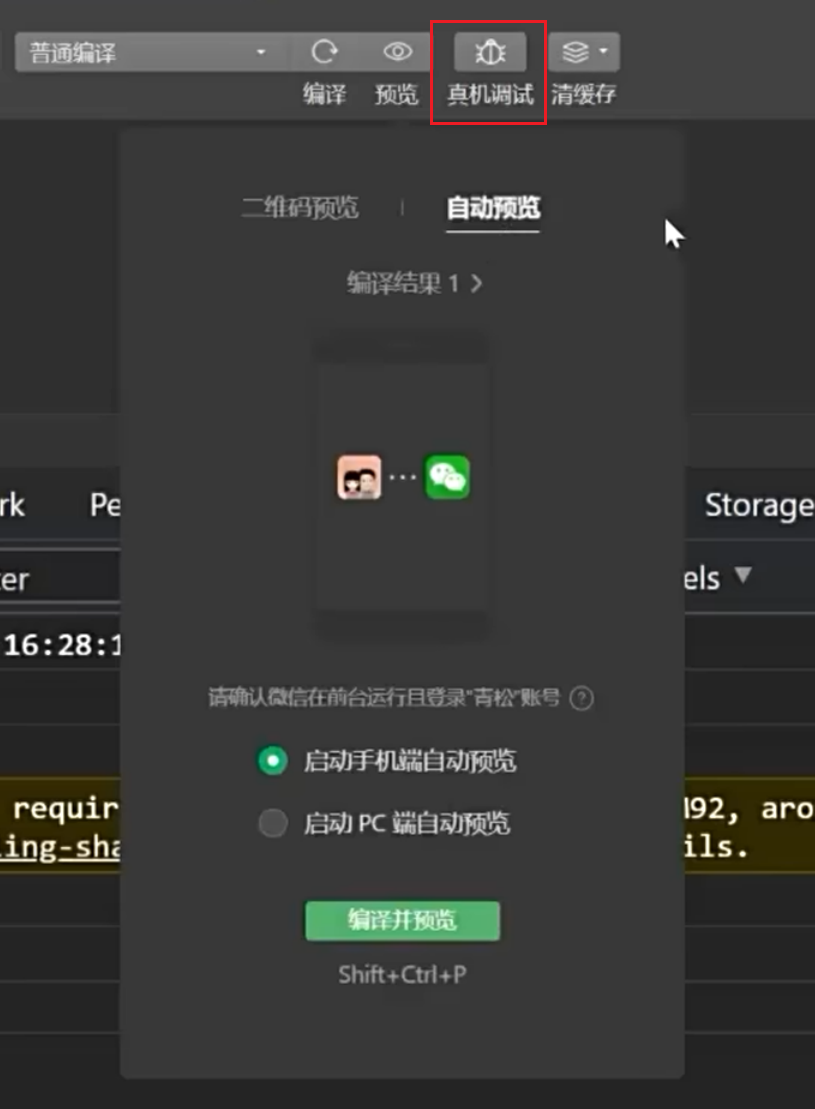
绑定微信开发者工具: 指定微信开发者工具安装目录后, HBX才能启动微信开发者工具

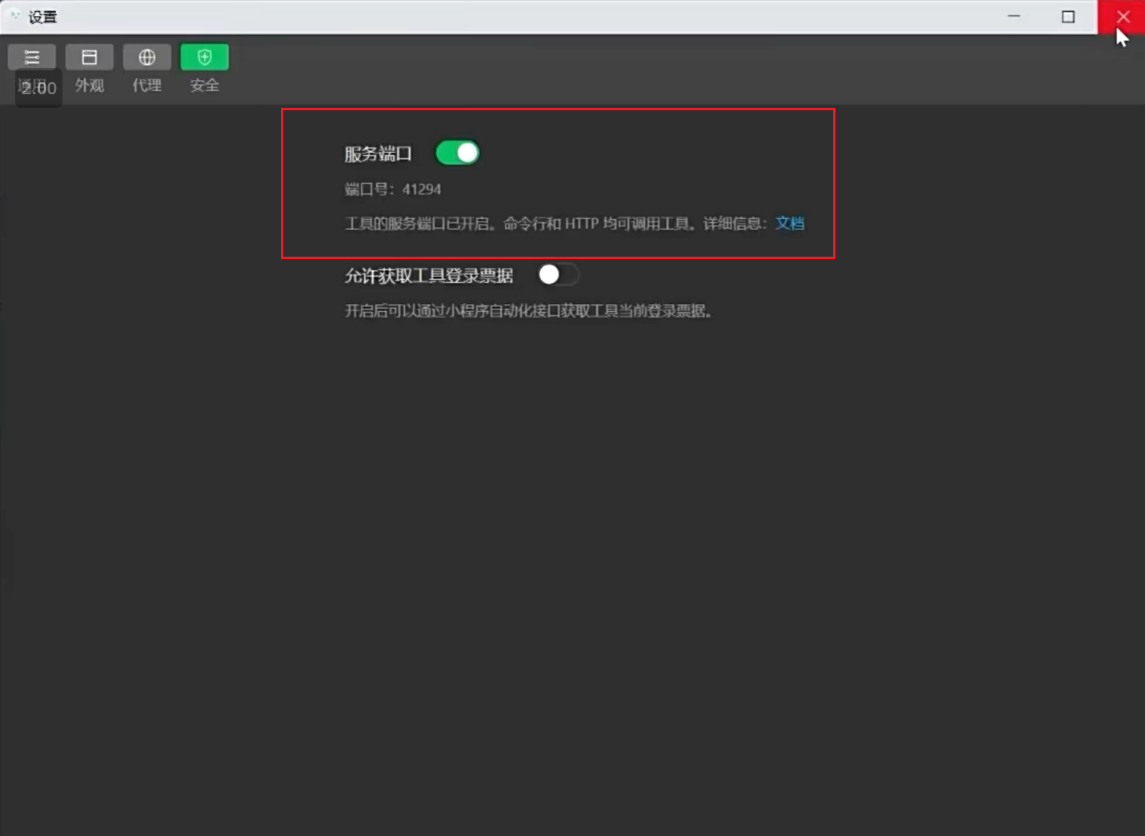
开启服务端口: 微信开发者工具/设置/安全设置/开启服务端口, 开启服务端口后HBX才能启动微信开发者工具

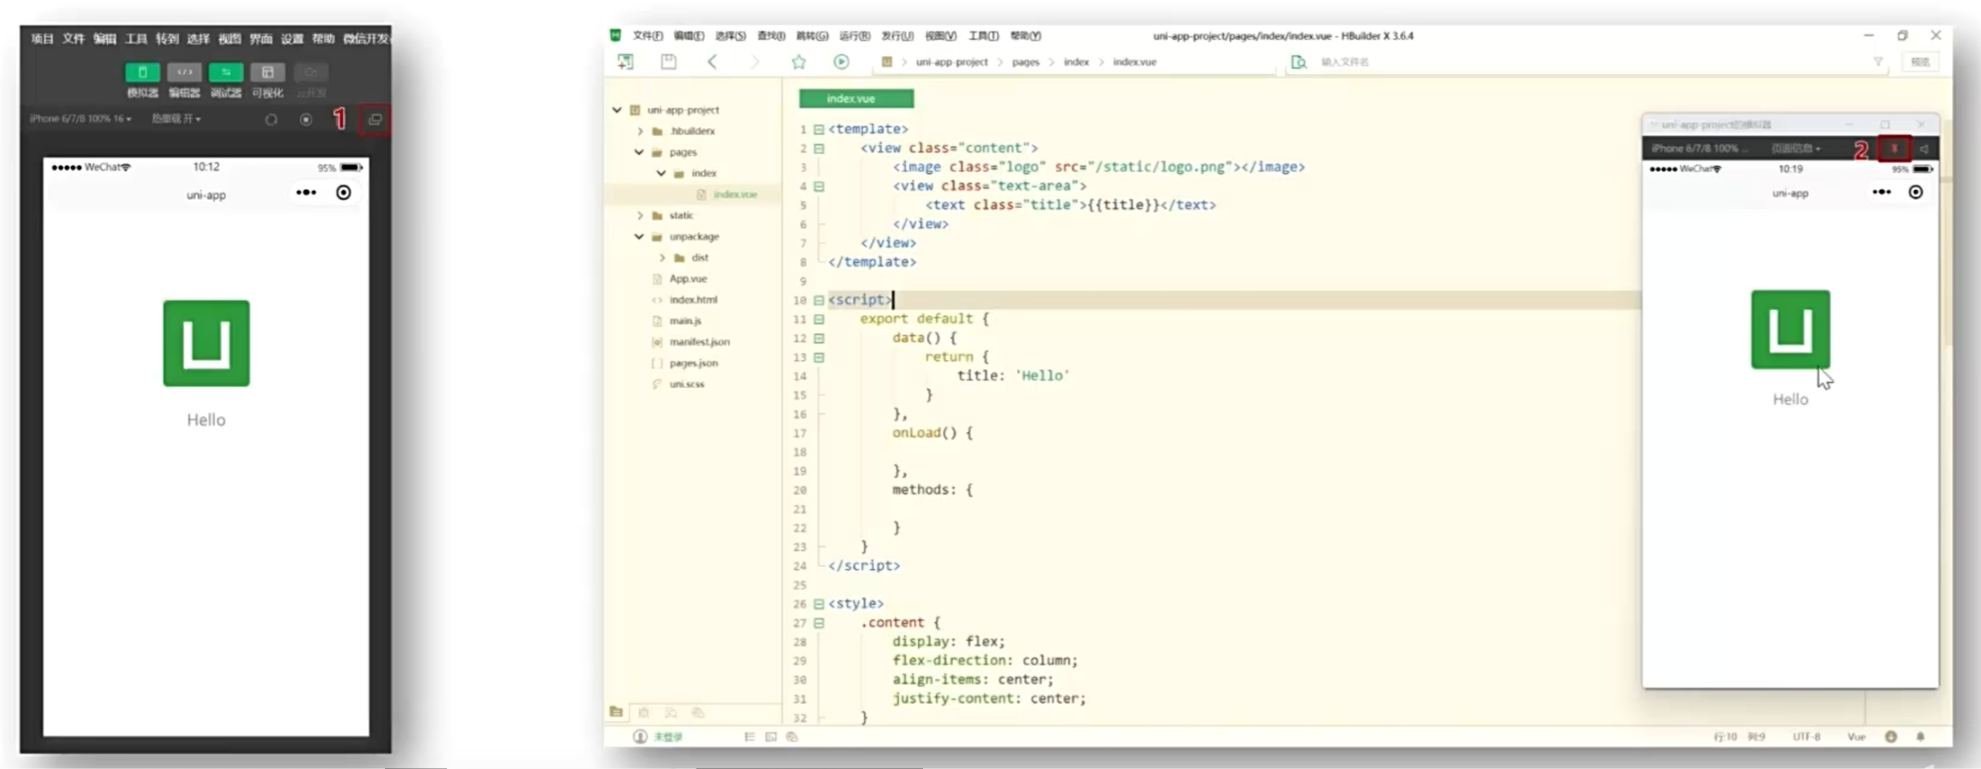
运行项目: 运行/小程序模拟器/微信开发者工具
开发技巧: 模拟器窗口分离/置顶
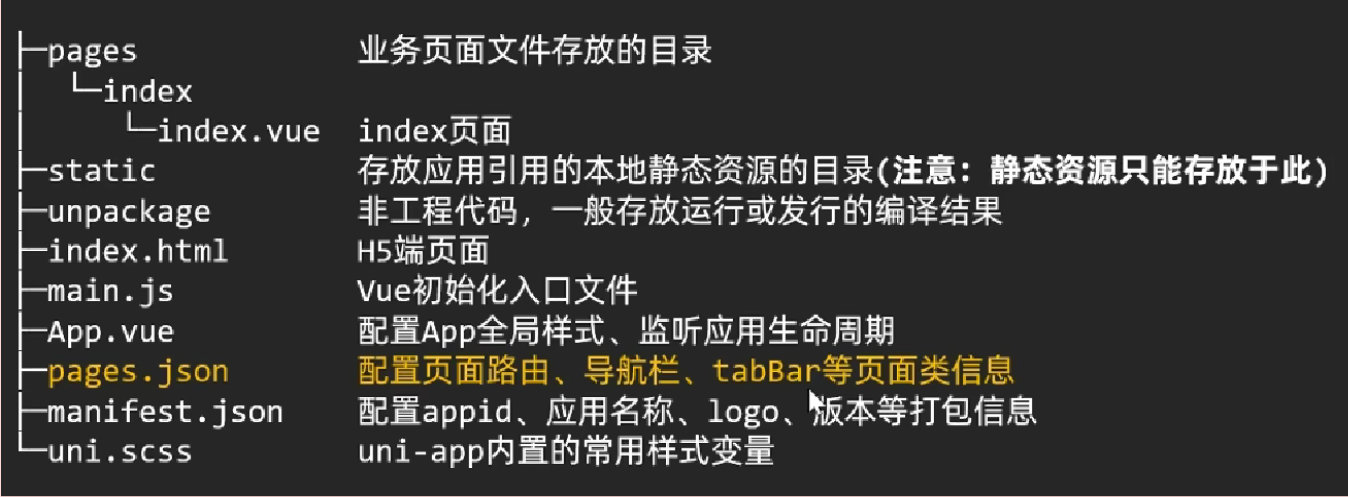
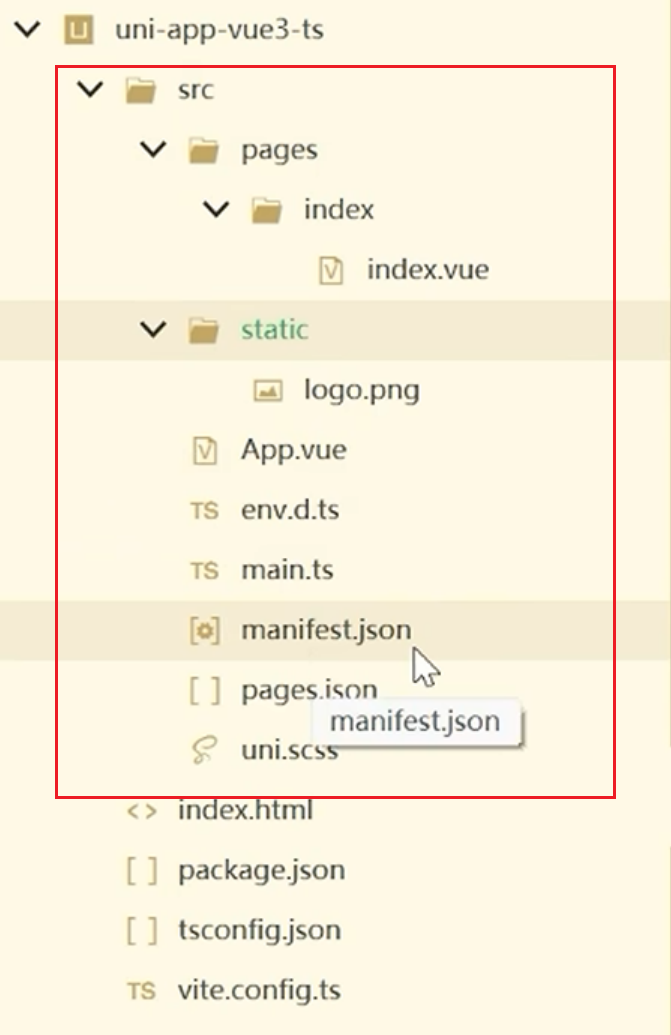
目录解析
tabbar切换案例
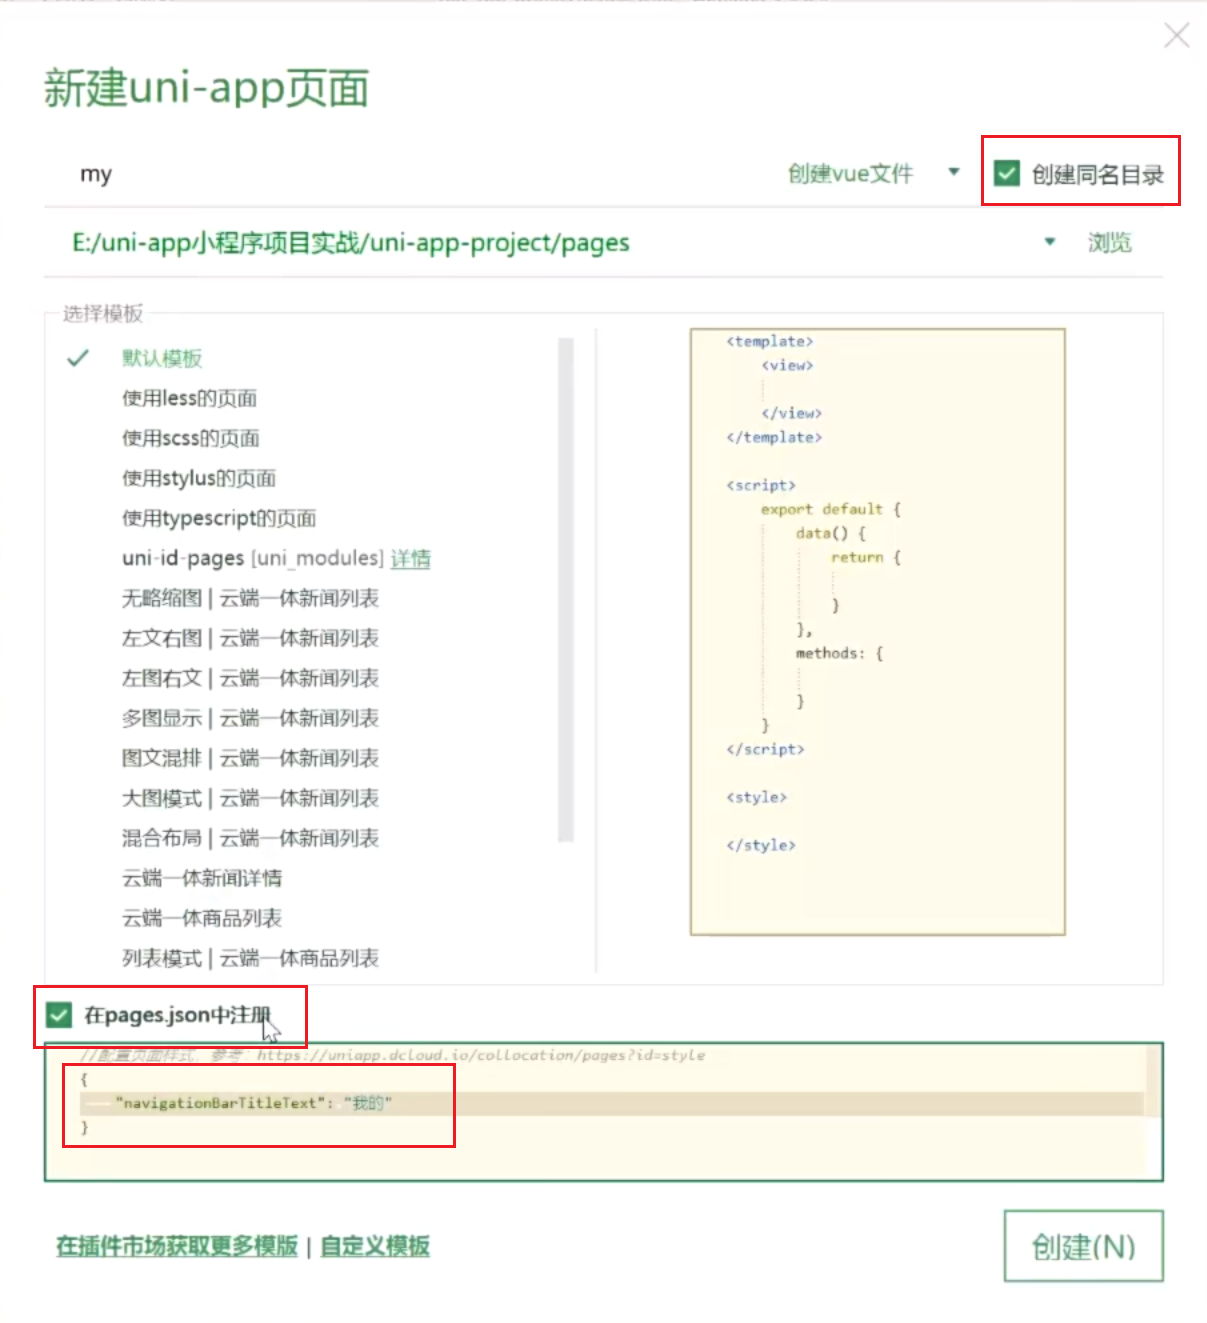
- 创建页面: page/右键新建页面
-
设置tabbar和窗口表现
// 页面配置文件
{
// 页面路由和窗口表现, 创建页面自动添加
"pages": [
// pages数组中第一项表示应用启动页
{
"path": "pages/index/index",
"style": {
"navigationStyle": "custom", // 隐藏默认导航
"navigationBarTextStyle": "white",
"navigationBarTitleText": "首页"
}
},
{
"path": "pages/my/my",
"style": {
"navigationStyle": "custom",
"navigationBarTextStyle": "white",
"navigationBarTitleText": "我的"
}
},
],
// 全局页面设置
"globalStyle": {
"navigationBarTextStyle": "black",
"navigationBarTitleText": "",
"navigationBarBackgroundColor": "#F8F8F8",
"backgroundColor": "#F8F8F8"
},
// 设置 TabBar, 至少两个
"tabBar": {
"color": "#333",
"selectedColor": "#27ba9b",
"backgroundColor": "#fff",
"borderStyle": "white",
"list": [
{
"text": "首页",
"pagePath": "pages/index/index",
"iconPath": "static/tabs/home_default.png",
"selectedIconPath": "static/tabs/home_selected.png"
},
{
"text": "我的",
"pagePath": "pages/my/my",
"iconPath": "static/tabs/user_default.png",
"selectedIconPath": "static/tabs/user_selected.png"
}
]
}
} -
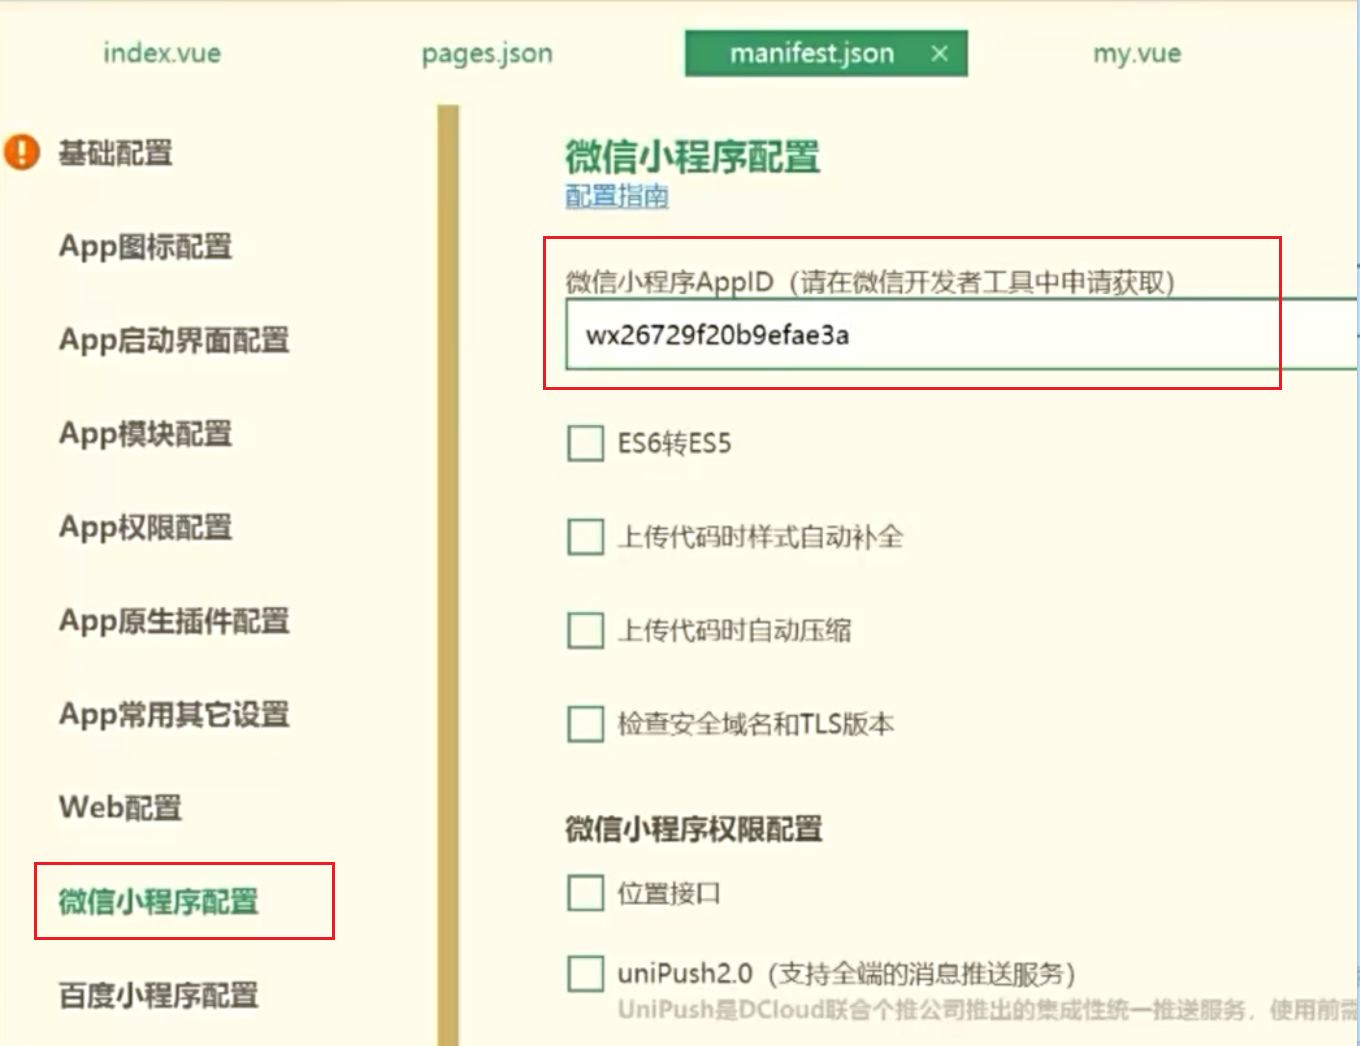
配置应用信息: 配置微信appid后, 才能使用微信开发者工具进行真机预览
uniapp对比原生小程序: 每个页面都是.vue文件, 数据绑定和事件处理遵循 vue 规范就可以了
- 属性绑定 src="{{ url }}" 升级为 :src="url"
- 事件绑定 bindtap="xxx" 升级为 @tap="xxx" , 支持()传参
- 支持Vue常用指令 v-for/v-if/v-show/v-model
- 多端开发使用 uni 替换 wx 调用接口能力
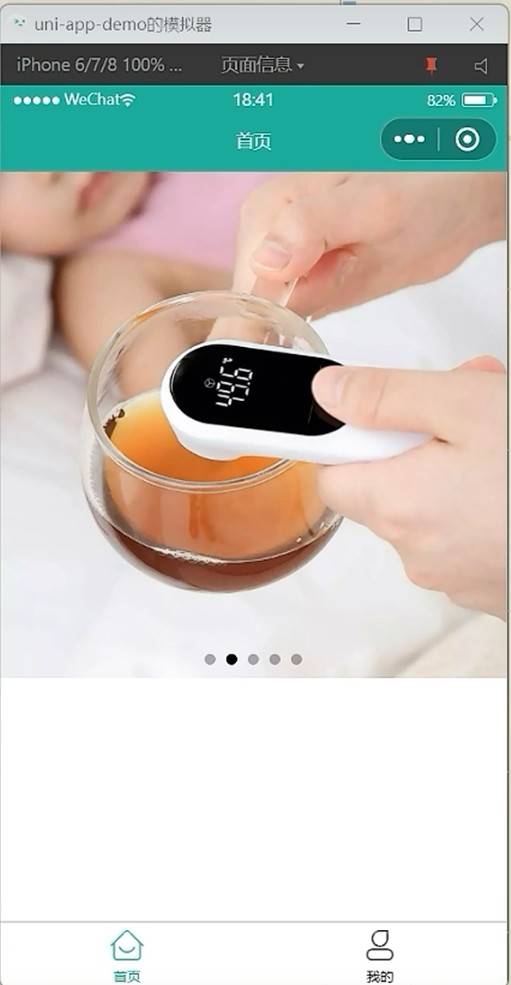
实现轮播图效果和大图预览效果
<template>
  <swiper class="banner" indicator-dots circular :autoplay="false">
    <swiper_item v-for="item in pictures" :key="item.id">
      <image @tap="onPreviewImage(item.url)" :src="item.url"></image>
    </swiper-item>
  </swiper>
</template>

<script>
export default {
   data() {
      return {
        // 轮播图数据
        pictures:[
          { id: '1',url: "https://pcapi-xiaotuxian-front-devtest.itheima.net/miniapp/uploads/goods_preview 1.jpg"},
          { id: '2',url: "https://pcapi-xiaotuxian-front-devtest.itheima.net/miniapp/uploads/goods_preview 2.jpg"},
          { id: '3',url: "https://pcapi-xiaotuxian-front-devtest.itheima.net/miniapp/uploads/goods_preview 3.jpg"},
        ]
      }
   },
  methods: {
    onPreviewImage(url) {
      uni.previewImage({
        urls:this.pictures.map(v=>v.url),
        current:url
      })
    }
  }
}
</scripr>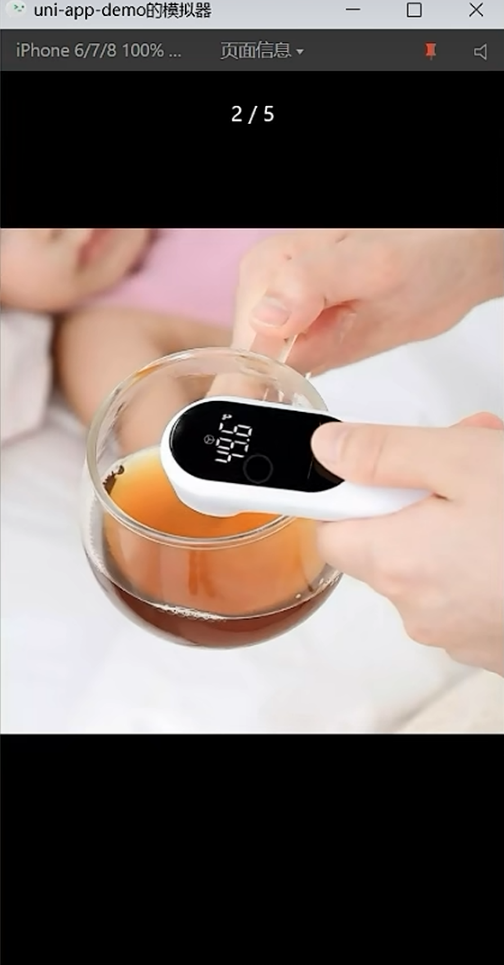
命令行创建
创建项目
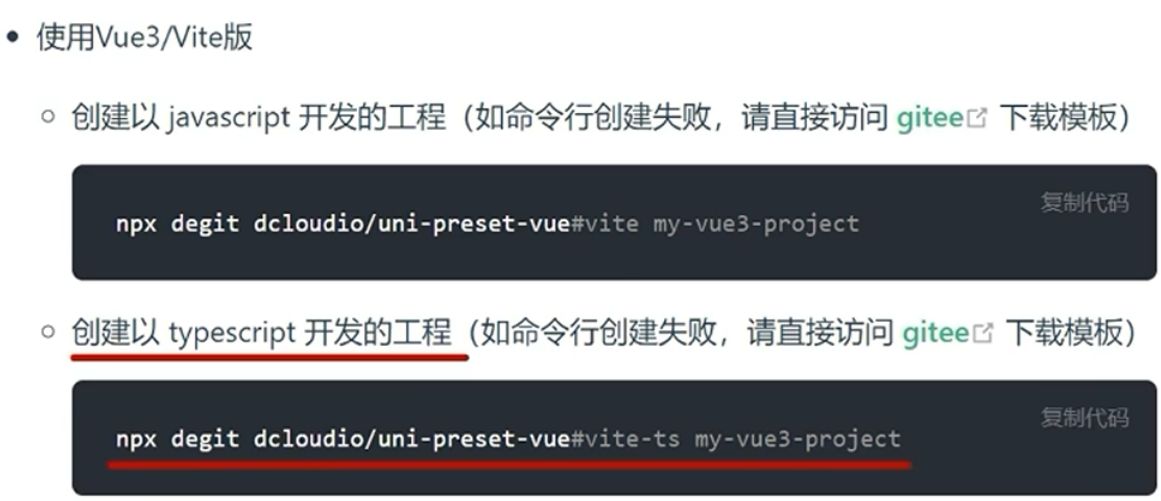
- 打开cmd, 执行命令: npx degit dcloudio/uni-preset-vue#vite-ts 自定义项目名称
- npx是node自带的包管理工具
- 官网链接: uni-app官网创建uni-app
- 如果下载失败可以去官网下载, 或者切换网络尝试
运行项目
- 项目中src目录下存放的就是uni-app工程代码
- 添加appid: 在manifest.json文件配置appid
- 安装依赖: pnpm install
- 项目编译: pnpm dev:mp-weixin
- 项目运行: 把编译后的文件 dist/dev/mp-weixin 导入微信开发者工具
vscode编译器配置: 目前vscode对TS类型支持友好
- 插件安装uni-app插件
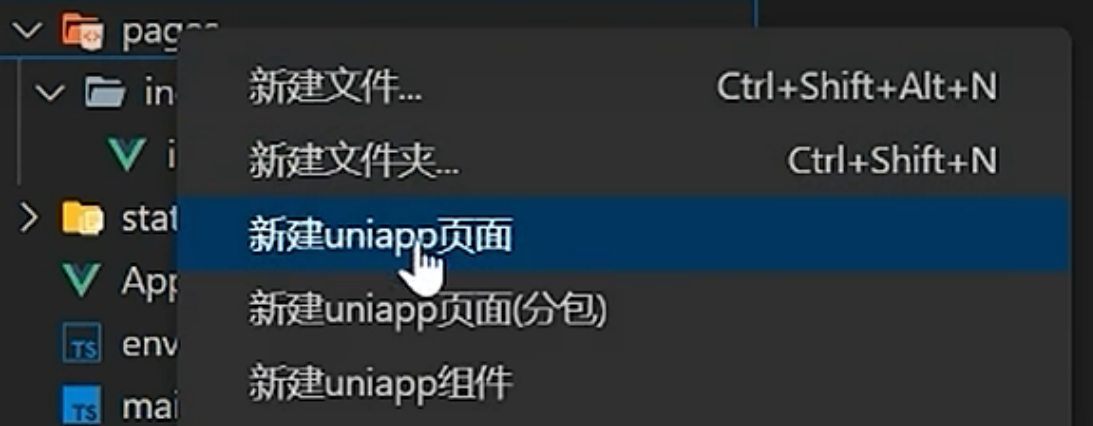
安装uni-create-view插件
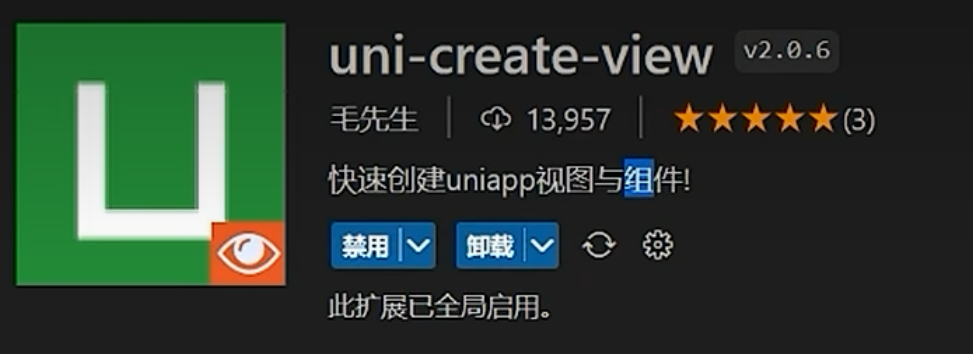
功能: 快速创建页面
安装uni-helper插件

功能: uniapp代码提示, ctrl + i
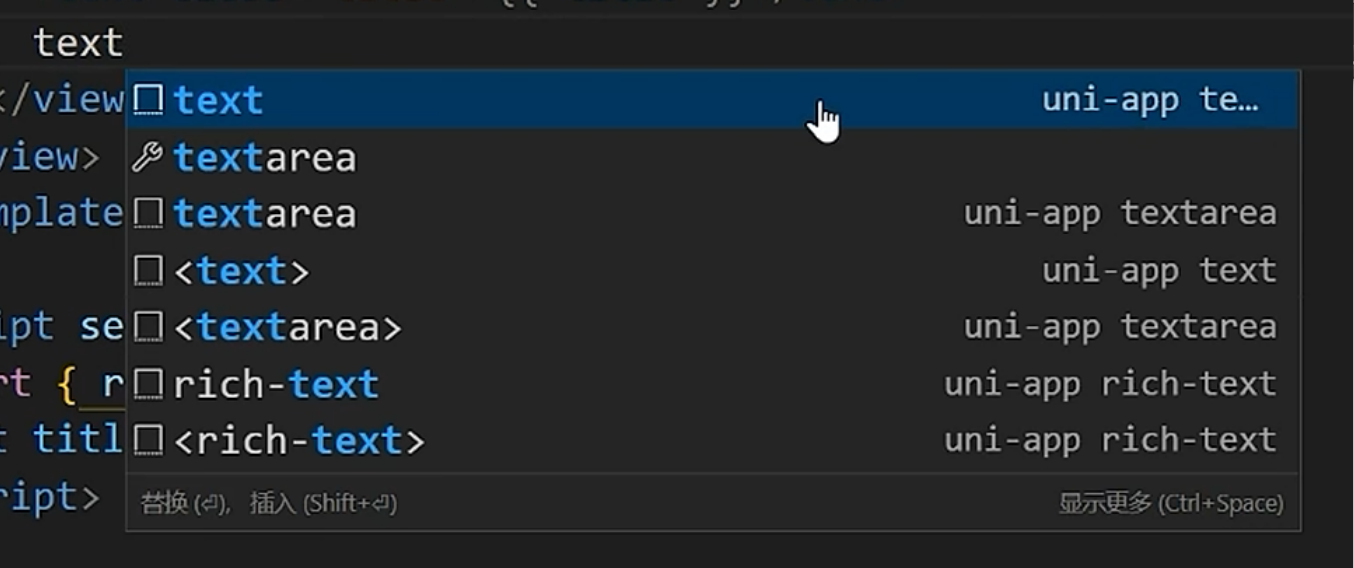
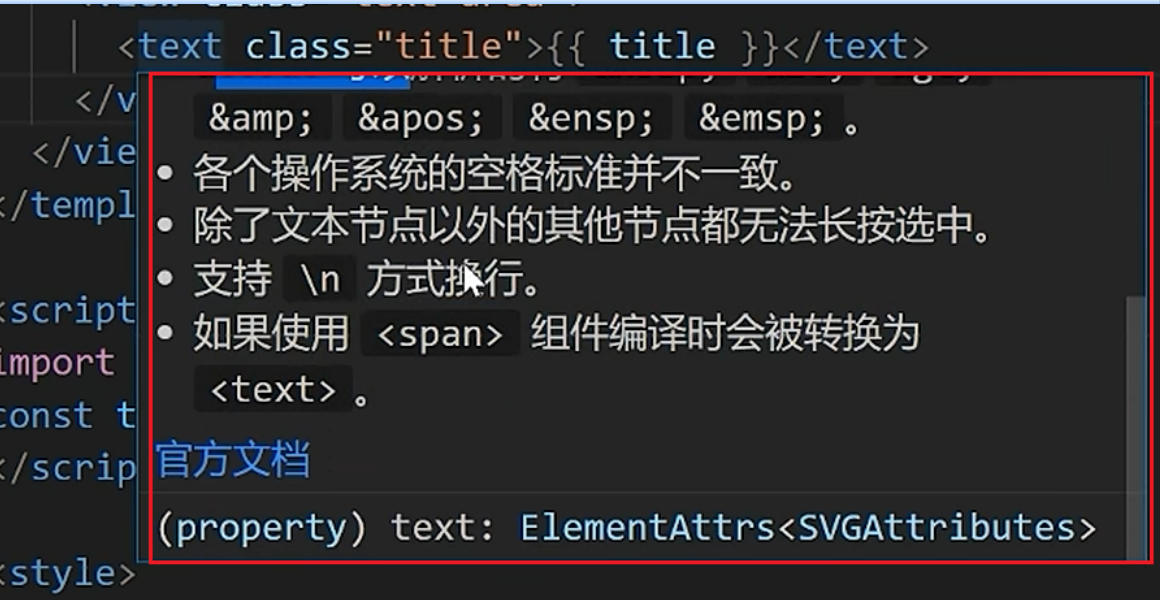
安装 uniapp小程序扩展 插件
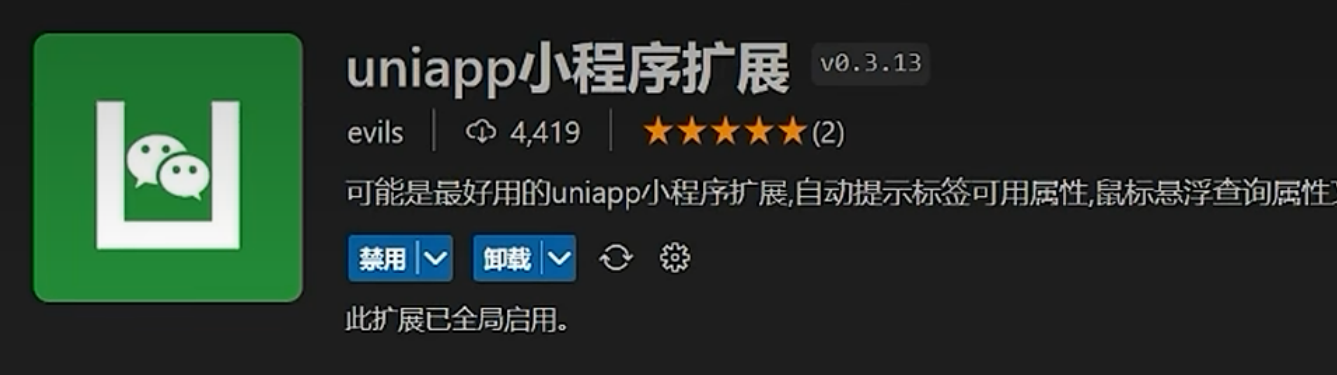
功能: 鼠标悬停查看文档
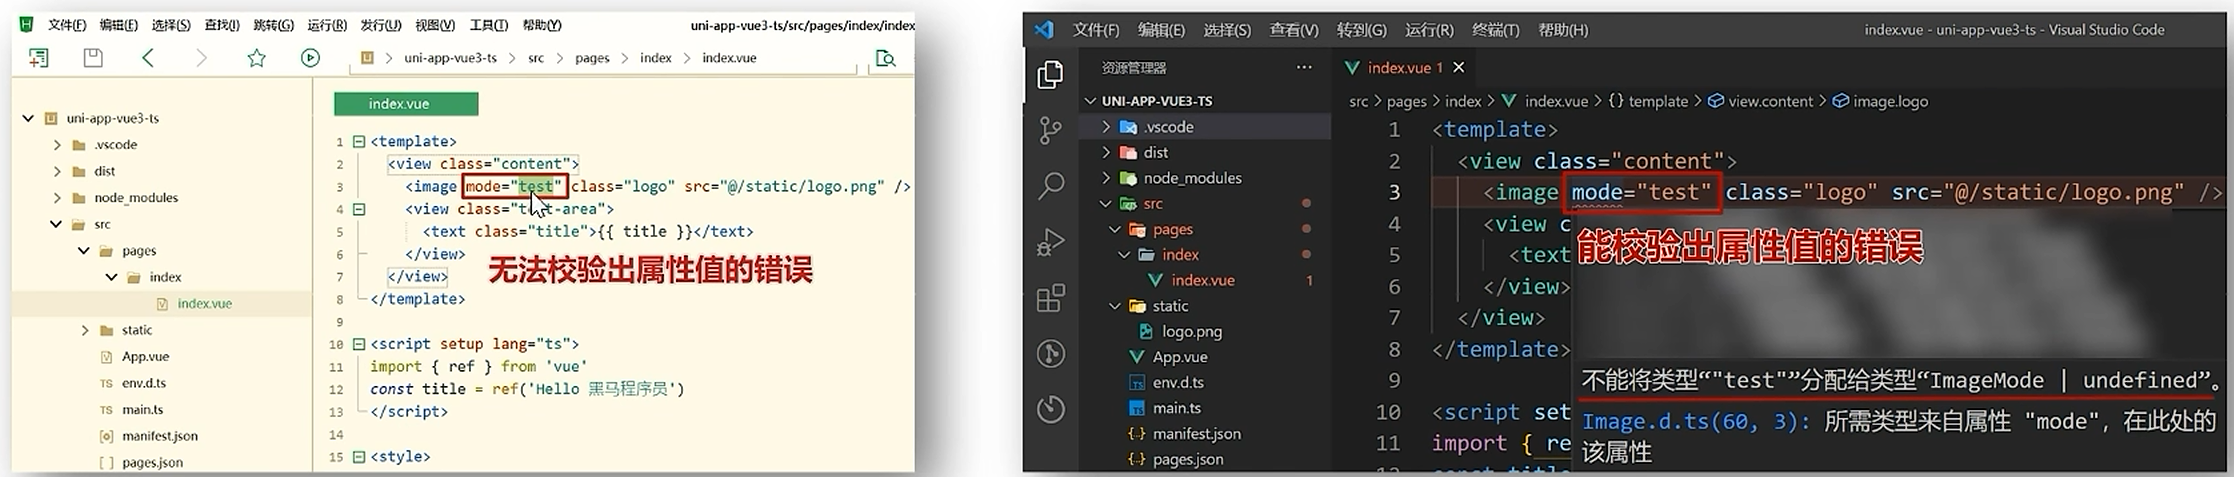
- 配置ts类型校验
-
作用: 使用uniapp或微信组件时, 如果属性配置错误, 在编码阶段直接爆红, 开发效率更高
-
依赖安装: pnpm i -D @types/wechat-miniprogram @uni-helper/uni-app-types
{
"compilerOptions": {
... ...
"types": [
"@dcloudio/types", // 默认的TS类型文件
"miniprogram-api-typings", //微信小程序组件类型增强文件
"@uni-helper/uni-app-types", //uniapp组件类型增强文件
]
},
"vueCompilerOptions": {
// 配置vue的编辑器模式为uniapp
// 已废弃,现调整为 nativeTags,请升级 Volar 插件至最新版本
// experimentalRuntimeMode: "runtime-uni-app",
"nativeTags": [
"block",
"component",
"template",
"slot"
]
},
}
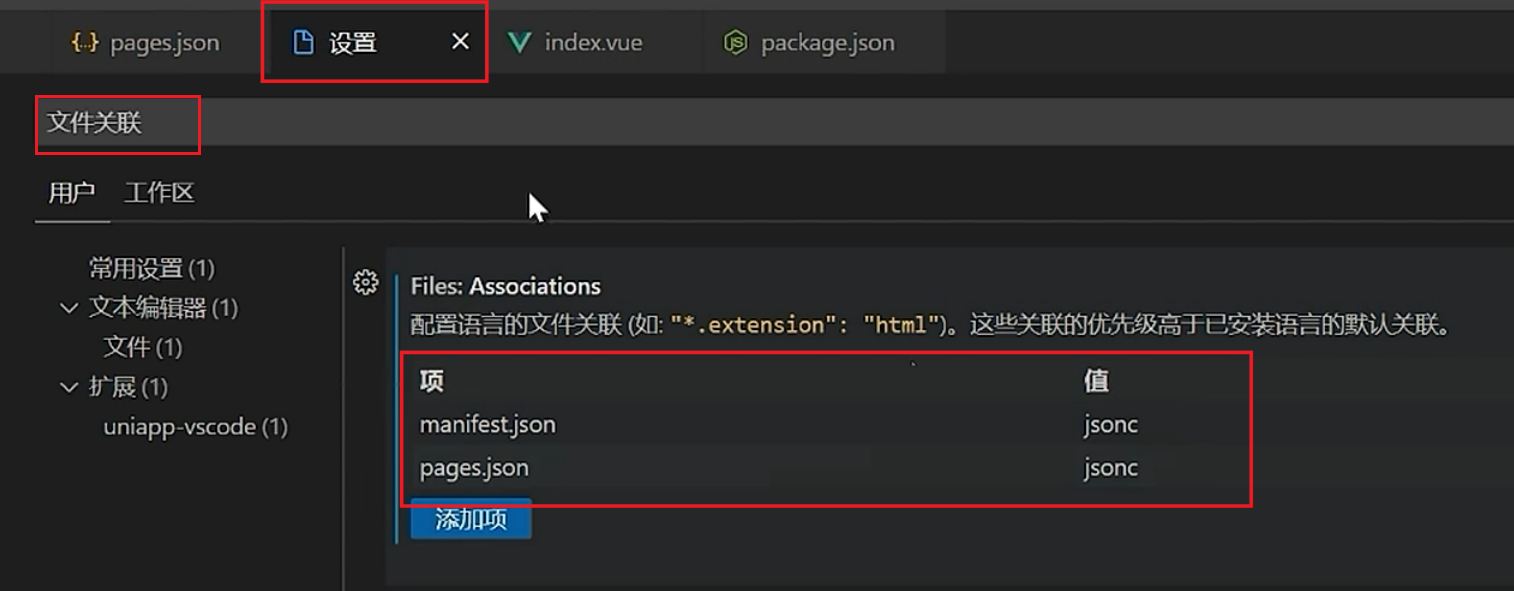
- 解决json注释问题
- HBX中, 允许JSON文件中出现注释
- vscode中, JSON文件默认是严格JSON模式, 把JSON配置文件配置成jsonc模式, 就可以正确识别注释了
- uniapp中, 只有pages.json和manifest.json文件支持注释, 其他的json文件不要配置
基础架构
模版代码: git clone http://gititcast.cn/heimagianduan/erabbit-uni-app-vue3-ts.git heima-shop
安装依赖: pnpm install
配置appid:
{
    /* 小程序特有相关 */
    "mp-weixin" : {
        "appid" : "wxb161c259ad057faaaa",
        "setting" : {
            "urlCheck" : false
        },
        "usingComponents" : true
    },
}
编译代码: pnpm dev:mp-weixin
运行代码: 微信小程序打开dist/dev/mp-weixin
安装uni-ui组件库, 并配置uni-ui组件的自动按需导入
{
	// 组件自动引入规则
	"easycom": {
		// 开启自动扫描
		"autoscan": true,
		// 以正则方式自定义组件匹配规则
		"custom": {
			// uni-ui 规则如下配置
			"^uni-(.*)": "@dcloudio/uni-ui/lib/uni-$1/uni-$1.vue",
		}
	},
	"pages": [
    ... ...
  ],
}- 执行 pnpm i @dcloudio/uni-ui 命令安装组件库
- 自动导入原理: 当我们使用uni-cart 组件时, 由于组件名以 uni- 开头, 就会被custom规则匹配到, 把组件的名称提取出来, 然后交给$1变量读取, 拼接后是完整组件地址, 就能被引入到项目中
uni ui是基于JS开发的, 本身没有提供TS类型支持, 第三方社区开源了uni-ui的类型增强文件, 供我们使用
{
  "extends": "@vue/tsconfig/tsconfig.json",
  "compilerOptions": {
    ... ...
    "types": [
       // 默认的类型增强文件也是必须的
      "@dcloudio/types",
       // 添加安装的uni-ui类型增强文件
      "@uni-helper/uni-ui-types"
    ]
  },
  "include": [
    "src/**/*.ts",
    "src/**/*.d.ts",
    "src/**/*.tsx",
    // 要确保包含使用uni组件的vue文件
    "src/**/*.vue"
  ]
}- 安装命令: pnpm i -D @uni-helper/uni-ui-types
- 安装配置完成后需要重启项目, 才能生效
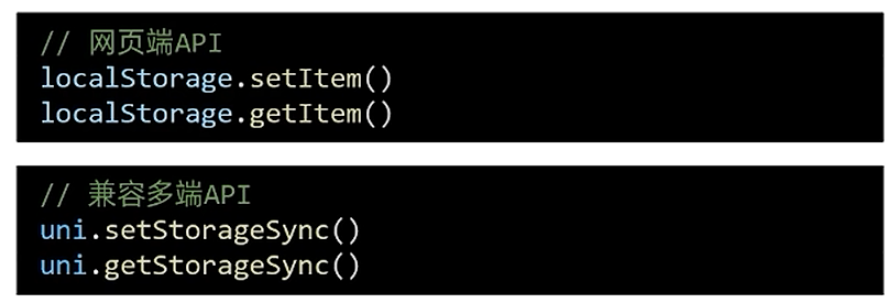
状态管理: 基础代码中已经集成了pinia仓库, 我们只进行持久化配置就可以了
// 定义 Store
export const useMemberStore = defineStore(
  'member',
  () => { },
  // 持久化配置
  {
    // 网页端配置
    // persist: true,
    // 小程序端配置
    persist: {
      storage: {
        setItem(key, value) {
          uni.setStorageSync(key, value)
        },
        getItem(key) {
          return uni.getStorageSync(key)
        },
      },
    },
  },
)- 由于网页端和小程序使用不同的本地存储API, 所以持久化配置的方式略有不同
请求拦截器: 拦截request/uploadFile请求, 配置基地址,超时时间, 请求头表示和token
import { useMemberStore } from '@/stores'
/**
* 请求拦截
*/
// 封装请求
const baseURL = 'https://pcapi-xiaotuxian-front-devtest.itheima.net'
// 请求拦截器
const httpInterceptor = {
// 拦截前触发
invoke(options: UniApp.RequestOptions) {
// 1,非http开头需要拼接地址
if (!options.url.startsWith('http')) {
options.url = baseURL + options.url
}
// 2, 请求超时(10s)
options.timeout = 10000
// 3,添加小程序端请求头标识
options.header = {
...options.header,
'source-client': 'miniapp',
}
// 4,添加token
const memberStore = useMemberStore()
const token = memberStore.profile?.token
if (token) {
options.header.Authorization = token
}
},
}
// 添加拦截器
uni.addInterceptor('request', httpInterceptor)
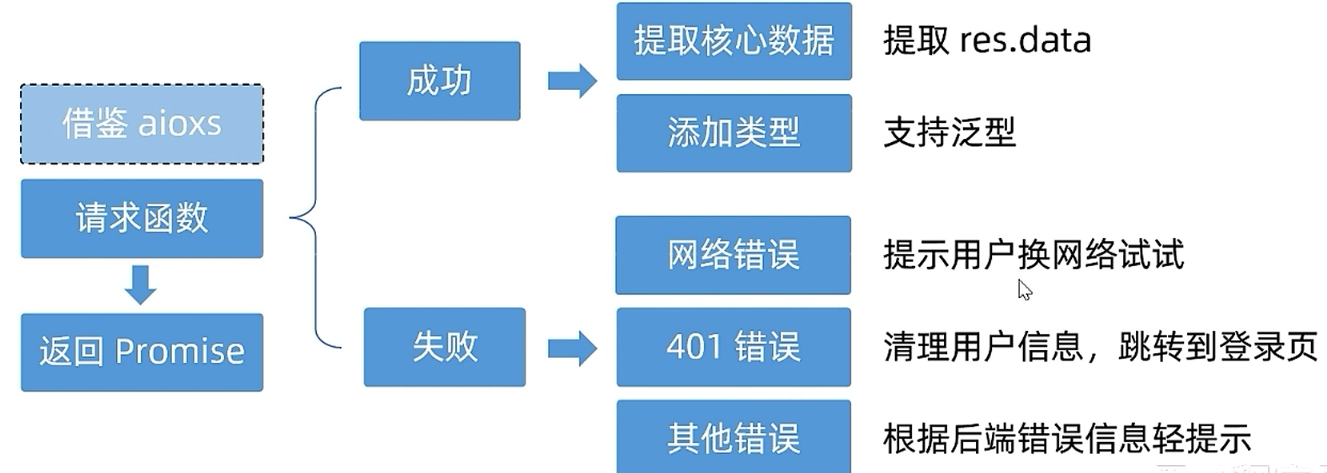
uni.addInterceptor('uploadFile', httpInterceptor)请求函数: 二次封装uni.request函数, 对返回结果进行promise化
/**
 * 请求函数
 */
// 接口(定义后台返回数据的类型)
interface Data<T> {
    code: string
    msg: string
    result: T
}

export const http = <T>(options: UniApp.RequestOptions) => {
    // 1,返回Promise对象
    return new Promise<Data<T>>((resolve, reject) => {
        uni.request({
            ...options,
            // 响应成功(uni.requres中只要服务器有响应,就执行success回调)
            success(res) {
                if (res.statusCode >= 200 && res.statusCode < 300) {
                    // 2,成功
                    resolve(res.data as Data<T>)
                } else if (res.statusCode === 401) {
                    // 清理用户信息,调整到登录页
                    const memberStore = useMemberStore()
                    memberStore.clearProfile()
                    uni.navigateTo({
                        url: '/pages/login/login',
                    })
                    reject(res)
                } else {
                    // 其他错误
                    uni.showToast({
                        title: (res.data as Data<T>).msg || '请求错误',
                        icon: 'none',
                    })
                    reject(res)
                }
            },
            fail(err) {
                // 3,失败
                uni.showToast({
                    title: '请求失败,换个网络试试',
                    icon: 'none',
                })
                reject(err)
            },
        })
    })
}- uni.request函数的sucess成功回调, 只要服务有响应就会执行, 我们需要对状态码进行更准确的判断
- 如果状态码是401就跳转到登录页, 如果是其他错误就展示后台返回的错误信息
- 如果网络出现问题, 服务器不会响应, 就会触发fail失败回调, 提示网络错误就行了
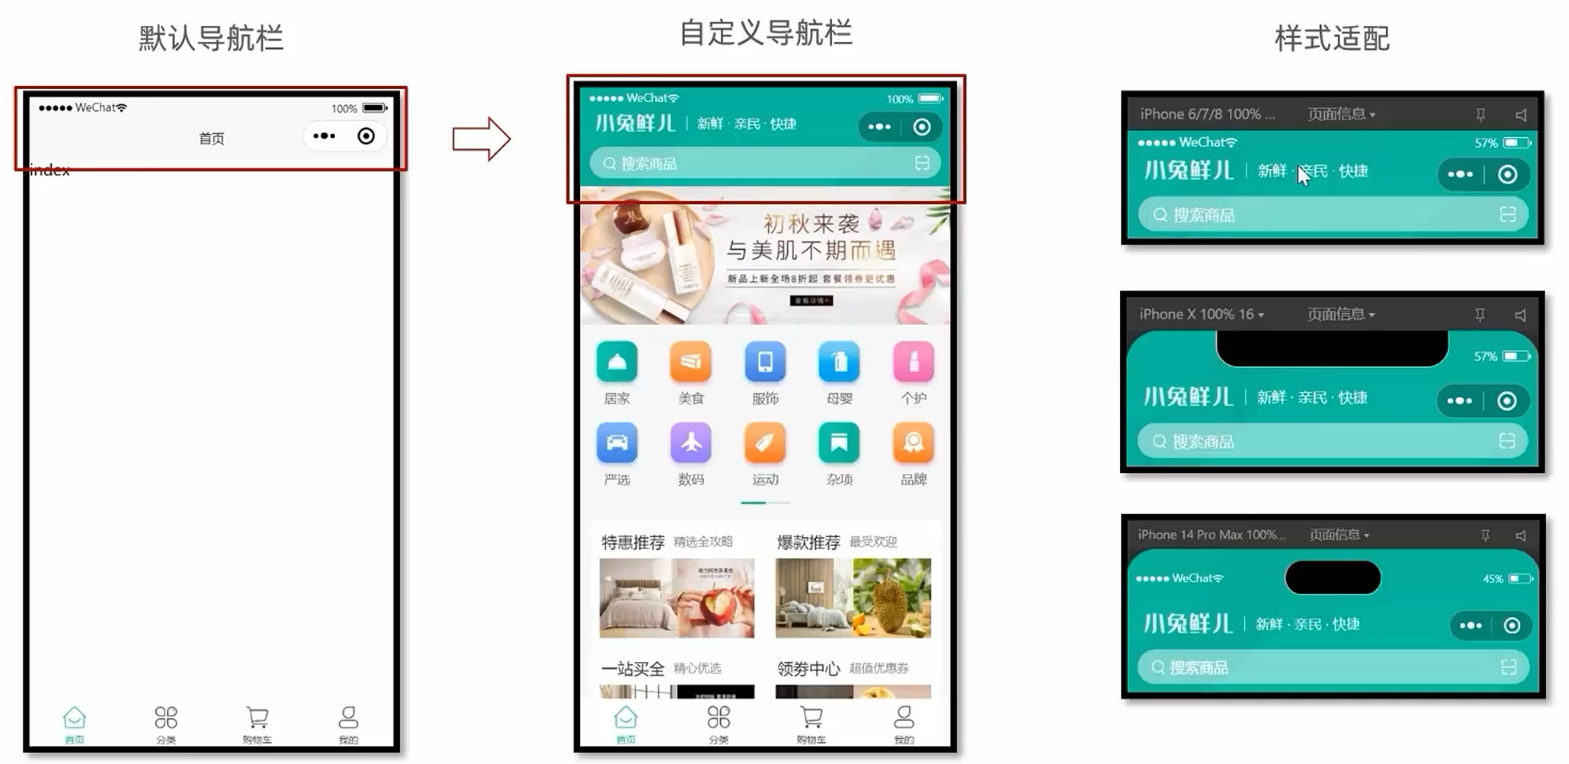
首页导航栏
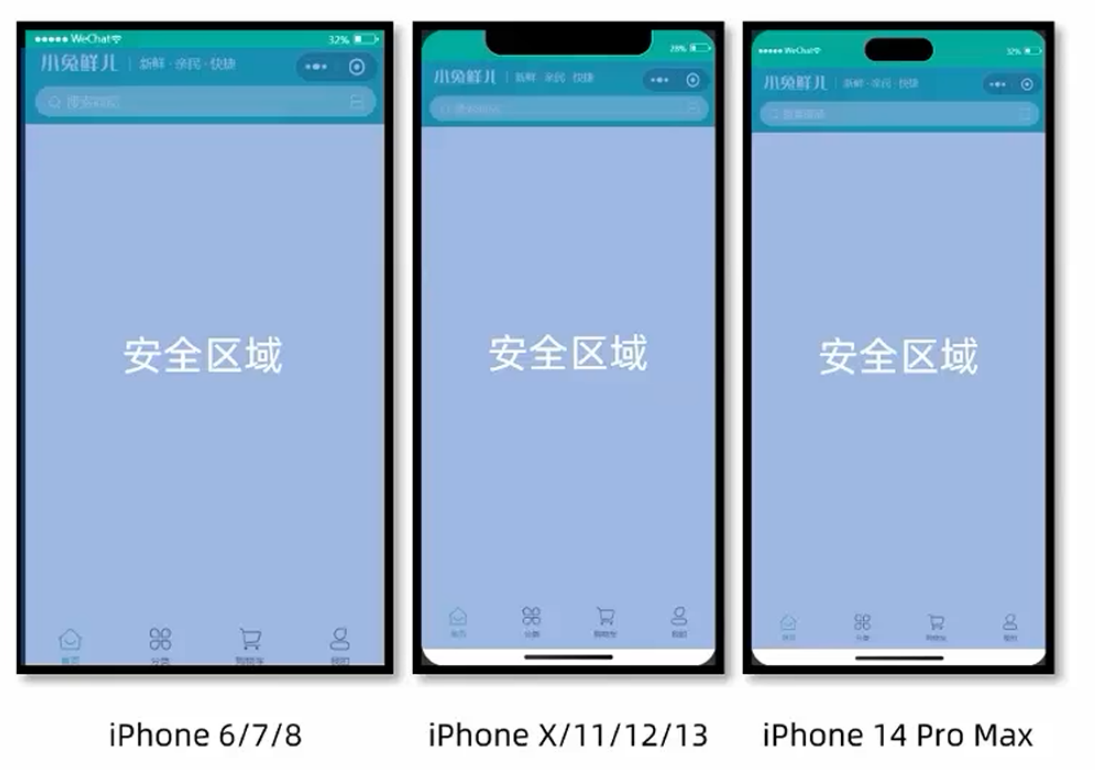
安全区域: 通过 uni.getSystemInfoSync() 方法获取不同机型导航栏的安全距离
准备导航栏组件, 使用导航栏组件
<script setup lang="ts">
// 获取屏幕边界到安全区域距离
const { safeAreaInsets } = uni.getSystemInfoSync()
</script>

<template>
  <view class="navbar" :style="{ paddingTop: safeAreaInsets!.top + 10 + 'px' }">
    <!-- logo文字 -->
    <view class="logo">
      <image class="logo-image" src="@/static/images/logo.png"></image>
      <text class="logo-text">新鲜 · 亲民 · 快捷</text>
    </view>
    <!-- 搜索条 -->
    <view class="search">
      <text class="icon-search">搜索商品</text>
      <text class="icon-scan"></text>
    </view>
  </view>
</template>

<style lang="scss">
/* 自定义导航条 */
.navbar {
  background-image: url(@/static/images/navigator_bg.png);
  background-size: cover;
  position: relative;
  display: flex;
  flex-direction: column;
  padding-top: 20px;
  .logo {
    display: flex;
    align-items: center;
    height: 64rpx;
    padding-left: 30rpx;
    .logo-image {
      width: 166rpx;
      height: 39rpx;
    }
    .logo-text {
      flex: 1;
      line-height: 28rpx;
      color: #fff;
      margin: 2rpx 0 0 20rpx;
      padding-left: 20rpx;
      border-left: 1rpx solid #fff;
      font-size: 26rpx;
    }
  }
  .search {
    display: flex;
    align-items: center;
    justify-content: space-between;
    padding: 0 10rpx 0 26rpx;
    height: 64rpx;
    margin: 16rpx 20rpx;
    color: #fff;
    font-size: 28rpx;
    border-radius: 32rpx;
    background-color: rgba(255, 255, 255, 0.5);
  }
  .icon-search {
    &::before {
      margin-right: 10rpx;
    }
  }
  .icon-scan {
    font-size: 30rpx;
    padding: 15rpx;
  }
}
</style>

<script setup lang="ts">
import CustomNavbar from './components/CustomNavbar.vue'

</script>

<template>
  <!-- 自定义导航组件 -->
  <CustomNavbar />
</template>
隐藏首页的默认导航栏
{
	"pages": [
		{
			"path": "pages/index/index",
			"style": {
				"navigationStyle": "custom", // 隐藏默认导航
				"navigationBarTextStyle": "white",
				"navigationBarTitleText": "首页"
			}
		},
	],
}
实现效果