上一篇我们分析了argo-workflow 中的 archive,包括 流水线GC、流水线归档、日志归档等功能。本篇主要分析 Workflow 中的几种触发方式,包括手动触发、定时触发、Event 事件触发等。
1. 概述
Argo Workflows 的流水线有多种触发方式:
- 手动触发:手动提交一个 Workflow,就会触发一次构建,那么我们创建的流水线,理论上是 WorkflowTemplate 对象。
- 定时触发:CronWorkflow,类似于 k8s 中的 job 和 cronjob,CronWorkflow 会定时创建 Workflow 来实现定时触发。
- Event 事件触发:比如通过git commit 触发,借助 argo-events 可以实现此功能。
2. 定时触发
CronWorkflow 本质上就是一个 Workflow + Cron Spec。
设计上参考了 k8s 中的 CronJob
Demo
一个简单的 CronWorkflow 如下:
yaml
apiVersion: argoproj.io/v1alpha1
kind: CronWorkflow
metadata:
  name: test-cron-wf
spec:
  schedule: "* * * * *"
  concurrencyPolicy: "Replace"
  startingDeadlineSeconds: 0
  workflowSpec:
    entrypoint: whalesay
    templates:
    - name: whalesay
      container:
        image: alpine:3.6
        command: [sh, -c]
        args: ["date; sleep 90"]
apply 一下,可以看到创建出来的 Workflow 命名为 $cronWorkflowName-xxx
bash
[root@lixd-argo workdir]# k get cwf
NAME           AGE
test-cron-wf   116s
[root@lixd-argo workdir]# k get wf
NAME                      STATUS    AGE   MESSAGE
test-cron-wf-1711852560   Running   47s
由于 template 中运行任务是 sleep 90s 因此,整个任务耗时肯定是超过 60s 的,根据设置的 concurrencyPolicy 为 Replace ,因此 60s 后,第二个 Workflow 被创建出来,第一个就会被停止掉。
bash
[root@lixd-argo workdir]# k get wf
NAME                      STATUS    AGE    MESSAGE
test-cron-wf-1711852560   Failed    103s   Stopped with strategy 'Terminate'
test-cron-wf-1711852620   Running   43s
具体参数
支持的具体参数如下:
go
type CronWorkflowSpec struct {
	// WorkflowSpec is the spec of the workflow to be run
	WorkflowSpec WorkflowSpec `json:"workflowSpec" protobuf:"bytes,1,opt,name=workflowSpec,casttype=WorkflowSpec"`
	// Schedule is a schedule to run the Workflow in Cron format
	Schedule string `json:"schedule" protobuf:"bytes,2,opt,name=schedule"`
	// ConcurrencyPolicy is the K8s-style concurrency policy that will be used
	ConcurrencyPolicy ConcurrencyPolicy `json:"concurrencyPolicy,omitempty" protobuf:"bytes,3,opt,name=concurrencyPolicy,casttype=ConcurrencyPolicy"`
	// Suspend is a flag that will stop new CronWorkflows from running if set to true
	Suspend bool `json:"suspend,omitempty" protobuf:"varint,4,opt,name=suspend"`
	// StartingDeadlineSeconds is the K8s-style deadline that will limit the time a CronWorkflow will be run after its
	// original scheduled time if it is missed.
	StartingDeadlineSeconds *int64 `json:"startingDeadlineSeconds,omitempty" protobuf:"varint,5,opt,name=startingDeadlineSeconds"`
	// SuccessfulJobsHistoryLimit is the number of successful jobs to be kept at a time
	SuccessfulJobsHistoryLimit *int32 `json:"successfulJobsHistoryLimit,omitempty" protobuf:"varint,6,opt,name=successfulJobsHistoryLimit"`
	// FailedJobsHistoryLimit is the number of failed jobs to be kept at a time
	FailedJobsHistoryLimit *int32 `json:"failedJobsHistoryLimit,omitempty" protobuf:"varint,7,opt,name=failedJobsHistoryLimit"`
	// Timezone is the timezone against which the cron schedule will be calculated, e.g. "Asia/Tokyo". Default is machine's local time.
	Timezone string `json:"timezone,omitempty" protobuf:"bytes,8,opt,name=timezone"`
	// WorkflowMetadata contains some metadata of the workflow to be run
	WorkflowMetadata *metav1.ObjectMeta `json:"workflowMetadata,omitempty" protobuf:"bytes,9,opt,name=workflowMeta"`
}
内容可以分为 3 部分:
- WorkflowSpec :这个就是 Workflow 的 Spec,一模一样的
- Cron Spec:增加了一些 Cron 相关字段
- WorkflowMetadata:一些 metadata,后续该 CronWorkflow 创建的 Workflow 都会携带上这里指定的 metadata
WorkflowSpec 和 WorkflowMetadata 没太大区别,就不赘述了,分析一下 Cron Spec 相关的几个字段:
- schedule:cron 表达式,
* * * * *每分钟创建一次 - concurrencyPolicy:并发模式,支持 Allow、Forbid、Replace
- Allow:允许同时运行多个 Workflow
- Forbid:禁止并发,有 Workflow 运行时,就不会再创建新的
- Replace: 表示新创建 Workflow 替换掉旧的,不会同时运行多个 Workflow。
- startingDeadlineSeconds:Workflow 创建出来到第一个 Pod 启动的最大时间,超时后就会被标记为失败。
- suspend:flag 是否停止 CronWorkflow,在定时任务不需要执行是可以设置为 true。
- timezone:时区,默认使用机器上的本地时间
大部分字段和 K8s CronJob 一致
yaml
apiVersion: argoproj.io/v1alpha1
kind: CronWorkflow
metadata:
  name: my-cron
spec:
  schedule: "* * * * *"
  concurrencyPolicy: "Replace"
  startingDeadlineSeconds: 0
  workflowSpec:
    entrypoint: whalesay
    templates:
    - name: whalesay
      container:
        image: alpine:3.6
        command: [sh, -c]
        args: ["date; sleep 10"]
  workflowMetadata:
    labels:
      from: cron
增加了 metadata,测试一下
bash
[root@lixd-argo workdir]# k get wf my-cron-1711853400 -oyaml|grep labels -A 1
  labels:
    from: cron
可以看到,创建出来的 Workflow 确实携带上了,在 CronWorkflow 中指定的 label。
3. Event
argo 提供了一个 Event API:/api/v1/events/{namespace}/{discriminator},该 API 可以接受任意 json 数据。
通过 event API 可以创建 Workflow ,类似于 Webhook。
具体请求长这样:
bash
curl https://localhost:2746/api/v1/events/argo/ \
  -H "Authorization: $ARGO_TOKEN" \
  -d '{"message": "hello"}'
或者这样:
bash
curl https://localhost:2746/api/v1/events/argo/my-discriminator \
  -H "Authorization: $ARGO_TOKEN" \
-d '{"message": "hello"}'- 1)准备 Token
- 2)创建 WorkflowEventBinding,配置接收 event 以及收到 event 后创建的 Workflow 信息
- 3)发送请求进行测试
Token
创建 RBAC 相关对象,role、rolebinding、sa,其中 role 只需要提供最小权限即可。
直接创建在 default 命名空间
bash
kubectl apply -f - <<EOF
apiVersion: rbac.authorization.k8s.io/v1
kind: Role
metadata:
  name: test
rules:
  - apiGroups:
      - argoproj.io
    resources:
      - workfloweventbindings
    verbs:
      - list
  - apiGroups:
      - argoproj.io
    resources:
      - workflowtemplates
    verbs:
      - get
  - apiGroups:
      - argoproj.io
    resources:
      - workflows
    verbs:
      - create
EOF
serviceaccount 和 rolebinding
bash
kubectl create sa test

kubectl create rolebinding test --role=test --serviceaccount=default:test
然后创建一个 Secret
bash
kubectl apply -f - <<EOF
apiVersion: v1
kind: Secret
metadata:
  name: test.service-account-token
  annotations:
    kubernetes.io/service-account.name: test
type: kubernetes.io/service-account-token
EOF
最后就可以查询 Secret 解析 Token 了
bash
ARGO_TOKEN="Bearer $(kubectl get secret test.service-account-token -o=jsonpath='{.data.token}' | base64 --decode)"

echo $ARGO_TOKEN
Bearer ZXlKaGJHY2lPaUpTVXpJMU5pSXNJbXRwWkNJNkltS...
测试,能否正常使用
bash
ARGO_SERVER=$(kubectl get svc argo-workflows-server -n argo -o=jsonpath='{.spec.clusterIP}')

curl http://$ARGO_SERVER:2746/api/v1/workflow-event-bindings/default -H "Authorization: $ARGO_TOKEN"
WorkflowEventBinding
为了接收 Event,可以创建 WorkflowEventBinding 对象,具体如下:
yaml
apiVersion: argoproj.io/v1alpha1
kind: WorkflowEventBinding
metadata:
  name: event-consumer
spec:
  event:
    # metadata header name must be lowercase to match in selector
    selector: payload.message != "" && metadata["x-argo-e2e"] == ["true"] && discriminator == "my-discriminator"
  submit:
    workflowTemplateRef:
      name: my-wf-tmple
    arguments:
      parameters:
      - name: message
        valueFrom:
          event: payload.message
spec.event 指定了该 Binding 该如何匹配收到的 Event,比如这里的条件就是:
- 1)payload 中有一个 message 参数,值不为空
- 2)header 中包含 x-argo-e2e,且值为 true
- 注意:这里匹配的时候 header 都会被转为小写
- 3)最后就是 discriminator 名字为 my-discriminator
如果匹配则会使用 submit 下面指定的内容创建 Workflow:
- 1)使用 my-wf-tmple 这个 workflowTemplate 创建 Workflow
- 2)使用 payload.message 作为参数
至于创建出的 Workflow 则是由 my-wf-tmple 定义了,先创建这个 Template
yaml
apiVersion: argoproj.io/v1alpha1
kind: WorkflowTemplate
metadata:
  name: my-wf-tmple
spec:
  templates:
    - name: main
      inputs:
        parameters:
          - name: message
            value: "{{workflow.parameters.message}}"
      container:
        image: docker/whalesay:latest
        command: [cowsay]
        args: ["{{inputs.parameters.message}}"]
  entrypoint: main
最后我们就可以发送 API 来触发 event 实现 Workflow 的创建
bash
curl $ARGO_SERVER:2746/api/v1/events/default/my-discriminator \
    -H "Authorization: $ARGO_TOKEN" \
    -H "X-Argo-E2E: true" \
    -d '{"message": "hello events"}'
测试一下:
bash
{}[root@lixd-argo workdir]# curl $ARGO_SERVER:2746/api/v1/events/default/my-discriminator \
>     -H "Authorization: $ARGO_TOKEN" \
>     -H "X-Argo-E2E: true" \
>     -d '{"message": "hello events"}'
{}[root@lixd-argo workdir]# k get wf
NAME                STATUS    AGE   MESSAGE
my-wf-tmple-ea81n   Running   5s
[root@lixd-argo workdir]# k get wf my-wf-tmple-ea81n -oyaml|grep parameters -A 5
    parameters:
    - name: message
      value: hello events
可以看到,Workflow 已经创建出来了,而且参数也是我们发请求时给的 hello events。
扩容
默认情况下 argo-server 可以同时处理 64 个事件,再多就会直接返回 503 了,可以通过以下参数进行调整:
- 1)--event-operation-queue-size:增加队列大小,以接收更多的事件
- 2)--event-worker-count:增加 worker 数量,提升处理速度
4. Webhook
前面 Event 章节提到了可以通过发送 HTTP 请求的方式来创建触发 event 以 Workflow,但是需要客户端提供 AuthToken。
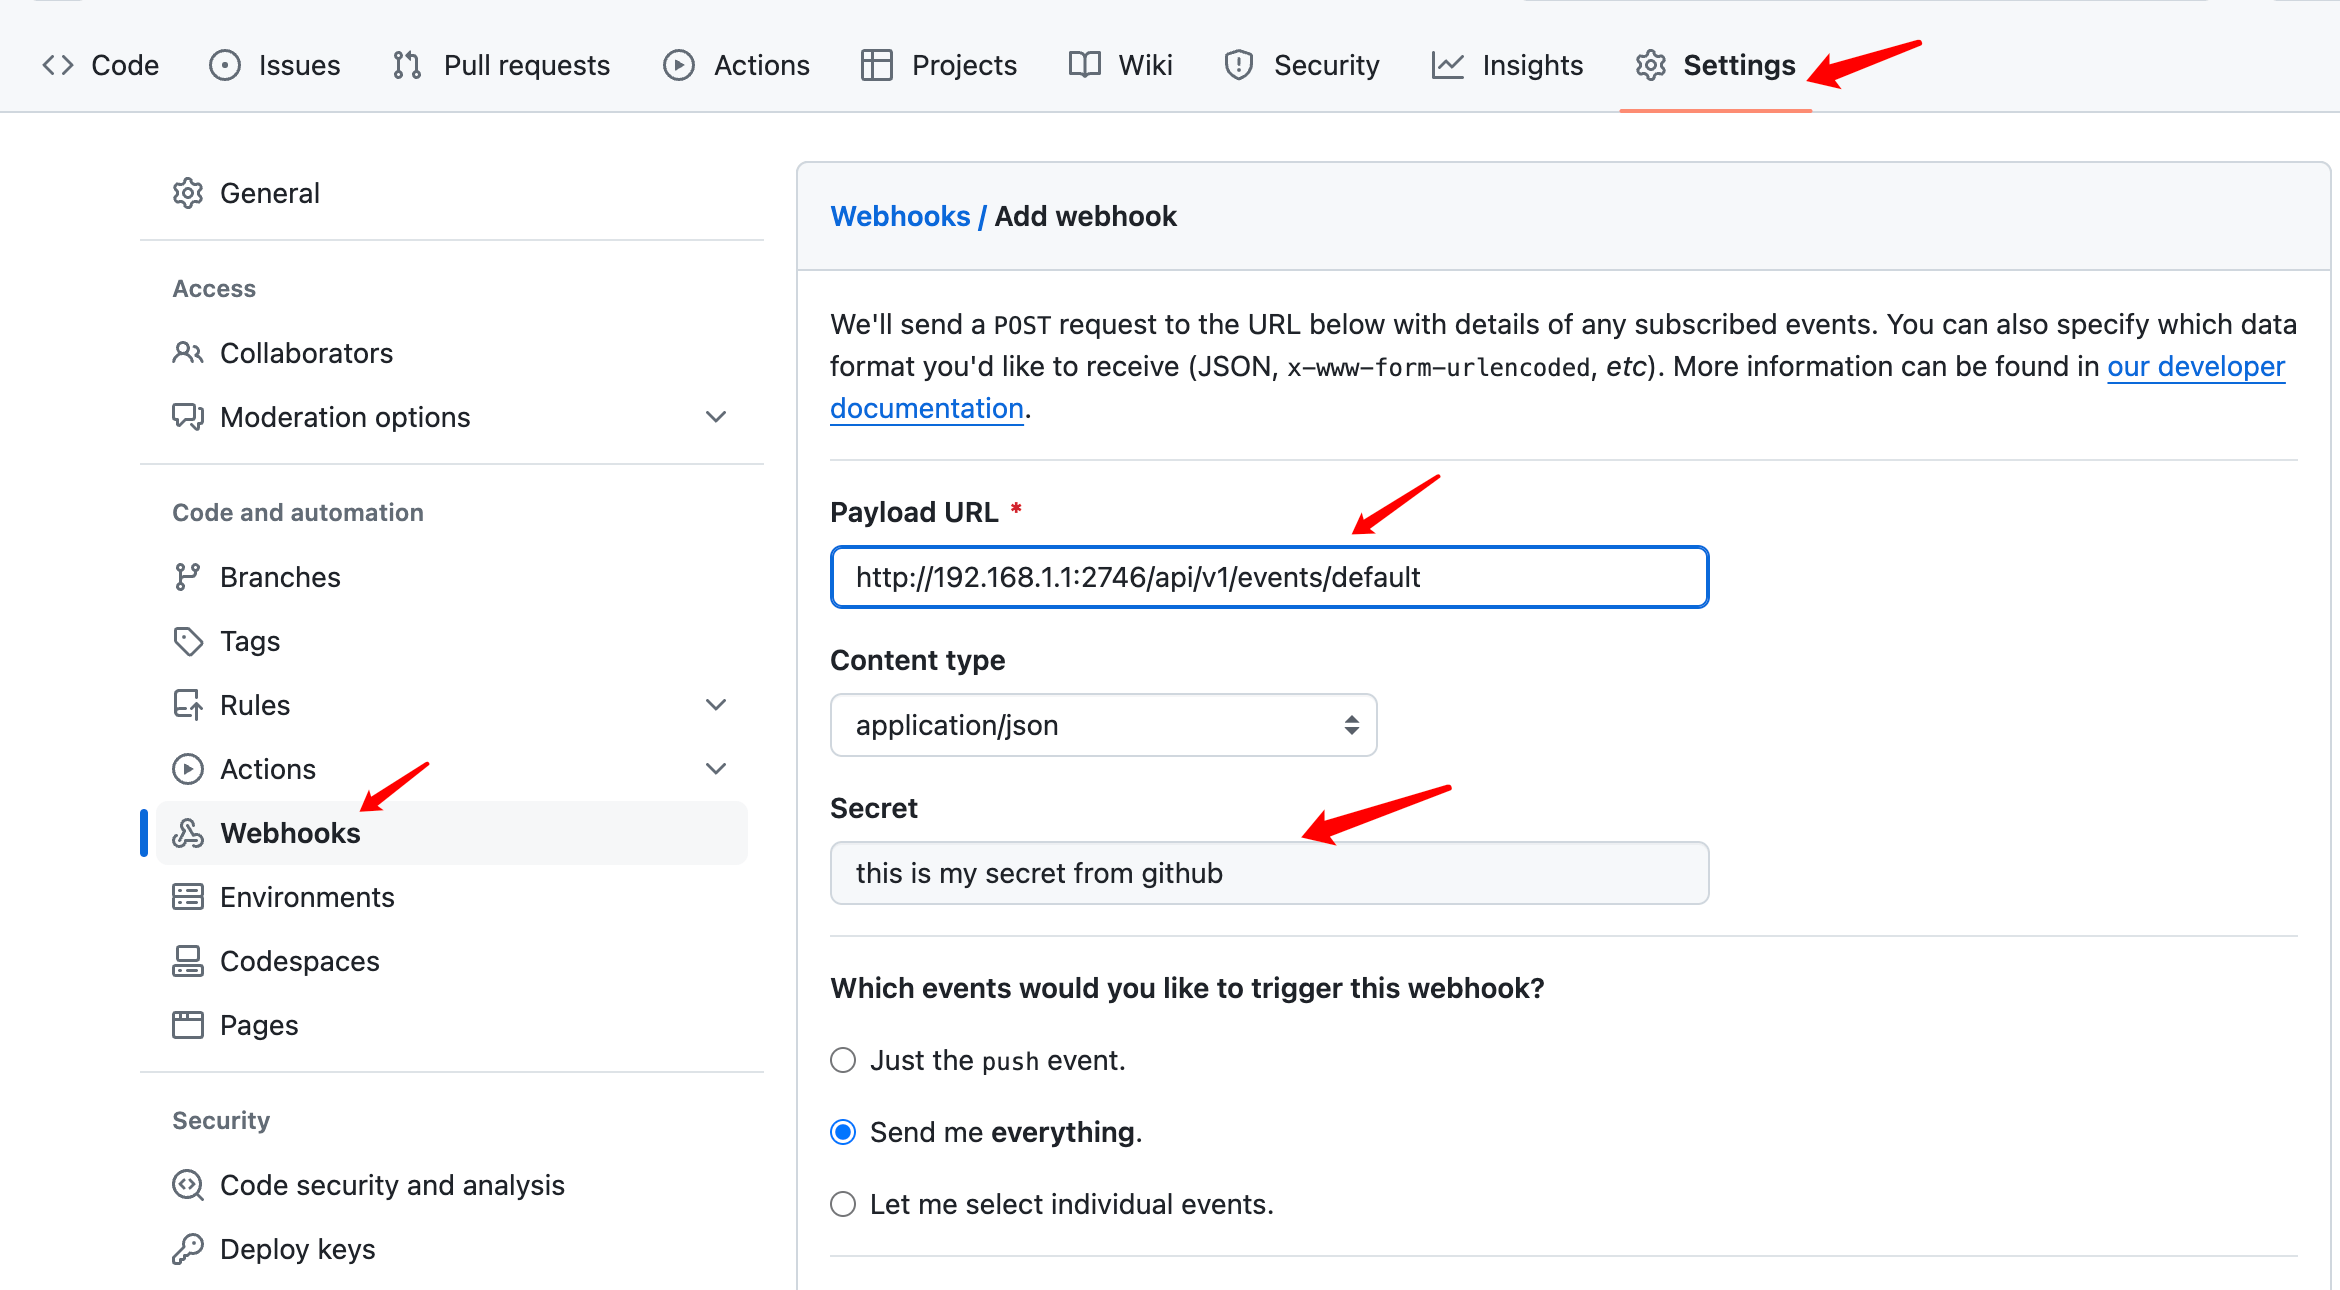
问题来了,对于一些不能指定 Token 的客户端来说就比较麻烦了,比如 Github、Gitlab 等 Git 仓库,都可以配置 Webhook,在收到 commit 的时候调用 Webhook 来触发流水线。
此时,这些发送过来的请求肯定是没有带 Token 的,因此需要额外配置来进行验证,保证 argo 只处理来自 Github、Gitlab 等等平台的 Webhook 请求。
- 1)创建 RBAC 相关对象,role、rolebinding、sa 准备好 token
- 2)配置 Webhook-clients,告诉 argo 什么类型的 Webhook 过来使用那个 secret 作为 token
第一步 Token 和 Event 章节一致,就不在赘述了,主要是第二步。
webhook-clients config
上一步,创建 RBAC 对象,准备好 Secret 之后,一般客户端都是解析 Secret 中的 Token,然后带上该 Token 发送请求,就像这样:
bash
ARGO_SERVER=$(kubectl get svc argo-workflows-server -n argo -o=jsonpath='{.spec.clusterIP}')
ARGO_TOKEN="Bearer $(kubectl get secret jenkins.service-account-token -o=jsonpath='{.data.token}' | base64 --decode)"

curl https://$ARGO_SERVER:2746/api/v1/events/default/ \
  -H "Authorization: $ARGO_TOKEN" \
  -d '{"message": "hello"}'
但是,对于 Webhook 客户端来说,是没办法这样指定 token 的,因此需要通过argo-workflows-webhook-clients 配置来告诉 argo,哪个 Webhook 使用哪个 Secret 中的 token。
创建一个名为argo-workflows-webhook-clients 的 Secret,内容大致是这样的:
yaml
kind: Secret
apiVersion: v1
metadata:
  name: argo-workflows-webhook-clients
# The data keys must be the name of a service account.
stringData:
  # https://support.atlassian.com/bitbucket-cloud/docs/manage-webhooks/
  bitbucket.org: |
    type: bitbucket
    secret: "my-uuid"
  # https://confluence.atlassian.com/bitbucketserver/managing-webhooks-in-bitbucket-server-938025878.html
  bitbucketserver: |
    type: bitbucketserver
    secret: "shh!"
  # https://developer.github.com/webhooks/securing/
  github.com: |
    type: github
    secret: "shh!"
  # https://docs.gitlab.com/ee/user/project/integrations/webhooks.html
  gitlab.com: |
    type: gitlab
secret: "shh!"- 其中 Key 必须是当前 Namespace 下的 Serviceaccount 名称。
- Value 则包含 type 和 secret 两部分。
- type:Webhook 来源,比如 github、gitlab
- secret:一个字符串,非 k8s secret,一般在对应平台添加 Webhook 时进行配置
以 Github 具体,secret 配置如下:
在添加 Webhook 时可以填一个 Secret 配置,实际就是一串加密字符,随便填什么都可以。
这样 Github 发送 Webhook 请求时就会携带上这个 Secret 信息,Argo 收到后就根据argo-workflows-webhook-clients 的 Secret 里配置的 type=github 的 secret 字段进行对比,如果匹配上就处理,否则就忽略该请求。
如果能匹配上就从对应的 Serviceaccount 中解析 Token 作为 Authorization 信息。
源码分析
Webhook 这一块,官方文档不是很详细,一笔带过了,因此翻了下源码。
这块逻辑以一个 Interceptor 的形式出现,对于所有 Event API 都会经过该逻辑,用于为没有携带 Authorization 的请求添加 Authorization 信息。
go
// Interceptor creates an annotator that verifies webhook signatures and adds the appropriate access token to the request.
func Interceptor(client kubernetes.Interface) func(w http.ResponseWriter, r *http.Request, next http.Handler) {
	return func(w http.ResponseWriter, r *http.Request, next http.Handler) {
		err := addWebhookAuthorization(r, client)
		if err != nil {
			log.WithError(err).Error("Failed to process webhook request")
			w.WriteHeader(403)
			// hide the message from the user, because it could help them attack us
			_, _ = w.Write([]byte(`{"message": "failed to process webhook request"}`))
		} else {
			next.ServeHTTP(w, r)
		}
	}
}
调用 addWebhookAuthorization 尝试添加认证信息。
go
func addWebhookAuthorization(r *http.Request, kube kubernetes.Interface) error {
	// try and exit quickly before we do anything API calls
	if r.Method != "POST" || len(r.Header["Authorization"]) > 0 || !strings.HasPrefix(r.URL.Path, pathPrefix) {
		return nil
	}
	parts := strings.SplitN(strings.TrimPrefix(r.URL.Path, pathPrefix), "/", 2)
	if len(parts) != 2 {
		return nil
	}
	namespace := parts[0]
	secretsInterface := kube.CoreV1().Secrets(namespace)
	ctx := r.Context()

	webhookClients, err := secretsInterface.Get(ctx, "argo-workflows-webhook-clients", metav1.GetOptions{})
	if err != nil {
		return fmt.Errorf("failed to get webhook clients: %w", err)
	}
	// we need to read the request body to check the signature, but we still need it for the GRPC request,
	// so read it all now, and then reinstate when we are done
	buf, _ := io.ReadAll(r.Body)
	defer func() { r.Body = io.NopCloser(bytes.NewBuffer(buf)) }()
	serviceAccountInterface := kube.CoreV1().ServiceAccounts(namespace)
	for serviceAccountName, data := range webhookClients.Data {
		r.Body = io.NopCloser(bytes.NewBuffer(buf))
		client := &webhookClient{}
		err := yaml.Unmarshal(data, client)
		if err != nil {
			return fmt.Errorf("failed to unmarshal webhook client \"%s\": %w", serviceAccountName, err)
		}
		log.WithFields(log.Fields{"serviceAccountName": serviceAccountName, "webhookType": client.Type}).Debug("Attempting to match webhook request")
		ok := webhookParsers[client.Type](client.Secret, r)
		if ok {
			log.WithField("serviceAccountName", serviceAccountName).Debug("Matched webhook request")
			serviceAccount, err := serviceAccountInterface.Get(ctx, serviceAccountName, metav1.GetOptions{})
			if err != nil {
				return fmt.Errorf("failed to get service account \"%s\": %w", serviceAccountName, err)
			}
			tokenSecret, err := secretsInterface.Get(ctx, secrets.TokenNameForServiceAccount(serviceAccount), metav1.GetOptions{})
			if err != nil {
				return fmt.Errorf("failed to get token secret \"%s\": %w", tokenSecret, err)
			}
			r.Header["Authorization"] = []string{"Bearer " + string(tokenSecret.Data["token"])}
			return nil
		}
	}
	return nil
}
具体流程如下:
- 首先判断了,只有 POST 方法,而且 Authorization 为空时才会自动添加。
- 然后就从 API 中指定的 Namespace 下查询名为 argo-workflows-webhook-clients 的 Secret。
- 最后就是循环对比,Secret 中的 type 和 secret 能否和当前请求匹配上,如果匹配上则把 data 对应的 key 做了 serviceaccount 名去查询 token 然后解析 token 做了 Authorization 使用。
第三步会直接使用 key 作为 serviceaccount,这也就是为什么配置argo-workflows-webhook-clients时需要把 serviceaccount 名称做为 key。
【ArgoWorkflow 系列】 持续更新中,搜索公众号【探索云原生】订阅,阅读更多文章。

5. 小结
本文主要分析了 Argo 中的 Workflow 的几种触发方式。
- 1)手动触发:手动创建 Workflow 对象方式触发流水线运行
- 2)定时触发:使用 CronWorkflow 根据 Cron 表达式自动创建 Workflow
- 3)Event:使用 argo-server 提供的 event api 配合WorkflowEventBinding 创建 Workflow
- 4)Webhook:该方式实则是 Event 方式的扩展,Event 方式请求时需要 Token 认证,Webhook 方式则通过
argo-workflows-webhook-clients配置好不同来源的 Webhook 使用的 Secret 以实现认证,这样就可以把 Event API 用作 Webhook 端点 配置到 Github、Gitlab 等环境了。