一、thread类
创建线程使用std::thread类
#include <iostream>
#include <thread> //必须包含<thread>头文件
void threadFunctionA()
{
std::cout << "Run New thread: 1" << std::endl;
}
void threadFunctionB(int n)
{
std::cout << "Run New thread: "<< n << std::endl;
}
int main()
{
std::cout << "Run Main Thread" << std::endl;
std::thread newThread1(threadFunctionA);
std::thread newThread2(threadFunctionB,2);
newThread1.join();
newThread2.join();
return 0;
}
thread 在传递参数时,是以右值传递 的,如果要传递一个左值可以使用std::ref和std::cref
std::ref可以包装按引用传递的值为右值。std::cref可以包装按const引用传递的值为右值。
#include <iostream>
#include <thread> //必须包含<thread>头文件
void threadFunc(int &arg1, int arg2)
{
arg1 = arg2;
std::cout << "New Thread arg1 = " << arg1 << std::endl;
}
int main()
{
std::cout << "Run Main Thread!" << std::endl;
int a = 1, b = 5;
std::thread newTh(threadFunc, std::ref(a), b); //使用ref
newTh.join();
return 0;
}

#include <iostream>
#include <thread>
#include <windows.h>
void foo()
{
std::cout << "Run New thread!\n";
Sleep(2000); //需要头文件<windows.h>
}
int main()
{
std::thread t(foo);
if (t.joinable())
{
t.join(); // 等待线程t执行完毕
// t.detach(); // 分离线程t与主线程
}
std::cout << "Run Main thread!\n";
return 0;
}
二、this_thread类

#include <iostream>
#include <thread>
#include <chrono>
void my_thread()
{
std::cout << "Thread " << std::this_thread::get_id() << " start!" << std::endl;
for (int i = 1; i <= 5; i++)
{
std::cout << "Thread " << std::this_thread::get_id() << " running: " << i << std::endl;
std::this_thread::yield(); // 让出当前线程的时间片
std::this_thread::sleep_for(std::chrono::milliseconds(200)); // 线程休眠200毫秒
}
std::cout << "Thread " << std::this_thread::get_id() << " end!" << std::endl;
}
int main()
{
std::cout << "Main thread id: " << std::this_thread::get_id() << std::endl;
std::thread t1(my_thread);
std::thread t2(my_thread);
t1.join();
t2.join();
return 0;
}
三、std::mutex
1、lock() 和 unlock()
#include <iostream>
#include <thread>
#include <mutex>
std::mutex mtx;
int num = 0;
void thread_function(int &n)
{
for (int i = 0; i < 100; ++i)
{
mtx.lock();
n++;
mtx.unlock();
}
}
int main()
{
std::thread myThread[500];
for (std::thread &a : myThread)
{
a = std::thread(thread_function, std::ref(num));
a.join();
}
std::cout << "num = " << num << std::endl;
std::cout << "Main thread exits!" << std::endl;
return 0;
}
2、lock_guard
std::lock_guard是C++标准库中的一个模板类,用于实现资源的自动加锁和解锁。它是基于RAII(资源获取即初始化)的设计理念,能够确保在作用域结束时自动释放锁资源,避免了手动管理锁的复杂性和可能出现的错误。
std::lock_guard的主要特点如下:
1)自动加锁: 在创建std::lock_guard对象时,会立即对指定的互斥量进行加锁操作。这样可以确保在进入作用域后,互斥量已经被锁定,避免了并发访问资源的竞争条件。
2)自动解锁:std::lock_guard对象在作用域结束时,会自动释放互斥量。无论作用域是通过正常的流程结束、异常抛出还是使用return语句提前返回,std::lock_guard都能保证互斥量被正确解锁,避免了资源泄漏和死锁的风险。
3)适用于局部锁定: 由于std::lock_guard是通过栈上的对象实现的,因此适用于在局部范围内锁定互斥量。当超出std::lock_guard对象的作用域时,互斥量会自动解锁,释放控制权。
示例代码:
#include <iostream>
#include <thread>
#include <mutex>
std::mutex mtx; // 互斥量
void thread_function()
{
std::lock_guard<std::mutex> lock(mtx); // 加锁互斥量
std::cout << "Thread running" << std::endl;
// 执行需要加锁保护的代码
} // lock_guard对象的析构函数自动解锁互斥量
int main()
{
std::thread t1(thread_function);
t1.join();
std::cout << "Main thread exits!" << std::endl;
return 0;
}
3、unique_lock
std::unique_lock 是C++标准库中的一个模板类,用于实现更加灵活的互斥量的加锁和解锁操作。它提供了比std::lock_guard更多的功能和灵活性。
std::unique_lock的主要特点如下:
- 自动加锁和解锁: 与std::lock_guard类似,std::unique_lock在创建对象时立即对指定的互斥量进行加锁操作,确保互斥量被锁定。在对象的生命周期结束时,会自动解锁互斥量。这种自动加锁和解锁的机制避免了手动管理锁的复杂性和可能出现的错误。
- 支持灵活的加锁和解锁: 相对于std::lock_guard的自动加锁和解锁,std::unique_lock提供了更灵活的方式。它可以在需要的时候手动加锁和解锁互斥量,允许在不同的代码块中对互斥量进行多次加锁和解锁操作。
- 支持延迟加锁和条件变量:std::unique_lock还支持延迟加锁的功能,可以在不立即加锁的情况下创建对象,稍后根据需要进行加锁操作。此外,它还可以与条件变量(std::condition_variable)一起使用,实现更复杂的线程同步和等待机制。
示例:
#include <iostream>
#include <thread>
#include <mutex>
std::mutex mtx; // 互斥量
void thread_function()
{
std::unique_lock<std::mutex> lock(mtx); // 加锁互斥量
std::cout << "Thread running" << std::endl;
// 执行需要加锁保护的代码
lock.unlock(); // 手动解锁互斥量
// 执行不需要加锁保护的代码
lock.lock(); // 再次加锁互斥量
// 执行需要加锁保护的代码
}
// unique_lock对象的析构函数自动解锁互斥量
int main()
{
std::thread t1(thread_function);
t1.join();
std::cout << "Main thread exits!" << std::endl;
return 0;
}
四、condition_variable
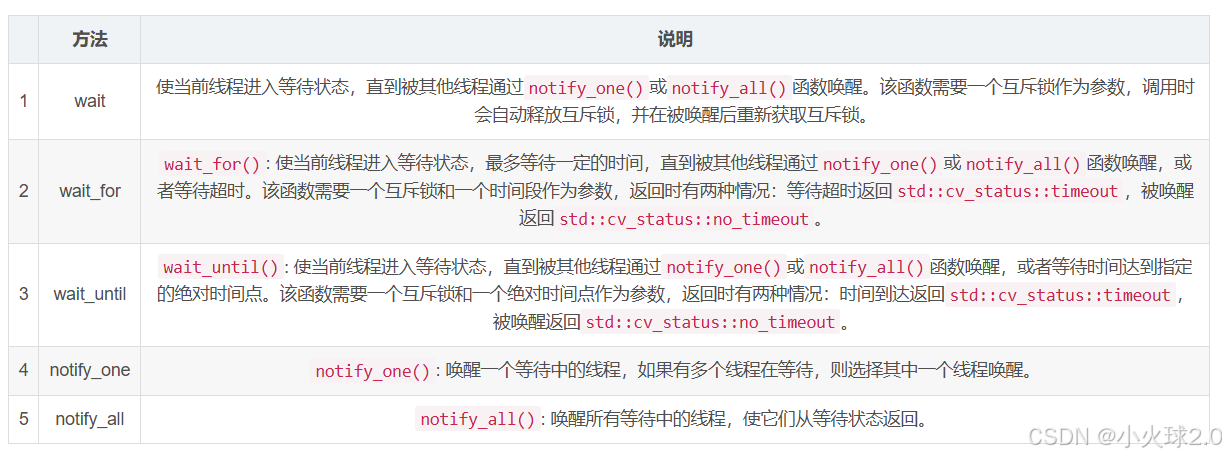
std::condition_variable 是C++标准库中的一个类,用于在多线程编程中实现线程间的条件变量和线程同步。它提供了等待 和通知的机制,使得线程可以等待某个条件成立时被唤醒,或者在满足某个条件时通知其他等待的线程。其提供了以下几个函数用于等待和通知线程:

示例:
#include <iostream>
#include <thread>
#include <condition_variable>
std::mutex mtx; // 互斥量
std::condition_variable cv; // 条件变量
bool isReady = false; // 条件
void thread_function()
{
std::unique_lock<std::mutex> lock(mtx);
while (!isReady)
{
cv.wait(lock); // 等待条件满足
}
std::cout << "Thread is notified" << std::endl;
}
int main()
{
std::thread t(thread_function);
// 模拟一段耗时操作
std::this_thread::sleep_for(std::chrono::seconds(2));
{
std::lock_guard<std::mutex> lock(mtx);
isReady = true; // 设置条件为true
}
cv.notify_one(); // 通知等待的线程
t.join();
return 0;
}
五、std::atomic
std::mutex可以很好地解决多线程资源争抢的问题,但它每次循环都要加锁、解锁,这样固然会浪费很多的时间。
在 C++ 中,std::atomic 是用来提供原子操作的类,atomic,本意为原子,原子操作是最小的且不可并行化的操作。这就意味着即使是多线程,也要像同步进行一样同步操作原子对象,从而省去了互斥量上锁、解锁的时间消耗。
使用 std::atomic 可以保证数据在操作期间不被其他线程修改,这样就避免了数据竞争,使得程序在多线程并发访问时仍然能够正确执行。
示例:
#include <iostream>
#include <thread>
#include <mutex>
#include <atomic> //必须包含
std::atomic_int num = 0;
void thread_function(std::atomic_int &n) //修改类型
{
for (int i = 0; i < 100; ++i)
{
n++;
}
}
int main()
{
std::thread myThread[500];
for (std::thread &a : myThread)
{
a = std::thread(thread_function, std::ref(num));
a.join();
}
std::cout << "num = " << num << std::endl;
std::cout << "Main thread exits!" << std::endl;
return 0;
}
