MedMamba原理和用于糖尿病视网膜病变检测尝试
1.MedMamba原理

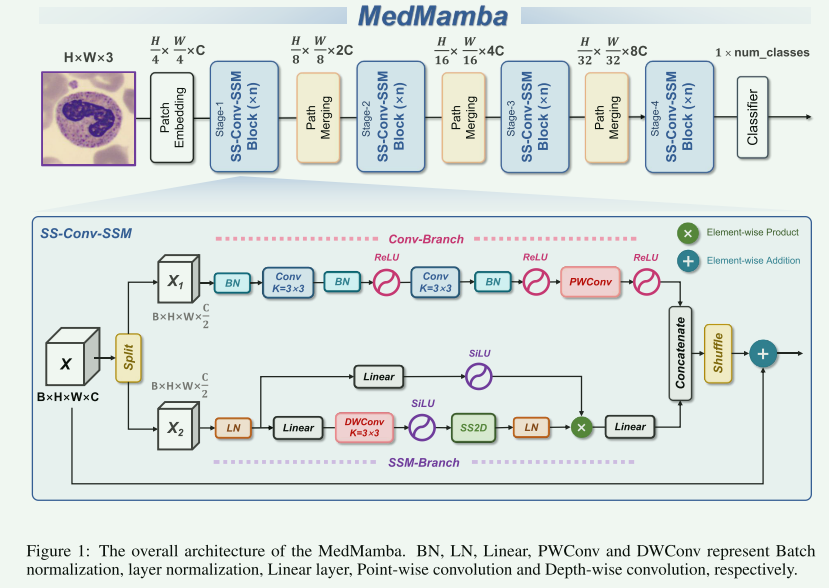
MedMamba发表于2024.9.28,是构建在Vision Mamba基础之上,融合了卷积神经网的架构,结构如下图:

原理简述就是图片输入后按通道输入后切分为两部分,一部分走二维分组卷积提取局部特征,一部分利用Vision Mamba中的SS2D模块提取所谓的全局特征,两个分支的输出通过通道维度的拼接后,经过channel shuffle增加信息融合。
2.代码解释
模型代码就在源码的MedMamba.py文件下,对涉及到的代码我进行了详细注释:
-
mamba部分
基本上是使用Vision Mamaba的SS2D:
Python
class SS2D(nn.Module):
    def __init__(
        self,
        d_model,
        d_state=16,
        # d_state="auto", # 20240109
        d_conv=3,
        expand=2,
        dt_rank="auto",
        dt_min=0.001,
        dt_max=0.1,
        dt_init="random",
        dt_scale=1.0,
        dt_init_floor=1e-4,
        dropout=0.,
        conv_bias=True,
        bias=False,
        device=None,
        dtype=None,
        **kwargs,
    ):
        # 设置设备和数据类型的关键参数
        factory_kwargs = {"device": device, "dtype": dtype}
        super().__init__()
        self.d_model = d_model # 模型维度
        self.d_state = d_state # 状态维度
        # self.d_state = math.ceil(self.d_model / 6) if d_state == "auto" else d_model # 20240109
        self.d_conv = d_conv # 卷积核的大小
        self.expand = expand  # 扩展因子
        self.d_inner = int(self.expand * self.d_model)  # 内部维度,等于模型维度乘以扩展因子
        # 时间步长的秩,默认为模型维度除以16
        self.dt_rank = math.ceil(self.d_model / 16) if dt_rank == "auto" else dt_rank
        # 输入投影层,将模型维度投影到内部维度的两倍,用于后续操作
        self.in_proj = nn.Linear(self.d_model, self.d_inner * 2, bias=bias, **factory_kwargs)
        # 深度卷积层,输入和输出通道数相同,组数等于内部维度,用于空间特征提取
        self.conv2d = nn.Conv2d(
            in_channels=self.d_inner,
            out_channels=self.d_inner,
            groups=self.d_inner,
            bias=conv_bias,
            kernel_size=d_conv,
            padding=(d_conv - 1) // 2, # 保证输出的空间维度与输入相同
            **factory_kwargs,
        )
        self.act = nn.SiLU() # 激活函数使用 SiLU
        # 定义多个线性投影层,将内部维度投影到不同大小的向量,用于时间步长和状态
        self.x_proj = (
            nn.Linear(self.d_inner, (self.dt_rank + self.d_state * 2), bias=False, **factory_kwargs),
            nn.Linear(self.d_inner, (self.dt_rank + self.d_state * 2), bias=False, **factory_kwargs),
            nn.Linear(self.d_inner, (self.dt_rank + self.d_state * 2), bias=False, **factory_kwargs),
            nn.Linear(self.d_inner, (self.dt_rank + self.d_state * 2), bias=False, **factory_kwargs),
        )
        # 将四个线性投影层的权重合并为一个参数,方便计算
        self.x_proj_weight = nn.Parameter(torch.stack([t.weight for t in self.x_proj], dim=0)) # (K=4, N, inner)
        # 删除单独的投影层以节省内存
        del self.x_proj
        # 初始化时间步长的线性投影,定义四组时间步长投影参数
        self.dt_projs = (
            self.dt_init(self.dt_rank, self.d_inner, dt_scale, dt_init, dt_min, dt_max, dt_init_floor, **factory_kwargs),
            self.dt_init(self.dt_rank, self.d_inner, dt_scale, dt_init, dt_min, dt_max, dt_init_floor, **factory_kwargs),
            self.dt_init(self.dt_rank, self.d_inner, dt_scale, dt_init, dt_min, dt_max, dt_init_floor, **factory_kwargs),
            self.dt_init(self.dt_rank, self.d_inner, dt_scale, dt_init, dt_min, dt_max, dt_init_floor, **factory_kwargs),
        )
        # 将时间步长的权重和偏置参数合并为可训练参数
        self.dt_projs_weight = nn.Parameter(torch.stack([t.weight for t in self.dt_projs], dim=0)) # (K=4, inner, rank)
        self.dt_projs_bias = nn.Parameter(torch.stack([t.bias for t in self.dt_projs], dim=0)) # (K=4, inner)
        del self.dt_projs
        # 初始化 S4D 的 A 参数,用于状态更新计算
        self.A_logs = self.A_log_init(self.d_state, self.d_inner, copies=4, merge=True) # (K=4, D, N)
        # 初始化 D 参数,用于跳跃连接的计算
        self.Ds = self.D_init(self.d_inner, copies=4, merge=True) # (K=4, D, N)
        # 选择核心的前向计算函数版本,默认为 forward_corev0
        # self.selective_scan = selective_scan_fn
        self.forward_core = self.forward_corev0
        # 输出层的层归一化,归一化到内部维度
        self.out_norm = nn.LayerNorm(self.d_inner)
        # 输出投影层,将内部维度投影回原始模型维度
        self.out_proj = nn.Linear(self.d_inner, self.d_model, bias=bias, **factory_kwargs)
        # 设置 dropout 层,如果 dropout 参数大于 0,则应用随机失活以防止过拟合
        self.dropout = nn.Dropout(dropout) if dropout > 0. else None

    @staticmethod
    def dt_init(dt_rank, d_inner, dt_scale=1.0, dt_init="random", dt_min=0.001, dt_max=0.1, dt_init_floor=1e-4, **factory_kwargs):
        dt_proj = nn.Linear(dt_rank, d_inner, bias=True, **factory_kwargs)
        # 初始化用于时间步长计算的线性投影层
        # Initialize special dt projection to preserve variance at initialization
        # 特殊初始化方法,用于保持初始化时的方差不变
        dt_init_std = dt_rank**-0.5 * dt_scale
        if dt_init == "constant": # 初始化为常数
            nn.init.constant_(dt_proj.weight, dt_init_std)
        elif dt_init == "random": # 初始化为均匀随机数
            nn.init.uniform_(dt_proj.weight, -dt_init_std, dt_init_std)
        else:
            raise NotImplementedError

        # Initialize dt bias so that F.softplus(dt_bias) is between dt_min and dt_max
        # 初始化偏置,以便在使用 F.softplus 时,结果处于 dt_min 和 dt_max 之间
        dt = torch.exp(
            torch.rand(d_inner, **factory_kwargs) * (math.log(dt_max) - math.log(dt_min))
            + math.log(dt_min)
        ).clamp(min=dt_init_floor)
        # Inverse of softplus: https://github.com/pytorch/pytorch/issues/72759
        # softplus 的逆操作,确保偏置初始化在合适范围内
        inv_dt = dt + torch.log(-torch.expm1(-dt))
        with torch.no_grad():
            dt_proj.bias.copy_(inv_dt)  # 设置偏置参数
        # Our initialization would set all Linear.bias to zero, need to mark this one as _no_reinit
        dt_proj.bias._no_reinit = True # 将该偏置标记为不重新初始化

return dt_proj-
SS_Conv_SSM
这部分就是论文提出的创新点,图片中的结构
Pythonclass SS_Conv_SSM(nn.Module): def __init__( self, hidden_dim: int = 0, drop_path: float = 0, norm_layer: Callable[..., torch.nn.Module] = partial(nn.LayerNorm, eps=1e-6), attn_drop_rate: float = 0, d_state: int = 16, **kwargs, ): super().__init__() # 初始化第一个归一化层,归一化的维度是隐藏维度的一半 self.ln_1 = norm_layer(hidden_dim//2) # 初始化自注意力模块 SS2D,输入维度为隐藏维度的一半 self.self_attention = SS2D(d_model=hidden_dim//2, dropout=attn_drop_rate, d_state=d_state, **kwargs) # DropPath 层,用于随机丢弃路径,提高模型的泛化能力 self.drop_path = DropPath(drop_path) # 定义卷积模块,由多个卷积层和批量归一化层组成,用于特征提取 self.conv33conv33conv11 = nn.Sequential( nn.BatchNorm2d(hidden_dim // 2), nn.Conv2d(in_channels=hidden_dim//2,out_channels=hidden_dim//2,kernel_size=3,stride=1,padding=1), nn.BatchNorm2d(hidden_dim//2), nn.ReLU(), nn.Conv2d(in_channels=hidden_dim // 2, out_channels=hidden_dim // 2, kernel_size=3, stride=1, padding=1), nn.BatchNorm2d(hidden_dim // 2), nn.ReLU(), nn.Conv2d(in_channels=hidden_dim // 2, out_channels=hidden_dim // 2, kernel_size=1, stride=1), nn.ReLU() ) # 注释掉的最终卷积层,可能用于进一步调整输出维度 # self.finalconv11 = nn.Conv2d(in_channels=hidden_dim, out_channels=hidden_dim, kernel_size=1, stride=1) def forward(self, input: torch.Tensor): # 将输入张量沿最后一个维度分割为左右两部分 input_left, input_right = input.chunk(2,dim=-1) # 对右侧输入进行归一化和自注意力操作,之后应用 DropPath 随机丢弃 x = self.drop_path(self.self_attention(self.ln_1(input_right))) # 将左侧输入从 (batch_size, height, width, channels) # 转换为 (batch_size, channels, height, width) 以适应卷积操作 input_left = input_left.permute(0,3,1,2).contiguous() input_left = self.conv33conv33conv11(input_left) # 将卷积后的左侧输入转换回原来的形状 (batch_size, height, width, channels) input_left = input_left.permute(0,2,3,1).contiguous() # 将左侧和右侧的输出在最后一个维度上拼接起来 output = torch.cat((input_left,x),dim=-1) # 对拼接后的输出进行通道混洗,增加特征的融合 output = channel_shuffle(output,groups=2) # 返回最终的输出,增加残差连接,将输入与输出相加 return output+input -
VSSLayer
有以上结构堆叠构成网络结构
Pythonclass VSSLayer(nn.Module): """ A basic Swin Transformer layer for one stage. Args: dim (int): Number of input channels. depth (int): Number of blocks. drop (float, optional): Dropout rate. Default: 0.0 attn_drop (float, optional): Attention dropout rate. Default: 0.0 drop_path (float | tuple[float], optional): Stochastic depth rate. Default: 0.0 norm_layer (nn.Module, optional): Normalization layer. Default: nn.LayerNorm downsample (nn.Module | None, optional): Downsample layer at the end of the layer. Default: None use_checkpoint (bool): Whether to use checkpointing to save memory. Default: False. """ def __init__( self, dim, depth, attn_drop=0., drop_path=0., norm_layer=nn.LayerNorm, downsample=None, use_checkpoint=False, d_state=16, **kwargs, ): super().__init__() # 设置输入通道数 self.dim = dim # 是否使用检查点 self.use_checkpoint = use_checkpoint # 创建 SS_Conv_SSM 块列表,数量为 depth self.blocks = nn.ModuleList([ SS_Conv_SSM( hidden_dim=dim, # 隐藏层维度等于输入维度 # 处理随机深度的丢弃率 drop_path=drop_path[i] if isinstance(drop_path, list) else drop_path, norm_layer=norm_layer, # 使用的归一化层 attn_drop_rate=attn_drop, # 注意力丢弃率 d_state=d_state, # 状态维度 ) for i in range(depth)]) # 重复 depth 次构建块 # 初始化权重 (暂时没有真正初始化,可能在后续被重写) # 确保这一初始化应用于模型 (在 VSSM 中被覆盖) if True: # is this really applied? Yes, but been overriden later in VSSM! # 对每个模块的参数进行初始化 def _init_weights(module: nn.Module): for name, p in module.named_parameters(): if name in ["out_proj.weight"]: # 克隆并分离参数 p,用于保持随机数种子一致 p = p.clone().detach_() # fake init, just to keep the seed .... # 使用 Kaiming 均匀初始化方法 nn.init.kaiming_uniform_(p, a=math.sqrt(5)) # 应用初始化函数到整个模型 self.apply(_init_weights) # 如果提供了下采样层,则使用该层,否则设置为 None if downsample is not None: self.downsample = downsample(dim=dim, norm_layer=norm_layer) else: self.downsample = None def forward(self, x): # 逐块应用 SS_Conv_SSM 模块 for blk in self.blocks: # 如果使用检查点,则通过检查点执行前向传播,节省内存 if self.use_checkpoint: x = checkpoint.checkpoint(blk, x) else: # 否则直接进行前向传播 x = blk(x) # 如果存在下采样层,则应用下采样层 if self.downsample is not None: x = self.downsample(x) # 返回最终的输出张量 return x -
最终的网络模型类
Pythonclass VSSM(nn.Module): def __init__(self, patch_size=4, in_chans=3, num_classes=1000, depths=[2, 2, 4, 2], depths_decoder=[2, 9, 2, 2], dims=[96,192,384,768], dims_decoder=[768, 384, 192, 96], d_state=16, drop_rate=0., attn_drop_rate=0., drop_path_rate=0.1, norm_layer=nn.LayerNorm, patch_norm=True, use_checkpoint=False, **kwargs): super().__init__() self.num_classes = num_classes # 设置分类的类别数目 self.num_layers = len(depths) # 设置层的数量,即编码器层的数量 # 如果 dims 是一个整数,则自动扩展为一个包含每一层维度的列表 if isinstance(dims, int): dims = [int(dims * 2 ** i_layer) for i_layer in range(self.num_layers)] self.embed_dim = dims[0] # 嵌入维度等于第一层的维度 self.num_features = dims[-1] # 特征维度等于最后一层的维度 self.dims = dims # 记录每一层的维度 # 初始化补丁嵌入模块,将输入图像分割成补丁并进行线性投影 self.patch_embed = PatchEmbed2D(patch_size=patch_size, in_chans=in_chans, embed_dim=self.embed_dim, norm_layer=norm_layer if patch_norm else None) # WASTED absolute position embedding ====================== # 是否使用绝对位置编码,默认情况下不使用 self.ape = False # self.ape = False # drop_rate = 0.0 # 如果使用绝对位置编码,则初始化位置编码参数 if self.ape: self.patches_resolution = self.patch_embed.patches_resolution # 创建位置编码的可训练参数,并进行截断正态分布初始化 self.absolute_pos_embed = nn.Parameter(torch.zeros(1, *self.patches_resolution, self.embed_dim)) trunc_normal_(self.absolute_pos_embed, std=.02) # 位置编码的 Dropout 层 self.pos_drop = nn.Dropout(p=drop_rate) # 使用线性函数生成每层的随机深度丢弃率 dpr = [x.item() for x in torch.linspace(0, drop_path_rate, sum(depths))] # 随机深度衰减规则 # 解码器部分的随机深度衰减 dpr_decoder = [x.item() for x in torch.linspace(0, drop_path_rate, sum(depths_decoder))][::-1] # 初始化编码器的层列表 self.layers = nn.ModuleList() for i_layer in range(self.num_layers): # 创建每一层的 VSSLayer layer = VSSLayer( dim=dims[i_layer], # 输入维度 depth=depths[i_layer], # 当前层包含的块数量 d_state=math.ceil(dims[0] / 6) if d_state is None else d_state, # 状态维度 drop=drop_rate, # Dropout率 attn_drop=attn_drop_rate, # 注意力 Dropout率 # 当前层的随机深度丢弃率 drop_path=dpr[sum(depths[:i_layer]):sum(depths[:i_layer + 1])], # 归一化层类型 norm_layer=norm_layer, # 下采样层,最后一层不进行下采样 downsample=PatchMerging2D if (i_layer < self.num_layers - 1) else None, # 是否使用检查点技术节省内存 use_checkpoint=use_checkpoint, ) # 将层添加到层列表中 self.layers.append(layer) # self.norm = norm_layer(self.num_features) # 平均池化层,用于将特征池化为单个值 self.avgpool = nn.AdaptiveAvgPool2d(1) # 分类头部,使用线性层将特征映射到类别数目 self.head = nn.Linear(self.num_features, num_classes) if num_classes > 0 else nn.Identity() # 初始化模型权重 self.apply(self._init_weights) # 对模型中的卷积层进行 Kaiming 正态分布初始化 for m in self.modules(): if isinstance(m, nn.Conv2d): nn.init.kaiming_normal_(m.weight, mode='fan_out', nonlinearity='relu') def _init_weights(self, m: nn.Module): """ out_proj.weight which is previously initilized in SS_Conv_SSM, would be cleared in nn.Linear no fc.weight found in the any of the model parameters no nn.Embedding found in the any of the model parameters so the thing is, SS_Conv_SSM initialization is useless Conv2D is not intialized !!! """ # 对线性层和归一化层进行权重初始化 if isinstance(m, nn.Linear): # 对线性层的权重使用截断正态分布初始化 trunc_normal_(m.weight, std=.02) # 如果存在偏置,则将其初始化为 0 if isinstance(m, nn.Linear) and m.bias is not None: nn.init.constant_(m.bias, 0) elif isinstance(m, nn.LayerNorm): # 对 LayerNorm 层的偏置和权重初始化 nn.init.constant_(m.bias, 0) nn.init.constant_(m.weight, 1.0) @torch.jit.ignore def no_weight_decay(self): # 返回不需要权重衰减的参数名 return {'absolute_pos_embed'} @torch.jit.ignore def no_weight_decay_keywords(self): # 返回不需要权重衰减的关键字 return {'relative_position_bias_table'} def forward_backbone(self, x): # 使用补丁嵌入模块处理输入张量 x = self.patch_embed(x) if self.ape: # 如果使用绝对位置编码,则将位置编码加到输入特征上 x = x + self.absolute_pos_embed # 位置编码之后应用 Dropout x = self.pos_drop(x) # 逐层通过编码器层 for layer in self.layers: x = layer(x) return x def forward(self, x): # 通过骨干网络提取特征 x = self.forward_backbone(x) # 变换维度以适应池化操 x = x.permute(0,3,1,2) # 使用自适应平均池化将特征降维 x = self.avgpool(x) # 展平成一个向量 x = torch.flatten(x,start_dim=1) # 通过分类头进行最终的类别预测 x = self.head(x) return x作者在原文中尝试了大中小三个不同的参数版本
pythonmedmamba_t = VSSM(depths=[2, 2, 4, 2],dims=[96,192,384,768],num_classes=6).to("cuda") medmamba_s = VSSM(depths=[2, 2, 8, 2],dims=[96,192,384,768],num_classes=6).to("cuda") medmamba_b = VSSM(depths=[2, 2, 12, 2],dims=[128,256,512,1024],num_classes=6).to("cuda")总体论文原理比较简单,但是论文实验做得很扎实,感兴趣查看原文。
3.在糖尿病视网膜数据上实验一下效果
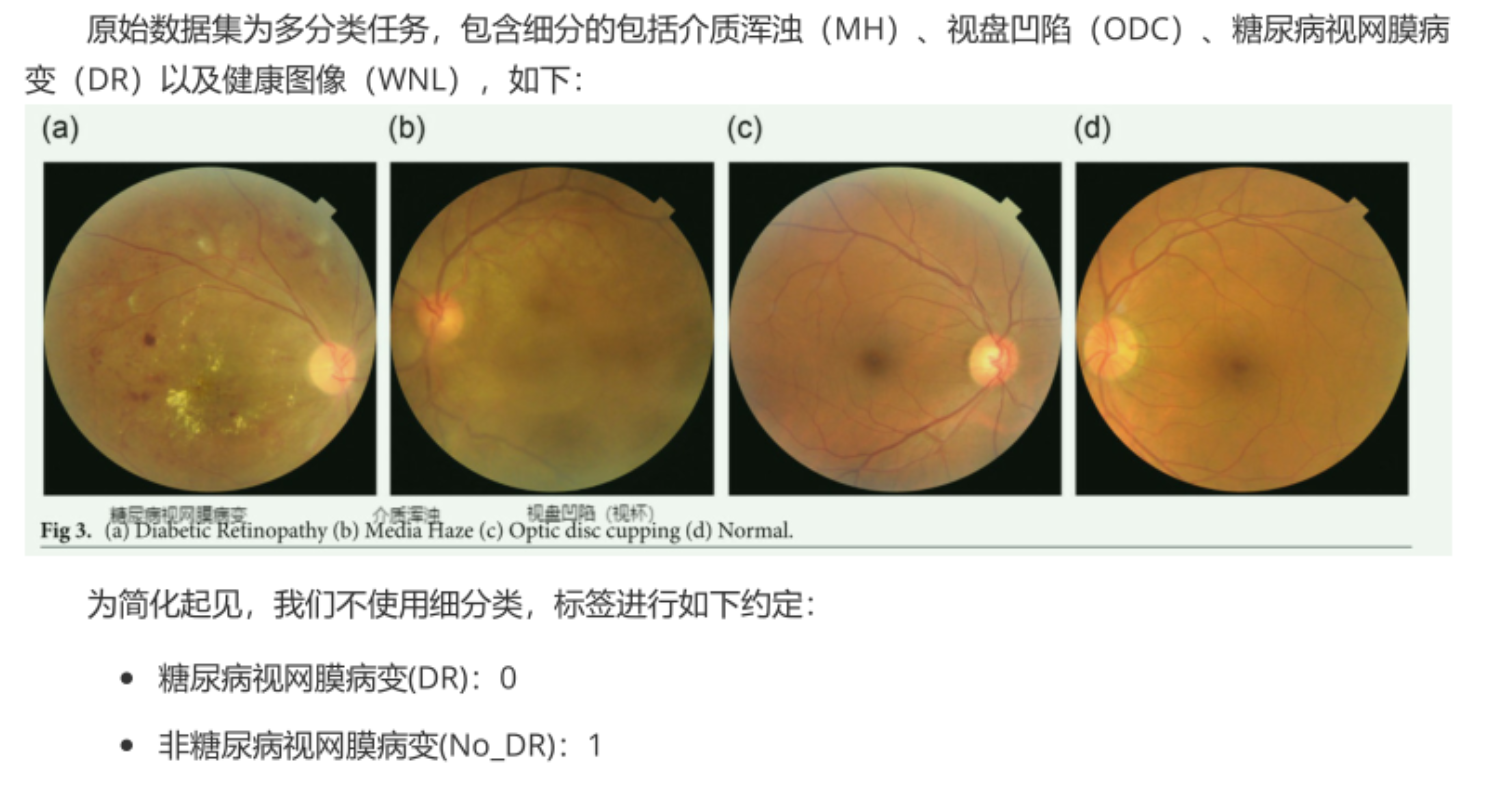
数据集情况
采用开源的retino_data糖尿病视网膜病变数据集:

环境安装
这部分主要是vision mamba的环境安装不要出错,参考官方Github会有问题:
-
Python 3.10.13
conda create -n vim python=3.10.13
-
torch 2.1.1 + cu118
pip install torch==2.1.1 torchvision==0.16.1 torchaudio==2.1.1 --index-url https://download.pytorch.org/whl/cu118
-
Requirements: vim_requirements.txt
pip install -r vim/vim_requirements.txt
-
pip install causal_conv1d-1.1.3.post1+cu118torch2.1cxx11abiFALSE-cp310-cp310-linux_x86_64.whl
-
pip install mamba_ssm-1.1.1+cu118torch2.1cxx11abiFALSE-cp310-cp310-linux_x86_64.whl
-
然后用官方项目里的mamba_ssm替换安装在conda环境里的mamba_ssm
-
用conda env list 查看刚才安装的mamba环境的路径,我的mamba环境在/home/aic/anaconda3/envs/vim
-
用官方项目里的mamba_ssm替换安装在conda环境里的mamba_ssm
cp -rf mamba-1p1p1/mamba_ssm /home/aic/anaconda3/envs/vim/lib/python3.10/site-packages
-
代码编写
编写一个检查数据集均值和方差的代码,不用Imagenet的:
python
# -*- coding: utf-8 -*-
# 作者: cskywit
# 文件名: mean_std.py
# 创建时间: 2024-10-07
# 文件描述:计算数据集的均值和方差


# 导入必要的库
from torchvision.datasets import ImageFolder
import torch
from torchvision import transforms

# 定义函数get_mean_and_std,用于计算训练数据集的均值和标准差
def get_mean_and_std(train_data):
  # 创建DataLoader,用于批量加载数据
  train_loader = torch.utils.data.DataLoader(
      train_data, batch_size=1, shuffle=False, num_workers=0,
      pin_memory=True)
  # 初始化均值和标准差
  mean = torch.zeros(3)
  std = torch.zeros(3)
  # 遍历数据集中的每个批次
  for X, _ in train_loader:
      # 遍历RGB三个通道
      for d in range(3):
          # 计算每个通道的均值和标准差
          mean[d] += X[:, d, :, :].mean()
          std[d] += X[:, d, :, :].std()
  # 计算最终的均值和标准差
  mean.div_(len(train_data))
  std.div_(len(train_data))
  # 返回均值和标准差列表
  return list(mean.numpy()), list(std.numpy())

# 判断是否为主程序
if __name__ == '__main__':
  root_path = '/home/aic/deep_learning_data/retino_data/train'
  # 使用ImageFolder加载训练数据集
  train_dataset = ImageFolder(root=root_path, transform=transforms.ToTensor())
  # 打印训练数据集的均值和标准差
  print(get_mean_and_std(train_dataset))
  # ([0.41586006, 0.22244255, 0.07565845],
  # [0.23795983, 0.13206834, 0.05284985])
然后编写train
python
# -*- coding: utf-8 -*-
# 作者: cskywit
# 文件名: train_DR.py
# 创建时间: 2024-10-10
# 文件描述:
import torch
import torch.nn as nn
from torchvision import transforms, datasets
import torch.optim as optim
from tqdm import tqdm

from MedMamba import VSSM as medmamba # import model
import warnings
import os,sys


warnings.filterwarnings("ignore")
os.environ['CUDA_VISIBLE_DEVICES']="0"

# 设置随机因子
def seed_everything(seed=42):
  os.environ['PYHTONHASHSEED'] = str(seed)
  torch.manual_seed(seed)
  torch.cuda.manual_seed(seed)
  torch.backends.cudnn.deterministic = True

def main():
  # 设置随机因子
  seed_everything()
  # 一些超参数设定
  num_classes = 2
  BATCH_SIZE = 64
  num_of_workers = min([os.cpu_count(), BATCH_SIZE if BATCH_SIZE > 1 else 0, 8])  # number of workers
  device = torch.device("cuda:0" if torch.cuda.is_available() else "cpu")
  epochs = 300
  best_acc = 0.0
  save_path = './{}.pth'.format('bestmodel')
  # 数据预处理
  transform = transforms.Compose([
      transforms.RandomRotation(10),
      transforms.GaussianBlur(kernel_size=(5, 5), sigma=(0.1, 3.0)),
      transforms.ColorJitter(brightness=0.5, contrast=0.5, saturation=0.5),
      transforms.Resize((224, 224)),
      transforms.ToTensor(),
      transforms.Normalize(mean=[0.41593555, 0.22245076, 0.075719066],
                           std=[0.23819199, 0.13202211, 0.05282707])

  ])
  transform_test = transforms.Compose([
      transforms.Resize((224, 224)),
      transforms.ToTensor(),
      transforms.Normalize(mean=[0.41593555, 0.22245076, 0.075719066],
                           std=[0.23819199, 0.13202211, 0.05282707])
  ])
  # 加载数据集
  root_path = '/home/aic/deep_learning_data/retino_data'
  train_path = os.path.join(root_path, 'train')
  valid_path = os.path.join(root_path, 'valid')
  test_path = os.path.join(root_path, 'test')
  dataset_train = datasets.ImageFolder(train_path, transform=transform)
  dataset_valid = datasets.ImageFolder(valid_path, transform=transform_test)
  dataset_test = datasets.ImageFolder(test_path, transform=transform_test)
  class_labels = {0: 'Diabetic Retinopathy', 1: 'No Diabetic Retinopathy'}
  val_num = len(dataset_valid)

  train_loader = torch.utils.data.DataLoader(dataset_train, batch_size=BATCH_SIZE,
                                             num_workers=num_of_workers,
                                             shuffle=True,
                                             drop_last=True)
  valid_loader = torch.utils.data.DataLoader(dataset_valid,
                                             batch_size=BATCH_SIZE,
                                             num_workers=num_of_workers,
                                             shuffle=False,
                                             drop_last=True)
  test_loader = torch.utils.data.DataLoader(dataset_test,
                                            batch_size=BATCH_SIZE,
                                            shuffle=False)
  print('Using {} dataloader workers every process'.format(num_of_workers))

  # 模型定义
  net = medmamba(num_classes=num_classes).to(device)
  loss_function = nn.CrossEntropyLoss()
  optimizer = optim.Adam(net.parameters(), lr=0.0001)
  train_steps = len(train_loader)

  for epoch in range(epochs):
      # train
      net.train()
      running_loss = 0.0
      train_bar = tqdm(train_loader, file=sys.stdout)
      for step, data in enumerate(train_bar):
          images, labels = data
          optimizer.zero_grad()
          outputs = net(images.to(device))
          loss = loss_function(outputs, labels.to(device))
          loss.backward()
          optimizer.step()

          # print statistics
          running_loss += loss.item()

          train_bar.desc = "train epoch[{}/{}] loss:{:.3f}".format(epoch + 1,
                                                                   epochs,
                                                                   loss)

      # validate
      net.eval()
      acc = 0.0  # accumulate accurate number / epoch
      with torch.no_grad():
          val_bar = tqdm(valid_loader, file=sys.stdout)
          for val_data in val_bar:
              val_images, val_labels = val_data
              outputs = net(val_images.to(device))
              predict_y = torch.max(outputs, dim=1)[1]
              acc += torch.eq(predict_y, val_labels.to(device)).sum().item()

      val_accurate = acc / val_num
      print('[epoch %d] train_loss: %.3f  val_accuracy: %.3f' %
            (epoch + 1, running_loss / train_steps, val_accurate))

      if val_accurate > best_acc:
          best_acc = val_accurate
          torch.save(net.state_dict(), save_path)

  print('Finished Training')

if __name__ == '__main__':
  main()
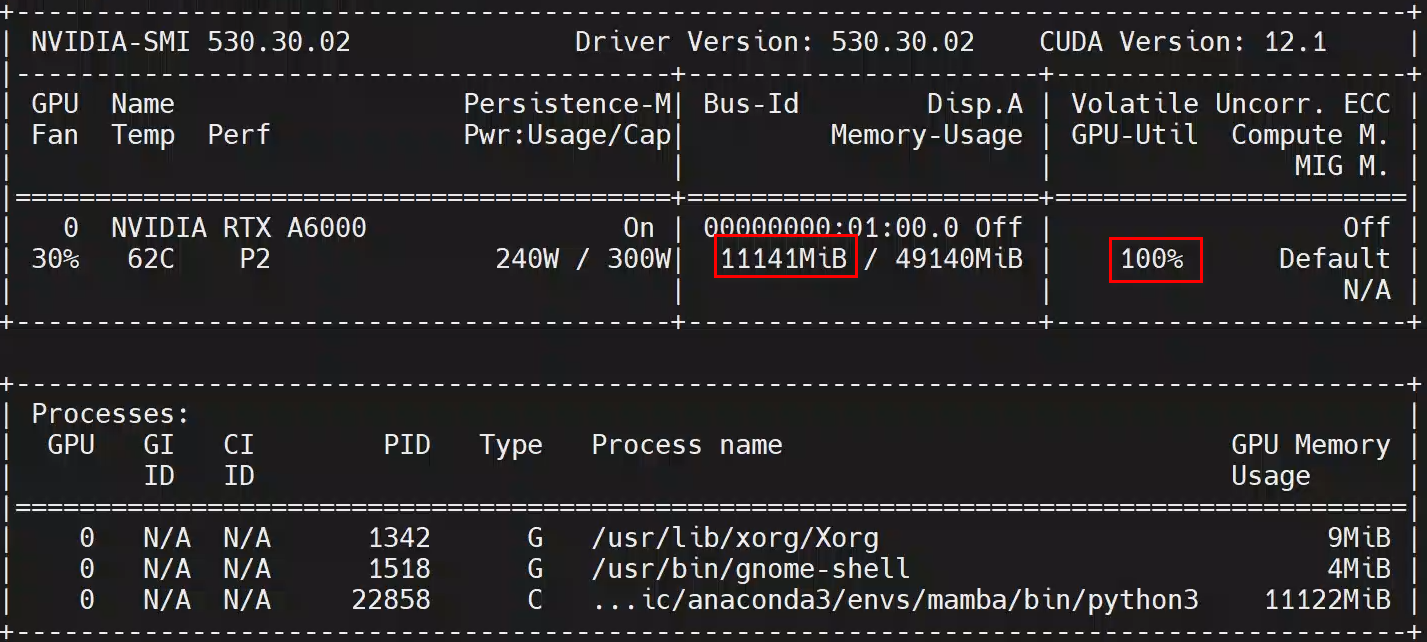
感觉Mamaba系列的通病了吧,显存占用不算高,GPU利用率超高:

可能是没有用任何的训练调参技巧,经过几个epoch后,验证集准确率很快提升到了92.3%,然后就没有继续上升了。