这是我的第366篇原创文章。
一、引言
前面我介绍了单变量时序预测和多变量时序预测,都是回归任务。
相关链接:
本文将介绍时序分类任务-基于LSTM模型进行时序数据二分类。
二、实现过程
2.1 准备数据
python
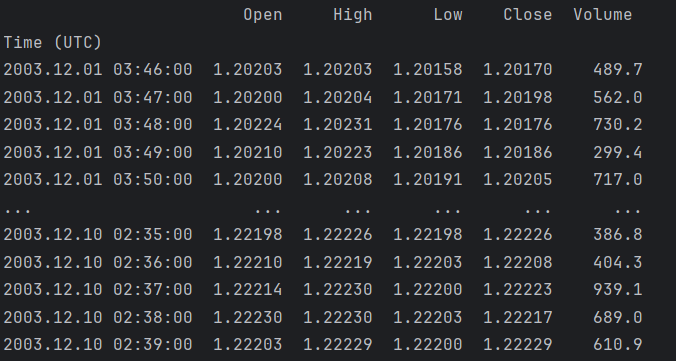
df1 = pd.read_table("train-small.txt",sep=',',header=0)
df1 = df1.iloc[:10000,:]
# 将Time (UTC)列设置为索引
df1.set_index('Time (UTC)', inplace=True)
df1:
2.2 归一化
python
min_max_scaler = preprocessing.MinMaxScaler()
df0 = min_max_scaler.fit_transform(df1)
df1 = pd.DataFrame(df0, columns=df1.columns)
2.3 构造标签列
计算close的变化,构造label:
python
record=(df1['Close'][1:].values-df1['Close'][0:-1].values)>0
classification=[0]
for i in record:
    if(i==True):
        classification.append(1)
    else:
        classification.append(0)

df1['label']=classification
df1.insert(0, 'label', df1.pop('label'))
fea_num = len(df1.columns)
print(df1)
df1:

2.4 数据划分
8比2划分数据集:
python
df = df1
test_split = round(len(df)*0.20)
print(test_split)
df_for_training=df[:-test_split]
df_for_testing=df[-test_split:]
df_for_training=df_for_training.values
df_for_testing=df_for_testing.values
2.5 数据转换
设置滑动窗口为2:
python
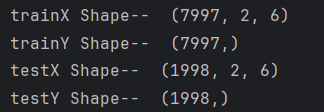
window_size = 2
trainX,trainY=createXY(df_for_training,window_size)
testX,testY=createXY(df_for_testing,window_size)

# 将数据集转换为 LSTM 模型所需的形状(样本数,时间步长,特征数)
trainX = np.reshape(trainX, (trainX.shape[0], window_size, fea_num))
testX = np.reshape(testX, (testX.shape[0], window_size, fea_num))

print("trainX Shape-- ",trainX.shape)
print("trainY Shape-- ",trainY.shape)
print("testX Shape-- ",testX.shape)
print("testY Shape-- ",testY.shape)
数据形状:
2.6 模型训练
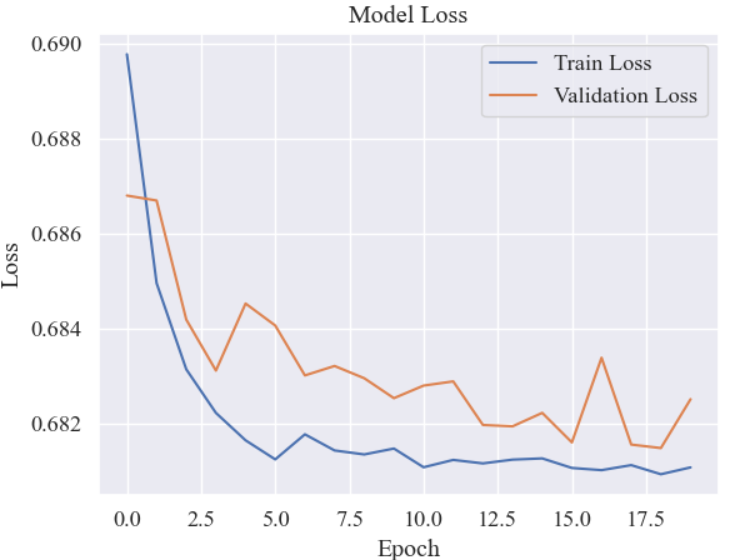
建立LSTM模型,进行训练:
python
model = Sequential()
model.add(LSTM(64, input_shape=(window_size, fea_num), return_sequences=False))
model.add(Dropout(0.01))
model.add(Dense(32, activation='relu'))
model.add(Dense(1, activation='sigmoid'))
model.compile(loss='binary_crossentropy',optimizer='adam',metrics=['accuracy'])
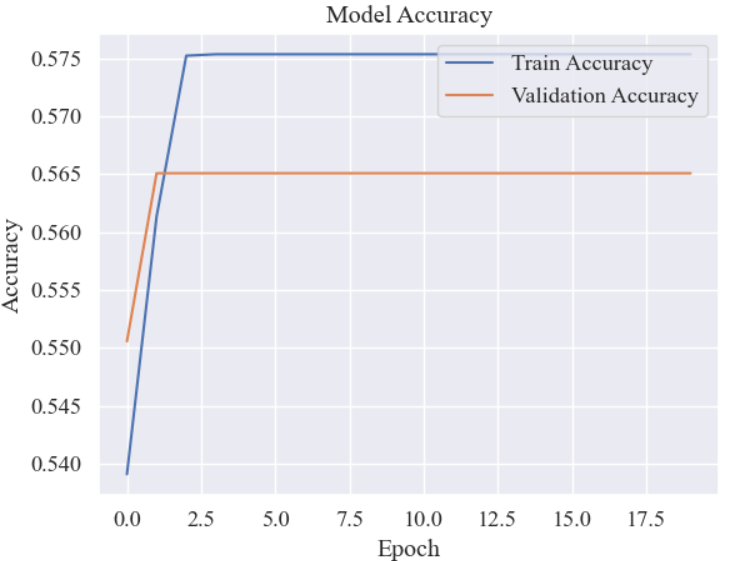
history = model.fit(trainX, trainY, epochs = 20, batch_size = 200,validation_data=(testX, testY))迭代loss曲线:
迭代accuracy曲线:
2.7 模型评估
python
y_test_predict=model.predict(testX)
y_test_predict=y_test_predict[:,0]
print(y_test_predict)
print(y_test_predict>0.5)
y_test_predict=[int(i) for i in y_test_predict>0.5]
y_test_predict=np.array(y_test_predict)
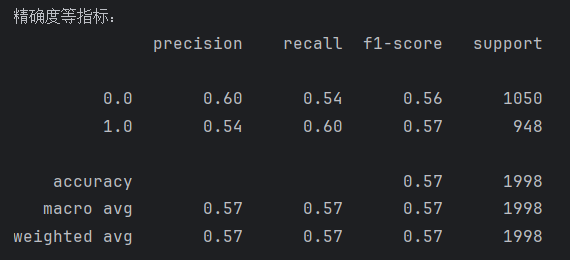
print("精确度等指标:")
print(metrics.classification_report(testY,y_test_predict))classification_report:
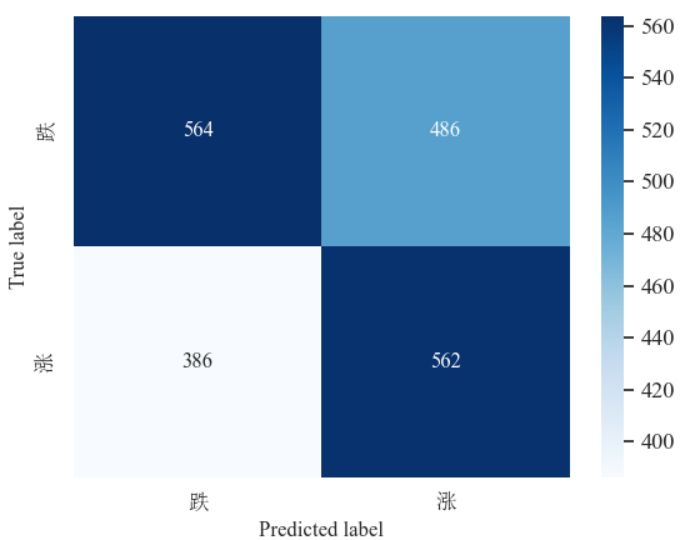
混淆矩阵:
作者简介:
读研期间发表6篇SCI数据挖掘相关论文,现在某研究院从事数据算法相关科研工作,结合自身科研实践经历不定期分享关于Python、机器学习、深度学习、人工智能系列基础知识与应用案例。致力于只做原创,以最简单的方式理解和学习,关注我一起交流成长。需要数据集和源码的小伙伴可以关注底部公众号添加作者微信。