1."名不符实"的Window类
Window 是一个窗口的概念,是所有视图的载体,不管是 Activity,Dialog,还是 Toast,他们的视图都是附加在 Window 上面的。例如在桌面显示一个悬浮窗,就需要用到 Window 来实现。WindowManager 是访问 Window 的入口。
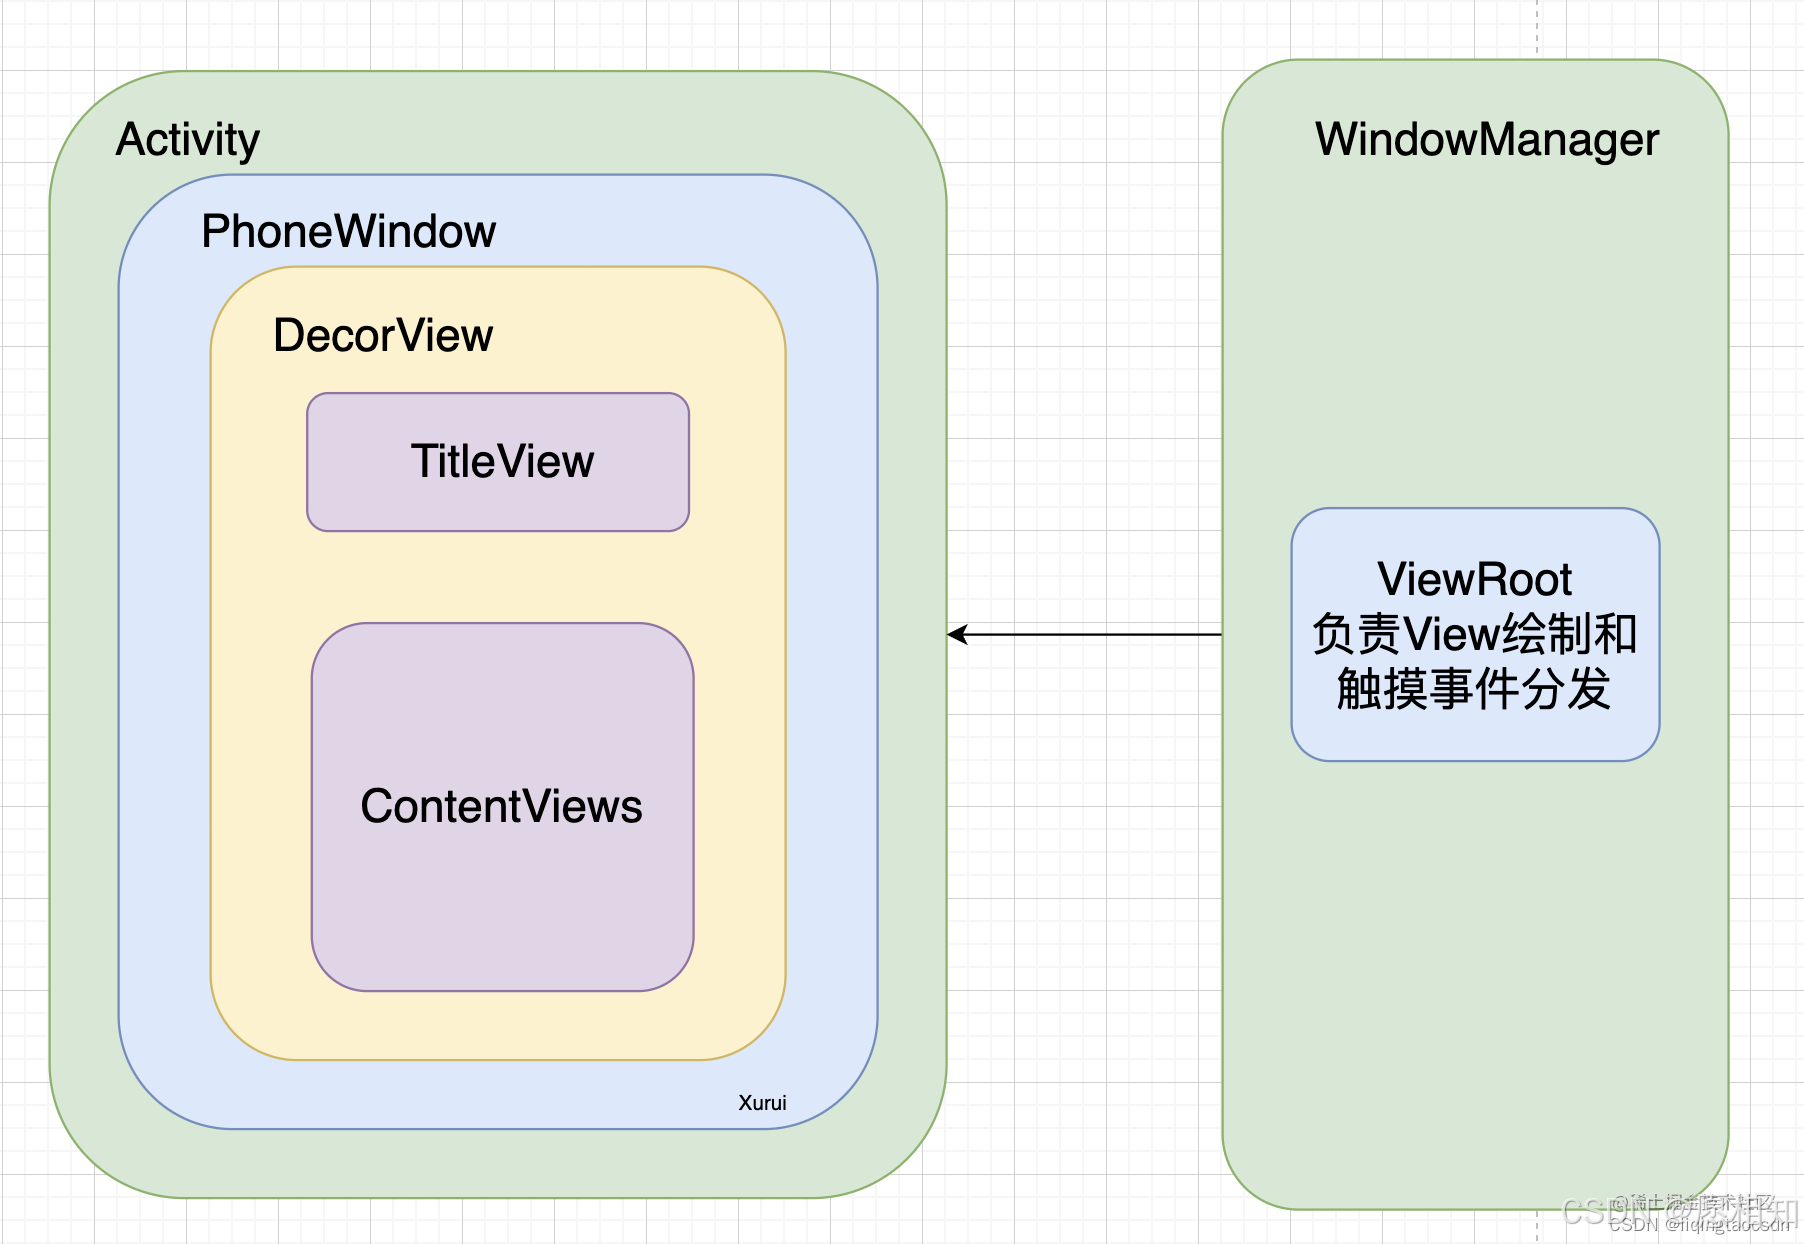
Window 是一个抽象类,他的实现类是 PhoneWidow,Activity 中的 DecorView ,Dialog 中的 View 都是在 PhoneWindow 中创建的。因此 Window 实际是 View 的直接管理者,例如:事件分发机制中,在 Activity 里面收到点击事件后,会首先通过 window 将事件传递到 DecorView,最后再分发到我们的 View 上。Activity 的 SetContentView 在底层也是通过 Window 来完成的。还有 findViewById 也是调用的 window。
__________________________________________首先介绍一下简单的使用
Window 和 WindowManager
如果要对 Window 进行添加和删除就需要通过 WindowManager 来操作,具体如下:
WindowManager 如何添加 Window?
Java
TextView textView = new TextView(this);
textView.setText("window");
textView.setTextSize(18f);
textView.setTextColor(Color.BLACK);
textView.setBackgroundColor(Color.WHITE);

WindowManager.LayoutParams parent = new WindowManager.LayoutParams(
        WindowManager.LayoutParams.WRAP_CONTENT,
        WindowManager.LayoutParams.WRAP_CONTENT,
        0,
        0,
        PixelFormat.TRANSPARENT);

parent.type = WindowManager.LayoutParams.TYPE_APPLICATION;
parent.flags = WindowManager.LayoutParams.FLAG_NOT_TOUCH_MODAL
        | WindowManager.LayoutParams.FLAG_NOT_FOCUSABLE;
parent.gravity = Gravity.END | Gravity.BOTTOM;
parent.y = 500;
parent.x = 100;

windowManager.addView(textView, parent);
上面这段代码可以添加一个 Window,位置在 (100,500),这里面比较重要的属性分别是 type 和 flags。
Type 窗口属性
Type 参数表示 Window 的类型,Window 分三种类型,对应着三种层级,如下:
| Window 类型 | 层级范围 | 说明 |
|---|---|---|
| 应用 Window | 1 ~ 99 | 对应着一个 Activity |
| 子 Window | 1000 ~ 1999 | 不能单独存在,需要附属在特定的 Window 之中, 例如常见的 PopupDialog,就是子 Window。 |
| 系统 Window | 2000 ~ 2999 | 需要声明权限才能创建的 Window 例如 Toast 和 系统状态栏这些都是系统的 Window |
- 子 Window 无法单独存在,必须依赖父级 Window,例如 PopWindow 必须依赖 Activity
- Window 分层,在显示时层级高的会覆盖层级低的窗口
Flags窗口的标志
Flags 表示 Window 的属性,它有多选项,通过这些可以通知 Window 显示的特性,例如:
| Floags | 特性 |
|---|---|
| FLAG_NOT_FOCUSABLE | 表示 Window 不需要获取焦点,也不需要各种输入事件, 此标记通同时启用 FLAG_NOT_TOUCH_MODAL 最终事件会直接传递给下层具有焦点的 Window。 |
| FLAG_NOT_TOUCH_MODAL | 将 Window 区域以外的单击事件传递给底层的 Window, 当前 Window 内的单击事件自己处理, 一般都要开启此事件,否则其他 Window 无法收到单击事件 |
| FLAG_SHOW_WHEN_LOCKED | 可以将 Window 显示在锁屏的界面上 |
| FLAG_TURN_SCREEN_ON | Window 显示时将屏幕点亮 |
WindowManager
WindowManager 所提供的功能很简单,常用的只有三个方法,即添加 View,更新View,和删除 View。
这三个方法定义在 ViewManager 接口中,而 WindowManager 继承了 ViewManager
Java
public interface ViewManager{    public void addView(View view, ViewGroup.LayoutParams params);    public void updateViewLayout(View view, ViewGroup.LayoutParams params);    public void removeView(View view);}
public interface WindowManager extends ViewManager
由此看来 WindowManager 操作 Window 的过程更像是在操作 Window 中的 View,我们平常简单的那种可以拖动的 Window 效果其实是很好实现的,只需要修改 LayoutParams 中的 x,y 值就可以改变 Window 的位置。首先给 View 设置 onTouchListener,然后在 onTouch 方法中不断的更新 View 的位置即可。
1.1 Window类不是真正的窗口
Window这个类是一个让人很迷惑的类,在我刚接触这个类的时候,看到它的名字我非常确信它就是一个"名符其实"的窗口。还有与它有关系的WindowManager,WindowManagerImpl这两个类,当看到这两个类的时候立马让我想到了WindowManagerService这个类,WindowManagerService作为一个服务运行在系统进程中管理所有的窗口,我天真的认为WindowManager和WindowManagerImpl就是与WindowManagerService相对应的类是提供与WindowManagerService进行binder通信的类。
首先Window类它是"名不符实",为什么这样说呢?Window类中没有measure(测量)相关方法,也没有layout(布局)相关的方法,甚至没有draw(绘制)相关的方法,更甚至连最基本的width和height属性都没有。我的理解是这样的既然作为一个窗口,那它就应该有上面提到的这些方法和属性。
别看WindowManagerService是翻译为中文是窗口管理服务 ,或者别看它的名字里面包含了Window这个词,但是Window类和WindowManagerService没有任何的关系(它俩谁也不认识谁),WindowManagerService中添加一个窗口的方法叫addWindow,别看方法名有Window这个词,这个方法添加的不是Window这个类,它的签名如下:
Java
public int addWindow(Session session, IWindow client, LayoutParams attrs, int viewVisibility,
            int displayId, int requestUserId, InsetsState requestedVisibility,
            InputChannel outInputChannel, InsetsState outInsetsState,
InsetsSourceControl[] outActiveControls)在调用WindowManager的addView方法的时候,也是根本和Window类没关系的,addView方法只是需要View和LayoutParams这两个参数,addView方法的签名如下:
Java
    public void addView(@NonNull View view, @NonNull ViewGroup.LayoutParams params) {
    }
1.2. Window类是一个封装类
Window类是一个封装类,它为了让开发者能更快的开发,把很多公共的代码都封装起来了,那接下来聊一聊都封装了哪些。
1.2.1 封装显示View代码
在Android中一个View被显示的做法如下:
Java
//把activity_main.xml解析出来
View rootView = getLayoutInflater().inflate(R.layout.activity_main);

//下面的代码都在初始化 LayoutParams
WindowManager.LayoutParams layoutParams = new WindowManager.LayoutParams();

//设置flags
layoutParams.flags = WindowManager.LayoutParams.FLAG_NOT_FOCUSABLE;
//设置窗口类型
layoutParams.type = WindowManager.LayoutParams.TYPE_APPLICATION;

//设置layoutParams的各种属性
layoutParams.format = PixelFormat.TRANSPARENT;
layoutParams.gravity = Gravity.TOP | Gravity.LEFT;
layoutParams.x = 0;
layoutParams.y = 0;
layoutParams.width = ViewGroup.LayoutParams.MATCH_PARENT;
layoutParams.height = ViewGroup.LayoutParams.MATCH_PARENT;

//调用WindowManager的addView方法,这时候才会真正的开始View的显示过程
getWindowManager().addView(rootView, layoutParams);
代码解释
View被显示的过程主要分如下三步:
- 初始化要显示的View
- 设置类型为WindowManager.LayoutParams对象的各种属性
- 调用getWindowManager().addView方法
而Window和它的子类PhoneWindow把上面的这些代码都封装好了,这样开发者就只需要调用Window的setContentView方法即可。
1.2.2 封装了界面的样式、布局
一般一个界面会被划分为标题栏 和内容区域,Window把标题栏和内容区域都封装了起来,这样开发者需要显示标题栏的时候只需要调用几个简单的方法即可,同时也能保证标题栏的样式一致性。但现实是大部分的开发者都自己重新开发自己的标题栏,其大概原因是官方的标题栏使用起来确实不好用。
Window还把界面样式也给封装了起来,需要显示什么样式开发者只需要简单的配置即可。
可以把Window理解为一个虚拟的窗口,Window类还封装了很多其他的功能比如还包含了UI的background,点击事件的分发等。这样在Activity、Dialog中就基本可以共用Window的一套代码了。
1.3. Window类重要属性和方法介绍
FEATURE_开头的属性
凡是以 FEATURE_ 开头的静态常量都是定义当前窗口具有什么特性(比如界面是带有标题栏呢,还是节目带有action bar)
- FEATURE_OPTIONS_PANEL:代表创建action bar的menu
- FEATURE_NO_TITLE:代表不显示标题栏
- FEATURE_PROGRESS:如果显示标题栏,则标题栏中显示进度条
- FEATURE_LEFT_ICON:如果显示标题栏,则标题栏显示左icon
- FEATURE_CUSTOM_TITLE:代表自定义标题栏
- FEATURE_ACTION_BAR:代表显示action bar
- FEATURE_CONTENT_TRANSITIONS:代表内容变化的时候的动画
几个方法:
setFlags方法 它的方法定义如下:
Java
    public void setFlags(int flags, int mask) {
        final WindowManager.LayoutParams attrs = getAttributes();
        attrs.flags = (attrs.flags&~mask) | (flags&mask);
        mForcedWindowFlags |= mask;
        dispatchWindowAttributesChanged(attrs);
    }
该方法的参数主要来自于WindowManager.LayoutParams.FLAG_开头的常量,比如设置窗口为全屏,可以使用下面代码设置:
Java
setFlags(WindowManager.LayoutParams.FLAG_FULLSCREEN,WindowManager.LayoutParams.FLAG_FULLSCREEN);requestFeature方法 方法定义如下:
Java
    public boolean requestFeature(int featureId) {
        final int flag = 1<<featureId;
        mFeatures |= flag;
        mLocalFeatures |= mContainer != null ? (flag&~mContainer.mFeatures) : flag;
        return (mFeatures&flag) != 0;
}该方法设置当前窗口的特性,比如设置窗口没有标题栏可以这样用:requestFeature(FEATURE_NO_TITLE)。它的参数就是上面的以FEATURE_开头的属性,该方法必须在setContentView方法调用之前才有效
findViewById方法 方法定义如下:
Java
    public <T extends View> T findViewById(@IdRes int id) {
        return getDecorView().findViewById(id);
    }
该方法作用就是根据view的id来查找到对应的View,咱们在Activity经常使用findViewById这个方法,其实最终会调用到Window的findViewById方法,而Window中又会调用到DecorView的findViewById方法。
getDecorView方法 方法定义如下:
Java
public abstract @NonNull View getDecorView();该方法是一个抽象方法,获取DecorView,子类去实现
1.4 小结
Window类它不是真正的窗口,和WindowManagerService没有任何关系,它只是一个封装类把公共的不易变化的内容都封装起来(比如把标题栏,UI background等封装起来),让Activity只关注content View即可,添加显示content View更简单(只需要调用Activity的setContentView方法即可,不需要关心WindowManager.LayoutParams这些属性的设置)Window类的使用者可不是单单只有Activity,还有Dialog等。
2."装饰者"DecorView类


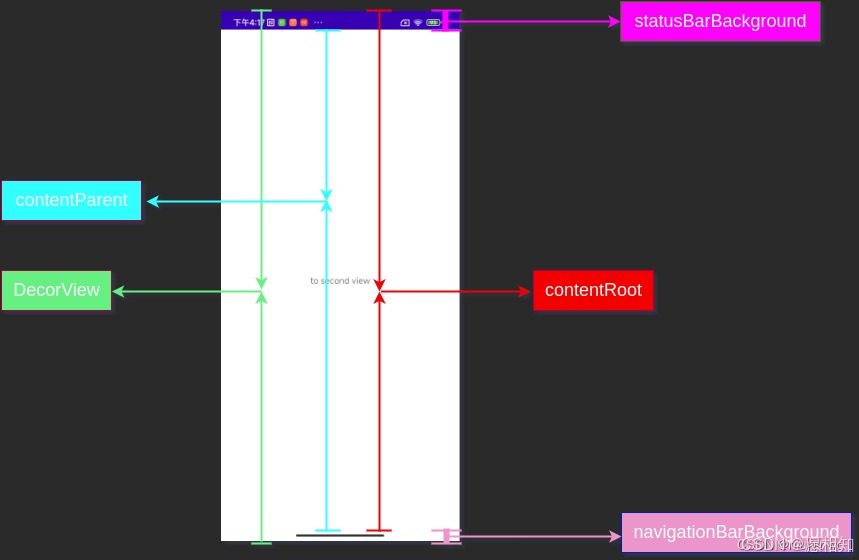
DecorView是整个View层级最顶层View ,它包含的直接子View有navigationBarBackground,statusBarBackground,LinearLayout
2.1.1 navigationBarBackground和statusBarBackground
navigationBarBackground
看它的名字就知道,它与navigationBar的background有关系,它就是一个View,主要的作用就是用来设置navigationBar的背景色。它的高度是固定不变的(如上面DecorView的两幅图中的上图),DecorView中会设置它的高度,它位于整个屏幕的底部,但是它的颜色是可以自定义的,比如您可以根据自己app的需求把它设置为黑色或者别的颜色。并且是可以隐藏navigation bar的,这样就间接的隐藏了navigationBarBackground(navigation bar都已经隐藏了,navigationBarBackground当然没有存在的必要了)。
statusBarBackground
它的作用是设置status bar的背景色,和navigationBarBackground类似,它的高度在DecorView中会被设置,它位于整个屏幕的最顶部,它的颜色值是可以自定义的。
自定义它的颜色值主要是在themes.xml样式文件中设置
Java
<resources xmlns:tools="http://schemas.android.com/tools">
    <!-- Base application theme. -->
    <style name="Theme.LifecycleDemo" parent="Theme.MaterialComponents.DayNight.DarkActionBar">
        <item name="colorPrimaryVariant">@color/purple_700</item>
    </style>
</resources>
status bar也是可以隐藏的,比如在全屏观看视频的时候,status bar会被隐藏,随之statusBarBackground也会隐藏。
小结
navigationBarBackground和statusBarBackground它们被设计出来的主要目的是:为了能让开发者控制status bar和navigation bar的背景色,这样就可以让整个界面更加的协调一致了。
navigationBarBackground和statusBarBackground能改变status bar和navigation bar背景色的主要原理是:Activiity中DecorView它的大小与屏幕大小一致。status bar和navigation bar的层级想对于Activity中DecorView要高很多(在z轴上的值要大很多),并且它们的背景都是透明的,因此status bar和navigation bar是"漂浮于"DecorView上的。这样在DecorView中修改navigationBarBackground和statusBarBackground它们的色值,从而以障眼法的方式看上去status bar和navigation bar的背景色被修改了,其实并没有。
2.1.2 contentRoot
如图1 contentRoot它的高度是从DecorView的顶部到navigationBarBackground这段距离,contentRoot它对应的是LinearLayout。contentRoot对应的就是上面提到的Window类中的不同主题类型的布局文件中的root view。不同的主题类型:比如有带标题栏的主题,带action bar的主题,或者只有内容的主题。
它包含View主要分为两部分:标题栏 (action bar)和contentParent。
标题栏开发者基本上不用,开发者一般都是自己来封装自己的标题栏。
contentParent:在调用Activity的setContentView方法的时候设置的content view最终会被添加到contentParent中,并且它的id是:com.android.internal.R.id.content。
DecorView会根据各种情况比如窗口设置了全屏,隐藏了navigation bar或者隐藏了status bar等 来设置contentRoot的margin top/left/bottom/right的值
Java
    WindowInsets updateColorViews(WindowInsets insets, boolean animate) {
        WindowManager.LayoutParams attrs = mWindow.getAttributes();
        int sysUiVisibility = attrs.systemUiVisibility | getWindowSystemUiVisibility();


        省略代码......

        final WindowInsetsController controller = getWindowInsetsController();

        // IME is an exceptional floating window that requires color view.
        final boolean isImeWindow =
                mWindow.getAttributes().type == WindowManager.LayoutParams.TYPE_INPUT_METHOD;
        if (!mWindow.mIsFloating || isImeWindow) {

        //consumingNavBar代表是否占据navigation bar的位置
        boolean consumingNavBar =
                ((attrs.flags & FLAG_DRAWS_SYSTEM_BAR_BACKGROUNDS) != 0
                        && (sysUiVisibility & SYSTEM_UI_FLAG_LAYOUT_HIDE_NAVIGATION) == 0
                        && decorFitsSystemWindows
                        && !hideNavigation)
                || forceConsumingNavBar;

        // If we didn't request fullscreen layout, but we still got it because of the
        // mForceWindowDrawsBarBackgrounds flag, also consume top inset.
        // If we should always consume system bars, only consume that if the app wanted to go to
        // fullscreen, as othrewise we can expect the app to handle it.

        //是否是全屏显示
        boolean fullscreen = (sysUiVisibility & SYSTEM_UI_FLAG_FULLSCREEN) != 0
                || (attrs.flags & FLAG_FULLSCREEN) != 0
                || !(controller == null || controller.isRequestedVisible(ITYPE_STATUS_BAR));

        //consumingStatusBar代表是否占据status bar的位置
        boolean consumingStatusBar = (sysUiVisibility & SYSTEM_UI_FLAG_LAYOUT_FULLSCREEN) == 0
                && decorFitsSystemWindows
                && (attrs.flags & FLAG_LAYOUT_IN_SCREEN) == 0
                && (attrs.flags & FLAG_LAYOUT_INSET_DECOR) == 0
                && mForceWindowDrawsBarBackgrounds
                && mLastTopInset != 0
                || (mLastShouldAlwaysConsumeSystemBars && fullscreen);

        //下面计算 consumed top/right/bottom/left 值

        //如果占据status bar的位置则consumedTop的值为mLastTopInset,mLastTopInset的值为status bar的高度
        int consumedTop = consumingStatusBar ? mLastTopInset : 0;
        int consumedRight = consumingNavBar ? mLastRightInset : 0;
        //如果占据navigation bar位置,则consumedBottom设置为mLastBottomInset,mLastBottomInset代表navigation bar的高度值
        int consumedBottom = consumingNavBar ? mLastBottomInset : 0;
        int consumedLeft = consumingNavBar ? mLastLeftInset : 0;

        //开始对mContentRoot的layoutparmas设置
        if (mContentRoot != null
                && mContentRoot.getLayoutParams() instanceof MarginLayoutParams) {
            MarginLayoutParams lp = (MarginLayoutParams) mContentRoot.getLayoutParams();
            if (lp.topMargin != consumedTop || lp.rightMargin != consumedRight
                    || lp.bottomMargin != consumedBottom || lp.leftMargin != consumedLeft) {

                //对mContentRoot的top/right/bottom/left的margin分别设置
                lp.topMargin = consumedTop;
                lp.rightMargin = consumedRight;
                lp.bottomMargin = consumedBottom;
                lp.leftMargin = consumedLeft;
                mContentRoot.setLayoutParams(lp);

                if (insets == null) {
                    // The insets have changed, but we're not currently in the process
                    // of dispatching them.
                    requestApplyInsets();
                }
            }
            if (insets != null) {
                insets = insets.inset(consumedLeft, consumedTop, consumedRight, consumedBottom);
            }
        }

        省略代码......

        return insets;
    }
2.2 DecorView是啥?
DecorView继承了FrameLayout类,DecorView是一个窗口中整个View层级最顶层View。正如其名"装饰View"它也确实有如此的功能,DecorView通过navigationBarBackground 和statusBarBackground这两个View搭建了"装饰"了navigation bar和status bar的功能。使用者就可以根据自己的需求来"装饰"navigation bar和status bar的样子了。如果想隐藏它们也是可以的。DecorView同样有"装饰"contentRoot的功能,可以对contentRoot的上下左右margin值进行设置,来修改contentRoot的显示边界。
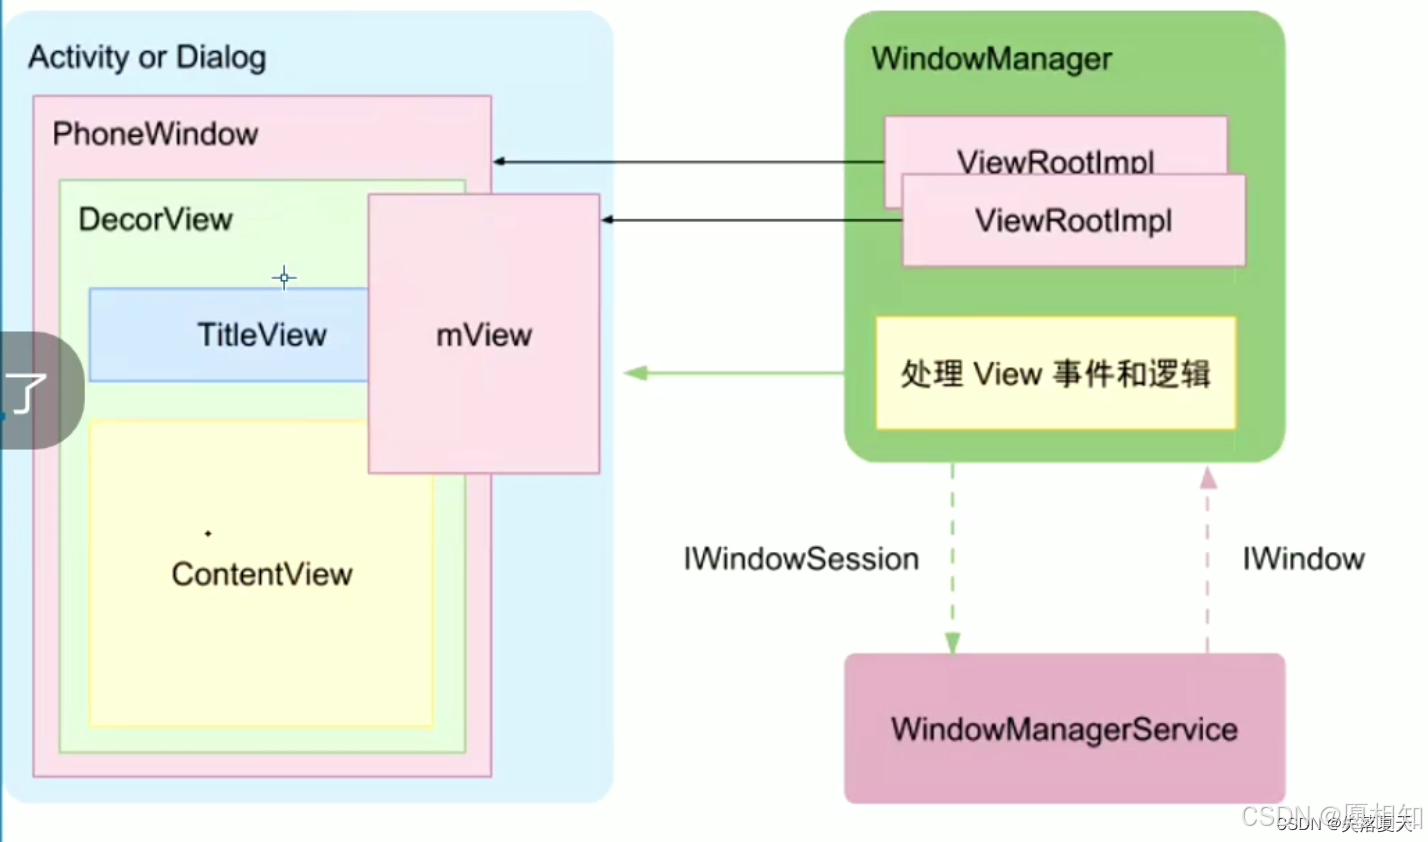
DecorView既然是一个窗口中整个View层级最顶层View,那很多非常重要的事情肯定是先通知到它,它作为顶级View然后在把相应的通知分发给它的子View,孙子View等等。ViewRootImpl类作为一个具有非常丰富功能的超级顶级类,它的其中最重要的mView属性它的值指向的就是DecorView。
ViewRootImpl中比如有点击事件发生的时候,就会调用DecorView的dispatchPointerEvent方法,DecorView最终会把点击事件分发到它的对应子View,看谁能处理这个事件。比如绘制事件发生的时候,会调用到DecorView的updateDisplayListIfDirty方法,DecorView开始递归调用它的子View,孙子View去进行绘制。

3.Window的子类PhoneWindow
PhoneWindow类是Window类的唯一子类,它实现了Window类中的一些方法比如实现了getDecorView()方法,会返回一个DecorView。很多的功能已经在Window类介绍过了,在此介绍下PhoneWindow是如何实现不同的特性窗口的。
3.1 不同特性的窗口
PhoneWindow类中实现不同特性的窗口的代码主要在generateLayout方法中,那就来看下这方法
Java
    protected ViewGroup generateLayout(DecorView decor) {
        //获取各种window相关的属性,放入TypedArray中
        TypedArray a = getWindowStyle();

        省略代码......

        //如果设置了Window_windowIsFloating,则代表是一个float类型的窗口,Dialog就是这种类型的窗口
        mIsFloating = a.getBoolean(R.styleable.Window_windowIsFloating, false);
        int flagsToUpdate = (FLAG_LAYOUT_IN_SCREEN|FLAG_LAYOUT_INSET_DECOR)
                & (~getForcedWindowFlags());
        //mIsFloating为true(Dialog的时候该值为true),则调用setLayout方法设置WindowManager.LayoutParams attrs的width和height属性为WRAP_CONTENT
        if (mIsFloating) {
            setLayout(WRAP_CONTENT, WRAP_CONTENT);
            setFlags(0, flagsToUpdate);
        } else {
            setFlags(FLAG_LAYOUT_IN_SCREEN|FLAG_LAYOUT_INSET_DECOR, flagsToUpdate);
            getAttributes().setFitInsetsSides(0);
            getAttributes().setFitInsetsTypes(0);
        }

        //如果R.styleable.Window_windowNoTitle为true,则代表是不需要标题栏的窗口,则调用requestFeature(FEATURE_NO_TITLE)
        if (a.getBoolean(R.styleable.Window_windowNoTitle, false)) {
            requestFeature(FEATURE_NO_TITLE);
        } else if (a.getBoolean(R.styleable.Window_windowActionBar, false)) {
            // Don't allow an action bar if there is no title.
            //不需要action bar的窗口
            requestFeature(FEATURE_ACTION_BAR);
        }

        省略其他的feature设置代码......

        //下面代码设置各种flag值,比如全屏了,status bar/navigation bar为透明了等
        if (a.getBoolean(R.styleable.Window_windowFullscreen, false)) {
            setFlags(FLAG_FULLSCREEN, FLAG_FULLSCREEN & (~getForcedWindowFlags()));
        }

        if (a.getBoolean(R.styleable.Window_windowTranslucentStatus,
                false)) {
            setFlags(FLAG_TRANSLUCENT_STATUS, FLAG_TRANSLUCENT_STATUS
                    & (~getForcedWindowFlags()));
        }

        if (a.getBoolean(R.styleable.Window_windowTranslucentNavigation,
                false)) {
            setFlags(FLAG_TRANSLUCENT_NAVIGATION, FLAG_TRANSLUCENT_NAVIGATION
                    & (~getForcedWindowFlags()));
        }


        省略代码.....

        //设置Dialog的窗口的dim属性
        if (a.getBoolean(R.styleable.Window_backgroundDimEnabled,
                mIsFloating)) {
            /* All dialogs should have the window dimmed */
            if ((getForcedWindowFlags()&WindowManager.LayoutParams.FLAG_DIM_BEHIND) == 0) {
                params.flags |= WindowManager.LayoutParams.FLAG_DIM_BEHIND;
            }
            if (!haveDimAmount()) {
                params.dimAmount = a.getFloat(
                        android.R.styleable.Window_backgroundDimAmount, 0.5f);
            }
        }

        省略代码......


        //下面的代码就很有意思了,根据features去获取布局文件(layoutResource)
         int layoutResource;
        int features = getLocalFeatures();

        //如果当前的窗口特性的标题栏是包含left icon或者right icon的,则进入下面的逻辑
        if ((features & ((1 << FEATURE_LEFT_ICON) | (1 << FEATURE_RIGHT_ICON))) != 0) {
            //悬浮类型的窗口,则进入下面逻辑(Dialog会走这)
            if (mIsFloating) {
                TypedValue res = new TypedValue();
                getContext().getTheme().resolveAttribute(
                        R.attr.dialogTitleIconsDecorLayout, res, true);
                layoutResource = res.resourceId;
            } else {
                layoutResource = R.layout.screen_title_icons;
            }
            // XXX Remove this once action bar supports these features.
            removeFeature(FEATURE_ACTION_BAR);
            // System.out.println("Title Icons!");
        } else if ((features & ((1 << FEATURE_PROGRESS) | (1 << FEATURE_INDETERMINATE_PROGRESS))) != 0
                && (features & (1 << FEATURE_ACTION_BAR)) == 0) {
            // Special case for a window with only a progress bar (and title).
            // XXX Need to have a no-title version of embedded windows.

            //如果是FEATURE_PROGRESS或者FEATURE_INDETERMINATE_PROGRESS特性的并且没有FEATURE_ACTION_BAR的窗口,则使用R.layout.screen_progress的布局文件
            layoutResource = R.layout.screen_progress;
            // System.out.println("Progress!");
        } else if ((features & (1 << FEATURE_CUSTOM_TITLE)) != 0) {

            //如果是自定义的特性的窗口,则进入这
            // Special case for a window with a custom title.
            // If the window is floating, we need a dialog layout
            if (mIsFloating) {
                TypedValue res = new TypedValue();
                getContext().getTheme().resolveAttribute(
                        R.attr.dialogCustomTitleDecorLayout, res, true);
                layoutResource = res.resourceId;
            } else {
                //使用R.layout.screen_custom_title布局文件
                layoutResource = R.layout.screen_custom_title;
            }
            // XXX Remove this once action bar supports these features.
            removeFeature(FEATURE_ACTION_BAR);
        } else if ((features & (1 << FEATURE_NO_TITLE)) == 0) {

            //如果是没有标题栏的特性的窗口,则进入这的逻辑

            // If no other features and not embedded, only need a title.
            // If the window is floating, we need a dialog layout
            if (mIsFloating) {
                TypedValue res = new TypedValue();
                getContext().getTheme().resolveAttribute(
                        R.attr.dialogTitleDecorLayout, res, true);
                layoutResource = res.resourceId;
            } else if ((features & (1 << FEATURE_ACTION_BAR)) != 0) {
                //如果是action bar特性的窗口,则使用R.layout.screen_action_bar布局文件
                layoutResource = a.getResourceId(
                        R.styleable.Window_windowActionBarFullscreenDecorLayout,
                        R.layout.screen_action_bar);
            } else {
                layoutResource = R.layout.screen_title;
            }
            // System.out.println("Title!");
        } else if ((features & (1 << FEATURE_ACTION_MODE_OVERLAY)) != 0) {
            layoutResource = R.layout.screen_simple_overlay_action_mode;
        } else {
            //默认使用R.layout.screen_simple布局文件
            // Embedded, so no decoration is needed.
            layoutResource = R.layout.screen_simple;
        }


        //mDecor它的类型是DecorView,调用onResourcesLoaded方法会把layoutResource解析出来,并且add view到mDecor中,这样DecorView中就有子View了
        mDecor.onResourcesLoaded(mLayoutInflater, layoutResource);

        //contentParent View它的id值是ID_ANDROID_CONTENT,因为上面已经把layoutResource对应的View加入到了DecorView中,因此调用findViewById可以找到contentParent View
        ViewGroup contentParent = (ViewGroup)findViewById(ID_ANDROID_CONTENT);

        省略代码......
    }
PhoneWindow主要根据下面的步骤来生成不同特性的窗口:
1.获取样式信息并设置feature
会从themes.xml样式文件中获取到对应的信息,比如根据R.styleable.Window_windowIsFloating获取的值为true,则代表当前的窗口是float类型的(Dialog就是这种类型的),比如根据R.styleable.Window_windowNoTitle获取的值为true,则代表当前的窗口是不需要标题栏的。获取到对应的样式信息后,调用requestFeature方法来设置窗口特性。 因此这也是在themes.xml样式文件中能控制生成什么样特性窗口的原因
2.获取样式信息并设置flag
XML
<resources xmlns:tools="http://schemas.android.com/tools"> <!-- Base application theme. --> <style name="Theme.LifecycleDemo" parent="Theme.MaterialComponents.DayNight.DarkActionBar"> <item name="android:windowFullscreen">true</item> </style></resources>比如上面的样式文件中,设置了"android:windowFullscreen"的值为true,则PhoneWindow类中会解析到R.styleable.Window_windowFullscreen的值,并且调用 setFlags(FLAG_FULLSCREEN, FLAG_FULLSCREEN & (~getForcedWindowFlags())) 方法设置窗口为全屏显示。
其他的样式文件中的设置也如此类似,因此这也是在themes.xml样式文件中能控制窗口的flag值的原因。
3.获取布局文件
上面的各种信息都设置完毕后,就可以根据最后的features信息来断定是使用哪个布局文件了。比如是FEATURE_PROGRESS或者FEATURE_INDETERMINATE_PROGRESS特性的并且没有FEATURE_ACTION_BAR的窗口,则使用R.layout.screen_progress布局文件
screen_progress.xml的代码如下:
TOML
<LinearLayout
    xmlns:android="http://schemas.android.com/apk/res/android"
    android:fitsSystemWindows="true"
    android:orientation="vertical"
    android:layout_width="match_parent"
    android:layout_height="match_parent">

    <!-- Popout bar for action modes -->
    <ViewStub
        android:id="@+id/action_mode_bar_stub"
        android:inflatedId="@+id/action_mode_bar"
        android:layout="@layout/action_mode_bar"
        android:layout_width="match_parent"
        android:layout_height="wrap_content"
        android:theme="?attr/actionBarTheme" />

    <!-- 带有progress功能的标题栏 -->
    <RelativeLayout
        android:id="@android:id/title_container"
        style="?android:attr/windowTitleBackgroundStyle"
        android:layout_width="match_parent"
        android:layout_height="?android:attr/windowTitleSize">

        <!-- 圆形progress -->
        <ProgressBar
            android:id="@+android:id/progress_circular"
            style="?android:attr/progressBarStyleSmallTitle"
            android:layout_width="wrap_content"
            android:layout_height="wrap_content"
            android:layout_marginStart="5dip"
            android:layout_alignParentEnd="true"
            android:layout_centerVertical="true"
            android:visibility="gone"
            android:max="10000" />

        <!-- 横向的progress -->
        <ProgressBar
            android:id="@+android:id/progress_horizontal"
            style="?android:attr/progressBarStyleHorizontal"
            android:layout_width="match_parent"
            android:layout_height="wrap_content"
            android:layout_marginStart="2dip"
            android:layout_alignParentStart="true"
            android:layout_toStartOf="@android:id/progress_circular"
            android:layout_centerVertical="true"
            android:visibility="gone"
            android:max="10000" />

        <!-- title -->
        <TextView
            android:id="@android:id/title"
            style="?android:attr/windowTitleStyle"
            android:layout_width="match_parent"
            android:layout_height="match_parent"
            android:layout_alignParentStart="true"
            android:layout_toStartOf="@android:id/progress_circular"
            android:background="@null"
            android:fadingEdge="horizontal"
            android:gravity="center_vertical"
            android:scrollHorizontally="true" />
    </RelativeLayout>

    <!-- 内容View -->
    <FrameLayout
        android:id="@android:id/content"
        android:layout_width="match_parent"
        android:layout_height="0dip"
        android:layout_weight="1"
        android:foregroundGravity="fill_horizontal|top"
        android:foreground="?android:attr/windowContentOverlay" />
</LinearLayout>
再比如默认特性的窗口,它的布局文件是R.layout.screen_simple,它的内容是特别简单的,它的代码如下:
TOML
<LinearLayout
    xmlns:android="http://schemas.android.com/apk/res/android"
    android:layout_width="match_parent"
    android:layout_height="match_parent"
    android:fitsSystemWindows="true"
    android:orientation="vertical">

    <!-- 一个ViewStub,用于延迟加载action mode bar -->
    <ViewStub
        android:id="@+id/action_mode_bar_stub"
        android:inflatedId="@+id/action_mode_bar"
        android:layout="@layout/action_mode_bar"
        android:layout_width="match_parent"
        android:layout_height="wrap_content"
        android:theme="?attr/actionBarTheme" />

    <!-- 一个FrameLayout,用于包含内容视图 -->
    <FrameLayout
        android:id="@android:id/content"
        android:layout_width="match_parent"
        android:layout_height="match_parent"
        android:foregroundInsidePadding="false"
        android:foregroundGravity="fill_horizontal|top"
        android:foreground="?android:attr/windowContentOverlay" />
</LinearLayout>
PhoneWindow根据不同的features去加载使用不同的布局文件。
4.contentRoot添加到DecorView
这里的contentRoot对应的就是上一步 根据不同的features去加载使用不同的布局文件 的根View(调用LayoutInflater的inflate方法是可以把布局文件的所有View都解析出来的),调用DecorView的addView方法就可以把contentRoot添加到DecorView中。
4.WindowManager类
WindowManager它是一个接口,从它的名字来看以为它和WindowManagerService(简称WMS)能有那么一点点的关系,但是你错了,它和WMS没有半毛钱关系。它做了一件"偷梁换柱"的事情,那这个事情是啥事情呢,下面就来聊下。
4.1 WindowManager和WindowManagerService没有任何关系
大家都知道我们是可以通过Context的getSystemServiceName方法获取到各种服务的,比如下面代码
SCSS
//获取ActivityManager
ActivityManager activityManager = (ActivityManager) getSystemService(Context.ACTIVITY_SERVICE);
如上代码,通过调用getSystemService(Context.ACTIVITY_SERVICE)方法是可以获取到ActivityManager的实例,这个ActivityManager就是ActivityManagerService的binder代理类,调用ActivityManager的方法最后通过binder调用是可以到达ActivityManagerService的对应方法的。
同理我们也可以使用如下代码获取到WindowManager
TOML
WindowManager windowManager = (WindowManager) getSystemService(Context.WINDOW_SERVICE);但是获取的这个WindowManager却和WindowManagerService没有任何关系,更谈不上与WMS通信了。
那我们就来看下为啥它们之间没有关系,从Context的getSystemService方法开始说起,Context是一个抽象类,ContextImpl类继承了Context,它也实现了getSystemService方法,如下代码
Java
    @Override
    public Object getSystemService(String name) {
        if (vmIncorrectContextUseEnabled()) {
            // Check incorrect Context usage.
            if (WINDOW_SERVICE.equals(name) && !isUiContext()) {
                final String errorMessage = "Tried to access visual service "
                        + SystemServiceRegistry.getSystemServiceClassName(name)
                        + " from a non-visual Context:" + getOuterContext();
                final String message = "WindowManager should be accessed from Activity or other "
                        + "visual Context. Use an Activity or a Context created with "
                        + "Context#createWindowContext(int, Bundle), which are adjusted to "
                        + "the configuration and visual bounds of an area on screen.";
                final Exception exception = new IllegalAccessException(errorMessage);
                StrictMode.onIncorrectContextUsed(message, exception);
                Log.e(TAG, errorMessage + " " + message, exception);
            }
        }
        //从SystemServiceRegistry获取服务
        return SystemServiceRegistry.getSystemService(this, name);
    }
上面方法最终调用了SystemServiceRegistry的getSystemService方法
TypeScript
public static Object getSystemService(ContextImpl ctx, String name) {
        if (name == null) {
            return null;
        }
        //从SYSTEM_SERVICE_FETCHERS中获取
        final ServiceFetcher<?> fetcher = SYSTEM_SERVICE_FETCHERS.get(name);

        省略代码......

        return ret;
    }
SYSTEM_SERVICE_FETCHERS是一个Map类型,在当前方法中是直接从SYSTEM_SERVICE_FETCHERS中获取,那肯定就有往SYSTEM_SERVICE_FETCHERS中注册的地方
Java
     static{

        省略其他的注册代码......

        //看到没有,这个地方注册了Context.WINDOW_SERVICE,它的最终会返回一个WindowManagerImpl实例
        registerService(Context.WINDOW_SERVICE, WindowManager.class,
                new CachedServiceFetcher<WindowManager>() {
            @Override
            public WindowManager createService(ContextImpl ctx) {
                return new WindowManagerImpl(ctx);
            }});

         registerService(Context.USER_SERVICE, UserManager.class,
                new CachedServiceFetcher<UserManager>() {
            @Override
            public UserManager createService(ContextImpl ctx) throws ServiceNotFoundException {
                IBinder b = ServiceManager.getServiceOrThrow(Context.USER_SERVICE);
                IUserManager service = IUserManager.Stub.asInterface(b);
                return new UserManager(ctx, service);
            }});

        省略其他的注册代码......
    }
各种服务的注册是在SystemServiceRegistry类的静态块中进行的,在注册window服务的时候Context.WINDOW_SERVICE,最终会返回一个WindowManagerImpl实例。看下别的服务的注册比如Context.USER_SERVICE,它最终会返回UserManagerService的binder代理类IUserManager,并且封装到Usermanager中。
从上面分析可知道,最终通过调用getSystemService(Context.WINDOW_SERVICE)获取的WindowManager,它是WindowManagerImpl类型的实例,WindowManagerImpl实现了WindowManager接口,因此WindowManagerImpl和WindowManagerService没有任何关系,也更不会与WMS进行binder通信了。
4.2 LayoutParams
LayoutParams类定义了很多与布局相关的很多属性比如width/height等,还定义了很多的常量,现在就介绍几个关键的属性。
窗口类型
为了对窗口有一个统一的管理,每种窗口都有它自己的type值,可以根据type值的大小来决定窗口的显示层级(在Z轴上的值)type值越大窗口显示的层级越大(离用户更近),这样如Toast就会显示在Activity的界面之上。 同时也可以根据type值的范围对窗口进行分类,大致可以划分为三类:应用程序级别的窗口,子窗口级别的窗口,系统级别的窗口。它们的type值是越来越大的。
- 应用程序级别的窗口:它的type值的范围是从1--99 TYPE_BASE_APPLICATION:1 TYPE_APPLICATION :2 Activity对应的窗口 TYPE_APPLICATION_STARTING:3 应用程序第一次启动的时候,白色背景的窗口 TYPE_DRAWN_APPLICATION:4 LAST_APPLICATION_WINDOW:99
- 子窗口级别的窗口:它的type值的范围是从1000--1999 TYPE_APPLICATION_PANEL:1000 TYPE_APPLICATION_MEDIA:1001 TYPE_APPLICATION_SUB_PANEL:1002 LAST_SUB_WINDOW:1999
- 系统级别的窗口:它的type值范围是从2000--2999 TYPE_STATUS_BAR:2000 status bar TYPE_SEARCH_BAR:2001 search bar TYPE_SYSTEM_ALERT:2003 比如电量不足界面 TYPE_TOAST:2005 toast LAST_SYSTEM_WINDOW:2999
上面的这些type值都定义在LayoutParams类中,只是选取了其中一部分。LayoutParams有一个type属性,它的值就取自上面的这些值,type属性的值并不是想用那个就用哪个是有要求的,比如当前窗口是应用程序级别,则它的type值就不能是2000以上的,因为2000以上是系统就级别的窗口,并且使用2000以上的窗口是需要权限的。
各种FLAG
LayoutParams中定义了各种类型的FLAG常量,它们用来控制窗口的一些特性
- FLAG_KEEP_SCREEN_ON:设置了这个flag,则不会锁屏
- FLAG_FULLSCREEN:代表窗口是全屏
上面列举了常用的两个,当然还有很多,LayoutParams的flags属性会持有这些FLAG值
4.3 WindowManager的关键方法
下面三个关键方法都是从ViewManager继承来的
addView
这是个抽象方法,WindowManagerImpl实现了这个方法,它的主要作用是添加一个View和它的LayoutParams
updateViewLayout
同样也是抽象方法,WindowManagerImpl实现了这个方法,它的作用是更新某个View和它的LayoutParams
removeView
同样也是抽象方法,WindowManagerImpl实现了这个方法,它的作用是移除View
上面的三个方法都和View有关系,比如addView方法主要是把一个View(它肯定是根View)和它对应的LayoutParams(View的layout相关的属性都在这个类中,比如width和height,还比如上面介绍的type和flags)进行添加,到底add到什么地方,后面会详细介绍到。
4.4 小结
WindowManager从名字上来看是不是管理Window的,应该和Window类有关系,最起码应该有addWindow,removeWindow这类的方法,但是其实不是。WindowManager和Window类没有关系,上面提到的三个方法也都和Window类没有关系,甚至它也没有addWindow,removeWindow这些方法。哈哈是不是世界观被侮辱了。还是上面提到的Window类的存在就是为了给开发者带来方便,android中添加和显示View的最终方法是WindowManager的addView方法,它的参数是View和LayoutParams,和Window类无关。
5.WindowManagerGlobal类
WindowManagerGlobal这个类从它的名字中的Global可以看出在一个进程中肯定只存在一个实例。下面是它的生成单例的方法
Java
    public static WindowManagerGlobal getInstance() {
        synchronized (WindowManagerGlobal.class) {
            if (sDefaultWindowManager == null) {
                sDefaultWindowManager = new WindowManagerGlobal();
            }
            return sDefaultWindowManager;
        }
    }
还记得上面提到的WindowManagerImpl类吗?通过调用getSystemService(Context.WINDOW_SERVICE)返回的就是WindowManagerImpl实例,这时候调用它的addView方法最终会调用到WindowManagerGlobal类的addView方法,addView方法的代码如下:
Java
public void addView(View view, ViewGroup.LayoutParams params,
            Display display, Window parentWindow, int userId) {

        省略代码......

        ViewRootImpl root;
        View panelParentView = null;

        synchronized (mLock) {
            // Start watching for system property changes.
            if (mSystemPropertyUpdater == null) {
                mSystemPropertyUpdater = new Runnable() {
                    @Override public void run() {
                        synchronized (mLock) {
                            for (int i = mRoots.size() - 1; i >= 0; --i) {
                                mRoots.get(i).loadSystemProperties();
                            }
                        }
                    }
                };
                SystemProperties.addChangeCallback(mSystemPropertyUpdater);
            }

            int index = findViewLocked(view, false);
            if (index >= 0) {
                if (mDyingViews.contains(view)) {
                    // Don't wait for MSG_DIE to make it's way through root's queue.
                    mRoots.get(index).doDie();
                } else {
                    throw new IllegalStateException("View " + view
                            + " has already been added to the window manager.");
                }
                // The previous removeView() had not completed executing. Now it has.
            }

            // If this is a panel window, then find the window it is being
            // attached to for future reference.
            if (wparams.type >= WindowManager.LayoutParams.FIRST_SUB_WINDOW &&
                    wparams.type <= WindowManager.LayoutParams.LAST_SUB_WINDOW) {
                final int count = mViews.size();
                for (int i = 0; i < count; i++) {
                    if (mRoots.get(i).mWindow.asBinder() == wparams.token) {
                        panelParentView = mViews.get(i);
                    }
                }
            }

            //生成ViewRootImpl的实例,赋值给root
            root = new ViewRootImpl(view.getContext(), display);

            view.setLayoutParams(wparams);

            //把view,root,params存储到各自的列表中
            mViews.add(view);
            mRoots.add(root);
            mParams.add(wparams);

            // do this last because it fires off messages to start doing things
            try {
                //调用ViewRootImpl的setView方法,设置View,params等参数,这个方法被调用后开始了View的绘制等流程
                root.setView(view, wparams, panelParentView, userId);
            } catch (RuntimeException e) {
                // BadTokenException or InvalidDisplayException, clean up.
                if (index >= 0) {
                    removeViewLocked(index, true);
                }
                throw e;
            }
        }
    }
addView方法主要做了以下几件事情:
- 各种异常判断
- 生成ViewRootImpl的实例
- 把root,view(这个view通常是DecorView类型),params等存储到各自的列表中
- 调用ViewRootImpl的setView方法,这个方法被调用后就开启了View的绘制流程,ViewRootImpl会和WMS建立交互,ViewRootImpl依据vsync机制进行View的绘制工作,并且把绘制的buffer通过binder调用传递给SurfaceFlinger进程,进行渲染等操作
5.1 小结
WindowManagerGlobal在一个进程中存在一个实例,它的addView方法中会把的View(View一般是DecorView类型),LayoutParams,ViewRootImpl这些值保存起来,并且最终会调用ViewRootImpl的setView方法开启View的绘制等流程。它的removeView方法中会把保存的View,LayoutParams,ViewRootImpl这些值移除。
因为通过调用getSystemService(Context.WINDOW_SERVICE)返回的就是WindowManagerImpl实例,那如果想与WMS(WindowManagerService)交互的话该怎么进行呢? WindowManagerGlobal类中给出了结果,如果需要与WMS通信,需要从WMS获取一个Session的binder代理实例,这个代理实例在一个进程中只存在一个,如下代码:
Java
    @UnsupportedAppUsage
    private static IWindowManager sWindowManagerService;
    @UnsupportedAppUsage
    private static IWindowSession sWindowSession;

    @UnsupportedAppUsage
    public static IWindowSession getWindowSession() {
        synchronized (WindowManagerGlobal.class) {
            //sWindowSession为null,则去获取
            if (sWindowSession == null) {
                try {
                    // Emulate the legacy behavior.  The global instance of InputMethodManager
                    // was instantiated here.
                    // TODO(b/116157766): Remove this hack after cleaning up @UnsupportedAppUsage
                    InputMethodManager.ensureDefaultInstanceForDefaultDisplayIfNecessary();

                    //先获取WindowManagerService的binder代理对象,这个对象是可以通过binder与WMS进行通信的
                    IWindowManager windowManager = getWindowManagerService();

                    //调用WMS的openSession方法,获取Session的binder代理对象
                    sWindowSession = windowManager.openSession(
                            new IWindowSessionCallback.Stub() {
                                @Override
                                public void onAnimatorScaleChanged(float scale) {
                                    ValueAnimator.setDurationScale(scale);
                                }
                            });
                } catch (RemoteException e) {
                    throw e.rethrowFromSystemServer();
                }
            }
            return sWindowSession;
        }
    }

    @UnsupportedAppUsage
    public static IWindowManager getWindowManagerService() {
        synchronized (WindowManagerGlobal.class) {
            if (sWindowManagerService == null) {
                //获取WMS的binder代理对象
                sWindowManagerService = IWindowManager.Stub.asInterface(
                        ServiceManager.getService("window"));
                try {
                    if (sWindowManagerService != null) {
                        ValueAnimator.setDurationScale(
                                sWindowManagerService.getCurrentAnimatorScale());
                        sUseBLASTAdapter = sWindowManagerService.useBLAST();
                    }
                } catch (RemoteException e) {
                    throw e.rethrowFromSystemServer();
                }
            }
            return sWindowManagerService;
        }
    }
WindowManagerGlobal的getWindowSession方法返回Session的binder代理对象,这样就可以调用对应的方法与Session进行通信,最终与WMS进行通信。
6.总结
6.1 DecorView类
继承了FrameLayout类,DecorView是一个窗口中整个View层级最顶层View。正如其名"装饰View"它也确实有如此的功能,DecorView通过navigationBarBackground和statusBarBackground这两个View搭建了"装饰"了navigation bar和status bar的功能。使用者就可以根据自己的需求来"装饰"navigation bar和status bar的样子了。如果想隐藏它们也是可以的。DecorView同样有"装饰"contentRoot的功能,可以对contentRoot的上下左右margin值进行设置,来修改contentRoot的显示边界。DecorView也是为Activity服务的,正是因为有了Window和PhoneWindow类,DecorView才有意义。
6.2 Window类,PhoneWindow类
它们就是封装类,主要作用是帮助开发者在Activity/Dialog中更方便快捷的添加显示View,并且提供了不同特性的窗口(比如有带标题栏的窗口,有带action bar的窗口,有带progress和title功能的窗口),Window类和WindowManagerService类没有任何的关系,虽然WindowManagerService中有addWindow的方法,但是这个方法也和Window类没有关系。DecorView的显示最终要调用WindowManager的addView方法,把DecorView和PhoneWindow中获取的LayoutParams作为addView的参数。
6.3 WindowManager接口,WindowManagerImpl类,WindowManagerGlobal类
它们是与addView,updateView,removeView功能有关系的类。调用getSystemService(Context.WINDOW_SERVICE)方法获取的是WindowManagerImpl实例,WindowManagerImpl实现了WindowManager接口,但是真正干活的不是WindowManagerImpl,而是WindowManagerGlobal,WindowManagerGlobal在一个进程中只存在一个实例,它会把View(View一般是DecorView类型),LayoutParams,ViewRootImpl这些值保存起来,它会与ViewRootImpl进行交互最终开启View的显示绘制流程。
这三个类与Window类没有关系,它们的名字中都有管理Window的功能,按道理来说它们应该有类似于addWindow/removeWindow/updateWindow相关的方法来进行与Window相关的操作,但是它们中却没有与Window类相关的方法,添加/更新/移除相关的方式是addView,updateView,removeView。
有了Window和PhoneWindow类,DecorView才有意义。
6.2 Window类,PhoneWindow类
它们就是封装类,主要作用是帮助开发者在Activity/Dialog中更方便快捷的添加显示View,并且提供了不同特性的窗口(比如有带标题栏的窗口,有带action bar的窗口,有带progress和title功能的窗口),Window类和WindowManagerService类没有任何的关系,虽然WindowManagerService中有addWindow的方法,但是这个方法也和Window类没有关系。DecorView的显示最终要调用WindowManager的addView方法,把DecorView和PhoneWindow中获取的LayoutParams作为addView的参数。
6.3 WindowManager接口,WindowManagerImpl类,WindowManagerGlobal类
它们是与addView,updateView,removeView功能有关系的类。调用getSystemService(Context.WINDOW_SERVICE)方法获取的是WindowManagerImpl实例,WindowManagerImpl实现了WindowManager接口,但是真正干活的不是WindowManagerImpl,而是WindowManagerGlobal,WindowManagerGlobal在一个进程中只存在一个实例,它会把View(View一般是DecorView类型),LayoutParams,ViewRootImpl这些值保存起来,它会与ViewRootImpl进行交互最终开启View的显示绘制流程。
这三个类与Window类没有关系,它们的名字中都有管理Window的功能,按道理来说它们应该有类似于addWindow/removeWindow/updateWindow相关的方法来进行与Window相关的操作,但是它们中却没有与Window类相关的方法,添加/更新/移除相关的方式是addView,updateView,removeView。
WindowManger接口和WindowManagerImpl类和WindowManagerService服务也没有任何的关系。
这里是学习的几个博客:
【view系列--Window,PhoneWindow,DecorView相关类 - CSDN App】https://blog.csdn.net/niurenwo/article/details/128368306?sharetype=blog\&shareId=128368306\&sharerefer=APP\&sharesource=2303_79296612\&sharefrom=link
【Android的View体系(二):DecorView的创建与显示 - CSDN App】https://blog.csdn.net/gaolh89/article/details/104027903?sharetype=blog\&shareId=104027903\&sharerefer=APP\&sharesource=2303_79296612\&sharefrom=link