目录
[二. 定位字体位置](#二. 定位字体位置)
[三. python处理字体](#三. python处理字体)
[1. 工具库](#1. 工具库)
[2. 字体读取](#2. 字体读取)
[3. 处理字体](#3. 处理字体)
[5请求数据 - 发现偏移量](#5请求数据 - 发现偏移量)
[5.4 多套字体替换](#5.4 多套字体替换)
[1. 采集目标](#1. 采集目标)
[2. 逆向结果](#2. 逆向结果)
一、了解什么是字体加密
字体加密是页面和前端字体文件想配合完成的一个反爬策略。通过css对其中一些重要数据进行加密,使我们在代码获取的和在页面上看到的数据是不同的。

前端人员通过使用font-face来达到这个目的,font-face是CSS3中的一个模块,他主要是把自己定义的Web字体嵌入到你的网页中。而font-face的格式为:
@font-face {
	font-family: <FontName>;      # 定义字体的名称。
	src: <source> [<format>][,<source> [<format>]]*;  # 定义该字体下载的网址,包括ttf,eof,woff格式等
}
二. 定位字体位置
- 字体加密会有个映射的字体文件
- 可以在元素面板搜索@font-face会通过这个标签指定字体文件,可以直接在页面上搜索,找到他字体的网址
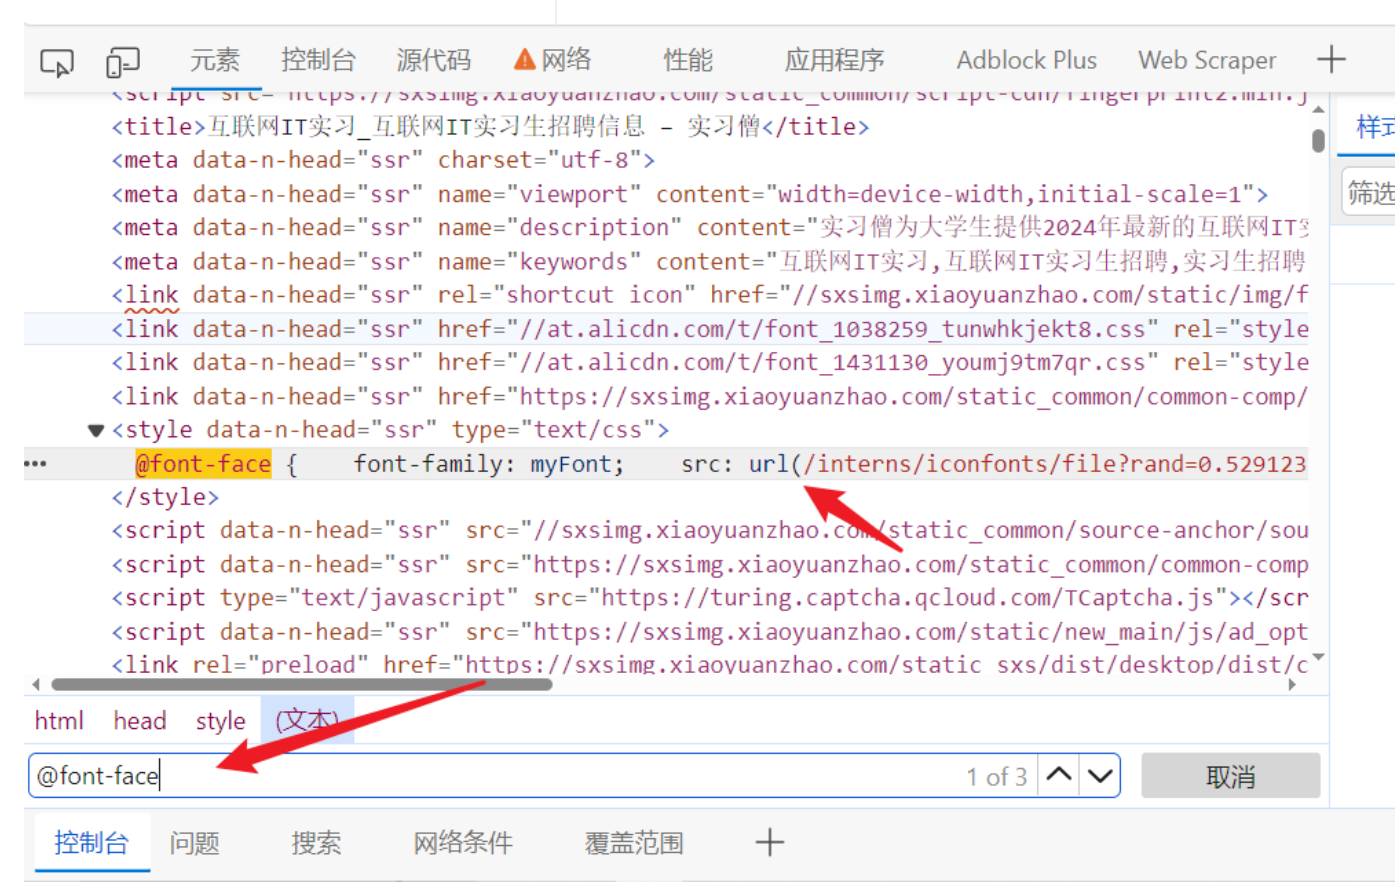
- 可以直接把字体文件下载下来, 文件可以一般需要自己修改后缀(网页的字体后缀一般选用woff)
- TTF:这是Windows操作系统使用的唯一字体标准,macintosh计算机也用truetype字体作为系统字体。
- OTF:这是一种开放的字体格式,支持Unicode字符集,可以在多种操作系统和设备上使用。
- FON:这是Windows 95及之前版本使用的字体格式。
- TTC:这是一种字体集合格式,包含多个字体文件,可以一次性安装多个字体。
- SHX:这是CAD系统自带的一种字体文件,符合了CAD的文字标准,但不支持中文等亚洲语言文字。
- EOT:这是早期网页浏览器使用的字体格式,但现在已经很少使用。
- WOFF:这是一种网页字体格式,可以在网页中使用,也可以转换为.TTF格式用于桌面应用。
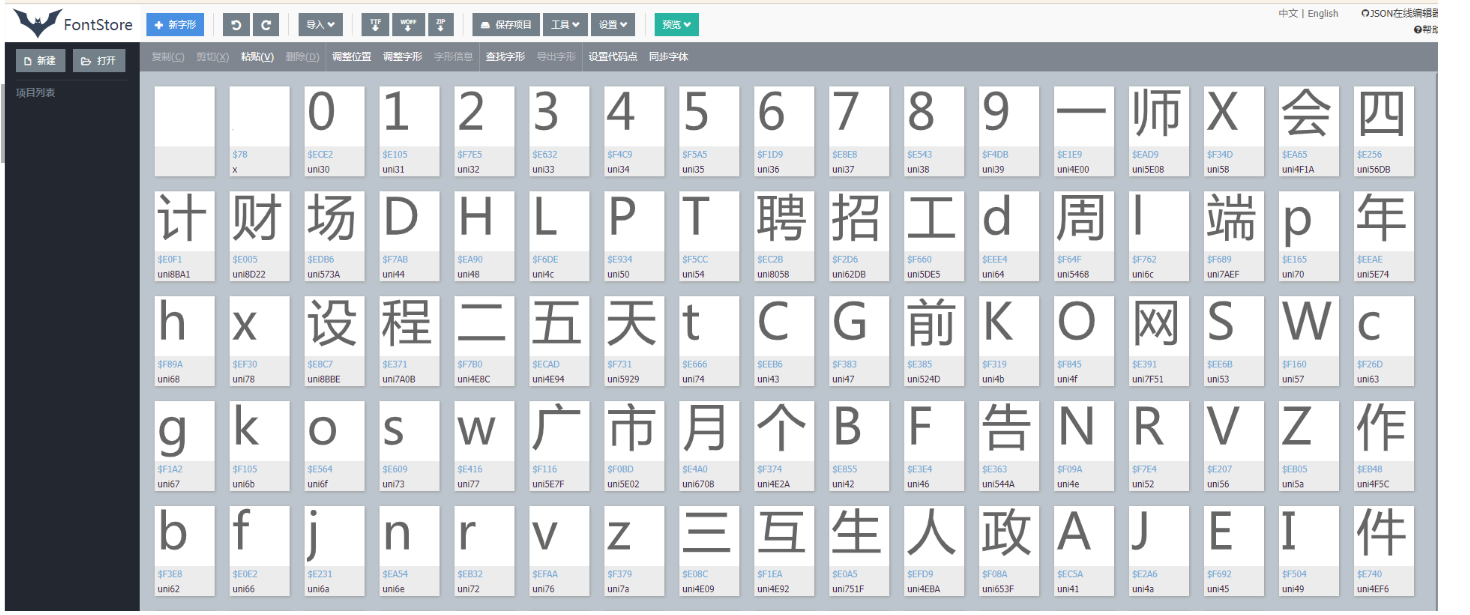
- 查看字体文件
- 在线字体解析网站:在线字体编辑器-JSON在线编辑器
- 可以直接把文件拖动到在线网址
我们抓包一个字体文件,在Font那一列,复制这个url到浏览器就可以下载下来

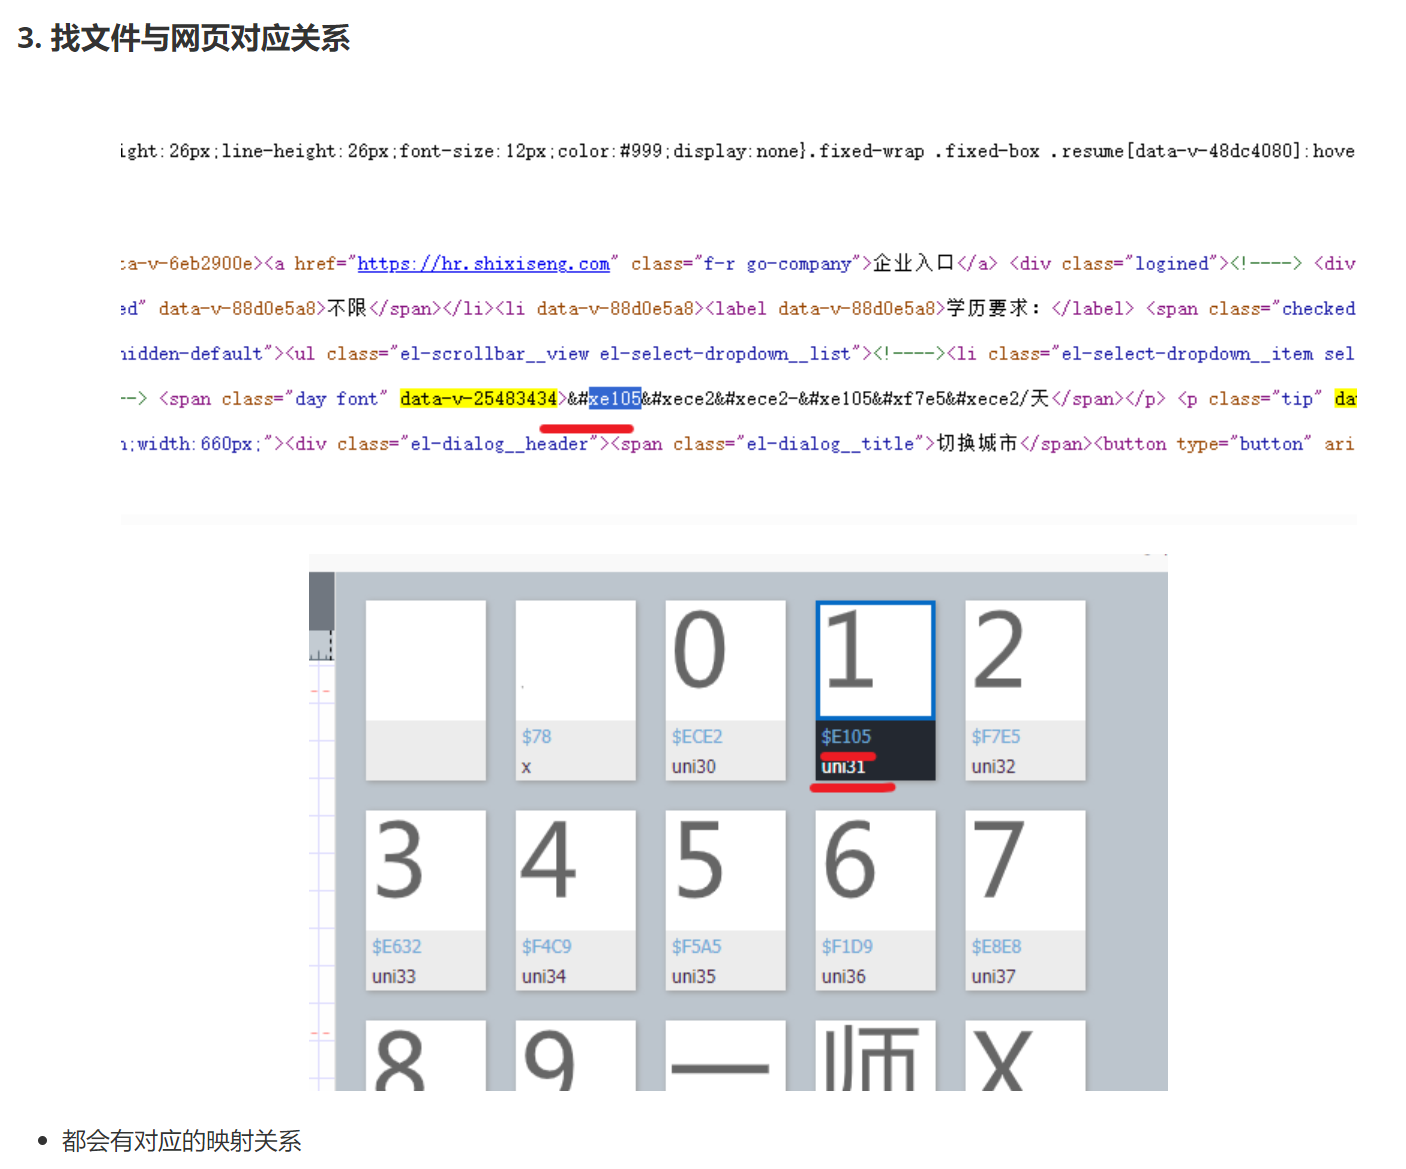
对应页面的数字。页面源码的字符前缀是&#x,woff文件的前缀是uni
三. python处理字体
1. 工具库
pip install fontTools # 使用这个包处理字体文件2. 字体读取
from fontTools.ttLib import TTFont
# 加载字体文件:
font = TTFont('file.woff')
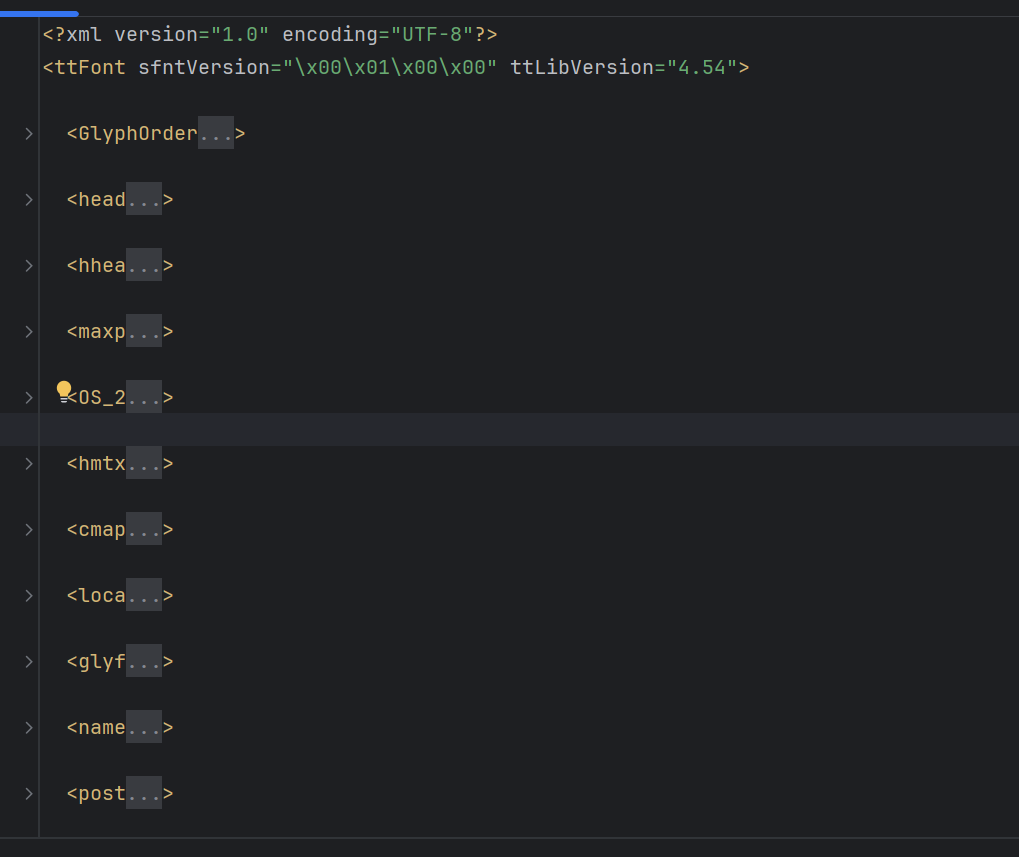
# 转为xml文件:可以用来查看字体的字形轮廓、字符映射、元数据等字体相关的信息
font.saveXML('file.xml')
3. 字体读取
from fontTools.ttLib import TTFont
# 加载字体文件:
font = TTFont('file.woff')
kv = font.keys()
print(kv)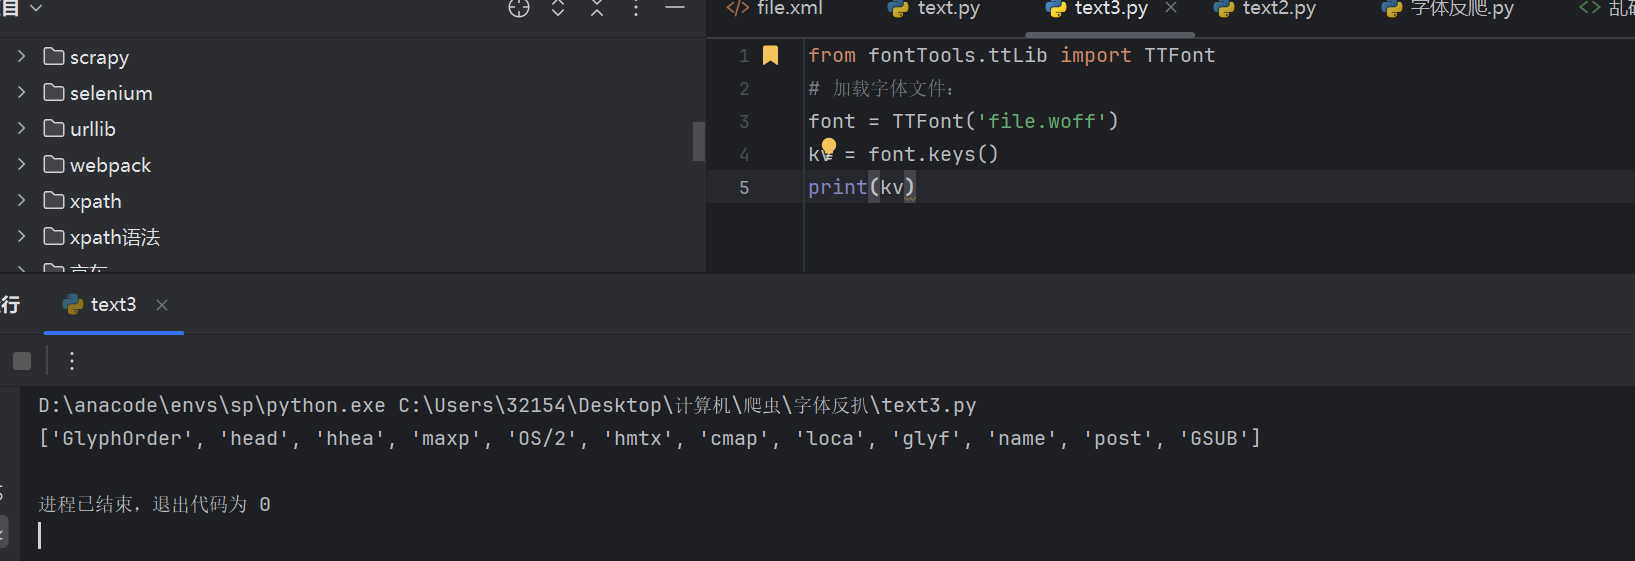
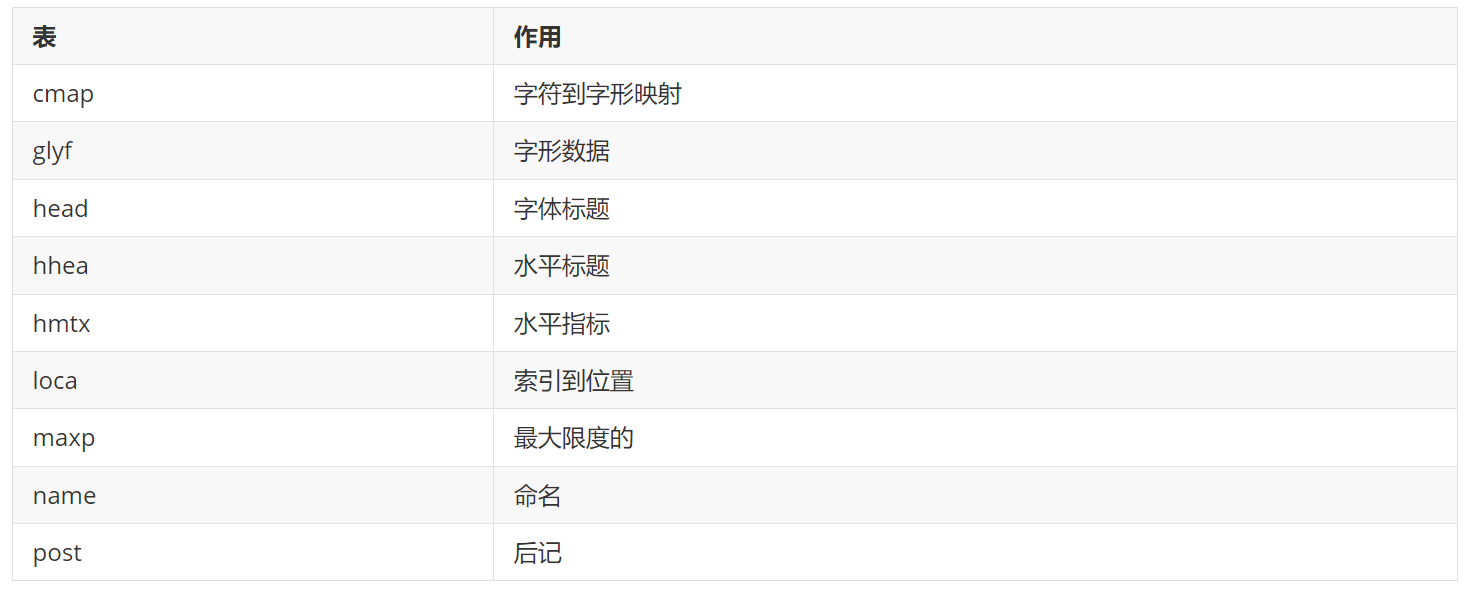
字体文件不仅包含字形数据和点信息,还包括字符到字形映射、字体标题、命名和水平指标等,这些信息存在对应的表中:
然后一些常见方法见 Python_FontTools使用-CSDN博客
3. 处理字体
如果想要把自定义的字体文字变化为系统能够识别的内容,就需要获取自定义字体与通用字体的映射规则,经过转化后就能得到正常文字信息。
字体解密的大致流程:
先找到字体文件的位置,查看源码大概就是xxx.woff这样的文件
重复上面那个操作,将两个字体文件保存下来
用上面的软件或者网址打开,并且通过 Python fontTools 将字体文件解析为 xml 文件
根据字体文件解析出来的 xml 文件与类似上面的字体界面找出相同内容的映射规律(重点)
在 Python 代码中把找出的规律实现出来,让你的代码能够通过这个规律还原源代码与展示内容的映射
案例1:起点
import re
import requests

url = 'https://www.qidian.com/rank/yuepiao/'
headers = {
    'Cookie': '_yep_uuid=16401b3f-da18-36f9-250b-44791c444165; e1=%7B%22l6%22%3A%22%22%2C%22pid%22%3A%22qd_P_rank_19%22%2C%22eid%22%3A%22%22%2C%22l1%22%3A5%7D; e2=%7B%22l6%22%3A%22%22%2C%22pid%22%3A%22qd_P_rank_19%22%2C%22eid%22%3A%22%22%2C%22l1%22%3A5%7D; newstatisticUUID=1689595424_1606659668; _csrfToken=6aCHItSuH6xVc1FVDCb7nGXnnDYFr6r6UdurzC7a; fu=801177549; traffic_utm_referer=; Hm_lvt_f00f67093ce2f38f215010b699629083=1689595425; Hm_lpvt_f00f67093ce2f38f215010b699629083=1689595425; _ga=GA1.2.225339841.1689595425; _gid=GA1.2.485020634.1689595425; _ga_FZMMH98S83=GS1.1.1689595425.1.1.1689595594.0.0.0; _ga_PFYW0QLV3P=GS1.1.1689595425.1.1.1689595594.0.0.0',
    'Host': 'www.qidian.com',
    'User-Agent': 'Mozilla/5.0 (Windows NT 10.0; Win64; x64) AppleWebKit/537.36 (KHTML, like Gecko) Chrome/114.0.0.0 Safari/537.36',
}

response = requests.get(url=url, headers=headers)
# print(response.text)

with open('乱码.html', mode='w', encoding='utf-8') as f:
    f.write(response.text)

"""下载字体文件"""
# format\('eot'\); src: url\('(.*?)'\) format\('woff'\), url\('
font_results = re.findall("format\('eot'\); src: url\('(.*?)'\) format\('woff'\), url\('",
                          response.text,
                          re.S)

print('解析到的字体地址: ', font_results)
font_link = font_results[0]

response_font = requests.get(url=font_link).content  # 字体文件是二进制数据|

with open('qidian.woff', mode='wb') as f:
    f.write(response_font)
    print('字体文件下载完成.........')

"""解析字体文件"""
from fontTools.ttLib import TTFont

font_path = 'qidian.woff'  # 字体文件路径
base_font = TTFont(font_path)

# # 将字体关系保存为 xml 格式
# base_font.saveXML('font.xml')

map_list = base_font.getBestCmap()
print('字体文件读取出来的规则:', map_list)

eng_2_num = {
    'period': ".",
    'two': '2',
    'zero': '0',
    'five': '5',
    'nine': "9",
    'seven': '7',
    'one': '1',
    'three': '3',
    'six': '6',
    'four': '4',
    'eight': '8'
}

for key in map_list.keys():
    map_list[key] = eng_2_num[map_list[key]]

print('最终的字体映射规则:', map_list)

"""替换字体"""
with open('乱码.html', mode='r', encoding='utf-8') as f:
    old_html = f.read()

new_html = old_html

for key, value in map_list.items():
    # 在循环中每一次替换结果用相同的变量覆盖掉
    new_html = new_html.replace('&#' + str(key) + ';', value)
    print(key, value, sep='|')

with open('替换以后的数据.html', mode='w', encoding='utf-8') as f:
    f.write(new_html)
    print('替换完成.......')
案例2:字符偏移:
分析流程:他所有的内容均在网页源代码中,不用去寻找api接口,皆大欢喜,但它的价格是css加密过的,即点击styles中的不显示红框中的内容,它的价格就会发生变化,复制它的url地址,会发现是一张雪碧图(爬取的价格图片背景像雪碧,所以叫做雪碧图),它的价格是根据像素点的变化,定位雪碧图的不同数字显示的。
实现思路:获得图片,通过图片识别,将像素点(偏移量)根雪碧图的数字一一对应,爬取像素点(偏移量),将识别出来的数字替换偏移量显示价格,实现价格的爬取。(css反爬一般都是通过这种位移的方式来保护它的数据的)
原文链接:https://blog.csdn.net/weixin_43612602/article/details/135322875

- 通过上述分析,咱们已经知道在网页前端中是通过一张图片,根据偏移量在图片中显示价格数字的。因此我们只需要把字体图片和价格的偏移量提取出来还原数据即可。
5请求数据 - 发现偏移量
构建字体映射规则
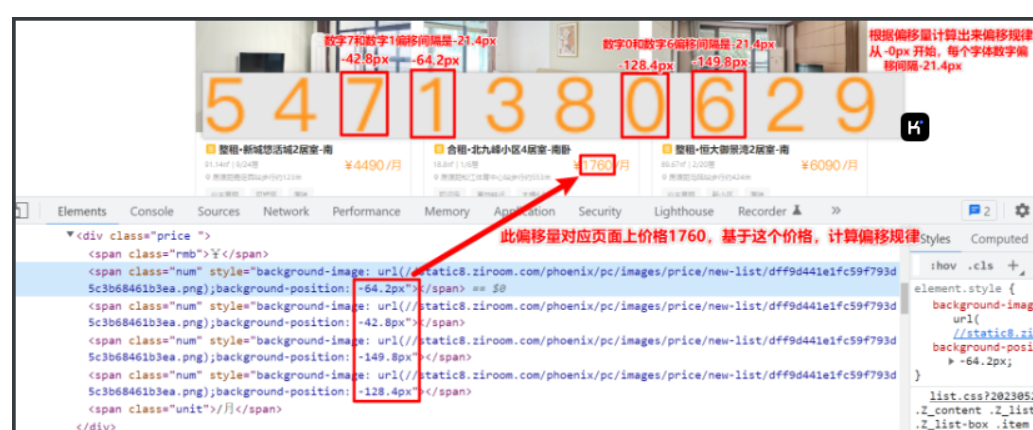
字体的偏移量数据我们可以在标签中可以看到,根据偏移量数据在字体文件图片中定位到特定的位置显示数字。因此我们需要分析每一个字体图片中每个字的偏移规则,然后使用OCR识图模块识别文字,将其字体关系一一映射出来。
通过分析,偏移量的偏移规律从-0px 开始,每个字体数字偏移间隔为 -21.4px ,分析思路如下图:
-
因为字体文件是一张图片,而且每次都会随时动态改变字体顺序,因此咱们可以使用识图OCR模块识图,不管怎么变,我们都会实时识别,具体代码如下所示:
import pprint
import reimport ddddocr
import parsel
import requestsheaders = {
'User-Agent': 'Mozilla/5.0 (Windows NT 10.0; Win64; x64) AppleWebKit/537.36 (KHTML, like Gecko) Chrome/113.0.0.0 Safari/537.36',
}def send_request(url):
"""
@param url: 请求地址
@return: 字体图片地址, 解析后的数据
"""
response = requests.get(url=url, headers=headers)
html_data = response.textwith open('数据偏移的网页.html', mode='w', encoding='utf-8') as f: f.write(html_data) """解析字体图片地址""" # <span class="num" style="background-image: url(//static8.ziroom.com/phoenix/pc/images/price/new-list/48d4fa3aa7adf78a1feee05d78f33700.png);background-position: -149.8px"></span> # <span.*?style="background-image: url\((.*?)\);background-position:.*?"></span> font_url = re.findall('<span.*?style="background-image: url\((.*?)\);background-position:.*?"></span>', html_data, re.S)[0] font_url = 'https:' + font_url # print('字体图片地址:', font_url) """解析数据""" data_list = [] selector = parsel.Selector(html_data) divs = selector.css('.Z_list-box>div') for div in divs: names = div.css('h5>a::text').get() if not names: # 页面中有一个数据是广告 continue move_list = [] # 字体偏移量列表 nums = div.css('span.num') for num in nums: num_str = num.get() num_result = re.findall('background-position: (.*?)"', num_str, re.S)[0] move_list.append(num_result) data_list.append({'names': names, 'price_list': move_list}) return font_url, data_listdef get_font(font_url, font_rule):
"""
请求字体图片数据, 构建字体映射规则
@param font_url: 字体图片地址
@param font_rule: 分析出来的字体偏移规则
@return: 返回字体映射规则
"""
font_data = requests.get(url=font_url, headers=headers).contentwith open('font.png', mode='wb') as f: f.write(font_data) """ddddocr识别图片文字""" ocr = ddddocr.DdddOcr(beta=True) # 指定识别模型 res = ocr.classification(font_data) print('字体图片识别结果:', res) """构建字体映射规则""" font_rules = dict(zip(font_rule, res)) return font_rulesif name == 'main':
"""发送请求, 解析图片地址和需要解密的字体数据"""
font_url, data_list = send_request('https://sh.ziroom.com/z/')
print('字体图片地址:', font_url)
print('解析后的数据:', data_list)"""请求字体图片数据, 构建字体映射规则""" # 分析出来的字体偏移规则 move = ['-0px', '-21.4px', '-42.8px', '-64.2px', '-85.6px', '-107px', '-128.4px', '-149.8px', '-171.2px', '-192.6px'] mapping = get_font(font_url, move) print('字体映射规则:', mapping)"""
pillow报错可以参考 https://blog.csdn.net/light2081/article/details/131517132
"""
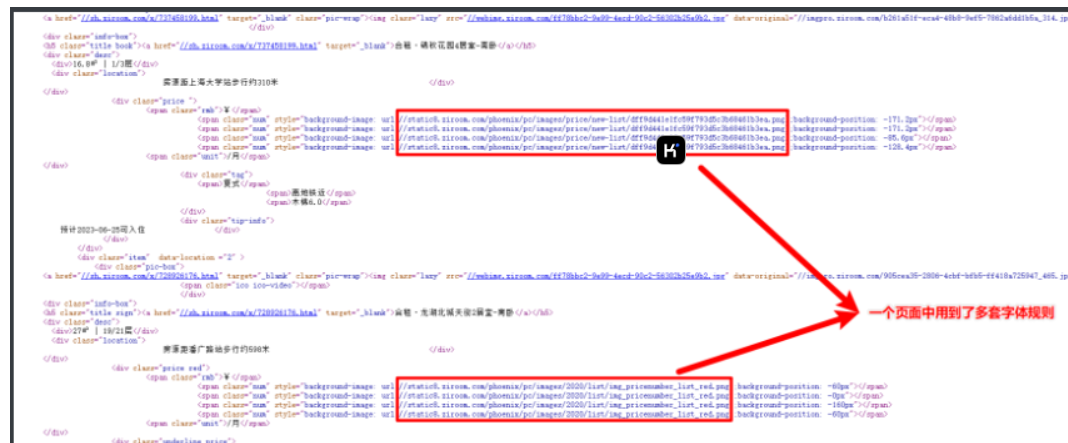
替换字体后,发现有的数据任然替换不了,后续通过分析发现某些页面中会有多套字体图片引用,每套字体的偏移规则不一样,后续通过分析每套字体偏移规则刷字体替换即可,思路和上诉情况一样。
5.4 多套字体替换
import pprint
import re
import ddddocr
import parsel
import requests
headers = {
'User-Agent': 'Mozilla/5.0 (Windows NT 10.0; Win64; x64) AppleWebKit/537.36 (KHTML, like Gecko) Chrome/113.0.0.0 Safari/537.36',
}
def decode_text(mapping, datas):
"""
替换字体数据
@param mapping: 字体映射规则
@param datas: 数据
@return: 替换后的数据
"""
for data in datas:
ret_list = [] # 存放偏移结果替换数据
for move in data['price_list']:
print('偏移量:', move)
value = mapping.get(move, move) # 字典有uni这个键就获取其值, 没有就返回设置的默认值char
ret_list.append(value)
# 重写数据
data['price_list'] = ret_list
return datas
def get_font(font_url, font_rule):
"""
请求字体图片数据, 构建字体映射规则
@param font_url: 字体图片地址
@param font_rule: 分析出来的字体偏移规则
@return: 返回字体映射规则
"""
font_data = requests.get(url=font_url, headers=headers).content
  with open('font.png', mode='wb') as f:
      f.write(font_data)

  """ddddocr识别图片文字"""
  ocr = ddddocr.DdddOcr(beta=True)  # 指定识别模型
  res = ocr.classification(font_data)
  print('字体图片识别结果:', res)

  """构建字体映射规则"""
  font_rules = dict(zip(font_rule, res))
  return font_rules
def send_request(url):
"""
@param url: 请求地址
@return: 字体图片地址, 解析后的数据
"""
response = requests.get(url=url, headers=headers)
html_data = response.text
with open('数据偏移的网页.html', mode='w', encoding='utf-8') as f:
f.write(html_data)
"""解析字体图片地址"""
# <span class="num" style="background-image: url(//static8.ziroom.com/phoenix/pc/images/price/new-list/48d4fa3aa7adf78a1feee05d78f33700.png);background-position: -149.8px"></span>
# <span.*?style="background-image: url\((.*?)\);background-position:.*?"></span>
font_url = re.findall('<span.*?style="background-image: url\((.*?)\);background-position:.*?"></span>',
html_data,
re.S)
################################################################################################################################################################################### 修改
font_url_set = set(['https:' + res for res in
font_url]) ########################################################################################################################## 修改
################################################################################################################################################################################### 修改
# print('字体图片地址:', font_url)
"""解析数据"""
data_list = []
selector = parsel.Selector(html_data)
divs = selector.css('.Z_list-box>div')
for div in divs:
names = div.css('h5>a::text').get()
if not names: # 页面中有一个数据是广告
continue
move_list = [] # 字体偏移量列表
nums = div.css('span.num')
for num in nums:
num_str = num.get()
num_result = re.findall('background-position: (.*?)"', num_str, re.S)[0]
move_list.append(num_result)
data_list.append({'names': names, 'price_list': move_list})
return font_url_set, data_list
if __name__ == '__main__':
# """发送请求, 解析图片地址和需要解密的字体数据"""
# font_url, data_list = send_request('https://sh.ziroom.com/z/')
# print('字体图片地址:', font_url)
# print('解析后的数据:', data_list)
#
# """请求字体图片数据, 构建字体映射规则"""
# # 分析出来的字体偏移规则
# move = ['-0px', '-21.4px', '-42.8px', '-64.2px', '-85.6px', '-107px', '-128.4px', '-149.8px', '-171.2px', '-192.6px']
# mapping = get_font(font_url, move)
# print('字体映射规则:', mapping)
#
# """替换字体数据, 得到最终结果"""
# result = decode_text(mapping, data_list)
# pprint.pprint(result)
"""解决第二套字体"""
"""发送请求, 解析图片地址和需要解密的字体数据"""
# 修改函数解析字体图片地址代码逻辑: (列表推导式加https协议)+(集合去重字体图片地址) -->代码注释修改部分
font_url_set, data_list = send_request('https://sh.ziroom.com/z/p45/')
print('字体图片地址:', font_url_set)
print('解析后的数据:', data_list)
"""通过循环去刷字体, 替换"""
grey_rule = ['-0px', '-15px', '-30px', '-45px', '-60px', '-75px', '-90px', '-105px', '-120px', '-135px']
yellow_rule = ['-0px', '-21.4px', '-42.8px', '-64.2px', '-85.6px', '-107px', '-128.4px', '-149.8px', '-171.2px',
'-192.6px']
red_rule = ['-0px', '-20px', '-40px', '-60px', '-80px', '-100px', '-120px', '-140px', '-160px', '-180px']
# 通过分析发现有三套字体 --> 一个是价格删除线的灰色字体, 一个是黄色字体, 一个是红色字体, 且字体顺序会发生改变
for font_url in font_url_set:
if 'new-list' in font_url: # 黄色字体地址中包含 new-list 字符串, 由此做判断逻辑
mapping = get_font(font_url, yellow_rule) # 黄色字体映射规则
data_list = decode_text(mapping, data_list) # 替换字体, 覆盖上面 data_list 变量
# pprint.pprint(data_list)
if 'list_red' in font_url: # 红色字体地址中包含 list_red-list 字符串, 由此做判断逻辑
mapping = get_font(font_url, red_rule) # 红色字体映射规则
data_list = decode_text(mapping, data_list) # 替换字体, 覆盖上面 data_list 变量
# pprint.pprint(data_list)
if 'list_grey' in font_url:
mapping = get_font(font_url, grey_rule) # 灰色字体映射规则
data_list = decode_text(mapping, data_list) # 替换字体, 覆盖上面 data_list 变量
pprint.pprint(data_list)套用模板
3.代码实现
版本1
速度较慢,在我本机上实测30秒完成识别
只需在 jiexi_fontFile 函数中输入对应的字体的路径即可
import time
import ddddocr
import io
import matplotlib.pyplot as plt
from fontTools.ttLib import TTFont
from fontTools.pens.freetypePen import FreeTypePen

def jiexi_fontFile(filepath):
    start_time=time.time()
    font = TTFont(filepath)  # 解析字体文件
    fontdata=font.getGlyphSet()
    dic = {}  # 保存识别结果的字典
    ocr = ddddocr.DdddOcr(beta=True,show_ad=False)    # ocr识别字体
    for n, v in font.getBestCmap().items():
        glyph = fontdata[v]
        pen = FreeTypePen(None)  # 实例化Pen子类
        glyph.draw(pen)  # 画出字形轮廓
        b = pen.array()
        iodata = io.BytesIO()
        plt.imshow(b)
        plt.axis('off')  # 禁用坐标轴
        plt.savefig(iodata, format='PNG')
        plt.close()
        result = ocr.classification(iodata.getvalue())    # 识别结果
        dic[n] = result
        print(n,'------>',result)
    print('耗时:',time.time()-start_time)
    print('长度:',len(dic))
    return dic


print(jiexi_fontFile('96fc7b50b772f52.woff2'))
版本2
速度更快,在我本机上实测4秒完成识别
只需在 identify_word 函数中输入对应的字体的路径即可
import time
import ddddocr
from io import BytesIO
from PIL import Image, ImageDraw, ImageFont
from fontTools.ttLib import TTFont

def font_to_img(_code, font_path):
    """
    将每个字体画成图片
    :param _code:字体的数字码点
    :param font_path:字体文件路径
    :return: 每个字体图片对象
    """
    img_size = 1024
    img = Image.new('1', (img_size, img_size), 255)
    draw = ImageDraw.Draw(img)
    font = ImageFont.truetype(font_path, int(img_size * 0.7))
    txt = chr(_code)
    bbox = draw.textbbox((0, 0), txt, font=font)
    x = bbox[2] - bbox[0]
    y = bbox[3] - bbox[1]
    draw.text(((img_size - x) // 2, (img_size - y) // 7), txt, font=font, fill=0)
    return img


def identify_word(font_path):
    """
    :param font_path:字体文件地址
    :return:字体印射规则
    """
    font = TTFont(font_path)
    ocr = ddddocr.DdddOcr(beta=True)
    font_mapping = {}
    for cmap_code, glyph_name in font.getBestCmap().items():
        bytes_io = BytesIO()
        pil = font_to_img(cmap_code, font_path)
        pil.save(bytes_io, format="PNG")
        word = ocr.classification(bytes_io.getvalue())  # 识别字体
        print(f'数字Unicode:{[cmap_code]}-{[glyph_name]}-识别结果:{word}')
        # 构建字体印射规则
        font_mapping[cmap_code] = word

    """去除字体印射识别为空的键值对"""
    del_key = []  # 收集要删除的键
    for key, value in font_mapping.items():
        if not value:
            del_key.append(key)
    for i in del_key:
        font_mapping.pop(i)
    return font_mapping  # 返回字体印射规则

s_t = time.time()
mapping = identify_word('96fc7b50b772f52.woff2')
print('耗时:', time.time() - s_t)
print('长度:', len(mapping))
print('字体印射规则:', mapping)
四.项目实战
1. 采集目标
2. 逆向结果
import requests
from lxml import etree
import re
from fontTools.ttLib import TTFont
class SXS():
def __init__(self):
self.url = 'https://www.shixiseng.com/interns?keyword=%E4%BA%92%E8%81%94%E7%BD%91IT&city=%E5%85%A8%E5%9B%BD&type=intern&from=menu'
self.headers = {
"authority": "www.shixiseng.com",
"accept": "text/html,application/xhtml+xml,application/xml;q=0.9,image/avif,image/webp,image/apng,*/*;q=0.8,application/signed-exchange;v=b3;q=0.7",
"accept-language": "zh-CN,zh;q=0.9",
"cache-control": "no-cache",
"pragma": "no-cache",
"sec-ch-ua": "^\\^Not",
"sec-ch-ua-mobile": "?0",
"sec-ch-ua-platform": "^\\^Windows^^",
"sec-fetch-dest": "document",
"sec-fetch-mode": "navigate",
"sec-fetch-site": "none",
"sec-fetch-user": "?1",
"upgrade-insecure-requests": "1",
"user-agent": "Mozilla/5.0 (Windows NT 10.0; Win64; x64) AppleWebKit/537.36 (KHTML, like Gecko) Chrome/121.0.0.0 Safari/537.36"
}
def get_data(self):
res = requests.get(self.url, headers=self.headers)
ttf = 'https://www.shixiseng.com' + \
re.findall('">@font-face { font-family: myFont; src: url\((.*?)\);}', res.text)[0]
font = requests.get(ttf)
with open('file.woff', 'wb')as f:
f.write(font.content)
with open('index.html', 'w', encoding='utf-8')as f:
f.write(res.text)
def get_font_data(self):
font_dict = {}
font = TTFont('file.woff')
# print(font.getBestCmap())
for k, v in font.getBestCmap().items():
if v[3:]:
content = "\\u00" + v[3:] if len(v[3:]) == 2 else "\\u" + v[3:]
real_content = content.encode('utf-8').decode('unicode_escape')
k_hex = hex(k)
# 网页返回的字体是以&#x开头 ,换成以这个开头,下面代码就是直接替换
real_k = k_hex.replace("0x", "&#x")
font_dict[real_k] = real_content
# print(font_dict)
return font_dict
def parse_data(self, font_dict):
with open('index.html', encoding='utf-8')as f:
data = f.read()
for k, v in font_dict.items():
# print(k, v)
data = data.replace(k, v)
html_Data = etree.HTML(data)
div_list = html_Data.xpath('//div[@class="clearfix intern-detail"]')
for i in div_list:
comp = i.xpath('./div/p/a[@class="title ellipsis"]/text()')[0]
price = i.xpath('.//span[@class="day font"]/text()')[0]
title = i.xpath('.//div[@class="f-l intern-detail__job"]/p/a[1]/text()')[0]
print(comp, price, title)
def main(self):
data = self.get_data()
# print(data)
font_dict = self.get_font_data()
self.parse_data(font_dict)
if __name__ == '__main__':
sxs = SXS()
sxs.main()
