前言
本篇文章主要是实现仿QQ步数View ,很老的一个View了,但技术永不落后,开搂!
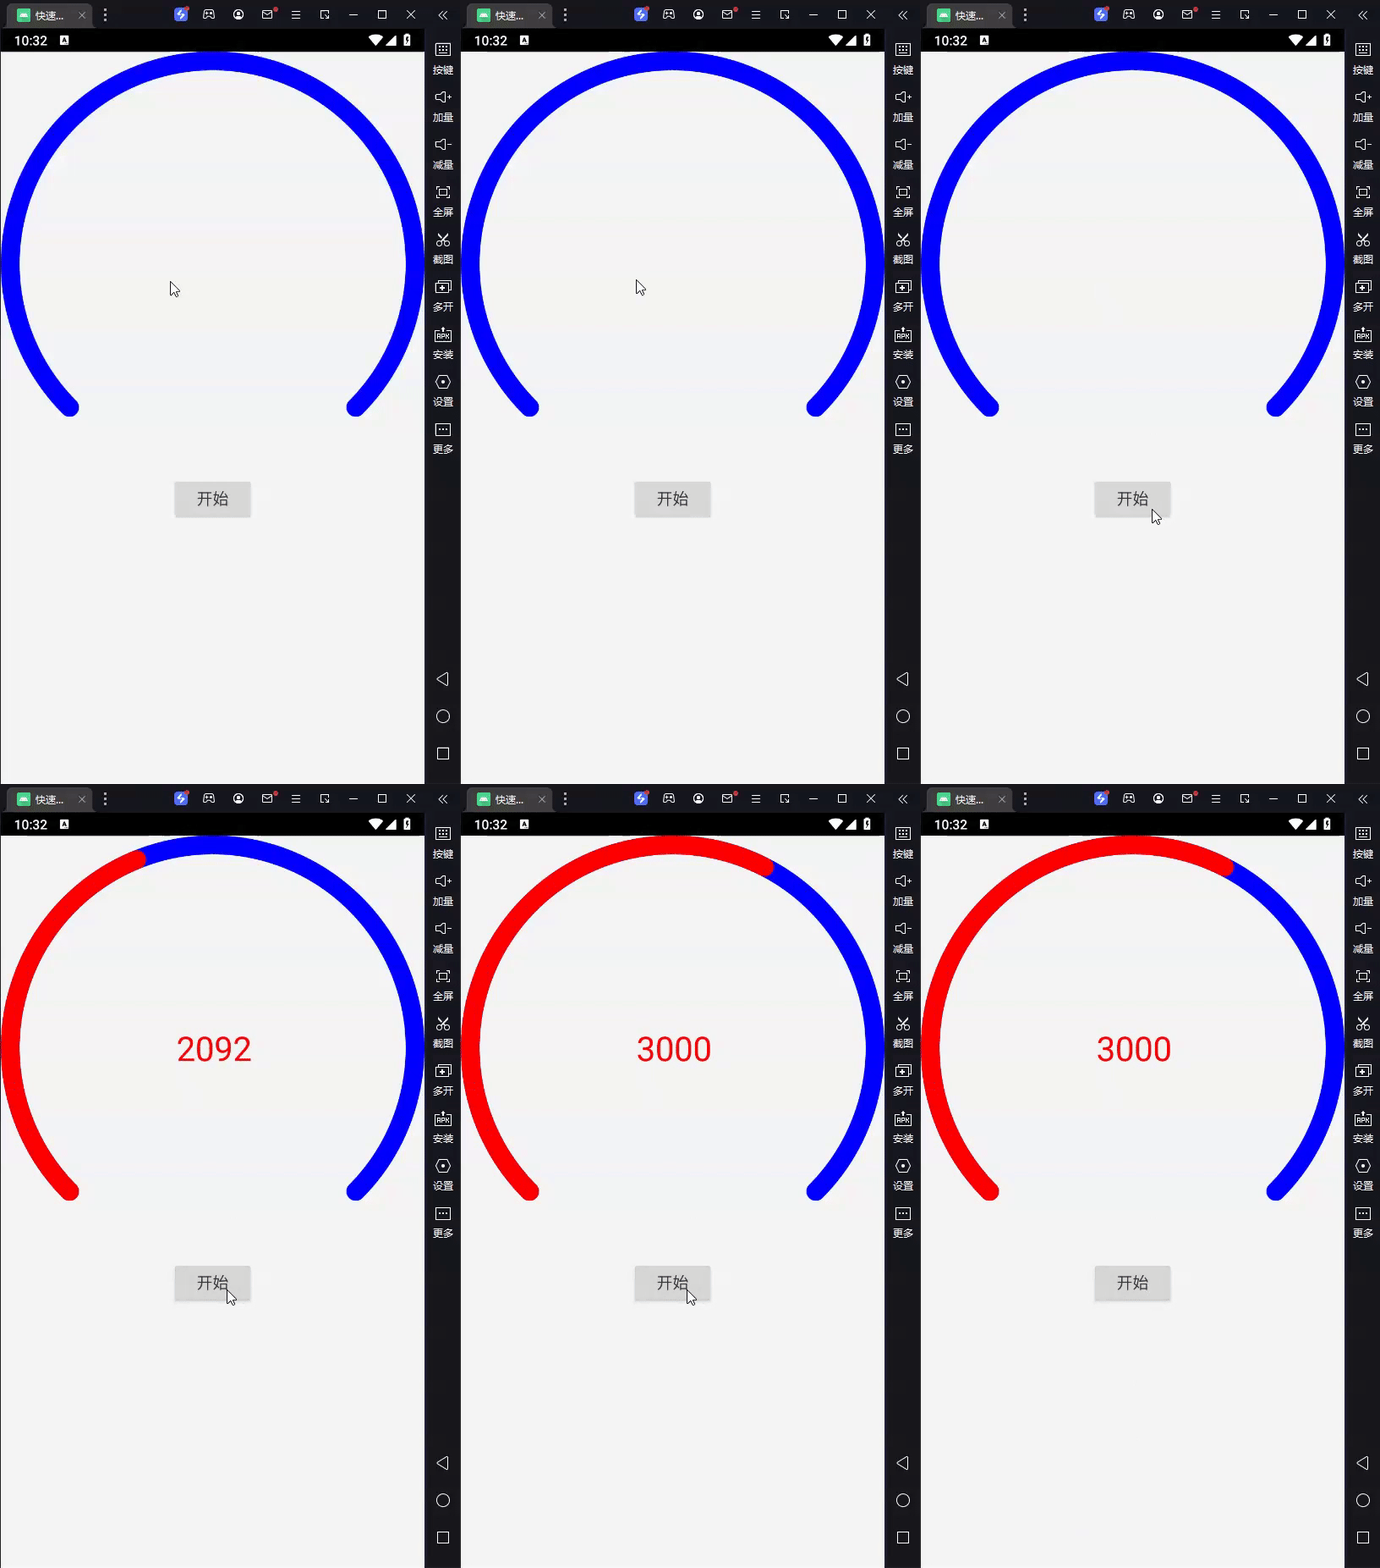
最终效果如下:

1. 结构分析
QQStepView 主要由三个元素组成:
- 显示一个圆环进度条,通过外环和内环的角度变化来表示进度。
- 支持自定义外环颜色、内环颜色、进度文本颜色和文本大小,这些都可以通过 XML 属性来配置。
- 支持动态更新进度 ,通过方法
setStep(int step)可以更新当前进度。
2. 定义自定义属性
为了使该控件在 XML 布局文件中可配置,我们需要定义一些自定义属性,例如外圈颜色、内圈颜色、边框宽度、文本大小和文本颜色。这些属性可以通过 res/values/attrs.xml 文件来定义:
xml
<declare-styleable name="QQStepView">
    <attr name="outerColor" format="color" />
    <attr name="innerColor" format="color" />
    <attr name="borderWidth" format="dimension" />
    <attr name="stepTextSize" format="dimension" />
    <attr name="stepTextColor" format="color" />
</declare-styleable>
3. 初始化视图元素
通过 TypedArray 获取用户在 XML 中设置的属性。
java
public QQStepView(Context context, @Nullable AttributeSet attrs) {
    super(context, attrs);
    TypedArray array = context.obtainStyledAttributes(attrs, R.styleable.QQStepView);
    mOuterColor = array.getColor(R.styleable.QQStepView_outerColor, mOuterColor);
    mInnerColor = array.getColor(R.styleable.QQStepView_innerColor, mInnerColor);
    mBorderWidth = array.getDimensionPixelSize(R.styleable.QQStepView_borderWidth, mBorderWidth);
    mStepTextSize = array.getDimensionPixelSize(R.styleable.QQStepView_stepTextSize, mStepTextSize);
    mStepTextColor = array.getColor(R.styleable.QQStepView_stepTextColor, mStepTextColor);
    array.recycle();
}
初始化画笔(Paint)
java
mOuterPaint = new Paint();
mOuterPaint.setColor(mOuterColor);
mOuterPaint.setAntiAlias(true);
mOuterPaint.setStyle(Paint.Style.STROKE); // 实心
mOuterPaint.setStrokeWidth(mBorderWidth);
mOuterPaint.setStrokeCap(Paint.Cap.ROUND);

mInnerPaint = new Paint();
mInnerPaint.setColor(mInnerColor);
mInnerPaint.setAntiAlias(true);
mInnerPaint.setStyle(Paint.Style.STROKE);
mInnerPaint.setStrokeWidth(mBorderWidth);
mInnerPaint.setStrokeCap(Paint.Cap.ROUND);

mTextPaint = new Paint();
mTextPaint.setColor(mStepTextColor);
mTextPaint.setTextSize(mStepTextSize);
mTextPaint.setAntiAlias(true);
4. 测量视图尺寸(onMeasure)
在这里,我们确保视图是正方形,即宽高相等。如果布局中的宽高为 wrap_content,我们通过 MeasureSpec 获取最大的尺寸,使用最小值来确保宽高相等:
java
@Override
protected void onMeasure(int widthMeasureSpec, int heightMeasureSpec) {
    super.onMeasure(widthMeasureSpec, heightMeasureSpec);
    int width = MeasureSpec.getSize(widthMeasureSpec);
    int height = MeasureSpec.getSize(heightMeasureSpec);
    int size = Math.min(width, height);
    setMeasuredDimension(size, size); // 确保视图为正方形
}
5. 绘制视图内容(onDraw)
我们逐步绘制外圆弧、内圆弧和文本。
本文重点概念就是canvas.drawArc,能理解这个方法的使用就行了。
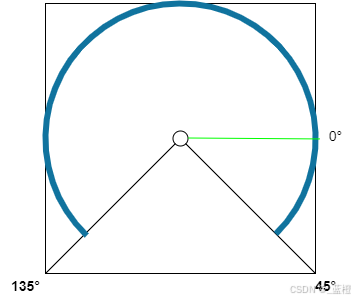
画了一张简图,配合着源码,接下来逐个分析其参数使用。

java
public void drawArc (RectF oval, float startAngle, float sweepAngle, boolean useCenter, @NonNull Paint paint)-
RectF oval:定义弧形的外接矩形。
RectF是一个矩形类,用来表示一个矩形的边界。弧形是通过外接矩形来确定的,所以这个矩形将决定弧形的大小和位置。oval定义了一个圆形的外接矩形。就是上图的正方形。 -
float startAngle:弧形的起始角度,单位是度(°)。这个角度表示弧形起始的方向,是从矩形的水平坐标轴开始计算的。即上图中的绿色线就是0°
由上图可知,我们的圆弧起始角度为 135 度。
-
float sweepAngle:弧形的扫过角度,单位是度(°)。这个角度表示弧形从起始角度开始扫过的角度,决定了弧形的弯曲度。如果是正数,表示顺时针方向绘制弧形;如果是负数,表示逆时针方向。扫过的角度为 360 - 90 = 270度。
-
boolean useCenter:是否绘制弧形的中心线。如果 useCenter 为 true,那么弧形会从矩形的中心到达弧形的起始和终止角度。如果 useCenter 为 false,则弧形的边缘将仅仅通过 startAngle 和 sweepAngle 绘制出来,而不会连到中心点。就是上图下面那两根连接中点的黑线。在我们代码中
useCenter设置为 false,意味着我们只绘制一个环形弧,而不是一个扇形。 -
@NonNull Paint paint:用于定义弧形样式的 Paint 对象
Paint用来设置绘制图形的颜色、样式、宽度等属性。
5.1 绘制外圆弧
首先,我们绘制外圆弧,这是显示总步数的背景。外圆弧的起始角度为135°,覆盖270°:
java
int center = getWidth() / 2; // 获取圆心位置
int radius = center - mBorderWidth / 2; // 半径要减去边框宽度的一半

RectF oval = new RectF(center - radius, center - radius, center + radius, center + radius);
canvas.drawArc(oval, 135, 270, false, mOuterPaint); // 绘制外圆弧
5.2 绘制内圆弧
内圆弧表示当前步数的进度。根据 mStepCurrent 和 mStepMax 计算内圆弧的弧度。如果步数为0,则不绘制内圆弧:
java
if (mStepCurrent <= 0) return;
float sweepAngle = (float) mStepCurrent / mStepMax * 270; // 计算当前步数对应的弧度
canvas.drawArc(oval, 135, sweepAngle, false, mInnerPaint); // 绘制内圆弧
5.3 绘制文本
最后,绘制步数文本。文本需要居中显示,因此我们计算文本的宽度和高度,然后调整其位置,使其垂直居中和水平居中。基线概念上篇文章已经介绍了,在这里直接使用,不理解的可以翻翻上一篇去查看。
java
String stepText = mStepCurrent + "";
Rect bounds = new Rect();
mTextPaint.getTextBounds(stepText, 0, stepText.length(), bounds);
int dx = getWidth() / 2 - bounds.width() / 2; // 水平偏移量

Paint.FontMetricsInt fontMetrics = mTextPaint.getFontMetricsInt();
int dy = (fontMetrics.bottom - fontMetrics.top) / 2 - fontMetrics.bottom; // 垂直偏移量
int baseLine = center + dy; // y轴偏移量

canvas.drawText(stepText, dx, baseLine, mTextPaint); // 绘制文本
6. 更新视图(setStep 和 setStepMax)
为了让步数进度条动态变化,我们提供了两个方法:setStep 用来设置当前步数,setStepMax 用来设置最大步数。在设置值后,调用 invalidate() 方法刷新视图:
java
public synchronized void setStep(int step) {
    mStepCurrent = step;
    invalidate(); // 刷新视图
}

public synchronized void setStepMax(int stepMax) {
    mStepMax = stepMax;
    invalidate(); // 刷新视图
}
7. 使用
这里使用了属性动画使View更新更丝滑,和插值器使动画更自然。
kotlin
 val myView = findViewById<QQStepView>(R.id.step_view)

        myView.setStepMax(5000)

        //属性动画
        val valueAnimator = ValueAnimator.ofInt(0, 3000);//表示从 0 到 3000 之间的整数值变化
        valueAnimator.setDuration(1000) //设置动画的持续时间为 1000 毫秒(1 秒)。这个动画会在 1 秒内从 0 平滑地增加到 3000。
        valueAnimator.interpolator = android.view.animation.DecelerateInterpolator()//开始时较快,结束时较慢
        valueAnimator.addUpdateListener { animation ->
            val value = animation.animatedValue as Int
            myView.setStep(value)
        }

        findViewById<Button>(R.id.btn_start).clickNoRepeat {
            valueAnimator.start()
        }
8. 完整代码
java
public class QQStepView extends View {

    private int mOuterColor = Color.RED;
    private int mInnerColor = Color.BLUE;
    private int mBorderWidth = 20; //px
    private int mStepTextSize;
    private int mStepTextColor;

    private Paint mOuterPaint;
    private Paint mInnerPaint;
    private Paint mTextPaint;

    private int mStepMax = 100;
    private int mStepCurrent = 0;


    public QQStepView(Context context) {
        this(context, null);
    }

    public QQStepView(Context context, @Nullable AttributeSet attrs) {
        this(context, attrs, 0);
    }

    public QQStepView(Context context, @Nullable AttributeSet attrs, int defStyleAttr) {
        super(context, attrs, defStyleAttr);

        // 1.分析效果
        // 2.确定自定义属性 attr.xml
        // 3.在布局文件中使用
        // 4.在自定义View 中获取自定义属性
        TypedArray array = context.obtainStyledAttributes(attrs, R.styleable.QQStepView);
        mOuterColor = array.getColor(R.styleable.QQStepView_outerColor, mOuterColor);
        mInnerColor = array.getColor(R.styleable.QQStepView_innerColor, mInnerColor);
        mBorderWidth = array.getDimensionPixelSize(R.styleable.QQStepView_borderWidth, mBorderWidth);
        mStepTextSize = array.getDimensionPixelSize(R.styleable.QQStepView_stepTextSize, mStepTextSize);
        mStepTextColor = array.getColor(R.styleable.QQStepView_stepTextColor, mStepTextColor);
        array.recycle();

        mOuterPaint = new Paint();
        mOuterPaint.setColor(mOuterColor);
        mOuterPaint.setAntiAlias(true);
        mOuterPaint.setStyle(Paint.Style.STROKE); //实心
        mOuterPaint.setStrokeWidth(mBorderWidth);
        mOuterPaint.setStrokeCap(Paint.Cap.ROUND);

        mInnerPaint = new Paint();
        mInnerPaint.setColor(mInnerColor);
        mInnerPaint.setAntiAlias(true);
        mInnerPaint.setStyle(Paint.Style.STROKE);
        mInnerPaint.setStrokeWidth(mBorderWidth);
        mInnerPaint.setStrokeCap(Paint.Cap.ROUND);

        mTextPaint = new Paint();
        mTextPaint.setColor(mStepTextColor);
        mTextPaint.setTextSize(mStepTextSize);
        mTextPaint.setAntiAlias(true);

        // onMeasure
        // 6.画外圆弧 画内圆弧 画文字
        // 7.其他
    }

    @Override
    protected void onMeasure(int widthMeasureSpec, int heightMeasureSpec) {
        super.onMeasure(widthMeasureSpec, heightMeasureSpec);
        // 布局可能是宽高 wrap_content
        //读取模式 AT_MOST 40dp

        // 宽高不一致 取最小值,确保是正方形
        int width = MeasureSpec.getSize(widthMeasureSpec);
        int height = MeasureSpec.getSize(heightMeasureSpec);

        int size = Math.min(width, height);

        setMeasuredDimension(size, size);
    }

    @Override
    protected void onDraw(Canvas canvas) {
        super.onDraw(canvas);

        // 1.画外圆弧
        int center = getWidth() / 2;
        int radius = center - mBorderWidth / 2;

        //RectF oval, float startAngle, float sweepAngle, boolean useCenter, @NonNull Paint paint
        RectF oval = new RectF(center - radius, center - radius, center + radius, center + radius);

        canvas.drawArc(oval, 135, 270, false, mOuterPaint);

        // 2.画内圆弧
        if (mStepCurrent <= 0) return;
        float sweepAngle = (float) mStepCurrent / mStepMax * 270;
        canvas.drawArc(oval, 135, sweepAngle, false, mInnerPaint);

        // 3.画文字
        String stepText = mStepCurrent + "";

        //控件的一半 减去 文字的一半
        Rect bounds = new Rect();
        mTextPaint.getTextBounds(stepText, 0, stepText.length(), bounds);
        int dx = getWidth() / 2 - bounds.width() / 2; // x轴偏移量

        //基线
        Paint.FontMetricsInt fontMetrics = mTextPaint.getFontMetricsInt();
        int dy = (fontMetrics.bottom - fontMetrics.top) / 2 - fontMetrics.bottom;
        int baseLine = center + dy; // y轴偏移量

        canvas.drawText(stepText, dx, baseLine, mTextPaint);
    }

    // 动起来
    public synchronized void setStep(int step) {
        mStepCurrent = step;
        invalidate();
    }

    public synchronized void setStepMax(int stepMax) {
        mStepMax = stepMax;
        invalidate();
    }
}另外给喜欢记笔记的同学安利一款好用的云笔记软件,对比大部分国内的这个算还不错的,免费好用:wolai