原文:https://medium.com/simform-engineering/build-vs-code-extension-using-vuejs-0714262af709
有没有想过创建自己的 VS Code 扩展?系好安全带,因为 JavaScript 和 VueJS 可以成为您的秘密武器!本指南深入探讨使用 VueJS 进行 VS Code 扩展开发的激动人心的世界,使您能够制作直观且交互式的扩展,从而简化您的编码体验。
目录:
- 如何设置和使用VueJS + Webview UI 工具包
- 如何在开发模式下运行扩展
- 上下文菜单选项
- 嵌套上下文菜单
- 自定义 Webview 中的侧边栏
- 从 Webview 到扩展以及扩展到 Webview 的消息处理
- 部署 VS Code 扩展
如何设置和使用 VueJS + Webview UI 工具包
- 从官方文档下载使用 VueJS + Webview 创建 VS Code 扩展的样板代码。
- 运行以下命令从存储库下载代码。
bash
git init
git remote add origin https://github.com/microsoft/vscode-webview-ui-toolkit-samples.git
git config core.sparseCheckout true
echo "frameworks/hello-world-vue" >> .git/info/sparse-checkout
git pull origin main
cd frameworks
cd hello-world-vue
code .
bash
# Install dependencies for both the extension and webview UI source code
npm run install:all

# Build webview UI source code
npm run build:webview
打开示例后,要在 VS Code 中运行扩展,请按照以下步骤操作:
- 按下
F5即可打开新的扩展开发主机窗口。 - 在主机窗口中,打开命令面板(
Ctrl+Shift+P或Cmd+Shift+P在 Mac 上)并输入Hello World (Vue): Show。
如何在开发模式下测试代码
要进行测试,您需要npm run build:webview每次使用 创建一个构建。之后,使用 打开一个新的 VS Code 窗口F5,并使用 执行硬重新加载ctrl + R。我知道这可能很耗时,但这对于在开发模式下进行测试是必要的。
bash
# Run this code in terminal
npm run build:webview
npm run compile

# In new terminal
npm run watch

# Press F5 and new development window will open
ctrl + R
extension.ts 文件是什么?
该extension.ts文件是用 TypeScript 编写的 VS Code 扩展的基本组成部分。它充当扩展功能的入口点,就像扩展激活时执行的主脚本一样。
上下文菜单选项
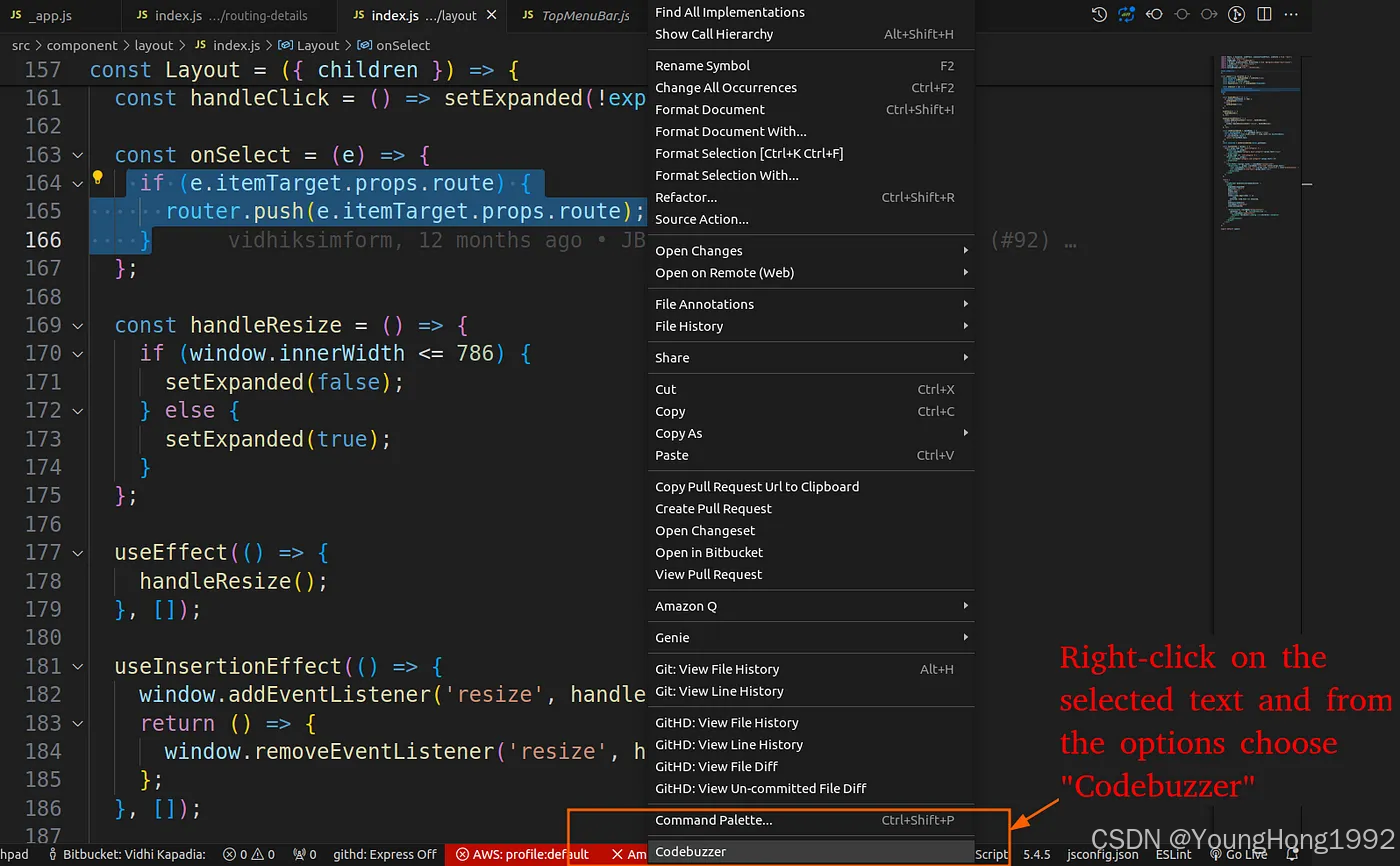
我们将学习如何添加上下文菜单选项,该选项仅在编辑器中选择文本时出现。
包文件
首先,我们在文件中定义扩展的贡献package.json。此文件指定命令和上下文菜单项:
bash
"contributes": {
  "commands": [
    {
      "command": "editor.showContextMenu",
      "title": "Codebuzzer"
    }
  ],
  "menus": {
    "editor/context": [
      {
        "command": "editor.showContextMenu",
        "when": "editorHasSelection",
        "title": "Codebuzzer"
      }
    ]
  }
}- Commands: 注册一个具有标识符
editor.showContextMenu和标题Codebuzzer的命令。 - Menus: 将此命令添加到编辑器的上下文菜单,条件
when是必须选择文本(editorHasSelection)。菜单项的标题为Codebuzzer。
extension.ts
接下来,我们在 中实现扩展的功能extension.ts。
bash
import * as vscode from "vscode";

export async function activate(context: vscode.ExtensionContext) {

  // Register the command for context menu contribution
  const submenuContribution = vscode.commands.registerCommand(
    "editor.showContextMenu",
    () => {
      const selection = vscode.window.activeTextEditor?.selection;

      if (selection && !selection.isEmpty) {
        // Inform the user that the context menu option was triggered
        vscode.window.showInformationMessage("Context menu option selected with text.");
      } else {
        // Inform the user if no text is selected
        vscode.window.showInformationMessage("Select some text to get suggestions.");
      }
    }
  );

  // Add the command to the subscriptions so it gets disposed properly
  context.subscriptions.push(submenuContribution);
}
嵌套上下文菜单选项
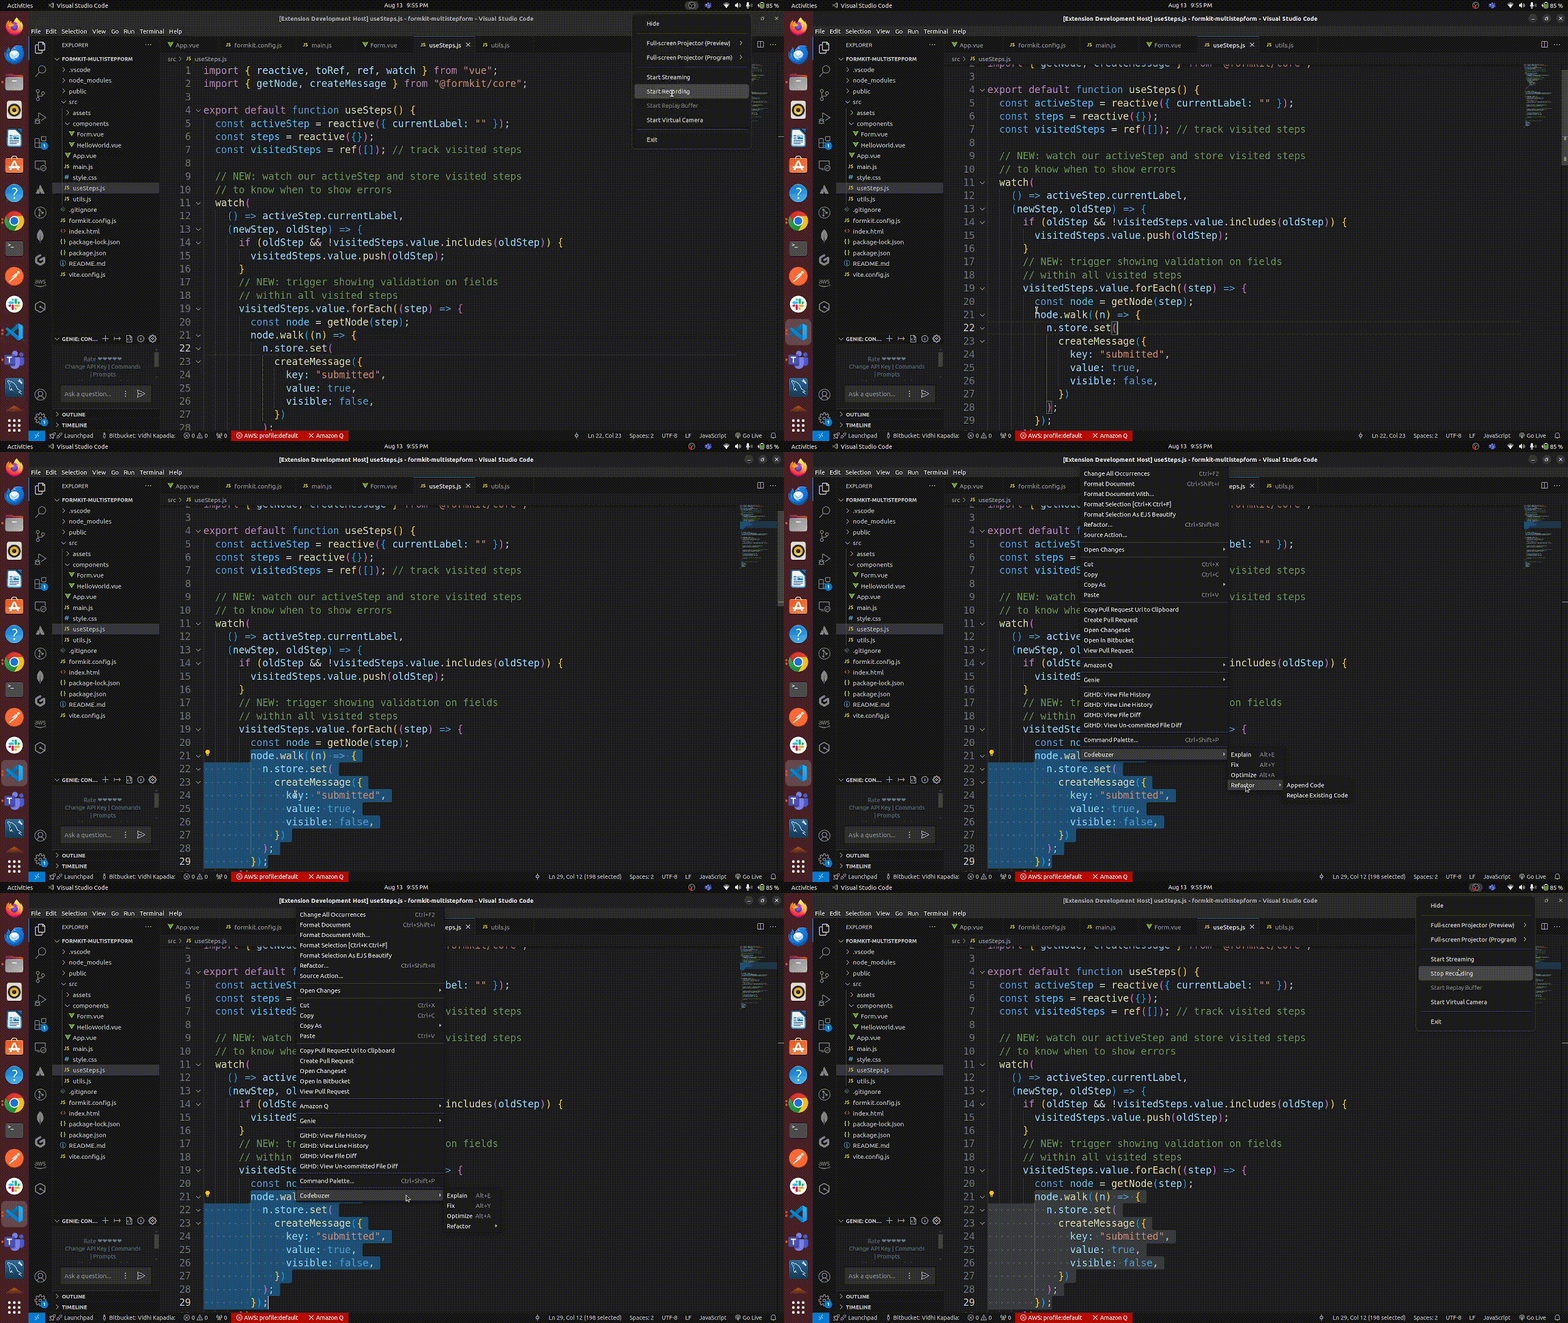
嵌套的上下文菜单将允许我们在子菜单下组织相关命令,从而使上下文菜单更加结构化和用户友好。
package.json
首先,我们在文件中定义扩展的贡献package.json。此文件指定命令、子菜单和上下文菜单项:
bash
"contributes": {
  "commands": [
    {
      "command": "demo.explain",
      "title": "Explain"
    },
    {
      "command": "demo.refactor",
      "title": "Refactor"
    },
    {
      "command": "demo.fix",
      "title": "Fix"
    },
    {
      "command": "demo.optimize",
      "title": "Optimize"
    },
    {
      "command": "demo.appendCode",
      "title": "Append Code"
    },
    {
      "command": "demo.replaceExistingCode",
      "title": "Replace Existing Code"
    }
  ],
  "submenus": [
    {
      "id": "submenuId",
      "label": "Codebuzzer"
    },
    {
      "id": "refactorSubMenuId",
      "label": "Refactor"
    }
  ],
  "menus": {
    "editor/context": [
      {
        "when": "editorHasSelection",
        "submenu": "submenuId"
      }
    ],
    "submenuId": [
      {
        "command": "demo.explain"
      },
      {
        "command": "demo.fix"
      },
      {
        "label": "Refactor",
        "submenu": "refactorSubMenuId"
      },
      {
        "command": "demo.optimize"
      }
    ],
    "refactorSubMenuId": [
      {
        "command": "demo.appendCode",
        "when": "editorHasSelection"
      },
      {
        "command": "demo.replaceExistingCode",
        "when": "editorHasSelection"
      }
    ]
  }
}
使用 Webview 面板自定义侧边栏
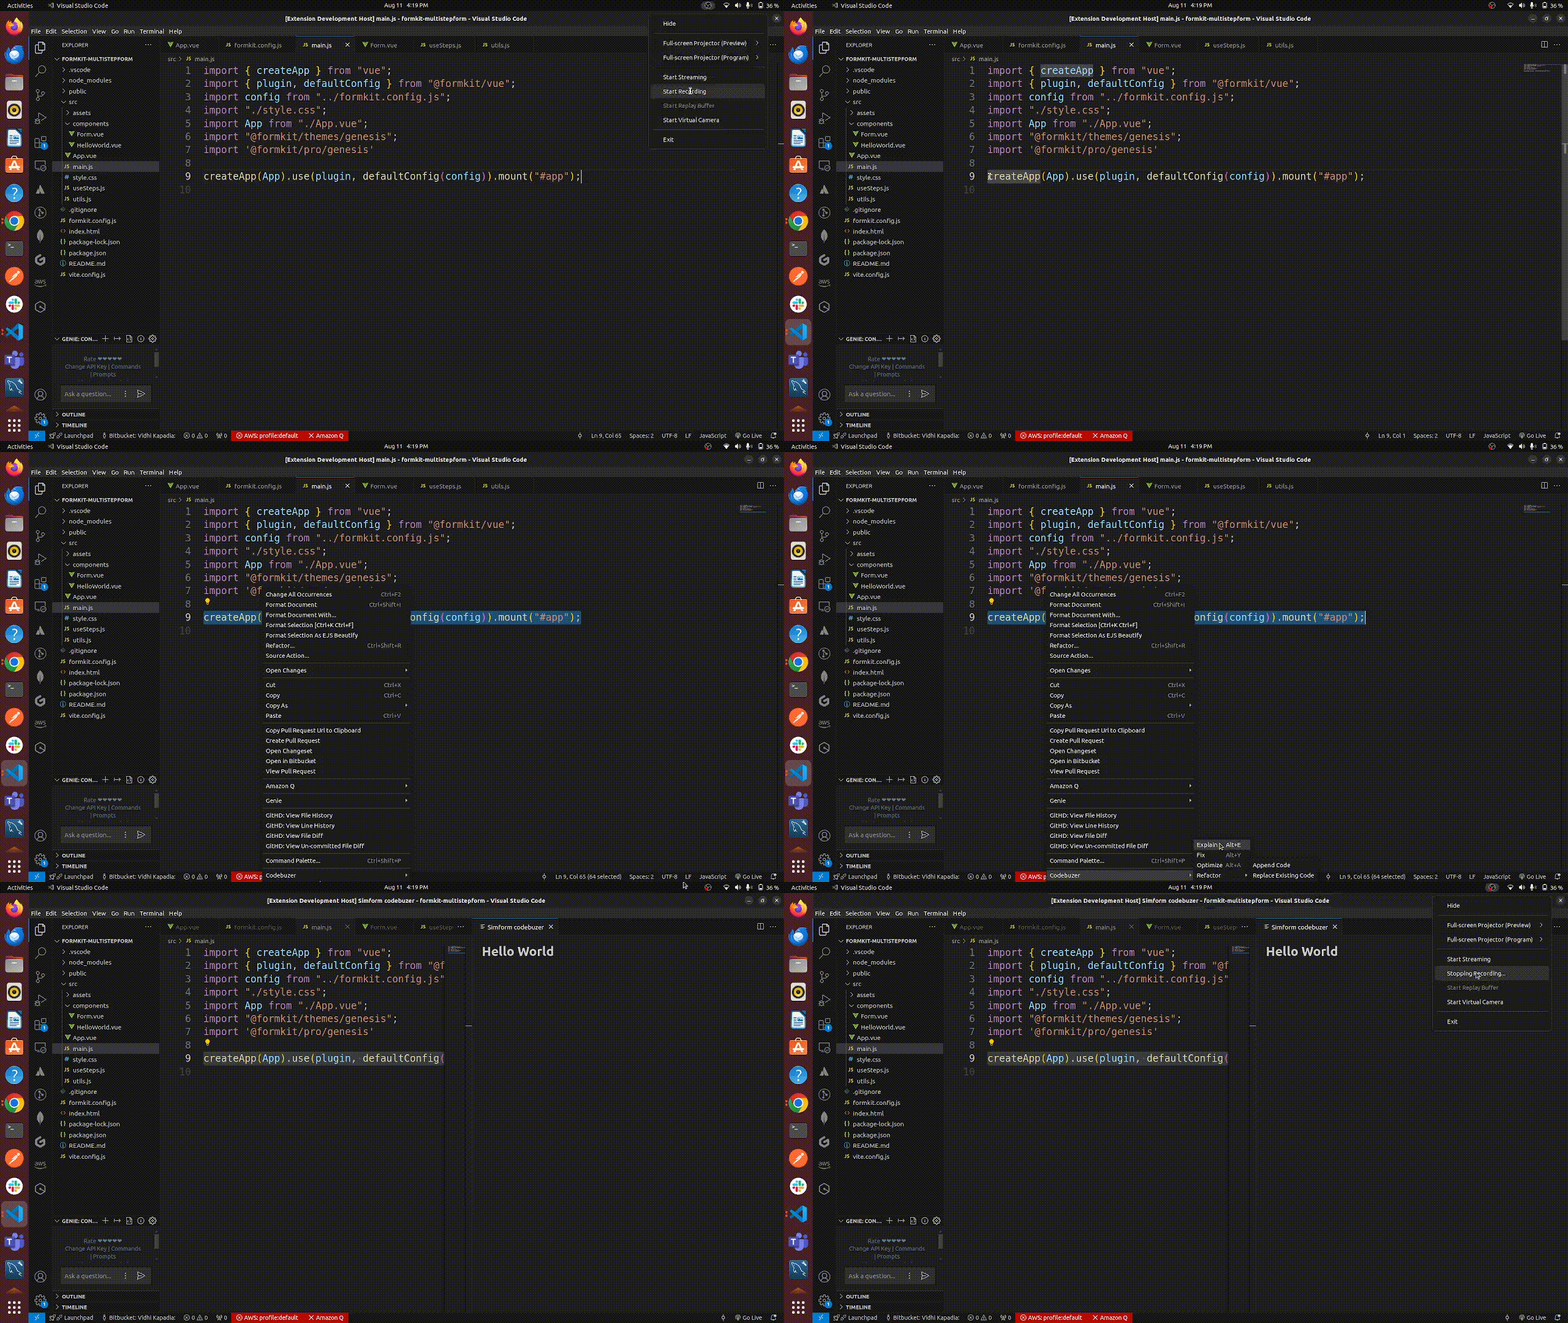
创建一个名为Codebuzzer的 Webview 面板,它将出现在当前活动的编辑器旁边。它还在 Webview 中启用 JavaScript 并将资源加载限制到特定目录。
bash
const panel = window.createWebviewPanel(
        // Panel view type
        "showHelloWorld",
        // Panel title
        "Codebuzzer",
        // The editor column the panel should be displayed in
        ViewColumn.Beside,
        // Extra panel configurations
        {
          // Enable JavaScript in the webview
          enableScripts: true,
          // Restrict the webview to only load resources from the `out` and `webview-ui/build` directories
          localResourceRoots: [
            Uri.joinPath(extensionUri, "out"),
            Uri.joinPath(extensionUri, "webview-ui/build"),
          ],
        }
);在webview-ui文件夹中,您可以编写任何您想要的 VueJS 代码。在这里我在 h1 标签内/scr/App.vue写了Hello World 。
将消息从扩展程序传递到 Webview
要从 VS Code 扩展向 Webview 发送消息,可以使用该postMessage方法。此方法将数据发送到 Webview,然后由在 Webview 中运行的相应脚本处理。
bash
const panel = vscode.window.createWebviewPanel(
    "showHelloWorld",
    "Codebuzzer",
    vscode.ViewColumn.One,
    { enableScripts: true }
);

// Function to send a message to the Webview
function sendMessageToWebview() {
    panel.webview.postMessage({ command: 'update', text: 'Hello from the extension!' });
}
处理 Webview 中的消息
在您的 Webview 的 HTML/JavaScript 中,您可以使用该方法监听来自扩展的消息window.addEventListener('message', ...)。
在VueJS中,我们可以监听里面的事件onmounted。
bash
onMounted(() => {
      window.addEventListener('message', event => {
            const message = event.data; // The JSON data that the extension sent
            if (message.command === 'update') {
                document.getElementById('message').textContent = message.text;
            }
        });
});
从 Webview 向扩展程序传递消息
要将消息从 Webview 发送回扩展,请使用vscode.postMessage VS Code API 提供的方法。
bash
<!DOCTYPE html>
<html lang="en">
<head>
    <meta charset="UTF-8">
    <meta name="viewport" content="width=device-width, initial-scale=1.0">
    <title>My Webview</title>
</head>
<body>
    <button id="send">Send Message to Extension</button>

    <script>
        const vscode = acquireVsCodeApi();

        document.getElementById('send').addEventListener('click', () => {
            vscode.postMessage({
                command: 'alert',
                text: 'Hello from the Webview!'
            });
        });
    </script>
</body>
</html>
处理扩展中的消息
在您的扩展中,您可以使用该onDidReceiveMessage方法处理从 Webview 发送的消息。
bash
panel.webview.onDidReceiveMessage(message => {
    switch (message.command) {
        case 'alert':
            vscode.window.showInformationMessage(message.text);
            break;
    }
});
部署Visual Studio Code(VS Code)扩展
- 准备您的扩展
在部署之前,请确保您的扩展已准备好进行分发:- 彻底测试:确保您的扩展按预期工作,并且没有错误。
- 更新package.json:确保您的package.json文件具有正确的元数据,包括扩展名,版本,描述和关键字。此外,确保正确列出所有依赖项。
- 安装vsce
Visual Studio代码扩展管理器(vsce)是一个命令行工具,用于打包和发布VS代码扩展。您可以使用npm全局安装它:
bash
npm install -g vsce- 打包你的扩展
一旦你的扩展准备好了,你可以使用.vsix将它打包到一个vsce文件中:
bash
vsce package-
创建发布者
要将扩展发布到Marketplace,您需要一个发布者帐户。如果你还没有,请按照以下步骤操作:
- 登录 Visual Studio Code 市场:前往Visual Studio Code 市场并使用您的 Microsoft 或 GitHub 帐户登录。
- 创建发布者:登录后,进入发布者管理页面,创建一个新的发布者。
-
获取个人访问令牌
您需要来自 Azure DevOps 的个人访问令牌 (PAT) 来在发布过程中验证您的发布者帐户。
- 转到您的Azure DevOps 个人资料。
- 导航到个人访问令牌并使用以下设置创建一个新令牌:
- 组织:所有可访问的组织
- 有效期:选择合适的有效期
- 范围:将范围设置为市场(市场内的所有范围)
- 复制令牌并妥善保存。
-
发布你的扩展
使用 PAT 和vsce,你可以将扩展发布到市场:
bash
vsce publish- 验证部署
发布后,请访问Visual Studio Code Marketplace并验证是否列出了您的扩展。您可以将其安装在本地VS Code实例中,以确保一切按预期运行。
其他提示:
- 自动发布:如果您有 CI/CD 管道,则可以使用vsce命令自动执行打包和发布过程。
- 手动安装:如果您想分发您的扩展而不将其发布到市场,您可以.vsix直接共享该文件,用户可以通过Extensions: Install from VSIX...在 VS Code 命令面板中选择来手动安装它。