使用python自动读取数据建立pptx
- 前言
- [如何使用 Python 自动生成 PPTX](#如何使用 Python 自动生成 PPTX)
- 图文实操案例(自动读取数据建立python文档)
前言
以下是简洁明了的使用python自动读取数据建立pptx的过程。
如果需要更详细的,可以看一下这个帖子:Python自动化办公:ppt文件操作教程
如何使用 Python 自动生成 PPTX
当我们在处理批量数据时 ,可以通过Python高效的自动生成PPTX。这里我们将使用python-pptx库来作为讲解。
第一步:安装所需库
首先使用pip来安装 python-pptx 库:
bash
pip install python-pptx如果数据中涉及到图片数据,还可以安装 Pillow 库:
bash
pip install Pillow第二步:创建一个新的 PPTX
- 通过
Presentation类来创建一个新的 PPTX 对象(这个对象最终可以保存成一个或多个文件):
python
from pptx import Presentation

# 创建一个新的PPTX对象
prs = Presentation()
第三步:添加幻灯片
PPTX 文件往往由多个幻灯片组成。我们可以使用不同的布局来添加幻灯片:
python
# 添加一张空白幻灯片
slide_layout = prs.slide_layouts[5]  # 选择一个空白布局
slide = prs.slides.add_slide(slide_layout)在python-pptx中,以下是prs.slide_layouts[0]到prs.slide_layouts[8]的布局

第四步:添加内容
你可以在幻灯片上添加文本框、图片等内容。:
添加文本
添加标题文本框
python
from pptx.util import Inches, Pt
from pptx.enum.text import PP_ALIGN

# 添加标题文本框
title_box = slide.shapes.add_textbox(Inches(0), Inches(0), prs.slide_width, Inches(1))
title_frame = title_box.text_frame
title_frame.text = "这是一个标题"
title_frame.paragraphs[0].font.bold = True
title_frame.paragraphs[0].font.size = Pt(32)
title_frame.paragraphs[0].alignment = PP_ALIGN.CENTER
添加图片
python
from PIL import Image

# 打开图片以获取尺寸
image_path = 'path/to/your/image.jpg'
with Image.open(image_path) as img:
    width, height = img.size
    aspect_ratio = width / height

# 根据宽高比调整图片大小
pic_height = Inches(2)
pic_width = pic_height * aspect_ratio

# 添加图片到幻灯片
left = Inches(0.5)
top = Inches(1.5)
slide.shapes.add_picture(image_path, left, top, height=pic_height)
第五步:保存 PPTX
完成所有幻灯片的添加后,我们可以保存 PPTX 文件:
python
prs.save('your_presentation.pptx')
print("PPTX 文件已保存为 'your_presentation.pptx'")
图文实操案例(自动读取数据建立python文档)
以下是我自动读取scene graph generation中VG150的groundtruth三元组和predicate三元组文件,并建立pptx的过程代码。
代码写的很清晰,大家看完我下面的流程,基本就对python制作pptx很熟练了。
py
import json
from pptx import Presentation
from pptx.util import Inches, Pt
from pptx.enum.text import PP_ALIGN
from PIL import Image

# 定义一个函数来加载JSON文件
def load_results_from_json(file_name):
    with open(file_name, 'r') as f:
        data = json.load(f)
    return data

# 加载保存的结果
results_file = 'SGG_Data.json'
results_data = load_results_from_json(results_file)

# 创建一个PPT对象
prs = Presentation()

# 定义一个函数来添加幻灯片
def add_slide(prs, image_id, gt_triplets, pred_triplets, image_path):
    slide_layout = prs.slide_layouts[5]
    slide = prs.slides.add_slide(slide_layout)

    # 读取图片大小
    with Image.open(image_path) as img:
        width, height = img.size
        aspect_ratio = width / height

    # 根据图片的宽高比调整图片大小
    pic_height = Inches(2)  # 你可以根据需要调整这个值
    pic_width = pic_height * aspect_ratio

    # 添加图片
    left = Inches(0.5)
    top = Inches(1)
    pic = slide.shapes.add_picture(image_path, left, top, height=pic_height)

    # 添加标题
    title_box = slide.shapes.add_textbox(Inches(0), Inches(0), prs.slide_width, Inches(1))
    title_frame = title_box.text_frame
    title_frame.text = f"Image ID: {image_id}"
    title_frame.paragraphs[0].font.bold = True
    title_frame.paragraphs[0].font.size = Pt(32)  # 调整字体大小
    title_frame.paragraphs[0].alignment = PP_ALIGN.CENTER

    # 添加 Groundtruth Triplets
    left = Inches(0.5)
    top = Inches(3.5)
    width = Inches(4.5)
    height = Inches(4.5)
    textbox = slide.shapes.add_textbox(left, top, width, height)
    text_frame = textbox.text_frame
    text_frame.text = "Groundtruth data:"
    for triplet in gt_triplets:
        p = text_frame.add_paragraph()
        p.text = f"{triplet[0]} - {triplet[1]} - {triplet[2]}"
        p.font.size = Pt(12)  # 调整字体大小

    # 添加 Predicted Triplets
    left = Inches(5.5)
    top = Inches(3.5)
    width = Inches(4.5)
    height = Inches(4.5)
    textbox = slide.shapes.add_textbox(left, top, width, height)
    text_frame = textbox.text_frame
    text_frame.text = "Predicted data:"
    for triplet in pred_triplets:
        p = text_frame.add_paragraph()
        p.text = f"{triplet['triplets'][0]} - {triplet['triplets'][1]} - {triplet['triplets'][2]} "
        p.font.size = Pt(12)  # 调整字体大小

# 设置生成幻灯片的最大数量
max_slides = 10

# 遍历数据并添加幻灯片
for i, res in enumerate(results_data):
    if i >= max_slides:
        break
    image_id = res['Image ID']
    gt_triplets = res['Groundtruth data']
    pred_triplets = res['Predicted data']
    image_path = f"C:/我的文件/数据集/VG_100K/{image_id}"  # 假设图片存储在images目录下
    add_slide(prs, image_id, gt_triplets, pred_triplets, image_path)

# 保存PPT文件
prs.save('test_demo.pptx')
print("PPT file has been saved as 'test_demo.pptx'")
生成结果:

- 根据上面我提供的知识。我现在希望每页
空白页面上,没有【单击此处添加标题】框。
所以我把代码中的slide_layout = prs.slide_layouts[5]改成slide_layout = prs.slide_layouts[6]。

得到下面结果

- 根据上面的知识,现在我希望
pptx中的图片放大一点,所以我把下述代码进行如下修改:
py
    # 读取图片大小
    with Image.open(image_path) as img:
        width, height = img.size
        aspect_ratio = width / height

    # 根据图片的宽高比调整图片大小
    pic_height = Inches(2)  # 你可以根据需要调整这个值
    pic_width = pic_height * aspect_ratio

    # 添加图片
    left = Inches(0.5)
    top = Inches(1)
pic = slide.shapes.add_picture(image_path, left, top, height=pic_height)首先修改图片的大小,原来是高度为2Inch,现在修改为3Inch,然后通过ratio比例, 图片自动会放大。
py
    # 根据图片的宽高比调整图片大小
    pic_height = Inches(3)  # 你可以根据需要调整这个值
    pic_width = pic_height * aspect_ratio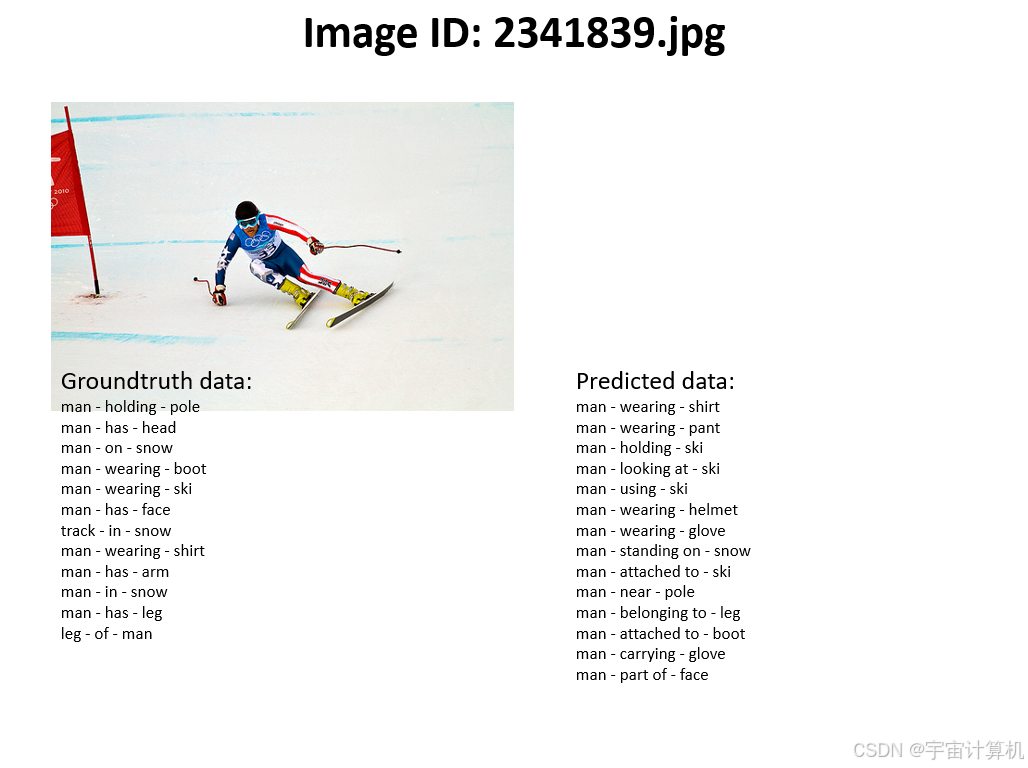
之后我觉得图片大了,把图片往左边和上边挪一挪,所以对下述代码:
py
    # 添加图片
    left = Inches(0.5)
    top = Inches(1)
    pic = slide.shapes.add_picture(image_path, left, top, height=pic_height)
做如下修改:
(left就是图片的左边距,我改成0.2Inch,往左边挪挪,top是上边距,我改成0.6Inch,往上边挪挪。)

之后我觉得字体小了,我把字体试着调大,那就需要调节下述代码:
py
    # 添加 Groundtruth Triplets
    left = Inches(0.5)
    top = Inches(3.5)
    width = Inches(4.5)
    height = Inches(4.5)
    textbox = slide.shapes.add_textbox(left, top, width, height)
    text_frame = textbox.text_frame
    text_frame.text = "Groundtruth data:"
    for triplet in gt_triplets:
        p = text_frame.add_paragraph()
        p.text = f"{triplet[0]} - {triplet[1]} - {triplet[2]}"
p.font.size = Pt(12) # 调整字体大小下面这部分是Groundtruth data文本的左边距,上边距,还有文本的宽和高。我们暂时不用调节(我把上边距往下调了一点点)
py
    left = Inches(0.5)
    top = Inches(3.8)
    width = Inches(4.5)
height = Inches(4.5)我们只需要调节字体即可(我将字体从12调节到14):
py
p.font.size = Pt(14) # 调整字体大小得到如下PPT:

字体也调节成功。