前言
以下文章来源于谷动谷力 ,作者大树
传播分享电子信息资讯,电子技术知识,嵌入式开发教程,电子方案开发分享。
大家好,我是谷动谷力的大树。
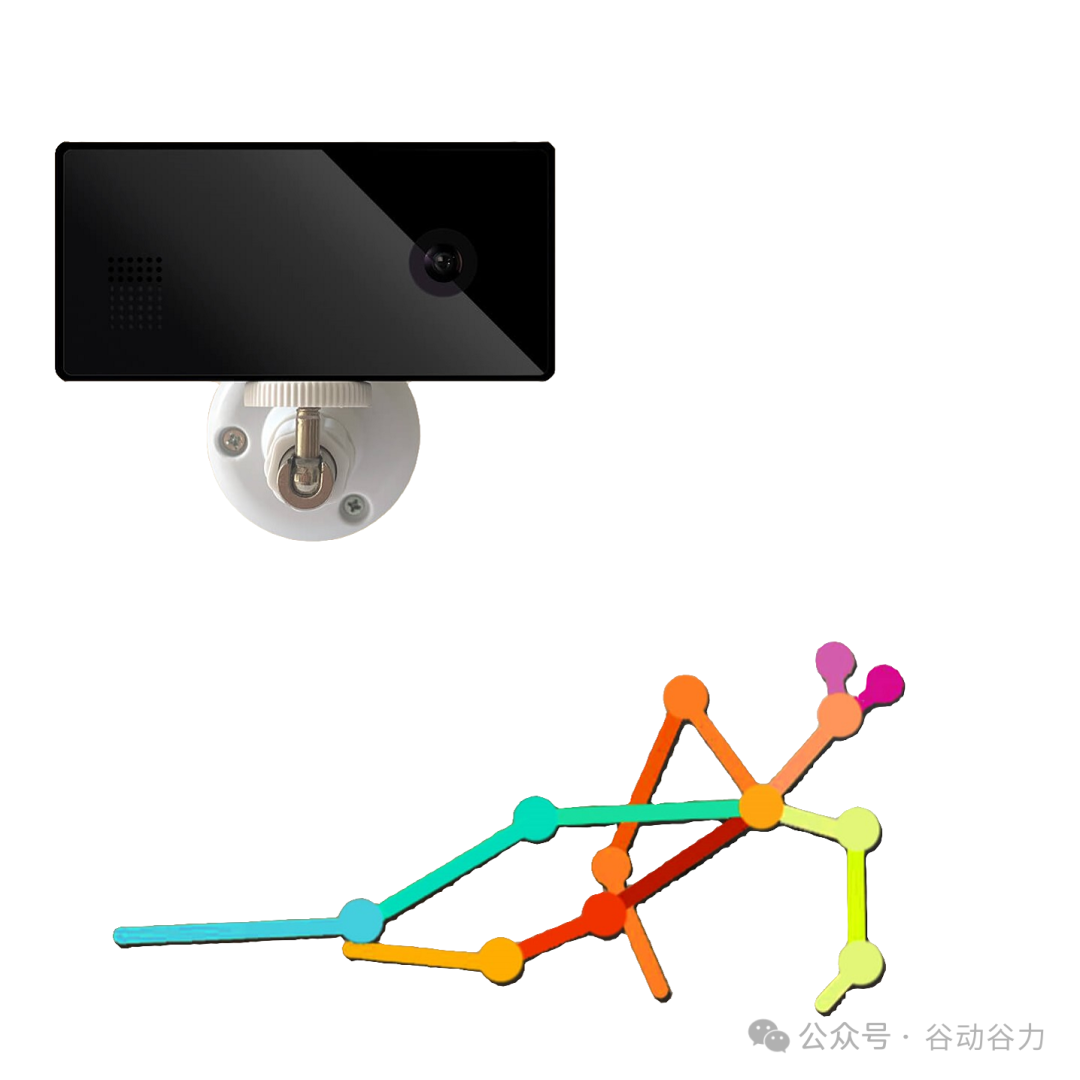
今天我们来探讨一下获取火柴人(骨架数据)的实时数据并播放的方法。由于笔者水平有限,难免会有出入之处,请大家批评指正。
获取火柴人摄像头骨架数据的步骤
获取火柴人(骨架数据)的实时数据并播放的通常涉及以下步骤:
-
获取MQTT oaunth token;
-
获取mqttAccount相关信息;
-
获取streamtoken;
-
获取组ID;
-
建立MQTT连接;
-
订阅骨架数据流:
-
接收骨架数据;
-
解析骨架数据;
-
渲染骨架数据;
-
保持连接活跃.
下面我们展开讲解,每个步聚。
获取MQTT oaunth token
依oauth接口文档
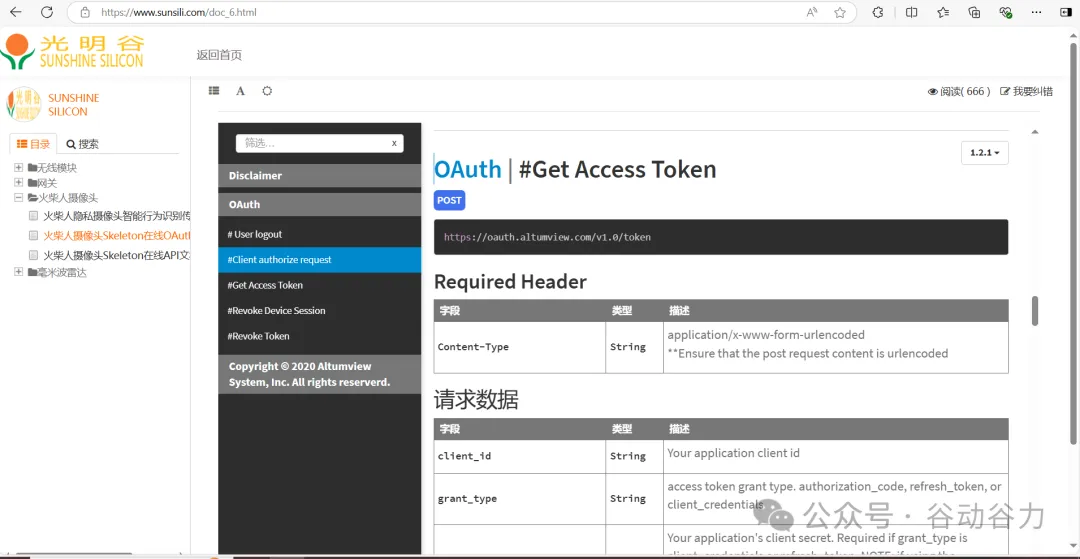
调用接口
https://oauth.altumview.com/v1.0/token方法:post
请求头:
| 字段 | 类型 | 描述 |
|---|---|---|
| Content-Type | String | application/x-www-form-urlencoded **Ensure that the post request content is urlencoded |
示例:content-type:application/x-www-form-urlencoded

请求体:
| 字段 | 类型 | 描述 |
|---|---|---|
| client_id | String | Your application client id |
| grant_type | String | access token grant type. authorization_code, refresh_token, or client_credentials |
| client_secret可选 | String | Your application's client secret. Required if grant_type is client_credentials or refresh_token. NOTE: if using the authorization code flow, refresh token will only be returned if client secret is provided. However, refrain from storing the client_secret in public apps where the code can be exposed. |
| scope可选 | String | Scopes of this request. Default: [user:read]. Options: camera:write person:write alert:write user:write group:write invitation:write room:write camera:read person:read alert:read user:read group:read invitation:read room:read person_info:write |
| redirect_uri可选 | String | Required for grant_type of authorization_code. Redirect uri value, previously used when receiving authorization code |
| code可选 | String | The authorization code. Required for grant_type of authorization_code. |
| code_verifier可选 | String | Required for grant_type of authorization_code. Code verifier for the proivded challenge from GET login endpoint. |
| refresh_token可选 | String | Required for grant_type of refresh_token. This is the refresh token retreived from the previous request. NOTE: if using the authorization code flow, refresh token will only be returned if client secret is provided. |
| state可选 | String | Application state, which will return the same value in the same field during return |
| device_desctiption可选 | String | Desciption of the device making the request |
必填项:
-
client_id: 联系我们获取
-
grant_type:client_credentials
非必填项我们也填上,因为我们的grant_type是 client_credentials,所以我们client_secret也需要填上,稍后用到
scope:camera:write camera:read //请求摄像头的读写权限
client_secret: ********** //联系我们获取
响应
如何返回200,恭喜你,第一步成功了
请求成功(200)
| 字段 | 类型 | 描述 |
|---|---|---|
| status_code | Number | HTTP response code. |
| success | Boolean | The status of the operation. |
| message | String | The message of the operation. |
| token_type | String | token type; default is "bearer" |
| access_token | String | authrization code for obtain access token. |
| refresh_token可选 | String | Refresh token is not included if using the client credential grant, or if client_secret is not provided in the authorization code flow |
| data | Object | The data of the operation. |
| is_group_owner | String | Is this user a group owner |
| expires_in | Number | the token expiration time in seconds |
| state | Number | The state from the request |
HTTP/1.1 200 OK{ "status_code": 200, "message": "The request has succeeded.", "success": true, "token_type": "bearer", "access_token": "12346e3babcd21c1bef3f2f12342d64087a3abcd", "refresh_token": "cfab8df1234380abcd378123412aabcdd2c41234", "expires_in": 3600, "state": "", "data": { "is_group_owner": true, "email": "de@sunsili.com", "user_id": 123 }}上面有一个重要东西,就是
access_token也就是我们费尽心思,写接口要获取的东西,有了它才进行下一步如果请求失败呢,请依如下说明,排除请求失败(4xx)
| 名称 | 类型 | 描述 |
|---|---|---|
| InvalidRequestFieldError | The parameter is provided in invalid format. | |
| error_code | Number | The error response code. |
| message | String | The message of the operation. |
| success | Boolean | The status of the operation. |
| status_code | Number | HTTP response code. |
| FeatureNotSupportedError | This feature is not supported on this Camera. |
示例:
HTTP/1.1 400 Bad Request
{
"status_code": 400,
"error_code": 6,
"message": "Invalid neccessary fields'",
"success": false
}
获取mqttAccount信息
获取MQTT用户名、密码和WSS URL。注意,MQTT会话有时间限制,需要定期更新。
依接口文档
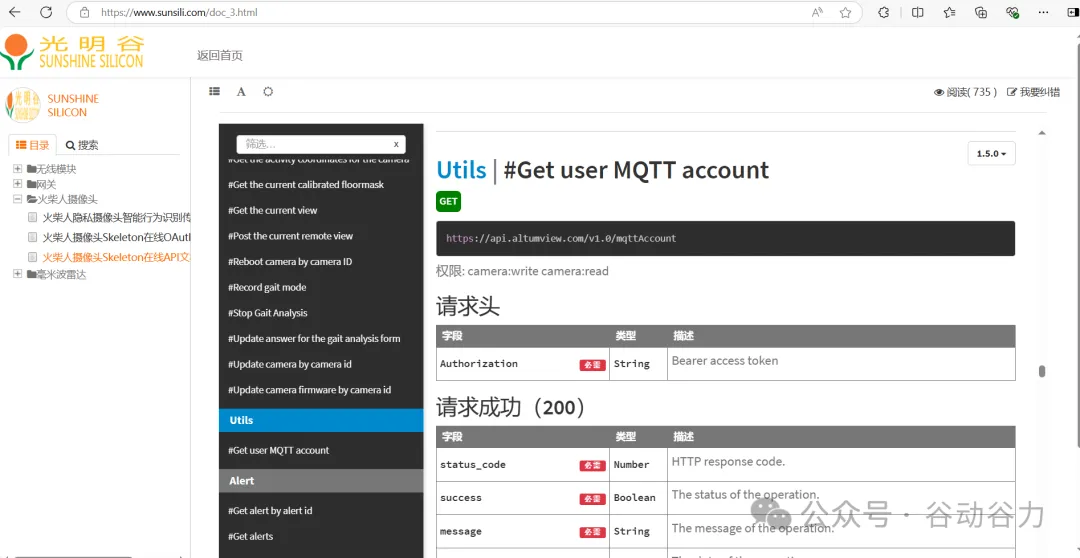
调用接口:
https://api.altumview.com/v1.0/mqttAccount示例如下:

此接口需要权限: camera:write camera:read,上一个步一定申请这个权限。
请求头
| 字段 | 类型 | 描述 |
|---|---|---|
| Authorization必需 | String | Bearer access token |
如果返回码为200,恭喜你又成功了一步
请求成功(200)
| 字段 | 类型 | 描述 |
|---|---|---|
| status_code必需 | Number | HTTP response code. |
| success必需 | Boolean | The status of the operation. |
| message必需 | String | The message of the operation. |
| data必需 | Object | The data of the operation. |
| wss_url必需 | String | The WSS URL. |
| mqtt_account必需 | Object | The MQTT account object result. |
| username必需 | String | The MQTT username connect to MQTT server |
| passcode必需 | String | The MQTT passcode connect to MQTT server |
| expires_at必需 | Number | The MQTT account expires epoch time in second |
| legacy_subscribe_topics必需 | String[] | The legacy MQTT subscribe topics that are allowed for the account, this will be removed in the future |
| subscribe_topics必需 | String[] | The MQTT subscribe topics that are allowed for the account, not in use yet |
| legacy_publish_topics必需 | String[] | The legacy MQTT publish topics that are allowed for the account, this will be removed in the future |
| publish_topics必需 | String[] | The MQTT publish topics that are allowed for the account, not in use yet |
HTTP/1.1 200 OK
{
   "data":{
      "mqtt_account":{
         "username": "someusername",
         "passcode": "somepasscode",
         "expires_at": 1594432207,
         "legacy_subscribe_topics": [
           "mobileClient/43A726FEE257AAAA/#",
           "mobileClient/200776FFFF70E05F/#",
           "mobileClient/2B9FBBBBDD6DAB73/#",
         ],
         "subscribe_topics": [mobileClient/160/#],
         "legacy_publish_topics": [
           "mobile/43A726FEE2576342/#",
           "mobile/200776214270E05F/#",
         },
         "publish_topics": ["mobile/160/#"]
     },
     "wss_url": "wss://beijing.altumview.com:8084/mqtt"
   },
   "message":"The request has succeeded.",
   "success":true,
   "status_code":200
}此接口返回数据会告诉你:
MQTT用户名、密码和WSS URL, 可以订阅的主题等信息
拿到上面信息,我们来测试一下MQTT数据流
测试MQTT数据流
首先建立MQTT连接
要用上面接口获取的MQTT用户名、密码和WSS URL
我测试用的MQTTX windows客户端(可联系我们获取),其他平台测试的客户端(需要的朋友联系我们获取帮助)
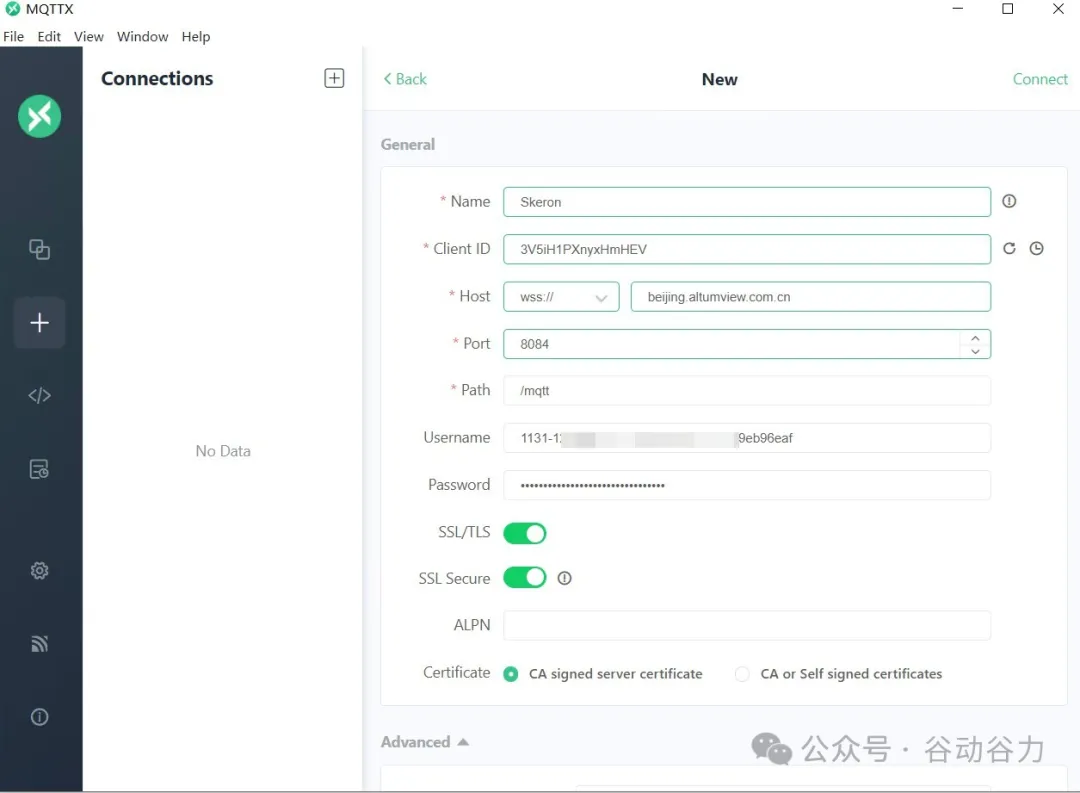
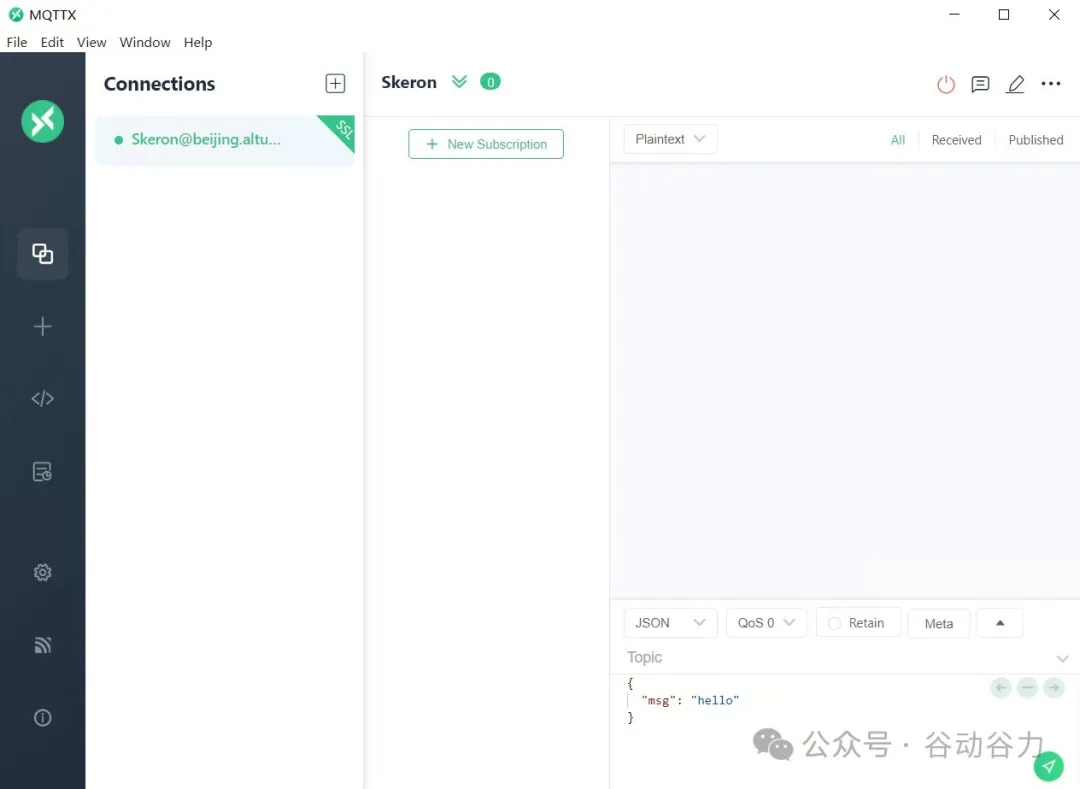
然后订阅主题
使用流令牌订阅MQTT主题,以接收骨架数据。主题格式为
mobileClient/${groupId}/camera/${serialNumber}/skeleton/${streamToken}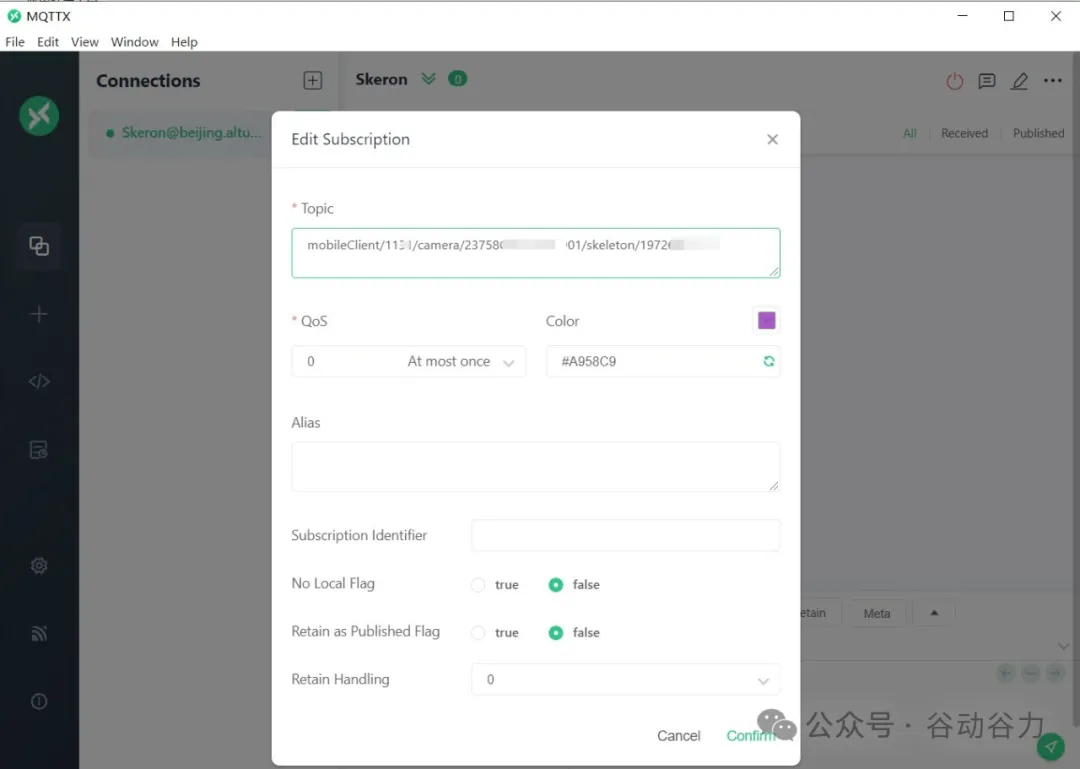
火柴人检测到有人时,才推送火柴人数据到MQTT
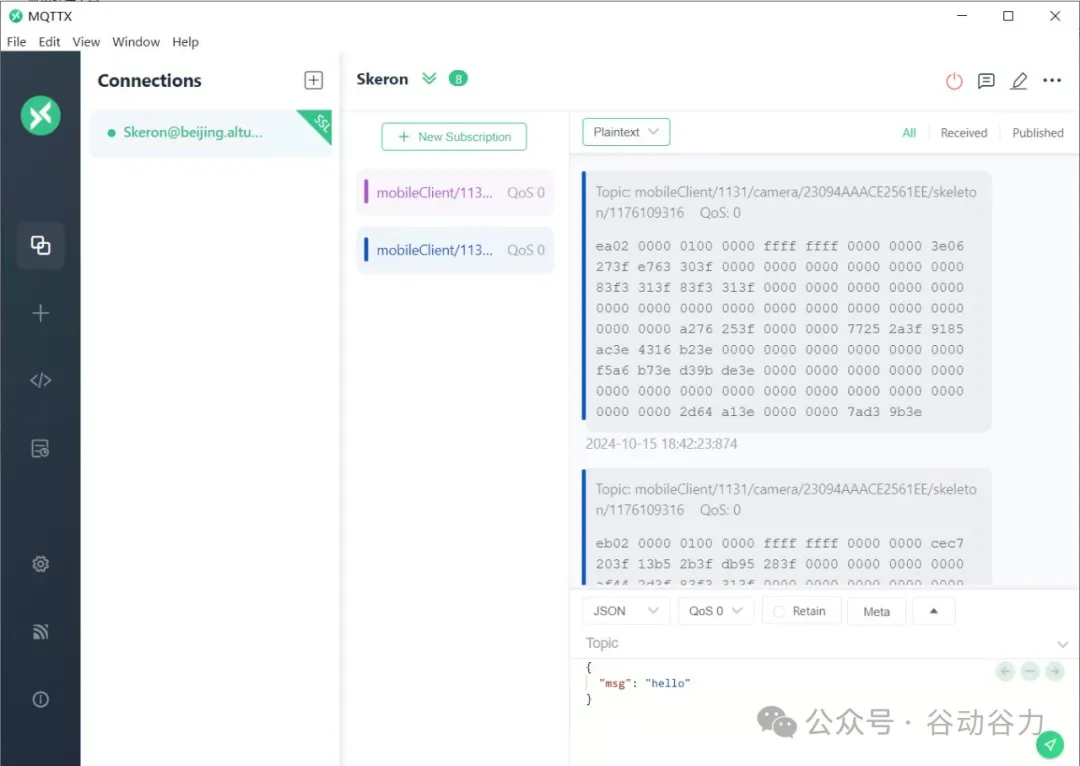
渲染生成火柴人动画
有了上面的基础,我们已经可以创建MQTT连接并获取到火柴人数据了,下面我们要做就是解析火柴人数据,并渲染生成火柴人动画了。这个用代码说话吧!
html
<html>
   <title>Skeleton Stream Demo</title>
   <script src="https://docs.altumview.com/resources/js_libs/jquery.min.js"></script>
   <script src="https://docs.altumview.com/resources/js_libs/mqttws31.min.js" type="text/javascript"></script>
   <script src="https://docs.altumview.com/resources/js_libs/polyfill.min.js"></script>
   <script type="text/javascript" language="javascript">
      /*****************************************************************************************
       * You must replace parameters with your own. Refer to the FAQ for more detail on how to configure them:
       * https://docs.altumview.com/FAQ.pdf
       * For demo, these settings are configured to an AltumView account on the Canadian server.
       * If you do not see any skeleton rendering, the sensor is no longer available.
       *
       * Last updated: March 18, 2022 by Andrew A.
      ******************************************************************************************/
      const oauthUrl = "https://oauth.ailecare.cn/v1.0";
      const apiUrl = "https://api.ailecare.cn/v1.0";
      const mqttUrl = "beijing.altumview.com.cn";
      const clientId = "HkJMDXEe6G1tJ66s";
      const clientSecret = "zFAl2CSkB6hGdzcIwfMMRbFErh8ValC7CS9ISsbnYZyH6xZdXbltoKrVAD7lQ4Xm";
      const serialNumber = "23E94A5DACD323EE"; // Use the mobile app to get the serial number
      const streamToken = "701406606"; // Call GET '/cameras/:id/streamtoken' endpoint to get Stream Token
      const groupId = 72; // Call GET '/info' endpoint to get Group ID


      const getCredentials = () => {
        $.ajax({
          "type": "POST",
          "url": `${oauthUrl}/token`,
          "headers": {
            "Content-Type": "application/x-www-form-urlencoded"
          },
          "data": {
            "client_id": clientId,
            "client_secret": clientSecret,
            "grant_type": "client_credentials",
            "scope": "camera:write camera:read",
          },
          "success": function(response) {
            token = response.access_token;
            console.log("token", token)
            var url = `${apiUrl}/mqttAccount`;
            var xhr = new XMLHttpRequest();
            xhr.open("GET", url);
            xhr.setRequestHeader("Authorization", "Bearer " + token);
            xhr.onreadystatechange = function() {
              if (xhr.readyState === 4) {
                console.log(xhr.responseText)
                const response = JSON.parse(xhr.responseText);
                username = response.data.mqtt_account.username;
                password = response.data.mqtt_account.passcode;
                const canvasWidth = 960;
                const canvasHeight = 540;
                const onFailure = () => {
                  const reconnectTimeout = 2000;
                  console.log("Connect failed. Trying to reconnect after 2 sec");
                  setTimeout(MQTTConnect, reconnectTimeout);
                }


                const onMessageArrived = (message) => {
                  const byteList = message.payloadBytes
                  const frameNum = parseStringInt32(byteList, 0)
                  const numPeople = parseStringInt32(byteList, 4)


                  const people = []
                  for (let i = 0; i < numPeople; i++) {
                    const pos = 8 + 152 * i;
                    const personId = parseStringInt32(byteList, pos);
                    const person = {};
                    for (let j = 0; j < 18; j++) {
                      const x = parseStringFloat(byteList, pos + 8 + j * 4);
                      const y = parseStringFloat(byteList, pos + 80 + j * 4);
                      if (x && y) person[j] = new Point(x, y);
                    }
                    person.name = personId;
                    people.push(person);
                  }


                  const canvas = document.getElementById('canvas');
                  if (canvas && people) {
                    const ctx = canvas.getContext('2d');
                    ctx.clearRect(0, 0, canvasWidth, canvasHeight);


                    people.forEach(person => {
                      drawSkeleton(ctx, 4, person);
                    })
                  }
                }


                const drawSkeleton = (ctx, lineWidth, points) => {
                  ctx.lineWidth = lineWidth;
                  ctx.lineCap = 'round';


                  let minX = 1;
                  let minY = 1;
                  pointPairs.forEach(pair => {
                    const startPoint = points[pair.start];
                    const endPoint = points[pair.end];
                    if (startPoint !== undefined && endPoint !== undefined) {
                      if (endPoint.x < minX) minX = endPoint.x;
                      if (endPoint.y < minY) minY = endPoint.y;
                      ctx.strokeStyle = pair.color;
                      drawLine(ctx, startPoint.x * canvasWidth, startPoint.y * canvasHeight, endPoint.x * canvasWidth, endPoint.y * canvasHeight);
                    }
                  })
                }


                function Point(x, y) {
                  this.x = x;
                  this.y = y;
                }


                const drawLine = (ctx, x0, y0, x1, y1) => {
                  ctx.beginPath();
                  ctx.moveTo(x0, y0);
                  ctx.lineTo(x1, y1);
                  ctx.stroke();
                }


                const pointPairs = [
                   { start: 0, end: 1, color: 'pink' },
                   { start: 1, end: 2, color: 'orange' },
                   { start: 2, end: 3, color: 'yellow' },
                   { start: 3, end: 4, color: 'lightYellow' },
                   { start: 1, end: 5, color: 'darkSalmon' },
                   { start: 5, end: 6, color: 'salmon' },
                   { start: 6, end: 7, color: 'lightSalmon' },
                   { start: 1, end: 8, color: 'darkTurquoise' },
                   { start: 8, end: 9, color: 'turquoise' },
                   { start: 9, end: 10, color: 'paleTurquoise' },
                   { start: 1, end: 11, color: 'darkRed' },
                   { start: 11, end: 12, color: 'red' },
                   { start: 12, end: 13, color: 'orange' },
                   { start: 0, end: 14, color: 'purple' },
                   { start: 14, end: 16, color: 'purple' },
                   { start: 0, end: 15, color: 'violet' },
                   { start: 15, end: 17, color: 'violet' }
                 ]


                const parseStringInt32 = (stringData, startIndex) => {
                  const t = stringData.slice(startIndex, startIndex + 4);
                  return new DataView(t.buffer).getInt32(0, true);
                }


                const parseStringFloat = (stringData, startIndex) => {
                  const t = stringData.slice(startIndex, startIndex + 4);
                  return new DataView(t.buffer).getFloat32(0, true);
                }


                const onConnect = () => {
                  console.log('connect success');
                  var soptions = {
                    qos: 0
                  };


                  // Next, subscribe to this topic with the aforementioned stream token appended
                  const subscribeTopic = `mobileClient/${groupId}/camera/${serialNumber}/skeleton/${streamToken}`;
                  mqtt.subscribe(subscribeTopic, soptions);


                  console.log(`subscribe to ${subscribeTopic}`);
                  // Finally, publish the same stream token as a message to the camera in order to start streaming. You must publish this message every 45 seconds to keep streaming going.
                  const publishTopic = `mobile/${groupId}/camera/${serialNumber}/token/mobileStreamToken`;
                  message = new Paho.MQTT.Message(streamToken);
                  message.destinationName = publishTopic;
                  message.qos = 2;
                  message.retained = false;
                  mqtt.send(message);


                  console.log("Connected");


                  const reconnectTimeout = 44000;
                  setTimeout(MQTTConnect, reconnectTimeout);
                }


                const MQTTConnect = async (id) => {
                  const port = 8084;
                  console.log(`connecting to ${mqttUrl}:${port}`);
                  mqtt = new Paho.MQTT.Client(mqttUrl, port, username);
                  const options = {
                    timeout: 3,
                    onSuccess: onConnect,
                    onFailure: onFailure,
                    useSSL: true,
                    userName: username,
                    password: password
                  };
                  mqtt.onMessageArrived = onMessageArrived;
                  mqtt.connect(options);
                }
                MQTTConnect(1);
              }
            };
            xhr.send();
          },
          "error": function(errorThrown) {
            alert(JSON.stringify(errorThrown.error()));
          }
        });
      }
</script>
   <body>
      <p>This is a demo of the Skeleton Streaming</p>
      <canvas id="canvas" width="960" height="540" style="background-color: black; transform: scaleX(-1)"></canvas>
      <script>
         getCredentials();
</script>
   </body>
</html>
这段代码是一个HTML页面,用于展示一个基于MQTT协议的在线直播演示,具体是展示火柴人动画。下面是对代码的详细解析:
代码概述
-
HTML结构:页面包含一个<canvas>元素,用于绘制动画。
-
JavaScript逻辑:
-
引入了jQuery、MQTT WebSocket客户端库和Polyfill库。
-
获取URL参数,如客户名称和应用类型。
-
动态设置画布尺寸以适应不同屏幕。
-
使用Ajax请求获取访问令牌和MQTT账户信息。
-
连接到MQTT服务器,并订阅特定主题以接收动画数据。
-
接收到数据后,解析并在画布上绘制火柴人动画。
-
还包含了一些辅助函数,如绘制线条、解析数据等。
-
详细解析
-
HTML头部:
-
引入了必要的JavaScript库。
-
设置了页面标题。
-
-
HTML主体:
- 一个<div>容器包裹了一个<canvas>元素,用于显示动画。
-
JavaScript代码:
-
drawSkeleton:绘制火柴人的骨架。
-
Point:表示点的类。
-
drawLine:绘制线条。
-
parseStringInt32和parseStringFloat:解析二进制数据。
-
解析接收到的数据,提取出火柴人的位置信息。
-
在画布上绘制火柴人动画。
-
使用获取的用户名和密码连接到MQTT服务器。
-
订阅特定主题以接收火柴人动画数据。
-
定期发布消息以保持连接。
-
参数获取:从URL中获取客户名称和应用类型。
-
画布尺寸设置:根据窗口大小动态调整画布尺寸。
-
获取凭证:通过Ajax请求获取OAuth令牌和MQTT账户信息。
-
MQTT连接:
-
数据处理:
-
辅助函数:
-

错误处理
请注意,根据文档说明,您需要每15分钟获取一次流令牌以保持数据流的活跃状态。
总结
这段代码是一个完整的在线直播演示页面,展示了如何使用MQTT协议和Web技术(HTML、JavaScript)来实现实时动画的展示。它涵盖了从前端界面设计,后端数据处理的完整流程,包括网络通信、数据解析和图形绘制等关键技术。
这个过程需要您的应用程序能够处理网络请求、WebSocket连接、二进制数据处理和图形渲染。您可能需要根据您应用程序的具体技术栈选择合适的库和工具来实现上述功能。
如果您遇到任何问题,可以参考我们API文档或联系技术支持获取帮助。
了解火柴人摄像头
了解火柴人摄像头,请参考:【推荐好物】火柴人隐私摄像头 AI智能行为检测跌倒报警
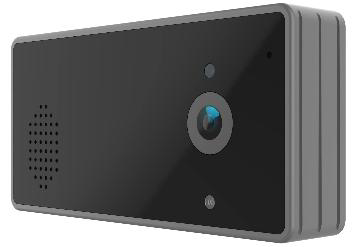
这款火柴人隐私保护摄像头内置NPU(人工智能神经网络处理器),运行多种深度学习算法,可以检测测人员的活动,并应用大数平台对各种行为(躺、站、坐、弯腰)进入统计分析,从而实现跌倒风险评估。当发生紧急情况时(例如跌倒),传感器会立即向家人或护 理人员发送报警信息。为保护隐私,传感器通过AI算法将原始图像计算成火柴人动画数据,只上传火柴人动画数据到云平台(APP和后台只能查看火柴人动画),绝不上传原始视频,因此火柴人传感器可以安装在家里的任何房间,包括卧室和浴室。火柴人动画还是极有价值的医疗数据,可以有多种用途,如可以分析老人的健康状况,协助事故调查和分析,改进养老机构的服务质量,帮助医生提前发现一些疾病,例如帕金森症、阿兹海默症、抑郁症等,并帮助医生和病人进行康复治疗。
示例代码演示
查看我们的在线示例:Skeleton Stream Demo火柴人动画在线直播演示 (http://www.sunsili.com/html/live/streamDemo01.html)
请注意,这个过程需要您的应用程序能够处理网络请求、WebSocket连接、二进制数据处理和图形渲染。您可能需要根据您应用程序的具体技术栈选择合适的库和工具来实现上述功能。如果您遇到任何问题,可以参考我们API文档或联系技术支持获取帮助。
API参考文档
火柴人摄像头Skeleton在线OAuthAPI文档_SUNSHINE SILICON (http://www.sunsili.com/doc_6.html)
火柴人摄像头Skeleton在线API文档_SUNSHINE SILICON (http://www.sunsili.com/doc_3.html)
开源地址
https://gitee.com/lojam/mqtt-web-stream-demo/tree/master/streamDemo
后记
谢谢观看,需要资料可在评论区留言。或查看原文,获取下载。
请帮忙小编点赞、在看,给小篇加鸡腿。欢迎关注,更加精彩及时送达!

再次感谢您的阅读,笔者能力有限,有错在所难免,请批评指正!
往期精彩
NXP Zigbee JN516X JN517x JN518X 用vsCode studio 环境开发编译
推荐一款vsCode 可能智能生成代码 代码补全 代码解释 代码纠错 AI插件 iFlyCode
我写了一个低成本的智能语音控制小夜灯方案,放AI里搜索,发现AI总结很到位,比我更懂我设计的方案
【方案推荐】光明谷推出 VC-S100D 高性价比的语音控制小夜灯方案
光明谷S-BE5607E蓝牙5.4 低成本插卡\U盘\蓝牙音箱方案
【方案推荐】SMP37A-Player 低成本的插卡\U盘\USB音箱\MP3播放\ USB声卡方案
基于SUN6200无线通信模块 C51示例程序 SDK开源代码解读
中科蓝讯AB5607E蓝牙5.4 低成本蓝牙接近开关定时开关方案
【应用方案】基于MT7628 JN5169-Zigbee-4G智能网关方案
【openwrt】MT7628/7688 openwrt下启用串口2 UART2入坑指南
毫米波雷达S-ED713 AI智能睡眠监测仪 睡眠质量分析 生命体征检测
一个使用链表所编写的单片机菜单框架MCU Menu Frame
NXP Zigbee JN5169 开发环境软件 文档和支持资源打包下载