Mac软件清单(前后端开发环境搭建)
一、Google Chrome
Mac软件网站 https://macwk.cn/
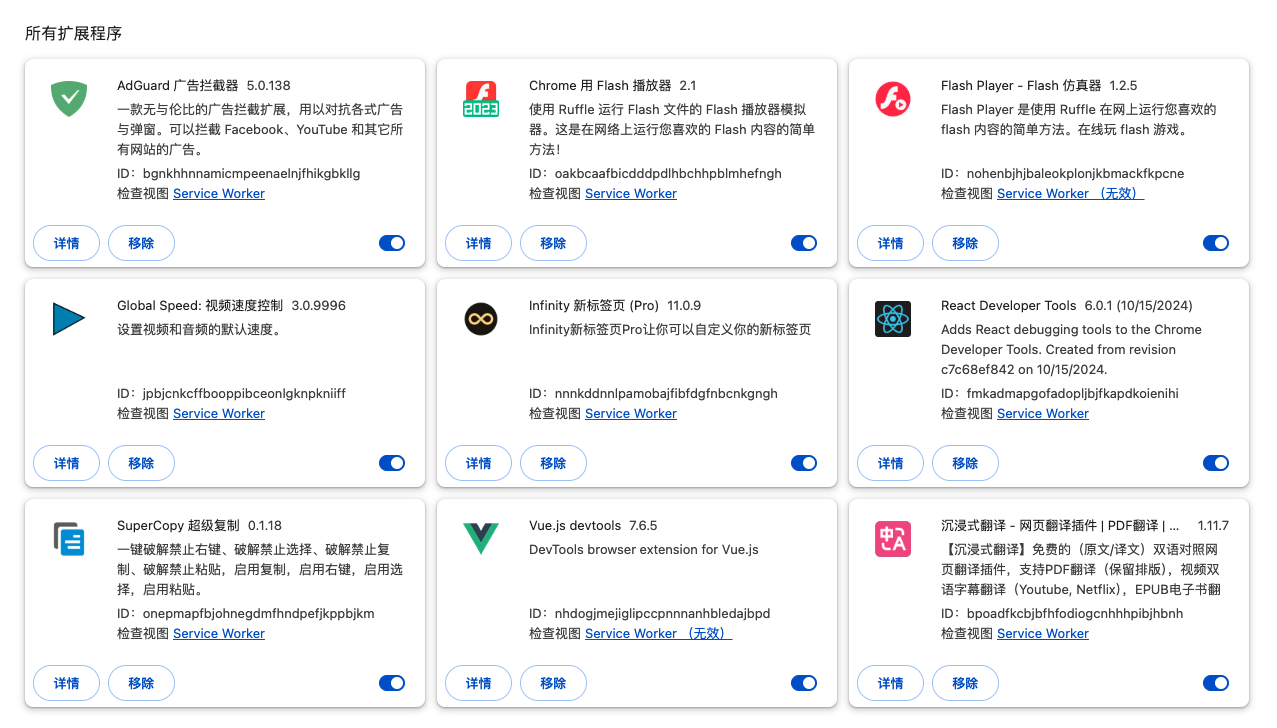
浏览器扩展插件:
- InfinityPro 新建标签页
- AdGuard 广告拦截器
- GlobalSpeed 视频速度控制
- SuperCopy 超级复制
- 沉浸式翻译
- Flash相关:chrome 用 flash 播放器、 flash player flash仿真器
- 开发相关:vue.js.devtools 、 react developer tools
二、基础工具
- 钉钉
- 微信
- 夸克(网盘)
- 语雀
- ToDesk
- WPS
- Clash X Pro
- Typora
- App cleaner & uninstaller8.4.3
三、开发工具
- Homebrew 包管理器
- 下载xxx环境 brew install xxx
- 查看已下载的环境 brew ls
- 查看服务 brew services ls
- 启动/停止xxx服务 brew start/stop xxx
- PinPix
- Figma
- WebStorm IDE
- 微信开发者工具/小程序开发者工具
- IntelliJ IDEA
- DataGrip
- Proxyman
- VMware Fusion
- Docker Desktop for Mac
四、环境搭建
git安装
- homebrew命令行安装
brew install git
- 配置个人信息
git config --global user.name "你的名字或昵称"
git config --global user.email "你的邮箱"
nvm安装
- homebrew命令行安装
brew install nvm
- 写入环境变量
- 打开.zshrc文件
vim ~/.zshrc - 写入环境变量:
shell
export NVM_DIR="$HOME/.nvm"
  [ -s "/opt/homebrew/opt/nvm/nvm.sh" ] && \. "/opt/homebrew/opt/nvm/nvm.sh"  # This loads nvm
  [ -s "/opt/homebrew/opt/nvm/etc/bash_completion.d/nvm" ] && \. "/opt/homebrew/opt/nvm/etc/bash_completion.d/nvm"  # This loads nvm bash_completion
node安装
直接基于nvm进行安装
- 安装xx版本
nvm installl xx
- 使用xx版本
nvm use xx
- 查看所有版本
nvm ls
mysql安装
- homebrew命令后安装
brew install mysql@8.0
- 安装成功会输出提示:
shell
We've installed your MySQL database without a root password. To secure it run:
    mysql_secure_installation

MySQL is configured to only allow connections from localhost by default

To connect run:
    mysql -u root

mysql@8.0 is keg-only, which means it was not symlinked into /opt/homebrew,
because this is an alternate version of another formula.

If you need to have mysql@8.0 first in your PATH, run:
  echo 'export PATH="/opt/homebrew/opt/mysql@8.0/bin:$PATH"' >> ~/.zshrc

For compilers to find mysql@8.0 you may need to set:
  export LDFLAGS="-L/opt/homebrew/opt/mysql@8.0/lib"
  export CPPFLAGS="-I/opt/homebrew/opt/mysql@8.0/include"

To start mysql@8.0 now and restart at login:
  brew services start mysql@8.0
Or, if you don't want/need a background service you can just run:
/opt/homebrew/opt/mysql@8.0/bin/mysqld_safe --datadir\=/opt/homebrew/var/mysql- 配置环境变量
shell
# 编辑环境变量
vim ~/.zshrc

# 增加以下内容
export PATH="/opt/homebrew/opt/mysql@8.0/bin:$PATH"
export LDFLAGS="-L/opt/homebrew/opt/mysql@8.0/lib"
export CPPFLAGS="-I/opt/homebrew/opt/mysql@8.0/include"
export PKG_CONFIG_PATH="/opt/homebrew/opt/mysql@8.0/lib/pkgconfig"

# 加载配置
source ~/.zshrc- 启动服务
brew services start mysql@8.0
- 安装配置(设置密码等)
shell
root@MacBook-Pro ~ % mysql_secure_installation

Securing the MySQL server deployment.

Connecting to MySQL using a blank password.

VALIDATE PASSWORD COMPONENT can be used to test passwords
and improve security. It checks the strength of password
and allows the users to set only those passwords which are
secure enough. Would you like to setup VALIDATE PASSWORD component?
# 是否设置密码
Press y|Y for Yes, any other key for No: y

There are three levels of password validation policy:

LOW    Length >= 8
MEDIUM Length >= 8, numeric, mixed case, and special characters
STRONG Length >= 8, numeric, mixed case, special characters and dictionary                  file
# 设置密码强度
Please enter 0 = LOW, 1 = MEDIUM and 2 = STRONG: 0
Please set the password for root here.
# 输入密码
New password:
# 确认密码
Re-enter new password:

Estimated strength of the password: 50
Do you wish to continue with the password provided?(Press y|Y for Yes, any other key for No) : y
By default, a MySQL installation has an anonymous user,
allowing anyone to log into MySQL without having to have
a user account created for them. This is intended only for
testing, and to make the installation go a bit smoother.
You should remove them before moving into a production
environment.
# 移除无密码用户
Remove anonymous users? (Press y|Y for Yes, any other key for No) : y
Success.

Normally, root should only be allowed to connect from
'localhost'. This ensures that someone cannot guess at
the root password from the network.
# 是否远程登陆
Disallow root login remotely? (Press y|Y for Yes, any other key for No) : n

 ... skipping.
By default, MySQL comes with a database named 'test' that
anyone can access. This is also intended only for testing,
and should be removed before moving into a production
environment.

# 是否移除测试数据库
Remove test database and access to it? (Press y|Y for Yes, any other key for No) : n

 ... skipping.
Reloading the privilege tables will ensure that all changes
made so far will take effect immediately.
# 是否重新加载
Reload privilege tables now? (Press y|Y for Yes, any other key for No) : y
Success.

All done!
root@MacBook-Pro ~ % - 连接服务
shell
mysql -u root -p
# 输入密码
jabba安装
jabba是一款java多版本管理工具
- homebrew命令后安装
brew install jabba
- 配置环境变量
shell
[ -s "$HOMEBREW_PREFIX/opt/jabba/share/jabba/jabba.sh" ] && . "$HOMEBREW_PREFIX/opt/jabba/share/jabba/jabba.sh"- 常用命令
- 安装特定版本的jdk
jabba install adopt@1.11.0-28 - 列出已安装的jdk版本
jabba ls - 列出远程可用的jdk版本
jabba ls-remote - 使用指定版本的jdk
jabba use <alias> - 设置默认 JDK 版本
jabba alias default <alias> - 删除已安装的 JDK 版本
jabba uninstall <alias> - 查看当前使用的 JDK 版本
jabba which
java安装
基于jabba安装
- 下载jdk1.8
jabba install zulu@1.8.362 - 设置默认版本:
jabba alias default zulu@1.8.362 - 使用当前版本:
jabba use zulu@1.8.362
maven安装
- 通过homebrew安装指定的版本号
brew install maven - 检查已安装的 Maven 版本
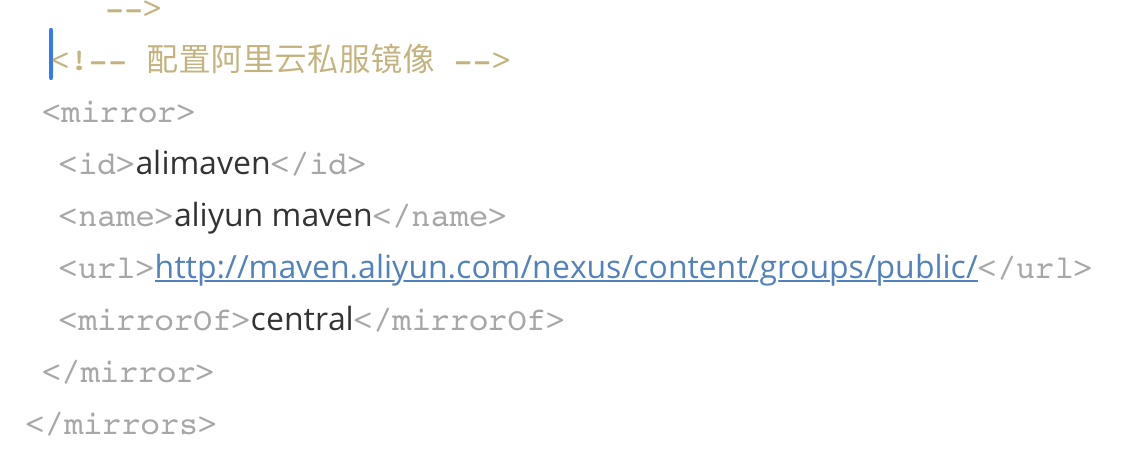
mvn -v - maven配置,包括本地仓库地址,切换阿里云镜像下载源

redis安装
- 使用 Homebrew 安装命令
brew install redis - 使用 Homebrew 启动软件
brew services start redis - 执行命令,启动服务
redis-server
