**前言:**本节讲述序列化和反序列化的相关内容。 这节的内容是博主前一篇博客的续章, 里面用到了很多知识点都是前一篇文章的。 友友们如果要学习序列化反序列化, 直接看本篇文章是看不懂的, 请看前一篇文章:linux网络 | 序列化反序列化的概念 与 结合网络计算器深度理解-CSDN博客
前一篇文章内容除了概念以外, 主要是利用序列化反序列化的知识点实现了一个网络计算器的服务端。 然后本节内容来实现以下客户端, 让服务端能够与客户端连接起来, 实现计算器的功能。 另外, 本节内容还会使用一下Json, 这是一个序列化反序列化解决方案,以后我们就不用自己手搓序列化反序列化了。
ps:本节内容友友们务必看完前上面的文章链接的文章哦!
目录
ClientCal实现
命令行参数
客户端同样要有命令行参数:
cpp
int main(int argc, char* argv[])
{
    if (argc != 3)
    {
        Usage(argv[0]);
        exit(0);
    }
    return 0;
}
connect
然后这个命令行参数第一个据说程序的名称, 第二个是表示要链接的服务器的IP地址, 第三个是表示要链接的服务器的端口号。
将ip地址和端口号获取之后就可以尝试进行连接, 链接的接口我们在socket套接字里面直接封装起来, 方便后面的使用:
cpp
    bool Connect(string serverip, uint16_t serverport)
    {
        sockaddr_in server;
        server.sin_family = AF_INET;
        server.sin_port = htons(serverport);
        inet_pton(AF_INET, serverip.c_str(), &(server.sin_addr));
        connect(sockfd, (sockaddr*)&server, sizeof(server));
        return true;
    }
这个函数就是将要连接的服务器端的ip地址和端口号传送进去, 然后就向服务器进行连接。
那么ClientCal里面的代码就是这样的:
cpp
#include<iostream>
using namespace std;
#include"tcpserver.hpp"
#include<string>
#include"socket.hpp"
#include<time.h>
#include<cstdlib>

void Usage(string proc)
{
    cout << "Usage: " << proc << endl;
}


int main(int argc, char* argv[])
{
    if (argc != 3)
    {
        Usage(argv[0]);
        exit(0);
    }

    //
    string serverip = argv[1];
    uint16_t port = stoi(argv[2]);

    Socket sockfd;
    sockfd.SocketInit();
    bool r = sockfd.Connect(serverip, port);
    if (!r) return 1;
    return 0;
}
准备工作
接下来就是向服务器发送请求,我们这里发送请求使用rand进行随机选数字, 选两个数字和一个操作符, 然后打包成报文,写到网卡里面。 在发送请求之前先做一些准备工作:
cpp
    srand(time(nullptr) ^ getpid());  //种随机数种子
    int cnt = 1;                      //对发送的请求个数进行计数, 我们只发送20次请求
    string opers = "+-*/%";           //加减乘除运算符

    string inbuffer_stream;           //请求字节流缓冲区
write
然后我们就是先一下写入操作:
cpp
while (cnt <= 20)
    {
        cout << "第" << cnt++ << "次测试......" << endl;  //计数这是第几次发送请求

        //随机数,选一个随机数
        int x = rand() % 100 + 1;
        usleep(1234);

        //选第二个随机数
        int y = rand() % 100 ;
        usleep(4321);

        //选一个随机的运算符
        char oper = opers[rand() % opers.size()];

        //对两个随机数和运算符进行序列化
        Request req(x, y, oper);
        req.DebugPrint();        //这个函数属于req里面的成员函数, 用于debug, 就是对请求进行一下打印, 方便观察。 代码后面展示
        string package;
        req.Serialize(&package);

        //对序列化的请求打包成保温
        package = Encode(package);
        cout << "这是最新的发出去的请求:\n" << package;

        //发送请求
        write(sockfd.Fd(), package.c_str(), package.size());
    }
这是debug的函数, 这个函数是
cpp
    void DebugPrint()
    {
        cout << "构建请求完成: " << x << op << y <<  "?= " << endl;

    }
read
客户端将数据发送过去之后, 服务端将数据进行处理,然后客户端就从对面接收数据,所以write函数后面就调用read函数:
cpp
    while (cnt <= 20)
    {
        cout << "第" << cnt++ << "次测试......" << endl;
        int x = rand() % 100 + 1;
        usleep(1234);

        int y = rand() % 100 ;
        usleep(4321);

        char oper = opers[rand() % opers.size()];
        Request req(x, y, oper);

        req.DebugPrint();

        string package;
        req.Serialize(&package);

        package = Encode(package);
        cout << "这是最新的发出去的请求:\n" << package;
        write(sockfd.Fd(), package.c_str(), package.size());

        char buffer[128];
        ssize_t n = read(sockfd.Fd(), buffer, sizeof(buffer));  //我们也无法保证我们能够读到一个完整的报文
        if (n > 0)
        {
            buffer[n] = 0;
            inbuffer_stream += buffer;
            string content;

            bool r = Decode(inbuffer_stream, &content);  //result code

            Response resp;
            r = resp.DeSerialize(content);

            resp.DebugPrint();
        }

        sleep(1);

    }
下面是全部代码:
cpp
#include<iostream>
using namespace std;
#include"tcpserver.hpp"
#include<string>
#include"socket.hpp"
#include<time.h>
#include<cstdlib>

void Usage(string proc)
{
    cout << "Usage: " << proc << endl;
}


int main(int argc, char* argv[])
{
    if (argc != 3)
    {
        Usage(argv[0]);
        exit(0);
    }

    //
    string serverip = argv[1];
    uint16_t port = stoi(argv[2]);

    Socket sockfd;
    sockfd.SocketInit();
    bool r = sockfd.Connect(serverip, port);
    if (!r) return 1;

    srand(time(nullptr) ^ getpid());
    int cnt = 1;
    string opers = "+-*/%";


    string inbuffer_stream;
    while (cnt <= 20)
    {
        cout << "第" << cnt++ << "次测试......" << endl;
        int x = rand() % 100 + 1;
        usleep(1234);

        int y = rand() % 100 ;
        usleep(4321);

        char oper = opers[rand() % opers.size()];
        Request req(x, y, oper);

        req.DebugPrint();

        string package;
        req.Serialize(&package);

        package = Encode(package);
        cout << "这是最新的发出去的请求:\n" << package;
        write(sockfd.Fd(), package.c_str(), package.size());

        char buffer[128];
        ssize_t n = read(sockfd.Fd(), buffer, sizeof(buffer));  //我们也无法保证我们能够读到一个完整的报文
        if (n > 0)
        {
            buffer[n] = 0;
            inbuffer_stream += buffer;
            string content;

            bool r = Decode(inbuffer_stream, &content);  //result code

            Response resp;
            r = resp.DeSerialize(content);

            resp.DebugPrint();
        }

        sleep(1);

    }

    return 0;
}
Json的使用
Json在使用之前要先安装, centos下是yum install -y jsoncpp-devel, Ubuntu下是:apt-get install libjsoncpp-dev。Ubuntu下建议安装前先update一下apt。
如果安装后, 可以检查一下是否安装成功:(Ubuntu下是这样的路径)


如果有上面这些文件, 说明就是安装成功了。
然后下面开始使用示例:
cpp
#include<iostream>
#include<jsoncpp/json/json.h>
#include<string>
using namespace std;

int main()
{
    Json::Value root;
    root["x"] = 100;
    root["y"] = 200;
    root["op"] = "+";
    root["dect"] = "this is a + oper";
    //
    Json::FastWriter w;
    string res = w.write(root); //序列化,参数就是我们的root。

    cout << res << endl;

    Json::Value v;
    Json::Reader r;  //r就是一个方法, 利用r里面的方法将res字符串给V, 就完成了反序列化
    r.parse(res, v);

    //这就是将反序列化的数据提取出来
    int x = v["x"].asInt();      //
    int y = v["y"].asInt();
    int op = v["op"].asInt();
    string desc = v["desc"].asString();
    return 0;
}
有了Json之后, 对于序列化和反序列化就可以改成Json版本的了, 这里使用条件编译进行控制, 保留代码痕迹。 注意, 序列化反序列化是serialize和deserialize, 而Encode和 Decode是对序列化的数据进行添加报头和解报头。Encode和Decode仍需要我们自己实现, 序列化和反序列化可以由Json代替:
cpp
//协议
#pragma once
#include<iostream>
using namespace std;
#include<string>
#include<jsoncpp/json/json.h>

// #define MySelf 1

const string blank_space_sep = " ";
const string protocol_sep = "\n";

string Encode(string &content)  //content正文部分
{
    string package = to_string(content.size()); //先添加len
    package += protocol_sep; //加反斜杠n
    package += content;
    package += protocol_sep; //字符串末尾加上反斜杠n

    return package;
}

bool Decode(string &package, string *content)
{
    size_t pos = package.find(protocol_sep);
    if(pos == string::npos) return false;
    string len_str = package.substr(0, pos);
    size_t len = stoi(len_str);
    size_t total_len = len_str.size() + len + 2;

    if (package.size() <= total_len) return false;
    *content = package.substr(pos + 1, len);

    package.erase(0, total_len);

    return true;
}

//json, protobuf。可以帮助自动序列化发序列化, 也就是线程的序列化反序列化方案。
class Request
{
public:
    Request(){}
    Request(int data1, int data2, char oper)
        : x(data1), y(data2), op(oper)
    {

    }


    bool serialize(string *out)
    {
#ifdef MySelf

        string s = to_string(x);
        s += blank_space_sep;
        s += op;
        s += blank_space_sep;
        s += to_string(y);

        *out += s;
        return true;
#else
        Json::Value root;
        root["x"] = x;
        root["y"] = y;
        root["op"] = op;
        Json::FastWriter w;
        *out = w.write(root);


#endif

    }

    bool deserialize(string &in)
    {
#ifdef MySelf

        size_t left = in.find(blank_space_sep);
        if (left == string::npos) return false;
        string part_x = in.substr(0, left);

        size_t right = in.rfind(blank_space_sep);
        if (right == string::npos) return false;

        string part_y = in.substr(right + 1);

        if (left + 2 != right) return false;

        op = in[left + 1];
        x = stoi(part_x);
        y = stoi(part_y);

        return true;
#else
        Json::Value root;
        Json::Reader r;
        r.parse(in, root); //反序列化
        x = root["x"].asInt();
        y = root["y"].asInt();
        op = root["op"].asInt();


#endif
    }

    void DebugPrint()
    {
        cout << "构建请求完成: " << x << op << y <<  "?= " << endl;

    }

public:
    int x;
    int y;
    char op;  // + - * / %
};

class Response
{
public:
    Response(){}
    Response(int res, int c)
        : result(res), code(c)
    {

    }

    bool serialize(string *out)
    {
#ifdef MySelf
        string s = to_string(result);
        s += blank_space_sep;
        s += to_string(code);

        *out += s;
        return true;
#else
        Json::Value root;
        root["result"] = result;
        root["code"] = code;

#endif
    }

    bool deserialize(string &in)
    {
#ifdef MySelf

        size_t pos = in.find(blank_space_sep);
        if (pos == string::npos) return false;
        string part_left = in.substr(0, pos);
        string part_right = in.substr(pos + 1, string::npos);

        result = stoi(part_left);
        code = stoi(part_right);
        return true;
#else
    Json::Value root;
    Json::Reader r;
    r.parse(in, root);
    result = root["result"].asInt();
    code = root["code"].asInt();
#endif
    }


public:
    int result;
    int code;  //0, 可信,否则!0具体是几, 表明对应的错误原因。

};
运行结果
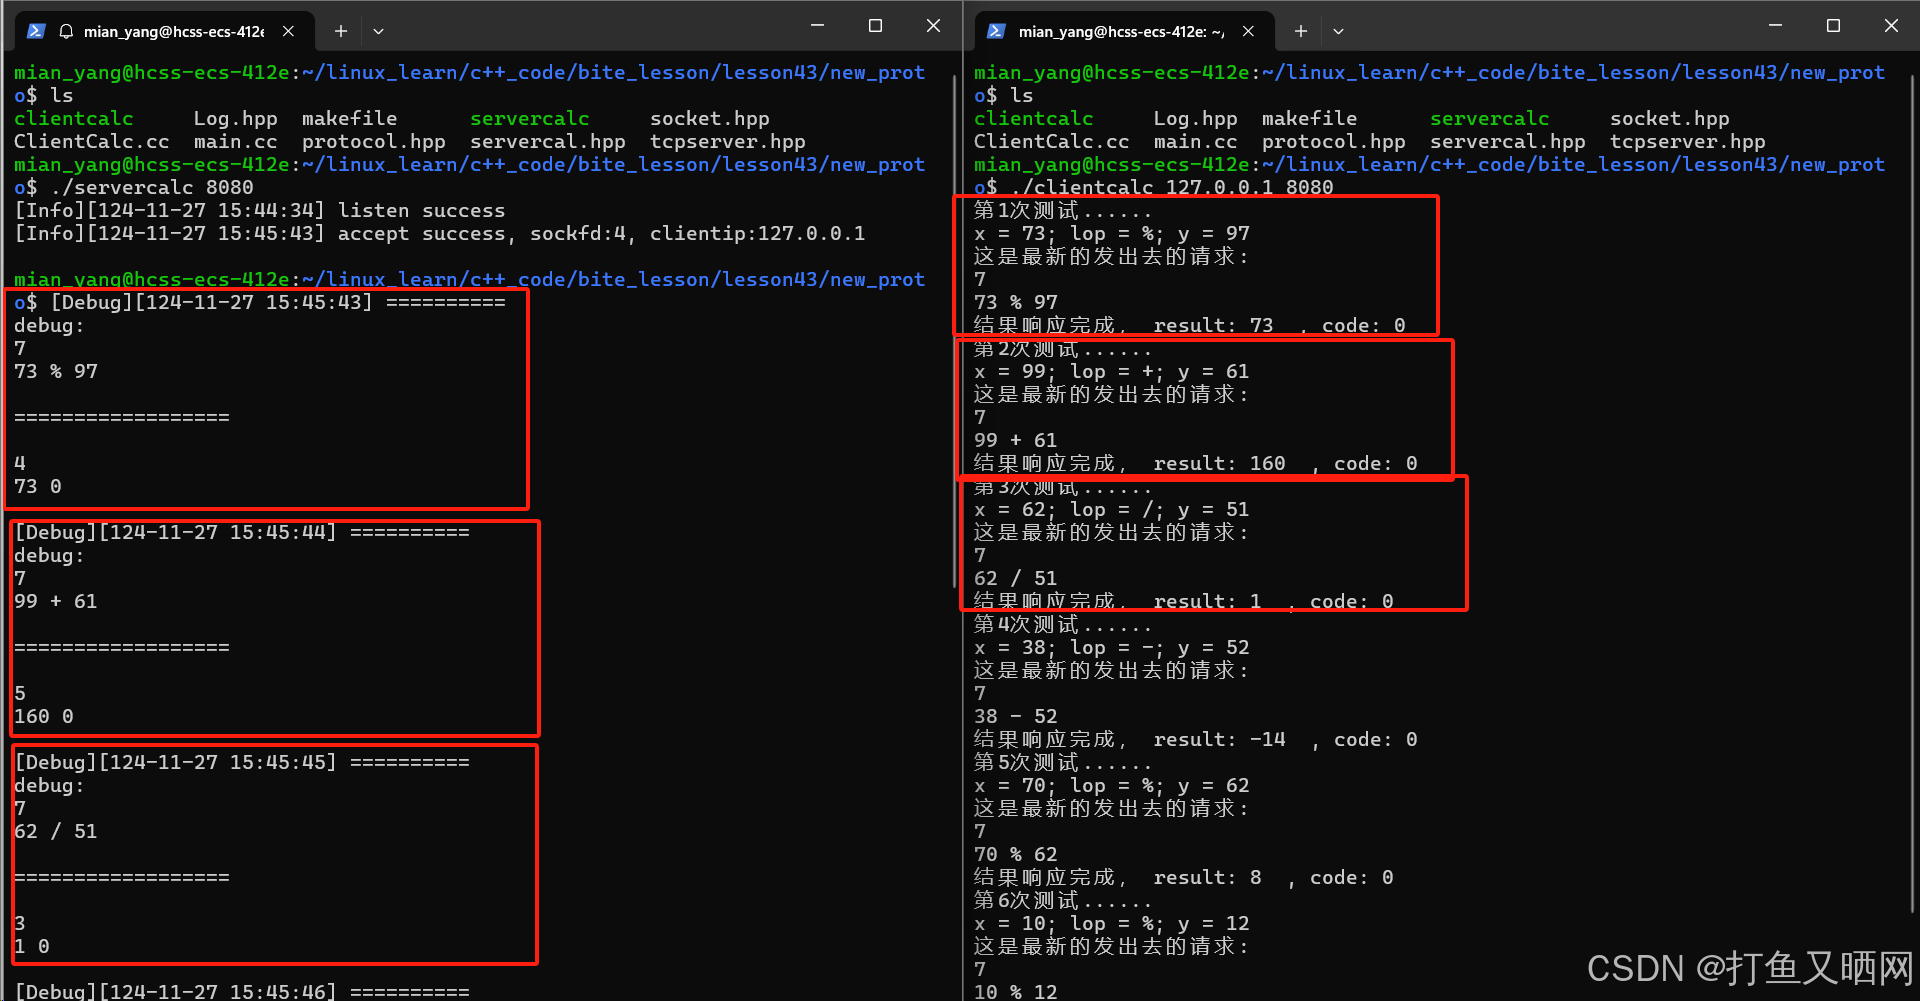
我们完成了客户端, 服务端上一节课也完成了。 现在我们就能让网络计算器跑起来了。 看一下运行结果:先启动服务端
再启动客户端:


------------------以上就是本节全部内容哦, 如果对友友们有帮助的话可以关注博主, 方便学习更多知识哦!!!