在使用 wxPython 开发跨平台应用时,结合后端实现附件信息的上传和管理是一种常见需求。WxPython跨平台开发框架是前后端分离的框架,前端采用的是WxPython + aiohttp 来构建跨平台的界面展示和处理,后端使用 FastAPI, SQLAlchemy, Pydantic, Redis 等技术构建的项目。后端数据库访问采用异步方式;数据库操作和控制器操作,采用基类继承的方式减少重复代码,提高代码复用性。支持Mysql、Mssql、Postgresql、Sqlite等多种数据库接入,通过配置可以指定数据库连接方式。
本篇随笔介绍WxPython跨平台开发框架之前后端结合实现附件信息的上传及管理,介绍附件管理中的前端展示、上传等操作,后端的接收附件以及存储文件和数据库信息等相关操作。
1、功能描述和界面
- 前端(wxPython GUI) :
- 提供文件选择、显示文件列表的界面。
- 支持上传、删除和下载附件。
- 展示上传状态和附件信息(如文件名、大小、上传时间)。
- 后端(REST API 服务) :
- 提供上传、删除、获取附件信息的接口。
- 使用常见的 Web 框架(如 Flask 或 FastAPI)实现。
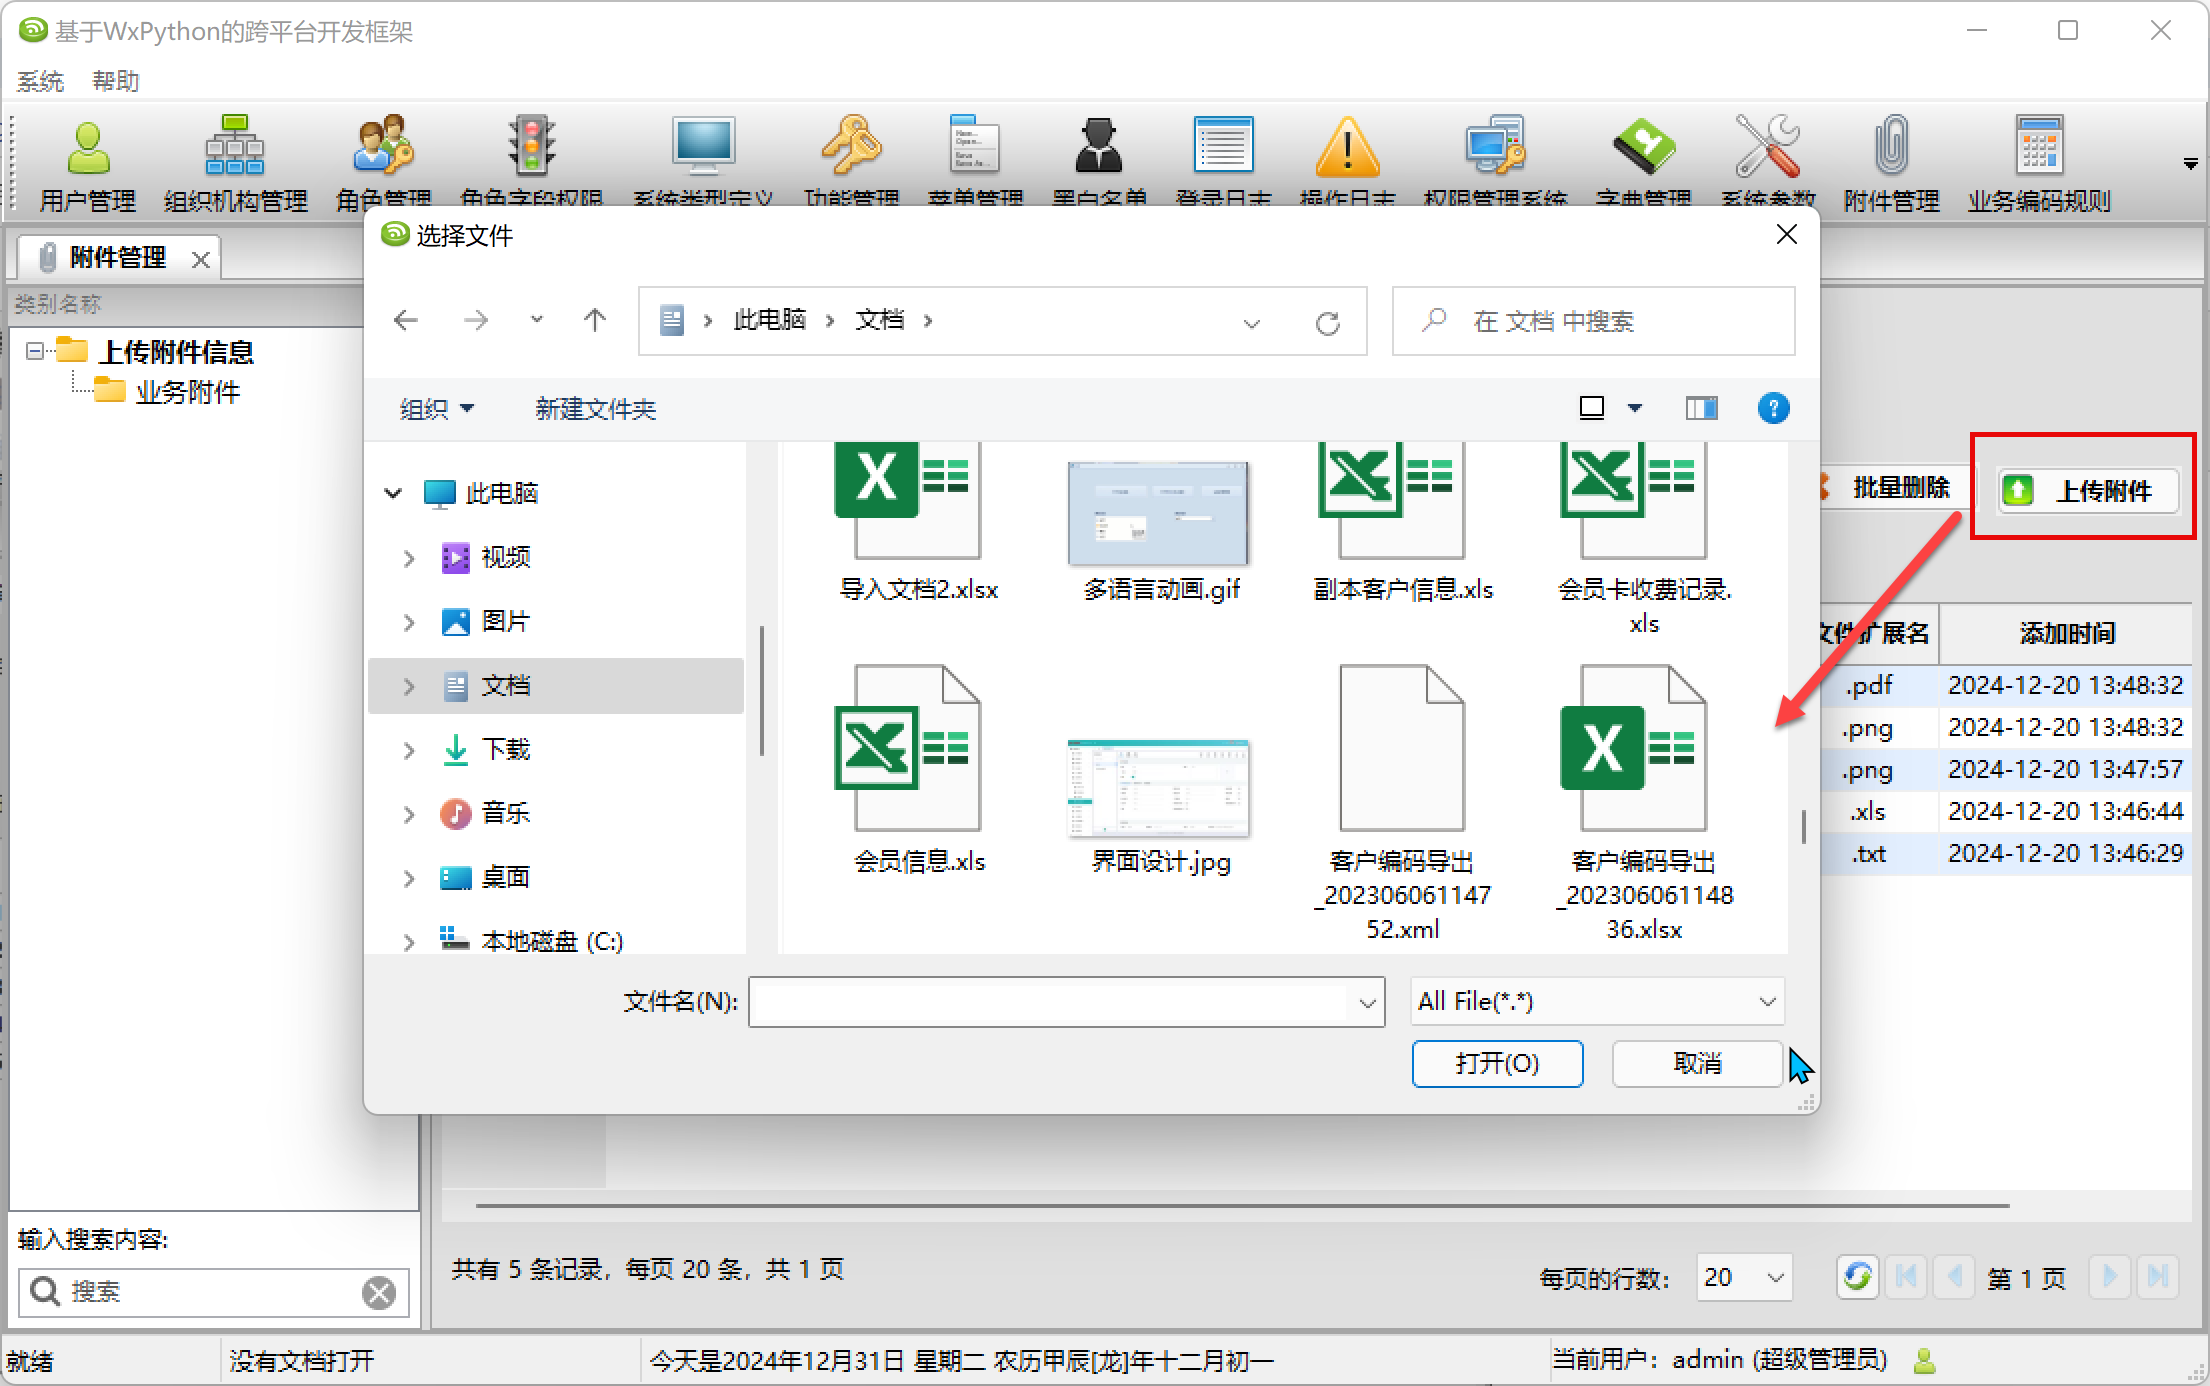
首先前端我们需要一个对所有附件进行管理的界面,以便对于附件进行统一的维护处理。

前端发起上传附件的处理,如下界面所示,可以选择多个不同类型的文件。

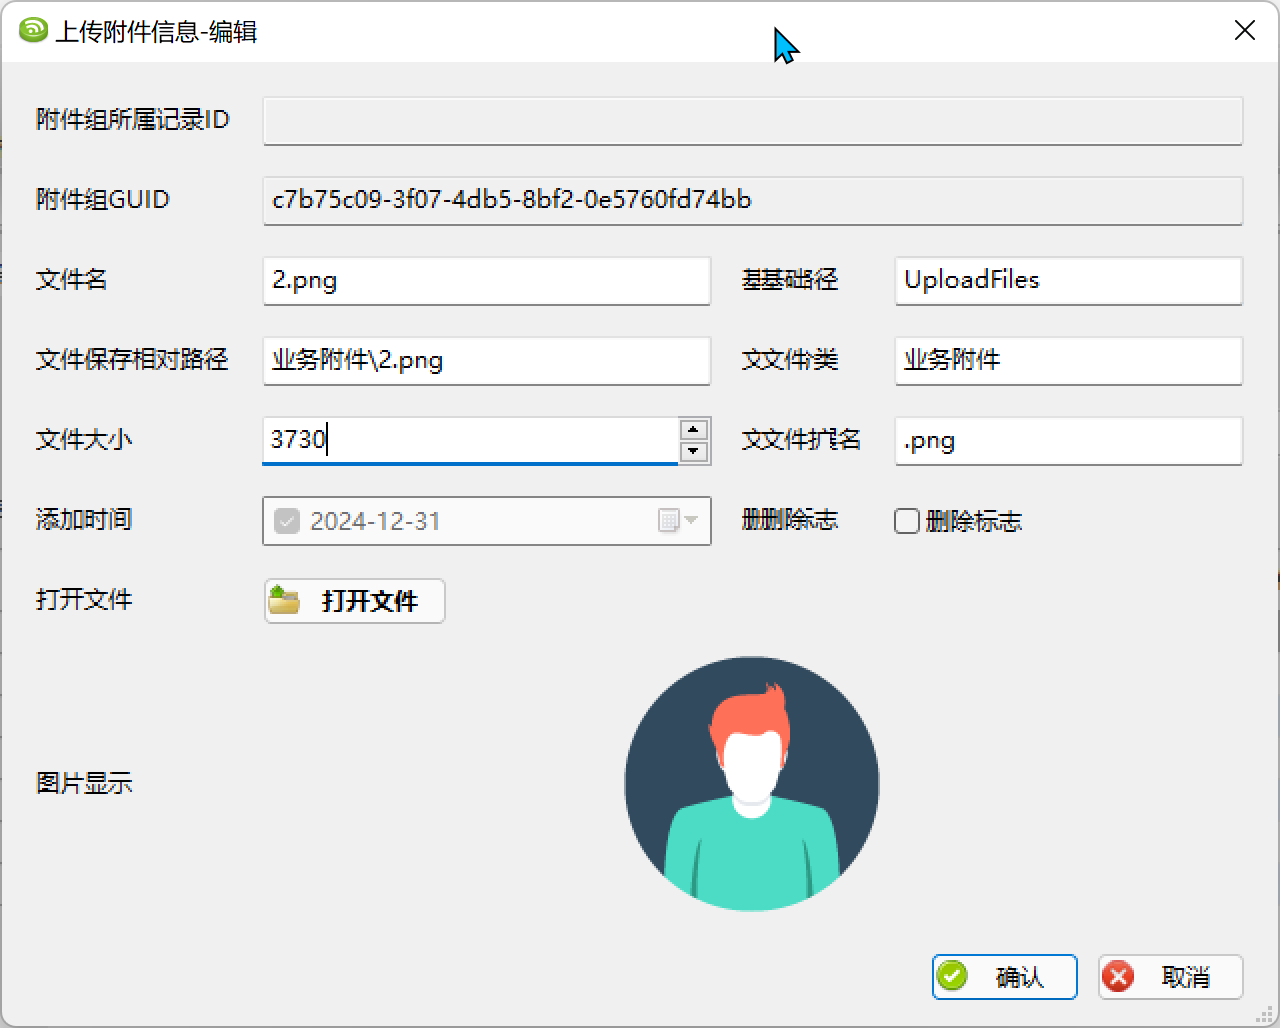
上传成功后,我们可以打开附件信息记录,如果是图片会显示出来,如果是其他格式,可以通过打开链接方式下载查看。

2、功能的实现处理
如果附件是简单的上传,比较容易处理,我们可以先了解一下简单的做法,然后在深入探讨实际框架中对于附件的处理。
1) FastAPI 端实现文件上传接口
首先,在 FastAPI 中创建一个接收文件的接口:
from fastapi import FastAPI, File, UploadFile

app = FastAPI()

@app.post("/upload/")
async def upload_file(file: UploadFile = File(...)):
    with open(file.filename, "wb") as f:
        f.write(await file.read())
    return {"filename": file.filename}
在公布对应的API接口后,在 前端的 wxPython 项目中,您可以通过 requests 库 或者 aiohttp 库 与 FastAPI 交互来实现文件上传。以下是简单的实现步骤和示例代码
import wx
import requests

class FileUploadFrame(wx.Frame):
    def __init__(self, *args, **kwargs):
        super().__init__(*args, **kwargs)

        panel = wx.Panel(self)
        self.upload_button = wx.Button(panel, label="上传文件", pos=(20, 20))
        self.upload_button.Bind(wx.EVT_BUTTON, self.on_upload)

        self.status_text = wx.StaticText(panel, label="", pos=(20, 60))

    def on_upload(self, event):
        with wx.FileDialog(
            self, "选择文件", wildcard="所有文件 (*.*)|*.*",
            style=wx.FD_OPEN | wx.FD_FILE_MUST_EXIST
        ) as file_dialog:
            if file_dialog.ShowModal() == wx.ID_CANCEL:
                return  # 用户取消选择

            # 获取文件路径
            file_path = file_dialog.GetPath()
            try:
                self.upload_file(file_path)
            except Exception as e:
                wx.LogError(f"文件上传失败: {e}")

    def upload_file(self, file_path):
        url = "http://127.0.0.1:8000/upload/"  # FastAPI 服务器的上传接口
        with open(file_path, "rb") as file:
            files = {"file": file}
            response = requests.post(url, files=files)

        if response.status_code == 200:
            self.status_text.SetLabel(f"上传成功: {response.json().get('filename')}")
        else:
            self.status_text.SetLabel(f"上传失败: {response.status_code}")

if __name__ == "__main__":
    app = wx.App(False)
    frame = FileUploadFrame(None, title="文件上传", size=(300, 150))
    frame.Show()
    app.MainLoop()
2) 上传多个文件的处理方式
上面是单个文件的上传处理,如果要一次性提交多个文件到 FastAPI 接口,可以使用 FastAPI 的 List[UploadFile] 类型接收多个文件。以下是完整的实现方法。
from fastapi import FastAPI, File, UploadFile
from typing import List

app = FastAPI()

@app.post("/upload/")
async def upload_files(files: List[UploadFile] = File(...)):
    saved_files = []
    for file in files:
        file_path = f"./uploaded/{file.filename}"  # 保存到 uploaded 目录
        with open(file_path, "wb") as f:
            f.write(await file.read())
        saved_files.append(file.filename)
    return {"uploaded_files": saved_files}
而在前端WxPython的处理中,需要对多个文件进行上传处理即可,可以使用 wx.FileDialog 的多选功能,并通过 requests 库批量上传多个文件。
import wx
import requests

class MultiFileUploadFrame(wx.Frame):
    def __init__(self, *args, **kwargs):
        super().__init__(*args, **kwargs)

        panel = wx.Panel(self)
        self.upload_button = wx.Button(panel, label="上传多个文件", pos=(20, 20))
        self.upload_button.Bind(wx.EVT_BUTTON, self.on_upload)

        self.status_text = wx.StaticText(panel, label="", pos=(20, 60), size=(300, -1))

    def on_upload(self, event):
        with wx.FileDialog(
            self, "选择文件", wildcard="所有文件 (*.*)|*.*",
            style=wx.FD_OPEN | wx.FD_MULTIPLE
        ) as file_dialog:
            if file_dialog.ShowModal() == wx.ID_CANCEL:
                return  # 用户取消选择

            # 获取选择的多个文件路径
            file_paths = file_dialog.GetPaths()
            try:
                self.upload_files(file_paths)
            except Exception as e:
                wx.LogError(f"文件上传失败: {e}")

    def upload_files(self, file_paths):
        url = "http://127.0.0.1:8000/upload/"  # FastAPI 服务器的上传接口
        files = [("files", (file_path.split("/")[-1], open(file_path, "rb"))) for file_path in file_paths]

        response = requests.post(url, files=files)

        if response.status_code == 200:
            uploaded_files = response.json().get("uploaded_files", [])
            self.status_text.SetLabel(f"上传成功: {', '.join(uploaded_files)}")
        else:
            self.status_text.SetLabel(f"上传失败: {response.status_code}")

if __name__ == "__main__":
    app = wx.App(False)
    frame = MultiFileUploadFrame(None, title="多文件上传", size=(400, 200))
    frame.Show()
    app.MainLoop()
不过我们附件的上传,往往还需要伴随着一些额外的信息,方便把这些信息存储在数据库中供查询参考,同时也是关联业务模块和附件信息的重要依据。
如果需要在上传多个文件的同时传递额外参数(如 guid 和 folder),可以将这些参数通过 POST 请求的表单数据 (data) 传递。FastAPI 可以同时处理文件和表单数据。
修改 FastAPI 接口以支持接收额外参数:
from fastapi import FastAPI, File, UploadFile, Form
from typing import List

app = FastAPI()

@app.post("/upload/")
async def upload_files(
    guid: str = Form(...),  # 接收 GUID 参数
    folder: str = Form(...),  # 接收 folder 参数
    files: List[UploadFile] = File(...),  # 接收文件
):
    saved_files = []
    for file in files:
        file_path = f"./{folder}/{file.filename}"  # 保存到指定的文件夹
        with open(file_path, "wb") as f:
            f.write(await file.read())
        saved_files.append(file.filename)
    return {"guid": guid, "folder": folder, "uploaded_files": saved_files}
而前端WxPython中对上传文件的地方进行适当的修改即可。
    def upload_files(self, file_paths, guid, folder):
        url = "http://127.0.0.1:8000/upload/"  # FastAPI 服务器的上传接口
        data = {"guid": guid, "folder": folder}
        files = [("files", (file_path.split("/")[-1], open(file_path, "rb"))) for file_path in file_paths]

        response = requests.post(url, data=data, files=files)

        # 释放文件资源
        for _, file_obj in files:
            file_obj[1].close()

        if response.status_code == 200:
            uploaded_files = response.json().get("uploaded_files", [])
            self.status_text.SetLabel(f"上传成功: {', '.join(uploaded_files)}")
        else:
            self.status_text.SetLabel(f"上传失败: {response.status_code}")
如果需要使用 aiohttp 进行异步数据请求,可以将 aiohttp 集成到 wxPython 的事件处理流程中,利用 asyncio 的事件循环处理异步任务。
客户端使用 aiohttp 进行异步请求。wxasync 库可以将 wxPython 和 asyncio 集成,从而支持异步操作。
    async def upload_files(self, file_paths, guid, folder):
        url = "http://127.0.0.1:8000/upload/"  # FastAPI 服务器的上传接口
        data = {"guid": guid, "folder": folder}
        files = [
            ("files", (file_path.split("/")[-1], open(file_path, "rb").read()))
            for file_path in file_paths
        ]

        async with aiohttp.ClientSession() as session:
            # 构造文件表单
            form_data = aiohttp.FormData()
            for key, value in data.items():
                form_data.add_field(key, value)
            for name, (filename, file_content) in files:
                form_data.add_field(name, file_content, filename=filename)

            # 异步 POST 请求
            async with session.post(url, data=form_data) as response:
                if response.status == 200:
                    result = await response.json()
                    uploaded_files = result.get("uploaded_files", [])
                    self.status_text.SetLabel(f"上传成功: {', '.join(uploaded_files)}")
                else:
                    self.status_text.SetLabel(f"上传失败: {response.status}")
3)文件名出现乱码的解决
在 FastAPI 中处理中文文件名时,如果不希望上传后的文件名被改变为其他编码(例如 UTF-8 编码被转为 ASCII 或其他编码),可以确保文件名在上传和保存时都以正确的编码进行处理。在使用 aiohttp 提交 FormData 时,中文文件名可能会因为编码不一致或处理不当而导致乱码。
当服务器接收到一个经过 URL 编码(也叫百分号编码)的文件名,如 '%E5%A4%87%E8%B4%A7%E8%AE%A2%E5%8D%95%E5%AF%BC%E5%87%BA.xls',你可以使用 Python 的 urllib.parse 模块来解码它,从而得到正确的文件名。
URL 编码是将非 ASCII 字符(如中文字符)转换为 % 后跟随两个十六进制数字的格式。因此,你需要使用 urllib.parse.unquote 或 urllib.parse.unquote_plus 来将其还原为原始字符串。
import urllib.parse

# 经过 URL 编码的文件名
encoded_filename = '%E5%A4%87%E8%B4%A7%E8%AE%A2%E5%8D%95%E5%AF%BC%E5%87%BA.xls'

# 使用 unquote 解码
decoded_filename = urllib.parse.unquote(encoded_filename)

print(decoded_filename)  # 输出:备货订单导出.xls
urllib.parse.unquote():用于解码 URL 编码的字符串,将百分号编码(如 %E5%A4%87)还原为原始字符。
如果文件名中有 + 符号代表空格(例如 Hello+World.txt),你可以使用 urllib.parse.unquote_plus(),它会将 + 转换为空格。
假设你在 FastAPI 中接收一个 URL 编码的文件名,并想要将其解析为正确的中文文件名:
from fastapi import FastAPI, File, UploadFile
import urllib.parse

app = FastAPI()

@app.post("/upload/")
async def upload_file(file: UploadFile = File(...)):
    # 获取 URL 编码的文件名
    encoded_filename = file.filename

    # 解码文件名
    decoded_filename = urllib.parse.unquote(encoded_filename)

    # 保存文件
    file_location = f"uploads/{decoded_filename}"
    with open(file_location, "wb") as buffer:
        buffer.write(await file.read())

    return {"filename": decoded_filename, "file_path": file_location}
4)后端提供提供静态文件访问,实现通过 URL 地址访问上传的文件
在 FastAPI 中上传文件后,默认情况下,文件存储在服务器的某个路径中。如果你想通过 URL 地址访问上传的文件,你需要确保文件保存的位置可以通过静态文件服务器访问,并且文件路径是公开可访问的。
FastAPI 提供了 StaticFiles 类,用于处理静态文件(如图片、CSS 文件等)的托管。你可以使用 StaticFiles 将上传的文件夹暴露为静态文件夹,并通过 URL 地址访问这些文件。
步骤:
- 设置静态文件目录:将上传的文件存储在一个公共目录中,并将该目录配置为静态文件目录。
- 访问文件:通过 URL 访问这些文件。
假设你希望将上传的文件存储在 uploads 目录,并能够通过 http://127.0.0.1:8000/uploads/{filename} 访问文件。
from fastapi import FastAPI, File, UploadFile
from fastapi.staticfiles import StaticFiles
import os

app = FastAPI()

# 将 uploads 目录映射为静态文件路径
app.mount("/uploads", StaticFiles(directory="uploads"), name="uploads")

# 创建上传文件的 API
@app.post("/upload/")
async def upload_file(file: UploadFile = File(...)):
    file_location = f"uploads/{file.filename}"

    # 保存上传的文件
    with open(file_location, "wb") as buffer:
        buffer.write(await file.read())

    return {"filename": file.filename, "file_path": file_location}
代码解释:
app.mount("/uploads", StaticFiles(directory="uploads"), name="uploads"):这行代码将uploads目录挂载为静态文件目录。即,FastAPI 会将该目录中的文件作为静态文件提供服务,URL 访问时通过/uploads路径访问这些文件。- 上传文件 :上传的文件会被保存到
uploads目录中。 - 访问文件 :文件上传后,你可以通过
http://127.0.0.1:8000/uploads/{filename}来访问上传的文件。
重要提示:
- 目录权限 :确保 FastAPI 进程对上传目录(如
uploads)有写权限,且该目录可公开访问。 - 文件安全:通过 URL 访问文件时要小心文件路径的安全性,避免恶意用户访问服务器上的敏感文件。你可以通过验证文件名或添加身份验证来保护这些文件。
进一步增强:
-
自定义文件路径:如果你想使用更加结构化的文件路径(例如按用户、日期等组织文件),你可以动态创建文件路径,并确保文件夹存在。
-
限制文件大小和类型:你可以在上传文件时限制文件的类型和大小,确保上传的文件符合预期。
3、WxPython跨平台框架的实现方式
上面介绍了很多上传文件的前端后端处理方式的细节,基于上面的各个地方我们进行了整合优化,因此实现方式上有所差异。
首先,在FastAPI的启动的时候,我们通过一个函数来注册静态文件的处理,方便上传文件后,可以通过上传文件的静态路径打开文件。
def register_static_file(app: FastAPI):
    """
    静态文件交互开发模式, 生产使用 nginx 静态资源服务

    :param app:
    :return:
    """
    if settings.STATIC_FILES:
        import os
        from fastapi.staticfiles import StaticFiles

        # 静态文件
        if not os.path.exists(STATIC_DIR):
            os.mkdir(STATIC_DIR)
        app.mount("/static", StaticFiles(directory=STATIC_DIR), name="static")

        # 上传文件
        if not os.path.exists(UPLOAD_FILES_DIR):
            os.mkdir(UPLOAD_FILES_DIR)
        app.mount(
            "/uploadfiles", StaticFiles(directory=UPLOAD_FILES_DIR), name="uploadfiles"
        )
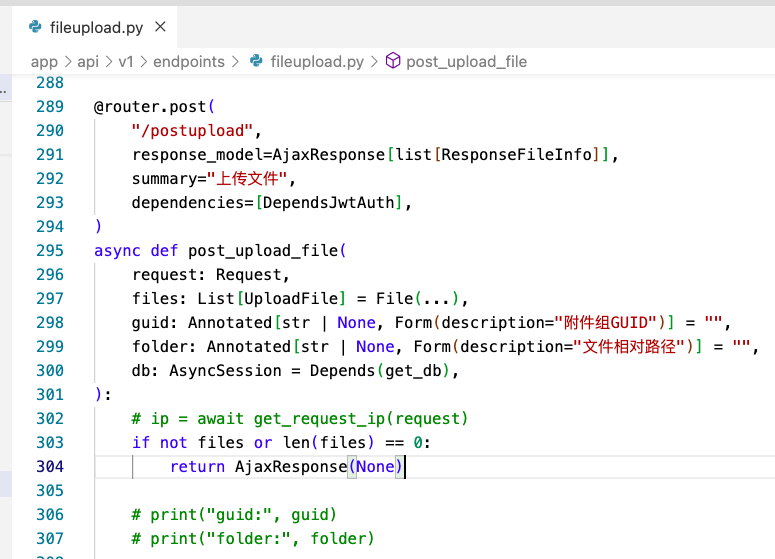
然后在FastAPI的路由器上提供上传文件的接口定义,如下所示。

接着通过遍历文件集合的方式,获得文件的名称、扩展名、字节集合、字节长度、以及其他相关的附带参数等等,从而构建附件的信息,方便保存到数据库进行存储。
    res_list = []
    for file in files:
        file_bytes = await file.read()  # 读取文件内容
        extension = Path(file.filename).suffix  # 使用 pathlib
        file_name = urllib.parse.unquote(Path(file.filename).name)  # 对文件名进行解码
        print("file_name:", file_name)

        dto = FileUploadDto(
            id=uuid.uuid4().hex,
            filename=file_name,
            fileextend=extension,
            filedata=file_bytes,
            filesize=len(file_bytes),
            category=folder,
            attachmentguid=guid,
            addtime=datetime.now(),
        )
文件信息,我们是另外存储在文件系统中的,需要判断文件是否存在,如果存在,使用另外的名称,然后在进行写入。
        # 创建目录
        os.makedirs(os.path.dirname(file_location), exist_ok=True)
        # 保存文件到文件系统
        with open(file_location, "wb") as buffer:
            buffer.write(file_bytes)
然后就是把文件的相关信息写入数据库,并返回相关的实体对象给前端即可。
        # 保存文件信息到数据库
        res = await fileupload_crud.create(db, dto)

        # 上传成功后,获取对应的地址返回
        url = get_file_url(request, dto.basepath, dto.savepath)
        res_list.append(ResponseFileInfo(id=dto.id, name=dto.filename, url=url))
Wxpython的前端需要封装对文件上传的API的调用,如下所示。

其中有一个ApiClient来代替通用的文件上传处理逻辑。其中主要就是构建一个FormData,把上传操作的额外参数和文件信息填入其中。
        form_data = aiohttp.FormData()
        for key, value in data.items():
            form_data.add_field(key, value)
文件信息,一样的处理方式,根据文件路径获得相关的文件名称和字节内容,然后添加到其中即可。
        if filepath_list and len(filepath_list) > 0:
            files = [
                ("files", (Path(file_path).name, open(file_path, "rb")))
                for file_path in filepath_list
            ]
            for name, (filename, file_content) in files:
                # print(f"name:{name},filename:{filename}")
                form_data.add_field(
                    name, file_content, filename=filename, content_type="text/plain"
                )
由于文件是我们用户登录后的操作,因此需要添加用户令牌。
        # 请求头默认为:multipart/form-data,需要增加只定义的信息
        headers = {}
        access_token = ApiClient.get_access_token()
        if access_token:
            headers["Authorization"] = f"Bearer {access_token}"
最后按常规的Post方式处理即可
WxPython的前端界面,我们添加一个按钮,
self.btnUpload = ControlUtil.create_button(
 pane,
 btn_name="上传附件",
 icon_name="upload",
 icon_size=16,
 handler=self.OnUpload,
 is_async=True,
)
然后使用其按钮事件上传文件操作,如下代码所示。
    async def OnUpload(self, event: wx.Event):
        """上传附件"""
        # 打开文件选择对话框, 返回以逗号分隔的多个文件路径
        filePaths = FileDialogUtil.open_file(self, multiple=True, title="选择文件")
        if filePaths:
            # 上传文件
            guid = str(uuid4())  # 生成GUID
            await self.upload_files(filePaths.split(","), guid=guid, folder="业务附件")
        else:
            MessageUtil.show_info(self, "未选择文件")

    async def upload_files(
        self, file_list: list[str], guid: str = "", folder: str = ""
    ):
        """上传文件"""
        res = await api.postupload(file_list, guid=guid, folder=folder)
        # print(res)
        if res:
            MessageUtil.show_notification(self, "上传成功")
            # 刷新表格数据
            await self.update_grid()
        else:
            MessageUtil.show_error(self, "上传失败")
上传文件成功后,附件列表界面,展示所有相关的附件列表。

附件上传后,我们如果需要查看附件,双击列表即可打开相关的记录,显示我们附件的的相关信息。

以上就是对于FastApi后端+WxPython的前端对上传文件的相关协同操作实现过程。