1、概 述
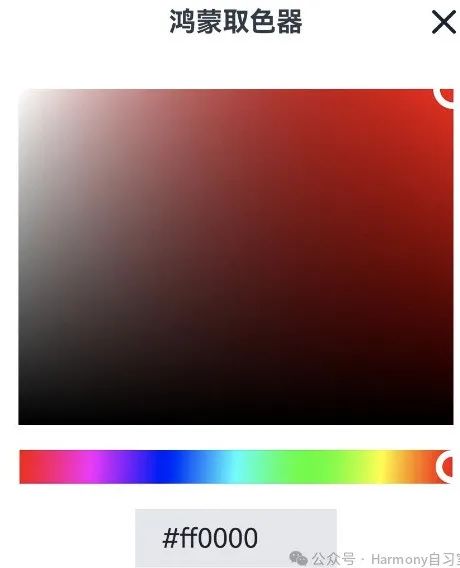
取色对话框在实际项目开发中非常常见(效果类似如下图),有朋友留言希望讨论一下,那我们来实现一个基本的颜色选择器。
申明:
核心代码参考自项目:https://gitee.com/yranfantasy/harmony-color-picker。感谢这位朋友

2、颜色转换工具函数
在开始实现前,我们一般会用到几个转换工具函数,例如将 #ff000格式的颜色转换为r,g,b数组,同样,我们需要将r,g,b数组转换为对应的颜色表达字符串。相关的函数已经非常成熟,本文贴一个,代码如下(color-utils.ets文件):
// color-utils.etsclass ColorUtils { hexToRgb(hex: string): [number, number, number] { const r = parseInt(hex.slice(1, 3), 16); const g = parseInt(hex.slice(3, 5), 16); const b = parseInt(hex.slice(5, 7), 16); return [r, g, b]; } hexToHsv(hex: string): [number, number, number] { hex = hex.replace('#', ''); const r = parseInt(hex.slice(0, 2), 16); const g = parseInt(hex.slice(2, 4), 16); const b = parseInt(hex.slice(4, 6), 16); const max = Math.max(r, g, b); const min = Math.min(r, g, b); const value = max / 255; let saturation = (max !== 0) ? ((max - min) / max) : 0; let hue = 0; if (saturation === 0) { hue = 0; } else { switch (max) { case r: hue = ((g - b) / (max - min)) + (g < b ? 6 : 0); break; case g: hue = ((b - r) / (max - min)) + 2; break; case b: hue = ((r - g) / (max - min)) + 4; break; } hue /= 6; hue = hue >= 0 ? hue : hue + 1; } return [hue * 360, saturation, value]; } hsvToHex(h: number, s: number, v: number): string { let r: number = 0, g: number = 0, b: number = 0; let i = Math.floor(h / 60); let f = h / 60 - i; let p = v * (1 - s); let q = v * (1 - f * s); let t = v * (1 - (1 - f) * s); switch (i % 6) { case 0: r = v; g = t; b = p; break; case 1: r = q; g = v; b = p; break; case 2: r = p; g = v; b = t; break; case 3: r = p; g = q; b = v; break; case 4: r = t; g = p; b = v; break; case 5: r = v; g = p; b = q; break; } r = Math.round(r * 255); g = Math.round(g * 255); b = Math.round(b * 255); return `#${this.toHex(r)}${this.toHex(g)}${this.toHex(b)}`; } toHex(n: number) { let hex = n.toString(16); return hex.length === 1 ? '0' + hex : hex; }}export default new ColorUtils()3、实现取色面板
我们的取色面板合适是使用两个Canvas去实现。
Canvas的使用我们已经讨论过很多个案例了,这里不再展开介绍基本用法,参考文章:
我们想实现的取色面板效果如下:
代码如下(注意第2行,我们导入了上一步的工具函数):
import { Size } from '@kit.ArkUI'import ColorUtils from './color-utils'class Point { x: number = 0 y: number = 0 constructor(x: number, y: number) constructor(); constructor(x: number = 0, y: number = 0) { this.x = x; this.y = y; }}@CustomDialogexport struct ColorPickDialog { controller: CustomDialogController private settings: RenderingContextSettings = new RenderingContextSettings(true) private hueContext: CanvasRenderingContext2D = new CanvasRenderingContext2D(this.settings) private satValContext: CanvasRenderingContext2D = new CanvasRenderingContext2D(this.settings) /** * hue panel point */ private hueTrackerPointSize: Size = { width: 20, height: 20 } @State private hueTrackerPoint: Point = new Point(0 - this.hueTrackerPointSize.height * 0.5, 0 - this.hueTrackerPointSize.width * 0.5) /** * satVal panel point */ private satValTrackerPointSize: Size = { width: 24, height: 24 } @State private satValTrackerPoint: Point = new Point(0 - this.satValTrackerPointSize.width * 0.5, 0 - this.satValTrackerPointSize.height * 0.5) /** * 默认颜色 */ @Link color: string @State private hue: number = 360; @State private sat: number = 0; @State private val: number = 0; aboutToAppear(): void { // hex to hsv const hsv = ColorUtils.hexToHsv(this.color) this.hue = hsv[0] this.sat = hsv[1] this.val = hsv[2] } build() { Column() { this.TitleBar() this.SatValPanel() Row() { this.HuePanel() }.margin(15) Stack() { TextInput({ text: this.color }) .fontColor('#1d2129') .fontSize(16) .backgroundColor(Color.Transparent) .onEditChange((isEditing) => { if (!isEditing) { const hsv = ColorUtils.hexToHsv(this.color) this.hue = hsv[0] this.sat = hsv[1] this.val = hsv[2] // invalidate canvas this.invalidateHuePanel() this.invalidateSatValPanel() } }) .onChange((value) => { this.color = value }) } .width(120) .height(35) .backgroundColor('#e5e6eb') .margin({ bottom: 10 }) } } @Builder private TitleBar() { RelativeContainer() { Row() { Text('鸿蒙取色器') .fontWeight(FontWeight.Bold) .fontSize(16) .layoutWeight(1) .textAlign(TextAlign.Center) } .justifyContent(FlexAlign.Center) .alignRules( { 'center': {'anchor': '__container__', 'align': VerticalAlign.Center }, 'left': { 'anchor': '__container__', 'align': HorizontalAlign.Start } }) Row() { SymbolGlyph($r('sys.symbol.xmark')) .fontSize(20) .fontWeight(FontWeight.Bold) .fontColor([$r('sys.color.font_primary')]) .onClick(() => { this.controller.close(); }) } .justifyContent(FlexAlign.Center) .alignRules( { 'right': { 'anchor': '__container__', 'align': HorizontalAlign.End }, 'center': {'anchor': '__container__', 'align': VerticalAlign.Center } } ) .margin({right: 10}) } .width('100%') .height(40) } @Builder private SatValPanel() { Stack() { Canvas(this.satValContext) .width('90%') .height(200) .margin({ top: 20 }) .onReady(() => { this.drawSatValPanel(true) }) .onTouch((event) => { let x = event.touches[0].x let y = event.touches[0].y if (x >= this.satValContext.width) { x = this.satValContext.width } if (x < 0) { x = 0 } if (y >= this.satValContext.height) { y = this.satValContext.height } if (y < 0) { y = 0 } this.satValTrackerPoint = new Point(x - this.satValTrackerPointSize.width * 0.5, y - this.satValTrackerPointSize.height * 0.5) this.color = this.getColor() const p = this.pointToSatVal(x, y) this.sat = p[0] this.val = p[1] }) Shape() { Circle() .size(this.satValTrackerPointSize) .fill(Color.Transparent) .borderRadius(this.satValTrackerPointSize.width / 2) .border({ color: Color.White, width: 4 }) .fill(Color.Transparent); } .margin({ top: 20 }) .enabled(false) .focusOnTouch(false) .position({ x: this.satValTrackerPoint.x, y: this.satValTrackerPoint.y }) } } private drawSatValPanel(isUpdateTrackerPoint: boolean = false) { this.satValContext.clearRect(0, 0, this.satValContext.width, this.satValContext.height) this.satValContext.fillStyle = ColorUtils.hsvToHex(this.hue, 1, 1); this.satValContext.fillRect(0, 0, this.satValContext.width, this.satValContext.height); const whiteGradient = this.satValContext.createLinearGradient(0, 0, this.satValContext.width, 0); whiteGradient.addColorStop(0, "#fff"); whiteGradient.addColorStop(1, "transparent"); this.satValContext.fillStyle = whiteGradient; this.satValContext.fillRect(0, 0, this.satValContext.width, this.satValContext.height); const blackGradient = this.satValContext.createLinearGradient(0, 0, 0, this.satValContext.height); blackGradient.addColorStop(0, "transparent"); blackGradient.addColorStop(1, "#000"); this.satValContext.fillStyle = blackGradient; this.satValContext.fillRect(0, 0, this.satValContext.width, this.satValContext.height); if (isUpdateTrackerPoint) { const p = this.setValToPoint(this.sat, this.val) this.satValTrackerPoint = new Point(p.x - this.satValTrackerPointSize.width / 2, p.y - this.satValTrackerPointSize.height / 2) } } private invalidateSatValPanel() { this.satValContext.clearRect(0, 0, this.satValContext.width, this.satValContext.height) this.drawSatValPanel(true) } private setValToPoint(sat: number, val: number): Point { const width = this.satValContext.width const height = this.satValContext.height const p = new Point() p.x = sat * width + 0 p.y = (1 - val) * height + 0 return p } private pointToSatVal(x: number, y: number): [number, number] { const width = this.satValContext.width const height = this.satValContext.height if (x < 0) { x = 0 } else if (x > width) { x = width } else { x = x - 0 } if (y < 0) { y = 0 } else if (y > height) { y = height } else { y = y - 0 } return [1 / width * x, 1 - (1 / height * y)] } @Builder private HuePanel() { Stack() { Canvas(this.hueContext) .width('100%') .height(20) .onReady(() => { this.drawHuePanel() this.drawSatValPanel() }) .onTouch((event) => { let x = event.touches[0].x let y = event.touches[0].y let xMaxBoundary = this.hueContext.width let xMinBoundary = 0 if (x > xMaxBoundary) { x = xMaxBoundary } if (x < xMinBoundary) { x = xMinBoundary } this.hueTrackerPoint = new Point(x - this.hueTrackerPointSize.width * 0.5, y) this.hue = this.pointToHue(x) this.invalidateHuePanel() this.color = this.getColor() }) Shape() { Circle() .size(this.hueTrackerPointSize) .fill(Color.Transparent) .borderRadius(this.hueTrackerPointSize.width / 2) .border({ color: Color.White, width: 4 }) .fill(Color.Transparent); } .enabled(false) .focusOnTouch(false) .position({ x: this.hueTrackerPoint.x, y: 0 }) } } private drawHuePanel() { const grad = this.hueContext.createLinearGradient(0, 0, this.hueContext.width, this.hueContext.height); let hue = new Array<string>(361) let count = 0 for (let i = hue.length - 1; i >= 0; i--, count++) { hue[count] = ColorUtils.hsvToHex(i, 1, 1) grad.addColorStop(1 - i / 360, hue[count]) } this.hueContext.fillStyle = grad this.hueContext.fillRect(0, 0, this.hueContext.width, this.hueContext.height) const p = this.hueToPoint(this.hue) this.hueTrackerPoint = new Point(p.x - this.hueTrackerPointSize.width / 2, 0) } private invalidateHuePanel() { this.hueContext.clearRect(0, 0, this.hueContext.width, this.hueContext.height) this.drawHuePanel() this.drawSatValPanel() } /** * Get coordinate points based on hue * @param hue * @returns */ private hueToPoint(hue: number): Point { const width = this.hueContext.width const p = new Point() p.x = (width - (hue * width / 360) + 0) p.y = 0 return p } /** * Calculate hue value based on x coordinate * @param x axis * @returns */ private pointToHue(x: number) { if (x < 0) { x = 0 } else if (x > this.hueContext.width) { x = this.hueContext.width } else { x = x - 0 } let hue = 360 - (x * 360 / this.hueContext.width) if (hue < 0) { hue = 0 } else if (hue > 360) { hue = 360 } return hue } private getColor(): string { return ColorUtils.hsvToHex(this.hue, this.sat, this.val) }}4、在其他界面中使用
如果我们需要在其他page中使用,代码示例如下:
import { ColorPickDialog } from '../components/colorPicker/index';@Entry@Componentstruct Index { @State color: string = '#ff0000'; colorPickDialogController: CustomDialogController | null = new CustomDialogController({ builder: ColorPickDialog({color: this.color}), alignment: DialogAlignment.Center, width: '80%', cornerRadius: 15, backgroundColor: $r('sys.color.background_primary') }) build() { Column({space: 10}) { Text(this.color) Shape() { Rect() .width(100) .height(100) .fill(this.color) } Button('选择颜色') .onClick(() => { this.colorPickDialogController?.open() }) } .height('100%') .width('100%') } aboutToDisappear(): void { this.colorPickDialogController = null }}实现效果如下:
5、one more thing
最后,文章中的源代码地址如下:
https://gitee.com/lantingshuxu/harmony-class-room-demos/tree/feat/colorPicker