react native学习【6.1】------列表视图
官方文档
官方文档链接
https://reactnative.cn/docs/using-a-listview
具体内容
FlatList & SectionList
-
React Native 提供了几个适用于展示长列表数据的组件,一般而言我们会选用FlatList或是SectionList。
-
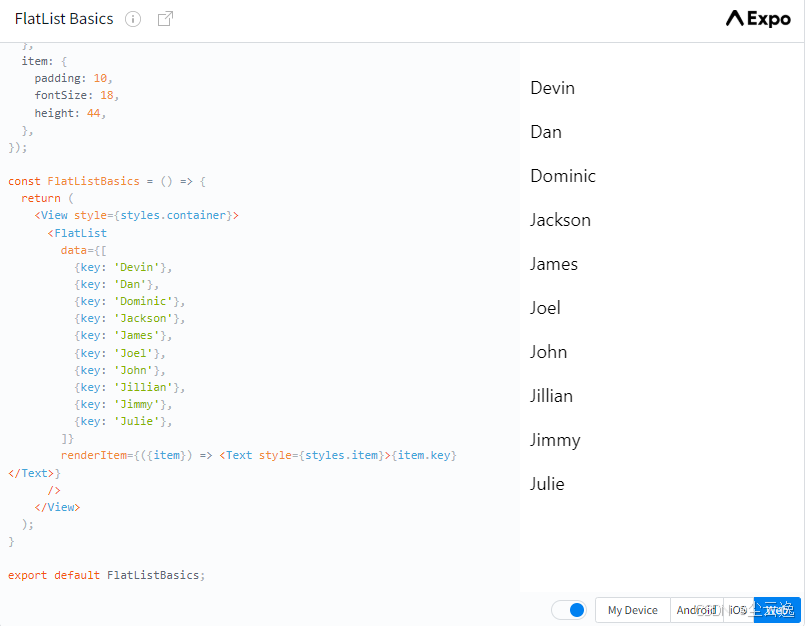
FlatList组件用于显示一个垂直的滚动列表,其中的元素之间结构近似而仅数据不同。FlatList更适于长列表数据,且元素个数可以增删。和ScrollView不同的是,FlatList并不立即渲染所有元素,而是优先渲染屏幕上可见的元素。FlatList组件必须的两个属性是data和renderItem。data是列表的数据源,而renderItem则从数据源中逐个解析数据,然后返回一个设定好格式的组件来渲染。- 下面的例子创建了一个简单的
FlatList,并预设了一些模拟数据。首先是初始化FlatList所需的data,其中的每一项(行)数据之后都在renderItem中被渲染成了Text组件,最后构成整个FlatList。
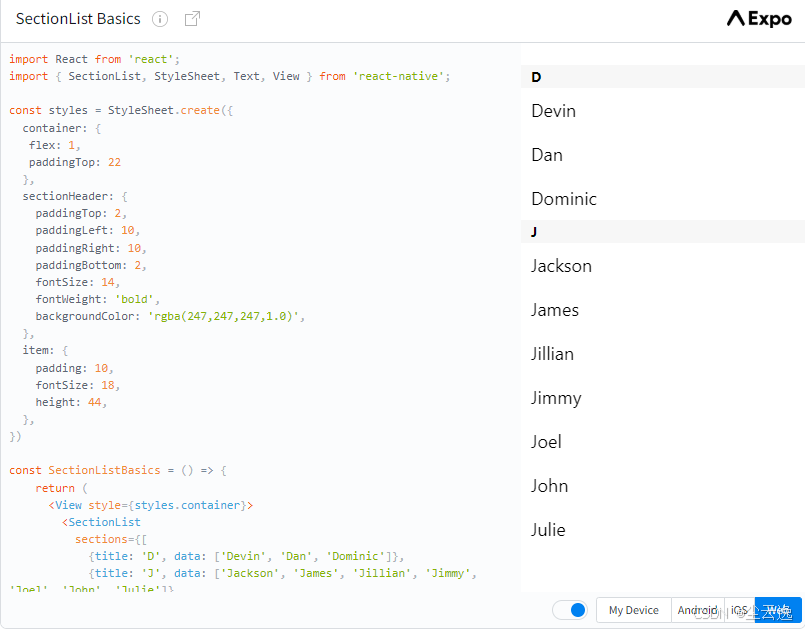
- 如果要渲染的是一组需要分组的数据,也许还带有分组标签的,那么
SectionList将是个不错的选择。
具体操作
1)移动文件
- 将(tabs)中的index.jsx contact.jsx移动到app文件夹下面;
- 删除(tabs)和(coffee)文件夹。
2)修改_layout.tsx文件
alt+z 可开启自动换行
删除导入语句
import { DarkTheme, DefaultTheme, ThemeProvider } from '@react-navigation/native';
import 'react-native-reanimated';
import { StatusBar } from 'expo-status-bar';(如果有的话)
2.
添加导入语句
import { Appearance } from 'react-native';
import { Colors } from '@/constants/Colors';
3.
修改并添加具体的代码语句
typescript
const colorScheme = Appearance.getColorScheme(); // 调用Appearance 来提供配色方案 'light' | 'dark'
const theme = colorScheme === 'dark' ? Colors.dark : Colors.light; // 根据当前的配色方案选择对应的主题颜色
对报错语句进行修改
typescript
// 直接删除掉相应的语句就行,下面是删除之后的代码:
return (
<Stack>
<Stack.Screen name="(tabs)" options={{ headerShown: false }} />
{/* <Stack.Screen name="(coffee)" options={{ headerShown: false }} /> */}
{/* 为每一个文件添加一个堆栈 */}
{/* <Stack.Screen name="index" options={{title: "Home", headerShown:false}} />
<Stack.Screen name="contact" options={{title: "Contact Us"}} /> */}
<Stack.Screen name="+not-found" />
</Stack>
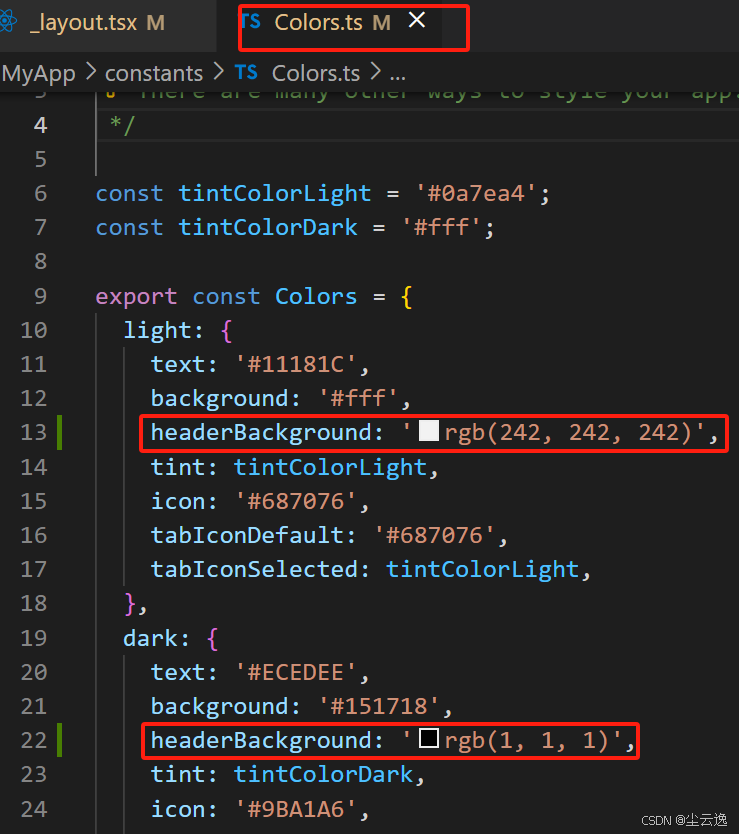
);之后,对Stack添加选项,设置标题headerStyle背景颜色 backgroundColor的时候需要对Colors文件添加代码hearderBackground。
typescript
return (
      <Stack screenOptions={{headerStyle: {backgroundColor: theme.headerBackground},
      headerTintColor: theme.text, headerShadowVisible: false,}}>
        <Stack.Screen name="index" options={{ headerShown: false, title: 'Home'}} />
        <Stack.Screen name="menu" options={{ headerShown: true, title: 'Meanu', headerTitle: 'Coffee Shop  Menu' }} />
        <Stack.Screen name="contact" options={{ headerShown: true, title: 'Contact', headerTitle: 'Contact Us' }} />
        <Stack.Screen name="+not-found" options={{headerShown: false}}/>
      </Stack>
  );
需要注意的是,还没有创建menu相关的文件,可能会报错。
最终的_layout.tsx文件的代码
typescript
import { useFonts } from 'expo-font';
import { Stack } from 'expo-router';
import * as SplashScreen from 'expo-splash-screen';
import { useEffect } from 'react';
import { Appearance } from 'react-native';
import { Colors } from '@/constants/Colors';


// Prevent the splash screen from auto-hiding before asset loading is complete.
SplashScreen.preventAutoHideAsync();

export default function RootLayout() {
  const colorScheme = Appearance.getColorScheme(); // 调用Appearance 来提供配色方案 'light' | 'dark'
  const theme = colorScheme === 'dark' ? Colors.dark : Colors.light; // 根据当前的配色方案选择对应的主题颜色
  const [loaded] = useFonts({
    SpaceMono: require('../assets/fonts/SpaceMono-Regular.ttf'),
  });

  useEffect(() => {
    if (loaded) {
      SplashScreen.hideAsync();
    }
  }, [loaded]);

  if (!loaded) {
    return null;
  }

  return (
      <Stack screenOptions={{headerStyle: {backgroundColor: theme.headerBackground},
      headerTintColor: theme.text, headerShadowVisible: false,}}>
        <Stack.Screen name="index" options={{ headerShown: false, title: 'Home'}} />
        <Stack.Screen name="menu" options={{ headerShown: true, title: 'Meanu', headerTitle: 'Coffee Shop  Menu' }} />
        <Stack.Screen name="contact" options={{ headerShown: true, title: 'Contact', headerTitle: 'Contact Us' }} />
        <Stack.Screen name="+not-found" options={{headerShown: false}}/>
      </Stack>
  );
}
3)添加并编写menu.jsx文件
在app文件夹下面添加menu.jsx文件(注意,此时的menu.jsx是和index.jsx文件是同等级的)
提到SafeAreaViewhttps://reactnative.cn/docs/safeareaview
javascript
import { StyleSheet, Appearance, Platform, SafeAreaView, ScrollView, FlatList, View, Text, Image } from "react-native";
import { Colors } from "@/constants/Colors";

export default function MenuScreen(){
    const colorScheme = Appearance.getColorScheme();
    const theme = colorScheme === "dark"? Colors.dark : Colors.light;
    const styles = createStyles(theme, colorScheme);
    // SafeAreaView在移动设备上使用,ScrollView在web上使用
    const Container = Platform.OS === 'web' ? ScrollView : SafeAreaView;

    // 菜单屏幕功能的返回
    return (
        // 这里的Container是父容器
        <Container>
            {/* data需要具体的数值,所以在constants文件夹下面创建文件MenuItems.js */}
            <FlatList
                data ={[]}
                renderItem={({item}) => ()}
                >

            </FlatList>
        </Container>
    )
}

function createStyles(theme, colorScheme) {
    return StyleSheet.create({
    });
}
上述内容存在不完善,提示一个错误。后面会完善
4)编写MenuItems.js
在constants文件夹下面创建文件MenuItems.js 。
javascript
export const MENU_ITEMS = [
    {
        "id":1,
        "title":"Espresso",
        "description": "Strong, concentrated coffee.",
    },
    {
        "id":2,
        "title":"Latte",
        "description": "Rich, smooth milk with a smooth texture.",
    },
    {
        "id":3,
        "title":"Cappuccino",
        "description": "A smooth, rich, and creamy coffee with a smooth texture.",
    },
    {
        "id":4,
        "title":"Americano",
        "description": "A strong, thick coffee with a smooth texture.",
    },
    {
        "id":5,
        "title":"Mocha",
        "description": "A smooth, rich, and creamy coffee with a smooth texture.",
    },
    {
        "id":6,
        "title":"Macchiato",
        "description": "A smooth, rich, and creamy coffee with a smooth texture.",
    },
    {
        "id":7,
        "title":"affogato",
        "description": "A smooth, rich, and creamy coffee with a smooth texture.",
    },
    {
        "id":8,
        "title":"coldblew",
        "description": "Rich, smooth milk with a smooth texture.",
    },
    {
        "id":9,
        "title":"cortado",
        "description": "A strong, thick coffee with a smooth texture.",
    },
    {
        "id":10,
        "title":"flatwhite",
        "description": "A smooth, rich, and creamy coffee with a smooth texture.",
    }
]
// 上述内容不一定准确,只是一个示例
5)创建menu图像文件夹
在images目录下面,创建menu文件夹,并将已有的coffee图像移动到该文件夹当中。
图像来源: https://github.com/gitdagray/react-native-course/tree/lesson-4/MyApp/assets/images/menu

6)创建调用图像的文件MenuImages.js
在constants文件夹下面创建文件MenuImages.js
创建数组存储这些咖啡。
javascript
import espresso from "@/assets/images/menu/espresso.png"
import americano from "@/assets/images/menu/americano.png"
import latte from "@/assets/images/menu/latte.png"
import cappuccino from "@/assets/images/menu/cappuccino.png"
import macchiato from "@/assets/images/menu/macchiato.png"
import mocha from "@/assets/images/menu/mocha.png"
import flatwhite from "@/assets/images/menu/flatwhite.png"
import cortado from "@/assets/images/menu/cortado.png"
import coldbrew from "@/assets/images/menu/coldbrew.png"
import affogato from "@/assets/images/menu/affogato.png"

export default [
    espresso,
    americano,
    latte,
    cappuccino,
    macchiato,
    mocha,
    flatwhite,
    cortado,
    coldbrew,
    affogato
]
欢迎交流~
一切顺利!