1.filebeat的input类型之filestream实战案例:
在7.16版本中已经弃用log类型,之后需要使用filebeat,与log不同,filebeat的message无需设置就是顶级字段
1.1简单使用:
filebeat.inputs:
- type: filestream
  enabled: true
  paths:
    - /tmp/myfilestream01.log
output.console:
  pretty: true
1.2解析json格式数据
filebeat.inputs:
  # 指定类型为filestream,在7.16版本中已经弃用log类型
- type: filestream
  enabled: true
  paths:
    - /tmp/myfilestream02.log
  parsers:
    # 配置json格式解析
    - ndjson:
       # 将错误消息记录到error字段中
       add_error_key: true
       # 如果解析的json格式字段和filebeat内置的顶级字段冲突,则覆盖,默认是不覆盖的。
       overwrite_keys: true
       # 将message解析的字段放入一个自定义的字段下。若不指定该字段,则默认解析的键值对会在顶级字段.
       target: readjson

output.console:
  pretty: true
1.3多行合并案例
filebeat.inputs:
  # 指定类型为filestream,在7.16版本中已经弃用log类型
- type: filestream
  enabled: true
  paths:
    - /tmp/myfilestream02.log
  parsers:
    - multiline:
        type: count
        count_lines: 4
    - ndjson:
       add_error_key: true
       overwrite_keys: true
       target: readjson

output.console:
  pretty: true
2.写入数据到es集群
filebeat.inputs:
- type: filestream
  enabled: true
  paths:
    - /tmp/shopping.json
  parsers:
    - multiline:
        type: count
        count_lines: 7
    - ndjson:
       add_error_key: true
       overwrite_keys: true

# 将日志输出到ES集群
output.elasticsearch:
  # 指定ES集群地址
  hosts: ["http://10.0.0.101:9200","http://10.0.0.102:9200","http://10.0.0.103:9200"]
  # 指定索引
  index: "shopping-%{+yyyy.MM.dd}-output"

# 禁用索引声明管理周期,若不禁用则自动忽略自定义索引名称
setup.ilm.enabled: false
# 设置索引模板的名称
setup.template.name: "lxc-shopping"
# 指定索引模板的匹配模式
setup.template.pattern: "lxc-shopping-*"
# 是否覆盖原有的索引模板
setup.template.overwrite: true
# 设置索引模板
setup.template.settings:
  # 指定分片数量为8
  index.number_of_shards: 8
  # 指定副本数量为0
  index.number_of_replicas: 0
3.多数据源写入es集群不同索引
filebeat.inputs:

- type: filestream
  enabled: true
  tags: "json"
  paths:
    - /tmp/ceshi.json
  parsers:
    - ndjson:
       add_error_key: true
       #overwrite_keys: true


- type: filestream
  enabled: true
  tags: "log"
  paths:
    - /tmp/ceshi.log
  parsers:
    - multiline:
        type: count
        count_lines: 3


- type: filestream
  enabled: true
  tags: "shopping"
  paths:
    - /tmp/shopping.json
  parsers:
    - multiline:
        type: count
        count_lines: 7
    - ndjson:
       add_error_key: true
       overwrite_keys: true
       target: shopping


output.elasticsearch:
  hosts:
  - "http://10.0.0.101:9200"
  - "http://10.0.0.102:9200"
  - "http://10.0.0.103:9200"
  # index: "oldboyedu-linux85-shopping-%{+yyyy.MM.dd}"
  indices:
     - index: "filebeate-14-json-docker-%{+yyyy.MM.dd}"
       when.contains:
         tags: "json"
     - index: "filebeate-14-log-%{+yyyy.MM.dd}"
       when.contains:
         tags: "log"
     - index: "filebeate-14-shopping-%{+yyyy.MM.dd}"
       when.contains:
         tags: "shopping"

setup.ilm.enabled: false
setup.template.name: "filebeate-14"
setup.template.pattern: "filebeate-14-*"
setup.template.overwrite: true
setup.template.settings:
  index.number_of_shards: 4
  index.number_of_replicas: 1
解析:这个配置是针对有多个数据源采集到es集群的一个例子。三个type分别代表三个数据源,output.elasticsearch.hosts设置了es集群的ip,includes下三个index分别包含上面的三个type,注意这里的index名称需要和下面设置的setup.template.pattern匹配,否则索引模板不生效。可以通过curl 10.0.0.101:9200/filebeate-14-shopping-2025.01.23/_search,检验数据是否成功写入,详见之前文档,这里不多赘述。另外,值得注意的是,副本分片数量应该小于节点数量(可写入节点)。
4.logstash的安装
二进制安装:
1.解压安装包:tar xf logstash-7.17.5-linux-x86_64.tar.gz -C /app/softwares/
2.创建软链接:ln -svf /app/softwares/logstash-7.17.5/bin/logstash /usr/local/sbin/
3.验证logstash版本:logstash -V
4.基于命令行启动logstash实例:logstash -e "input { stdin { type => stdin } } output { stdout {} }"
5.编写第一个logstash
root@elk101.lxcedu.com \~# vim config/01-stdin-to-stdout.conf
input {
  stdin { type => stdin }
}

output {
  stdout {}
}
6.logstash搭配filebeat实战案例
1.编写logstash配置文件并启动(输入为filebeat的输入,输出到es集群)
vim 02-beats-to-stdout.conf
input {
  # 指定输入的类型是一个beats
  beats {
    # 指定监听的端口号
    port => 8888
  }
}

output {
  # 将数据写入ES集群
  elasticsearch {
    # 指定ES主机地址
    hosts => ["http://localhost:9200"]
    # 指定索引名称
    index => "my-logstash01"
  }
}
logstash -rf 02-beats-to-stdout.conf
2.启动filebeat实例并写入数据
root@elk101.lxcedu.com /app/softwares/filebeat-7.17.5-linux-x86_64/config# vim 18-nginx-to-logstash.yaml
filebeat -e -c 18-nginx-to-logstash.yaml
filebeat.inputs:
- type: log
  paths:
    - /var/log/nginx/access.log*

# 将数据输出到logstash中
output.logstash:
  # 指定logstash的主机和端口
     hosts: ["10.0.0.101:8888"]
7.logstash的过滤插件之geoip实战案例:
1.logstash配置文件
vim config03-beats-geoip-es.conf
input {
  # 指定输入的类型是一个beats
  beats {
    # 指定监听的端口号
    port => 8888
  }
}


filter {
  # 根据IP地址分析客户端的经纬度,国家,城市信息等。
  geoip {
     source => "clientip"
     remove_field => [ "agent","log","input","host","ecs","tags" ]
  }

}

output {

  # 将数据写入ES集群
  elasticsearch {
    # 指定ES主机地址
    hosts => ["http://localhost:9200"]
    # 指定索引名称
    index => "geoip-logstash"
  }
}
logstash -rf config/03-beats-geoip-es.conf
(2)filebeat采集数据到logstash
filebeat.inputs:
- type: log
  paths:
    - /var/log/nginx/access.log*
  json.keys_under_root: true
  json.add_error_key: true

# 将数据输出到logstash中
output.logstash:
  # 指定logstash的主机和端口
     hosts: ["10.0.0.101:8888"]
此时在kibana创建索引模式,

之后便可在Discover筛选出需要的值,进行查看

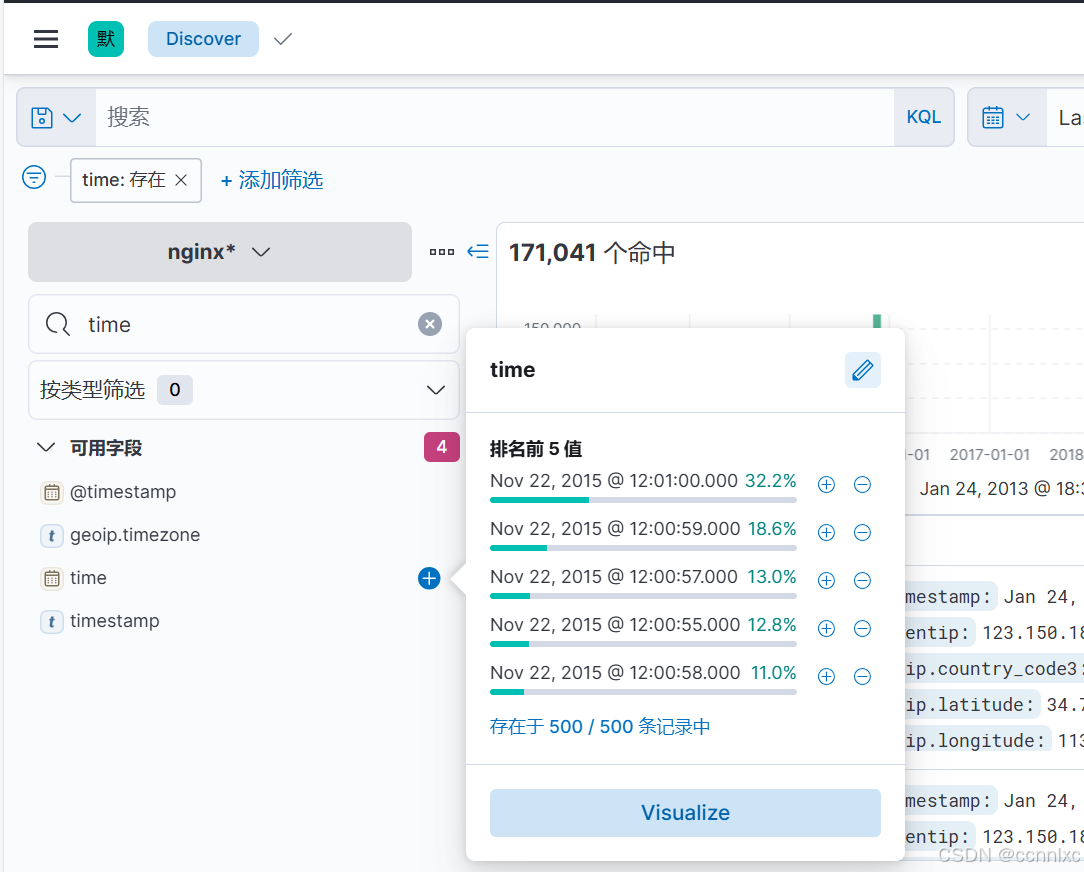
8.logstash解析nginx原生日志,并分析IP地址实战和修改日期字段数据类型
最好先创建索引模板,规划好分片和副本数量
1.logstash配置文件
vim config/04-beats-grok_geoip-es.conf
input {
  beats {
    port => 8888
  }
}


filter {
   #使用%%{HTTPD_COMBINEDLOG}解析日志
   grok {
      match => { "message" => "%{HTTPD_COMBINEDLOG}" }
      remove_field => [ "agent","log","input","host","ecs","tags" ]
   }

  geoip {
     source => "clientip"
  }

  date {
      # 匹配时间字符串字段并格式化
      # "22/Nov/2015:11:57:34 +0800",默认timestamp是keyword类型,不格式化无法在kbina分析
      match => [ "timestamp", "dd/MMM/yyyy:HH:mm:ss Z" ]
      # 匹配时区,可省略
      timezone => "Asia/Shanghai"
      # 将转后的日期替换为指定字段,若不指定,则默认值为"@timestamp"
      target => "time"
  }


}

output {
   #stdout {}

   elasticsearch {
    hosts => ["http://localhost:9200"]
    index => "nginx-logstash"
  }
}
启动:logstash -rf config/04-beats-grok_geoip-es.conf
2.filebeat采集数据到logstash
filebeat.inputs:
- type: log
  paths:
    - /tmp/access.log


# 将数据输出到logstash中
output.logstash:
   # 指定logstash的主机和端口
  hosts: ["10.0.0.101:8888"]
启动:filebeat -e -c 19-nginx-to-logstash.yaml
如下图kibana采集到的数据,可以看出上述对时间字段的修改生效
以上参考官方文档:
Logstash Introduction | Logstash Reference 7.17 | Elastic
grok正则匹配参考: