Python+Django接口自动化
引言:
最近被几个公司实习生整自闭了,没有基础,想学自动化又不知道怎么去学,没有方向没有头绪,说白了其实就是学习过程中没有成就感,所以学不下去。出于各种花里胡哨的原因,今天给大家整一个简单又有成就感的接口自动化学习吧。
不皮了,进入正题。本文中用到的技术点有:Python基础、Django基础、Request库、一丢丢前端基础。(考虑到大家零基础,所以文中代码编写使用纯新手手法)
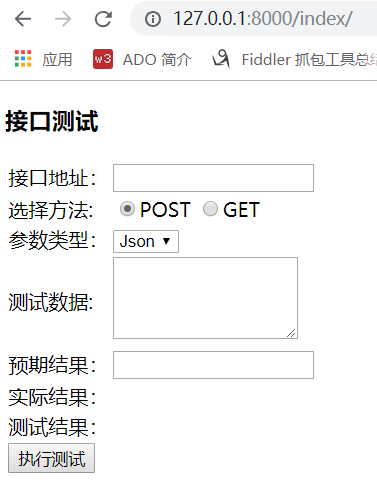
1、先创建一个Django项目(具体请参考Django基础入门教程)2、创建一个模板,新增一个index.html页面
-
<!DOCTYPE html> -
<html lang="en"> -
<head> -
<meta charset="UTF-8"> -
<title>Parker接口测试</title> -
</head> -
<body> -
<h3 style="...">接口测试</h3> -
<form action="/index/" method="post"> -
<table> -
<tr> -
<td>接口地址:</td> -
<td> -
<input type="text" name="url" /> <br/> -
</td> -
</tr> -
<tr> -
<td>选择方法:</td> -
<td> -
<input type="radio" name="fun" value="post" checked/>POST -
<input type="radio" name="fun" value="get" />GET -
</td> -
</tr> -
<tr> -
<td>参数类型:</td> -
<td> -
<select name="leixin"> -
<option value="json">Json</option> -
<option value="xml">XML</option> -
<option value="date">Data</option> -
</select> -
</td> -
</tr> -
<tr> -
<td>测试数据:</td> -
<td> -
<textarea name="testdate" style="with:200px;height:60px;"></textarea> -
</td> -
</tr> -
<tr> -
<td>预期结果:</td> -
<td> -
<input type="text" name="exr" /> <br/> -
</td> -
</tr> -
<tr> -
<td>实际结果:</td> -
<td> -
<label>{ { data1 }}</label><br/> -
</td> -
</tr> -
<tr> -
<td>测试结果:</td> -
<td> -
<label>{ { data }}</label><br/> -
</td> -
</tr> -
<tr> -
<td> -
<input type="submit" value="执行测试" /> -
</td> -
</tr> -
</table> -
</form> -
</body> -
</html>

2、在项目包中新建py文件,封装接口调用类
-
import requests -
import json -
class cls_api: -
def post(self,url,par): -
a_url=url -
a_par=par -
res=requests.post(a_url,a_par) -
return res -
def get(self,url,par): -
a_url=url -
a_par=par -
res=requests.get(a_url,a_par) -
return res
4、在views文件中添加如下代码
-
#-*- coding:utf-8 -*- -
from django.shortcuts import render -
from django.http import HttpResponse -
import json -
from parkerapi import postapi -
def index(request): -
pt=postapi.cls_api() -
exr=request.POST.get('exr',None) -
data="" -
data1="" -
if request.method=='POST': -
data=pt.post(request.POST.get('url',None), json.loads(request.POST.get('testdate',None))) -
result=data.json() -
data1=result['message'] -
if int(result['message']==int(exr)): -
data=u'测试通过' -
else: -
data=u'测试失败' -
return render(request,"index.html",{"data":data,"data1":data1}) -
def add_args(a,b): -
x=int(a) -
y=int(b) -
return x+y -
def post(request): -
if request.method=='POST': -
d={} -
if request.POST: -
a=request.POST.get('a',None) -
b=request.POST.get('b',None) -
if a and b: -
res=add_args(a, b) -
d['message']=res -
d=json.dumps(d) -
return HttpResponse(d) -
else: -
return HttpResponse(u'输入错误') -
else: -
return HttpResponse(u'输入为空') -
else: -
return HttpResponse(u'方法错误')
add_args函数处理加法运算,index函数接收前端POST数据,处理数据并返回结果,post函数处理接口请求并返回结果
记得添加Django路由
在urls中加入:

运行项目
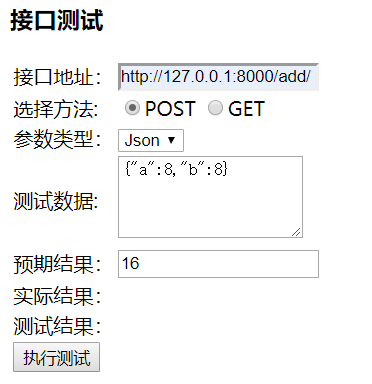
输入参数:
执行测试:
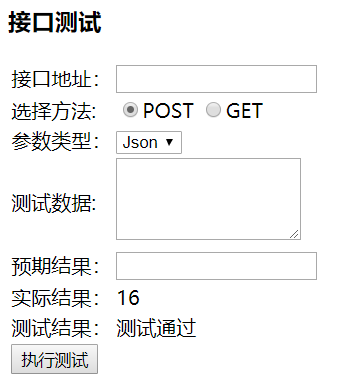
好了,以上就是一个简单的Django接口测试开发,比较适合基础差的同学入门学习