目录
[1. Props](#1. Props)
[2. 自定义事件](#2. 自定义事件)
[3. mitt](#3. mitt)
[4. v-model](#4. v-model)
[4.1 v-model用在html标签上](#4.1 v-model用在html标签上)
[4.2 v-model用在组件标签上](#4.2 v-model用在组件标签上)
[4.3 v-model 命名](#4.3 v-model 命名)
[4.4 总结](#4.4 总结)
[5. attrs](#5. attrs)
[6. refs 和 parent](#6. refs 和 parent)
[7. provide 和 inject](#7. provide 和 inject)
[8. pinia](#8. pinia)
[9. slot 插槽](#9. slot 插槽)
[10. 总结](#10. 总结)
组件通信是指在不同组件之间传递数据和方法调用的方式,本文会将 Vue3 组件间的9种通信方式逐一讲解。
1. Props
props是使用频率最高的一种通信方式,通常用来 父------>子 或 子------> 父。
注意的是,如果是想通过props来实现子传父,需要做一个前序动作,需要父组件先个子组件传一个函数。
即:
若 **父传子:**属性值是非函数。
若 子传父:属性值是函数。
Father.vue
<template>
    <div class="father">
      <h3>父组件</h3>
      <h3>父亲获取儿子传来的玩具:{{ toy }}</h3>
      <Child :car="car" :sendToy="getToy"></Child>
    </div>
  </template>

  <script setup lang="ts" name="Father">
     import Child from './Child.vue';
     import { ref } from 'vue'

     let car = ref('保时捷')

     let toy = ref('')
     // 父亲获取到儿子给的玩具
     function getToy(value:string){
        toy.value = value
         console.log('父亲获取到儿子给的玩具',value)
     }
  </script>

  <style scoped>
      .father{
          background-color:rgb(165, 164, 164);
          padding: 20px;
          border-radius: 10px;
      }
  </style>
Child.vue
<template>
<div class="child">
<h3>子组件</h3>
<h3> 父组件传过来的车:{{ car }}</h3>
<button @click="sendToy(toy)">给父组件传玩具</button>
</div>
</template>
<script setup lang="ts" name="Child">
defineProps(['car','sendToy'])
let toy = '变形金刚'
</script>
<style scoped>
.child{
background-color: skyblue;
padding: 10px;
box-shadow: 0 0 10px black;
border-radius: 10px;
}
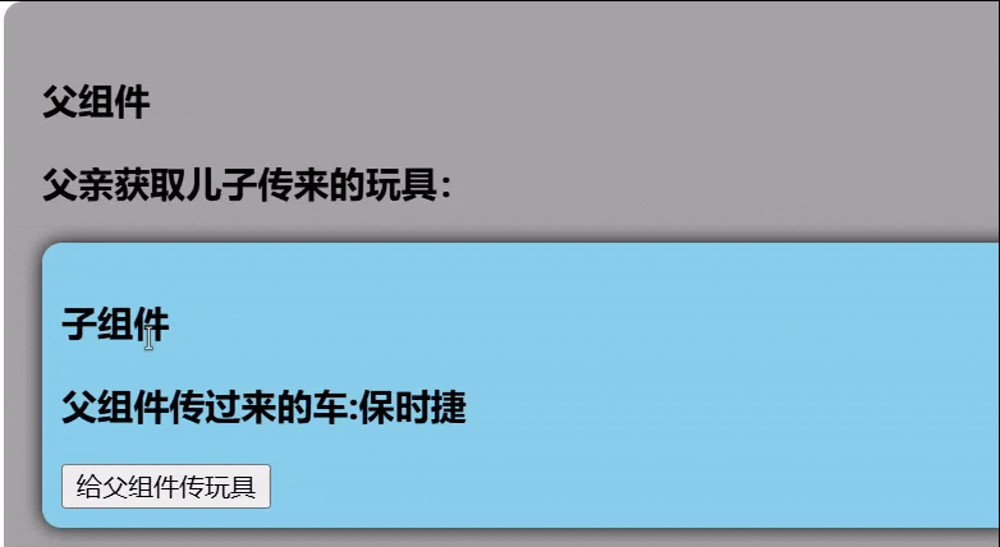
</style>如图所示,通过props,子组件接收父组件传过来的car,点击按钮,父组件接收来自子组件的toy
2. 自定义事件
自定义事件是实现子组件向父组件通信的重要方式之一。通过 &emit方法,子组件可以触发自定义事件,并将数据传递给父组件。
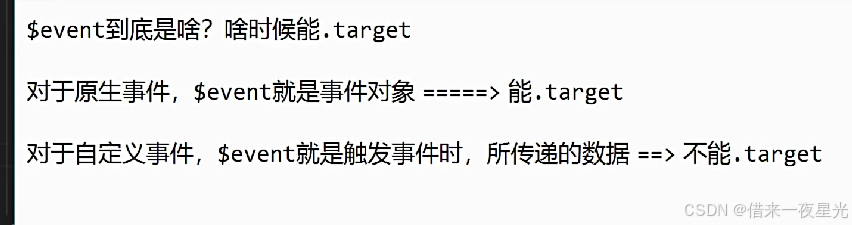
需要注意区分好:原生事件、自定义事件。
原生事件:
事件名是特定的(`click`、`mosueenter`等等)
事件对象`$event`: 是包含事件相关信息的对象(`pageX`、`pageY`、`target`、`keyCode`)
自定义事件:
事件名是任意名称。
事件对象`$event`: 是调用`emit`时所提供的数据,可以是任意类型!!!
下面用一个例子来演示自定义事件。
Father.vue
<template>
    <div class="father">
      <h3>父组件</h3>
      <h3>父亲获取儿子传来的玩具:{{ toy }}</h3>
      <Child @send-toy="getToy"></Child>
    </div>
  </template>

  <script setup lang="ts" name="Father">
     import Child from './Child.vue';
     import { ref } from 'vue'
     let toy = ref('')
     // 父亲获取到儿子给的玩具
     function getToy(value:string){
        toy.value = value
         console.log('父亲获取到儿子给的玩具',value)
     }
  </script>

  <style scoped>
      .father{
          background-color:rgb(165, 164, 164);
          padding: 20px;
          border-radius: 10px;
      }
  </style>
Child.vue
<template>
<div class="child">
<h3>子组件</h3>
<button @click="emit('send-toy','芭比娃娃')">给父组件传玩具</button>
</div>
</template>
<script setup lang="ts" name="Child">
let emit = defineEmits(['send-toy'])
</script>
<style scoped>
.child{
background-color: skyblue;
padding: 10px;
box-shadow: 0 0 10px black;
border-radius: 10px;
}
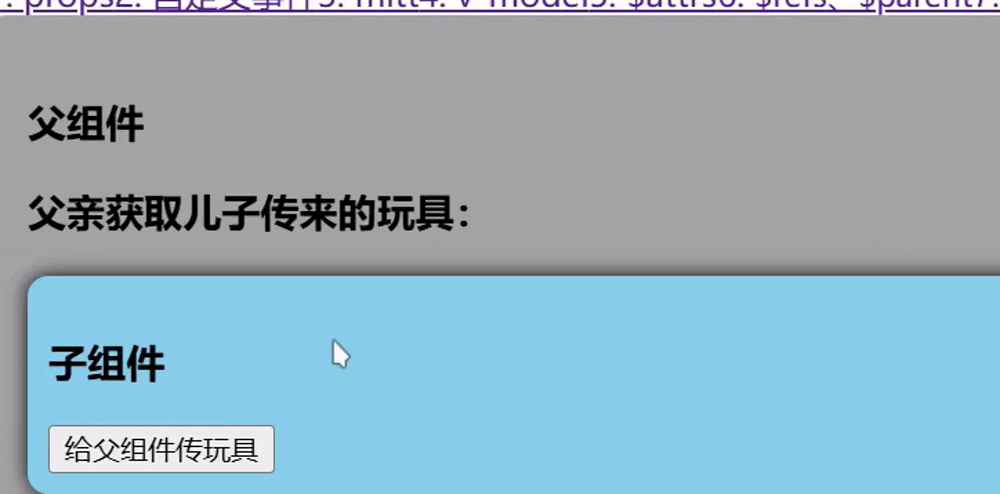
</style>如图所示,子组件使用 $emit 方法来触发一个自定义事件,并可以传递 toy参数。
父组件通过 v-on(或简写为 @)指令来监听子组件触发的事件,并在事件发生时执行回调函数。
3. mitt
mitt是一个轻量级的事件库,与消息订阅与发布(`pubsub`)功能类似,它提供了一种简单而强大的方式来发布和订阅自定义事件,特别适合在不直接父子关系的组件之间进行通信。即可以实现任意组件间的通信。
下面用一个例子来演示,用 mitt来实现两个子组件的通信(子组件1------> 子组件2)。
(1) 下载 mitt
npm install mitt(2) 在 utils 文件下创建 emitter.ts 文件
emitter.ts
// 引入mitt
import mitt from 'mitt'

// 调用mitt得到emitter,emitter能:绑定事件、触发事件
const emitter = mitt()

// 暴露mitter
export default emitter
(3) 由于这里是组件1向组件2传递数据,所以在组件2中通过 emitter.on 绑定事件。
为了使内存更加友好,在组件卸载时,最好将绑定的事件清除。
Child2.vue
<template>
  <div class="child2">
    <h3>子组件2</h3>
	<h3>组件1传过来的toy:{{ toy }}</h3>
  </div>
</template>

<script setup lang="ts" name="Child2">
import { onUnmounted, ref } from 'vue'
import emitter from '@/utils/emitter';

let toy = ref('');

// 给emitter 绑定send-toy事件
emitter.on('send-toy',(value:any)=>{
	toy.value = value;
	console.log(value);
})

// 在组件卸载时解绑send-toy事件
onUnmounted(()=>{
	emitter.off('send-toy')
})
</script>

<style scoped>
	.child2{
		margin-top: 50px;
		background-color: orange;
		padding: 10px;
		box-shadow: 0 0 10px black;
		border-radius: 10px;
	}
</style>
(4) 在组件1中通过 emitter.emit触发绑定的事件
Child1.vue
<template>
<div class="child1">
<h3>子组件1</h3>
<button @click="emitter.emit('send-toy',toy)">给组件2传toy</button>
</div>
</template>
<script setup lang="ts" name="Child1">
import { ref } from 'vue'
import emitter from '@/utils/emitter';
let toy = ref('芭比娃娃')
</script>
<style scoped>
.child1{
margin-top: 50px;
background-color: skyblue;
padding: 10px;
box-shadow: 0 0 10px black;
border-radius: 10px;
}
.child1 button{
margin-right: 10px;
}
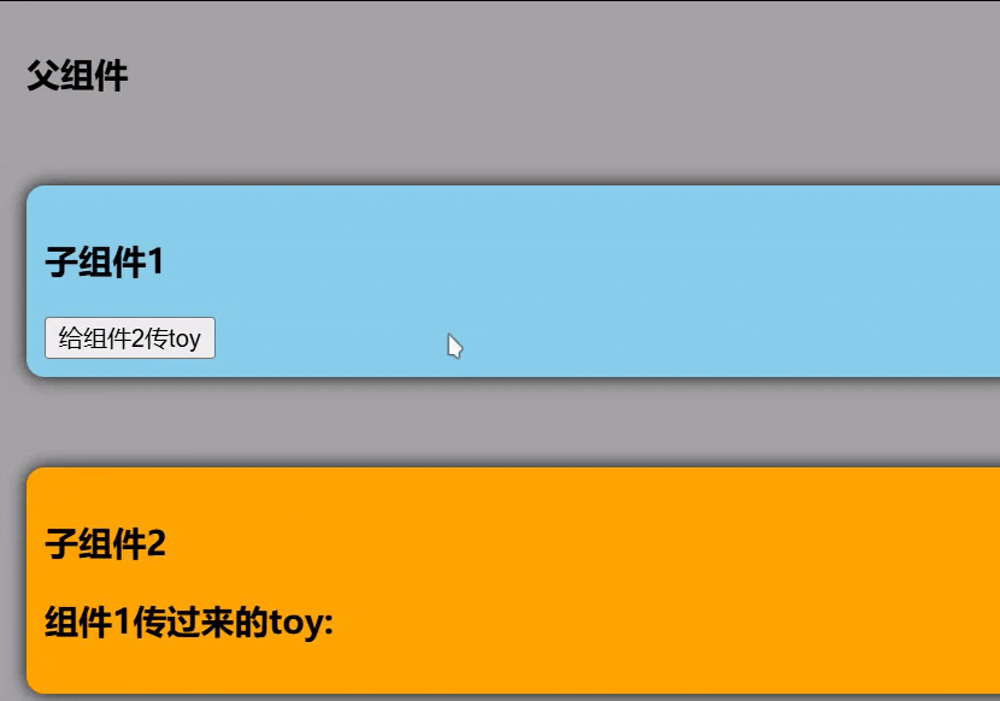
</style>效果如下
点击组件1中的按钮,通过 emitter.emit 触发绑定在组件2中的 send-toy 事件,并携带组件1中的toy数据,组件2接收后,展示在页面上。
4. v-model
子组件 <------> 父组件相互通信。
4.1 v-model用在html标签上
在html标签上使用时,v-model 的本质其实就是通过 :value 和 @input来实现的。
下面我将演示这两种等价的写法。
Father.vue
<template>
    <div class="father">
      <h3>父组件</h3>
      <input type="text" v-model="username">
      <input type="text" :value="username" @input="username = (<HTMLInputElement>$event.target).value">
    </div>
  </template>

  <script setup lang="ts" name="Father">
     import Child from './Child.vue';
     import { ref } from 'vue'

     let username = ref('zhangsan')
  </script>

  <style scoped>
      .father{
          background-color:rgb(165, 164, 164);
          padding: 20px;
          border-radius: 10px;
      }
  </style>
效果如下图所示,二则 v-model 和 :value + @input写出达到的效果是一致的。
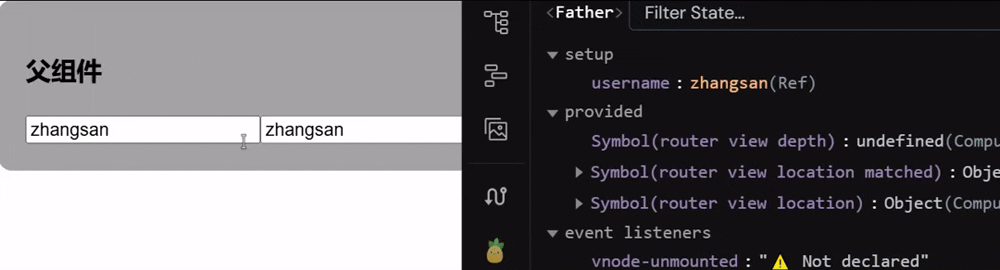
**注意:**由于 event.target可能为空,所以使用 `<`HTMLInputElement`>` 对 event.target 进行类型断言,告诉编译器 $event.target 是一个 HTMLInputElement 类型的对象。
4.2 v-model用在组件标签上
组件标签上的`v-model`的本质:`:moldeValue` + `update:modelValue`事件。
下面我将演示总结使用 v-model 和使用 :moldeValue` + `update:modelValue`事件。
父组件Father.vue
<template>
    <div class="father">
      <h3>父组件</h3>

      <Child v-model="username"/>
      <Child type="text" :modelValue="username" @update:modelValue="username = $event"/>
    </div>
  </template>

  <script setup lang="ts" name="Father">
     import Child from './Child.vue';
     import { ref } from 'vue'

     let username = ref('zhangsan')
  </script>

  <style scoped>
      .father{
          background-color:rgb(165, 164, 164);
          padding: 20px;
          border-radius: 10px;
      }
  </style>
input子组件
<template>
	<div class="child">
		<h3>子组件</h3>
		<input type="text"
		    :value="modelValue"
			@input="emit('update:modelValue', (<HTMLInputElement>$event.target).value)"
		>
	</div>
</template>

<script setup lang="ts" name="Child">
defineProps(['modelValue'])
const emit = defineEmits(['update:modelValue'])
</script>

<style scoped></style>
上面的代码中,第一个 <Child> 组件使用 v-model 实现了双向数据绑定。这实际上是 :modelValue="username" 和 @update:modelValue="username = $event" 的语法糖。
第二个 <Child> 组件显式地使用了 :modelValue和 @update:modelValue 来实现同样的效果,展示了 v-model 的底层工作原理。
说明了v-model ="username " 实际上是 :modelValue="username" 和 @update:modelValue="username = $event" 的简写。
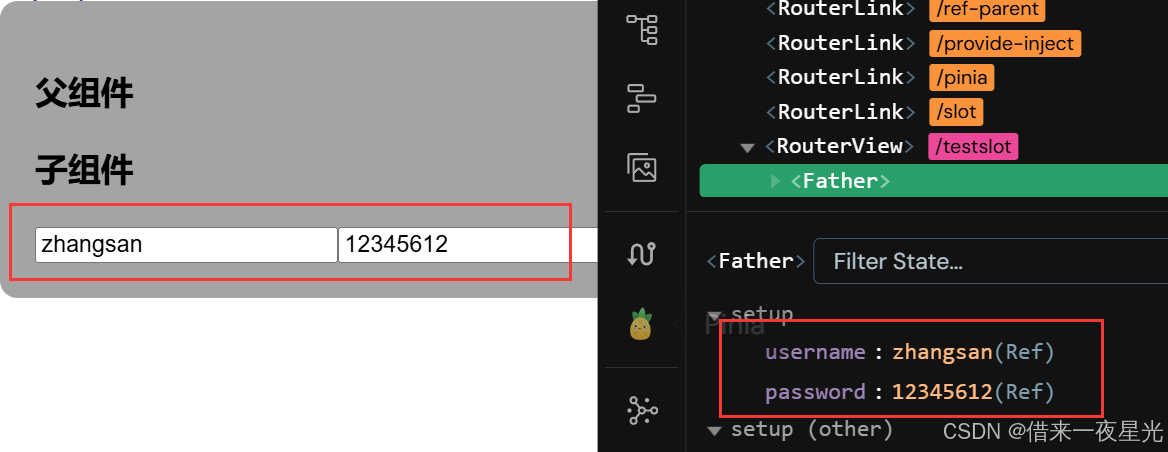
如下图所示

4.3 v-model 命名
当然,一个组件上可能绑定多个v-model,如果不加以区分,那么可能会导致报错,所以我们可以给每个v-model进行命名。
如下代码所示
Father.vue
<template>
    <div class="father">
      <h3>父组件</h3>

      <Child v-model:ming="username" v-model:mima="password"/>
    </div>
  </template>

  <script setup lang="ts" name="Father">
     import Child from './Child.vue';
     import { ref } from 'vue'

     let username = ref('zhangsan')
     let password = ref('123456')
  </script>

  <style scoped>
      .father{
          background-color:rgb(165, 164, 164);
          padding: 20px;
          border-radius: 10px;
      }
  </style>
input 组件 Child.vue
<template>
	<div class="child">
		<h3>子组件</h3>
		<input type="text"
		    :value="ming"
			@input="emit('update:ming', (<HTMLInputElement>$event.target).value)"
		>
		<input type="text"
		    :value="mima"
			@input="emit('update:mima', (<HTMLInputElement>$event.target).value)"
		>
	</div>
</template>

<script setup lang="ts" name="Child">
defineProps(['ming','mima'])
const emit = defineEmits(['update:ming','update:mima'])
</script>

<style scoped></style>
效果如下图所示
4.4 总结
在 Vue 3 中,v-model 实际上是以下两个部分的组合:
(1) Props:父组件通过 props 向子组件传递一个值。
(2)Events:子组件通过 $emit 触发一个更新事件(默认为@update:modelValue),通知父组件更新这个值。
v-model 实现了父子组件之间的双向数据绑定,从而实现了组件间的相互通信。
补充:
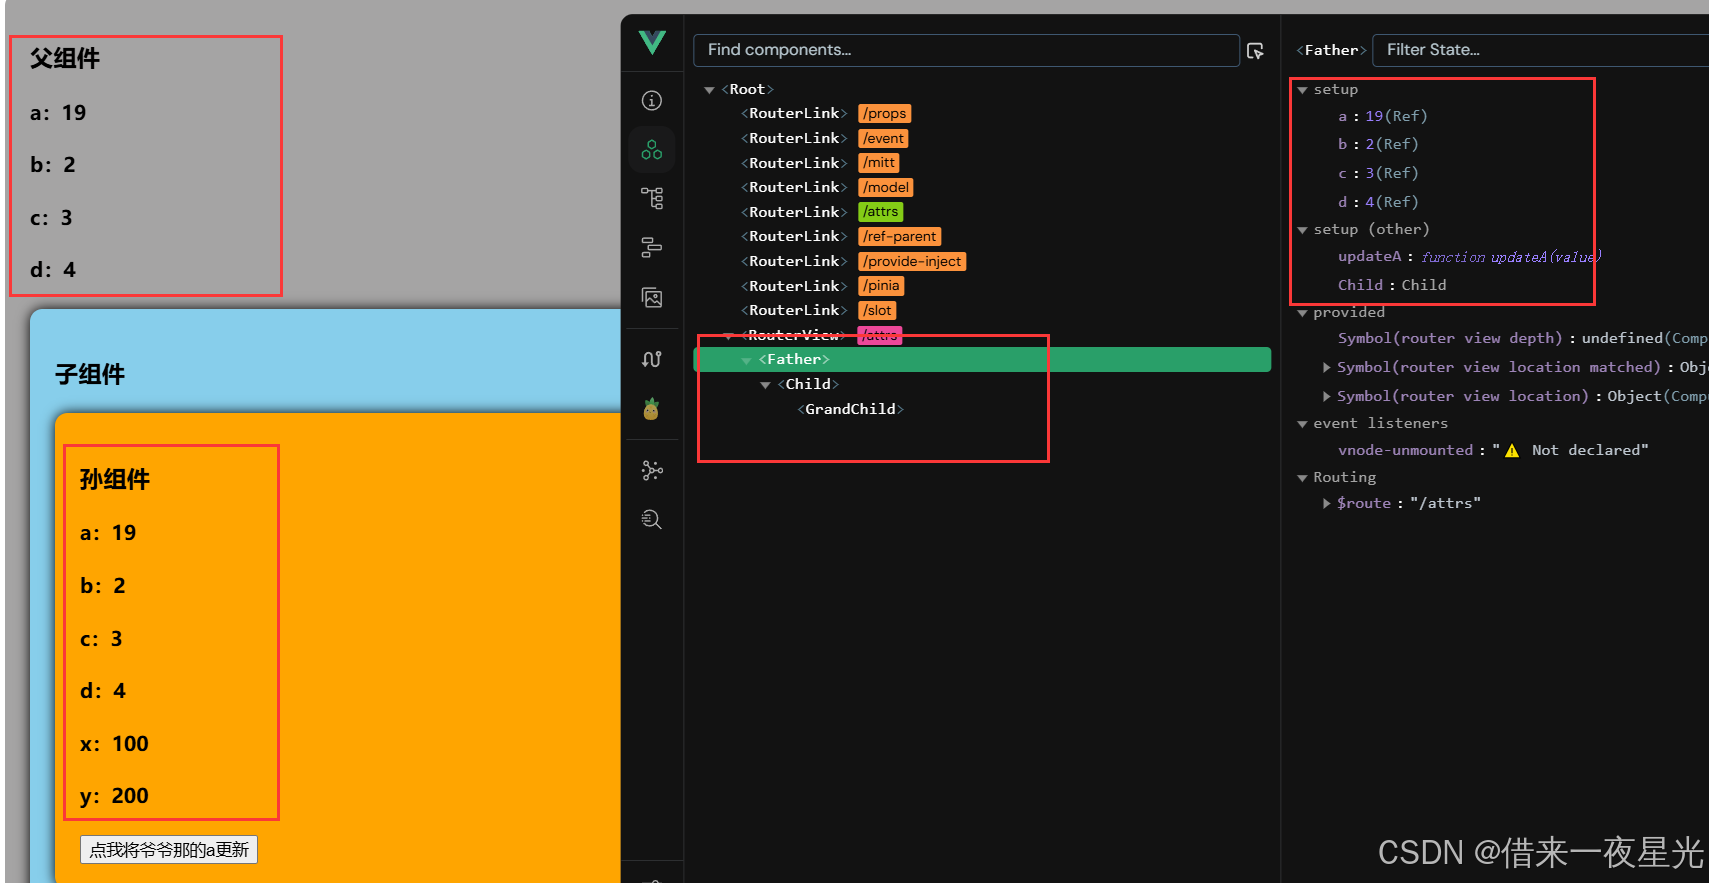
5. $attrs
祖先 <------> 孙子辈 互传数据。
$attrs 是一个特殊的属性对象,它包含了传递给组件但未被显式声明为 props的所有属性。我感觉和props类似,想要祖传孙,在祖先组件中传递的属性值为非函数,想要孙传祖,在祖先组件中传递的属性值为函数。
下面用一个例子来演示。
父组件Father.vue
<template>
  <div class="father">
    <h3>父组件</h3>
		<h4>a:{{a}}</h4>
		<h4>b:{{b}}</h4>
		<h4>c:{{c}}</h4>
		<h4>d:{{d}}</h4>
		<Child :a="a" :b="b" :c="c" :d="d" v-bind="{x:100,y:200}" :updateA="updateA"/>
  </div>
</template>

<script setup lang="ts" name="Father">
	import Child from './Child.vue'
	import {ref} from 'vue'

	let a = ref(1)
	let b = ref(2)
	let c = ref(3)
	let d = ref(4)

	function updateA(value:number){
		a.value += value
	}
</script>

<style scoped>
	.father{
		background-color: rgb(165, 164, 164);
		padding: 20px;
		border-radius: 10px;
	}
</style>
子组件Child.vue
<template>
	<div class="child">
		<h3>子组件</h3>
		<GrandChild v-bind="$attrs"/>
	</div>
</template>

<script setup lang="ts" name="Child">
	import GrandChild from './GrandChild.vue'
</script>

<style scoped>
	.child{
		margin-top: 20px;
		background-color: skyblue;
		padding: 20px;
		border-radius: 10px;
		box-shadow: 0 0 10px black;
	}
</style>
孙组件GrandChild.vue
<template>
	<div class="grand-child">
		<h3>孙组件</h3>
		<h4>a:{{ a }}</h4>
		<h4>b:{{ b }}</h4>
		<h4>c:{{ c }}</h4>
		<h4>d:{{ d }}</h4>
		<h4>x:{{ x }}</h4>
		<h4>y:{{ y }}</h4>
		<button @click="updateA(6)">点我将爷爷那的a更新</button>
	</div>
</template>

<script setup lang="ts" name="GrandChild">
	defineProps(['a','b','c','d','x','y','updateA'])
</script>

<style scoped>
	.grand-child{
		margin-top: 20px;
		background-color: orange;
		padding: 20px;
		border-radius: 10px;
		box-shadow: 0 0 10px black;
	}
</style>
这个示例展示了如何将父组件的数据传递给子组件,再由子组件传递给孙组件,并且展示了如何通过 $attrs 将未声明的属性自动传递下去。
6. refs 和 parent
$refs用于 :父→子。
$refs 是一个对象,它包含了所有通过 ref 属性注册的 DOM 元素或子组件实例。主要用于直接访问 DOM 元素或子组件实例,而不是通过数据绑定和事件处理来实现通信。
$parent用于:子→父。
$parent 是一个属性,允许你访问当前组件的父组件实例。虽然它可以用来直接访问父组件的数据和方法,但在大多数情况下,不推荐使用这种方式进行组件间的通信,因为它破坏了组件的封装性和可维护性。
下面还是用一个例子来做演示 👇 👇 👇
(1) 父组件通过 $refs 访问子组件的数据和方法。
(2) 子组件通过 $parent 访问父组件的数据和方法。
(3) 通过 defineExpose 向外部暴露数据和方法。
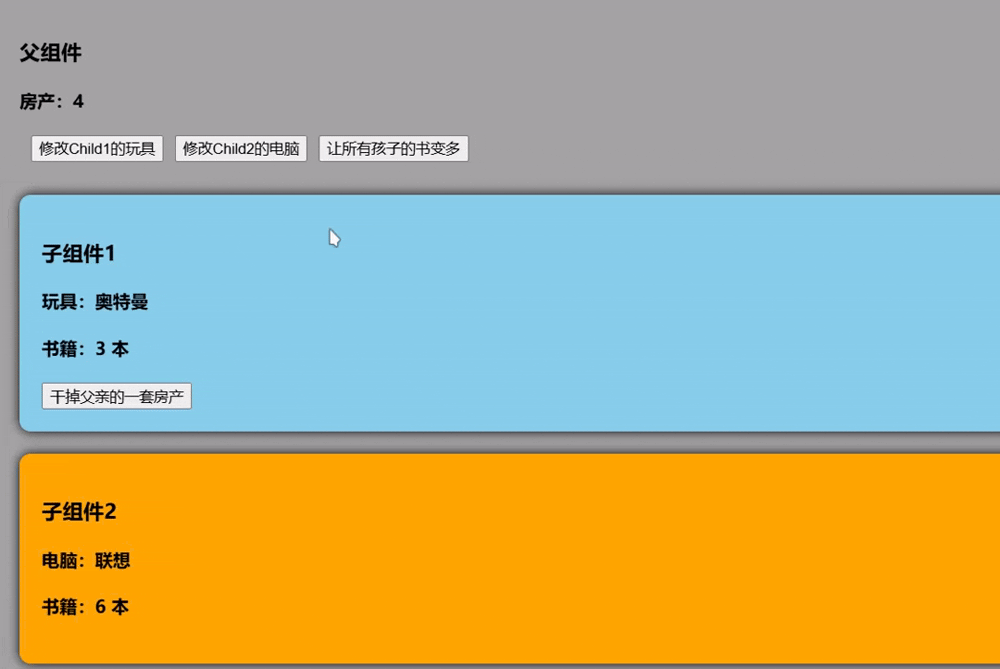
Father.vue
<template>
	<div class="father">
		<h3>父组件</h3>
		<h4>房产:{{ house }}</h4>
		<button @click="changeToy">修改Child1的玩具</button>
		<button @click="changeComputer">修改Child2的电脑</button>
		<button @click="getAllChild($refs)">让所有孩子的书变多</button>
		<Child1 ref="c1"/>
		<Child2 ref="c2"/>
	</div>
</template>

<script setup lang="ts" name="Father">
	import Child1 from './Child1.vue'
	import Child2 from './Child2.vue'
	import { ref,reactive } from "vue";
	let c1 = ref()
	let c2 = ref()


	// 数据
	let house = ref(4)
	// 方法
	function changeToy(){
		c1.value.toy = '小猪佩奇'
	}
	function changeComputer(){
		c2.value.computer = '华为'
	}
	function getAllChild(refs:{[key:string]:any}){
		console.log(refs)
		for (let key in refs){
			refs[key].book += 3
		}
	}
	// 向外部提供数据
	defineExpose({house})
</script>

<style scoped>
	.father {
		background-color: rgb(165, 164, 164);
		padding: 20px;
		border-radius: 10px;
	}

	.father button {
		margin-bottom: 10px;
		margin-left: 10px;
	}
</style>
Child1.vue
<template>
  <div class="child1">
    <h3>子组件1</h3>
		<h4>玩具:{{ toy }}</h4>
		<h4>书籍:{{ book }} 本</h4>
		<button @click="minusHouse($parent)">干掉父亲的一套房产</button>
  </div>
</template>

<script setup lang="ts" name="Child1">
	import { ref } from "vue";
	// 数据
	let toy = ref('奥特曼')
	let book = ref(3)

	// 方法
	function minusHouse(parent:any){
		parent.house -= 1
	}

	// 把数据交给外部
	defineExpose({toy,book})

</script>

<style scoped>
	.child1{
		margin-top: 20px;
		background-color: skyblue;
		padding: 20px;
		border-radius: 10px;
    box-shadow: 0 0 10px black;
	}
</style>
Child2.vue
<template>
  <div class="child2">
    <h3>子组件2</h3>
		<h4>电脑:{{ computer }}</h4>
		<h4>书籍:{{ book }} 本</h4>
  </div>
</template>

<script setup lang="ts" name="Child2">
		import { ref } from "vue";
		// 数据
		let computer = ref('联想')
		let book = ref(6)
		// 把数据交给外部
		defineExpose({computer,book})
</script>

<style scoped>
	.child2{
		margin-top: 20px;
		background-color: orange;
		padding: 20px;
		border-radius: 10px;
    box-shadow: 0 0 10px black;
	}
</style>
效果如下
changeToy:修改Child1的玩具属性。changeComputer:修改Child2的电脑属性。getAllChild:遍历所有引用的子组件并增加它们的书籍数量。Child1通过$parent访问父组件的house属性,并减少其值。
7. provide 和 inject
祖 <------>孙 相互通信
provide 和 inject 是一种用于跨层级组件通信的方式。它们允许祖先组件向其所有子孙组件提供数据和方法,而不需要通过中间组件逐层传递 props(如之前提到的 attrs)。这种方式特别适用于深层嵌套的组件结构或需要全局状态管理但不想使用 Vuex 或 Pinia 的场景。
provide:在祖先组件中定义并提供数据或方法。
inject:在子孙组件中接收并使用这些数据或方法。
下面依旧举个例子来演示
Father.vue
<template>
  <div class="father">
    <h3>父组件</h3>
    <h4>银子:{{ money }}万元</h4>
    <h4>车子:一辆{{car.brand}}车,价值{{car.price}}万元</h4>
    <Child/>
  </div>
</template>

<script setup lang="ts" name="Father">
  import Child from './Child.vue'
  import {ref,reactive,provide} from 'vue'

  let money = ref(100)
  let car = reactive({
    brand:'奔驰',
    price:100
  })
  function updateMoney(value:number){
    money.value -= value
  }

  // 向后代提供数据
  provide('moneyContext',{money,updateMoney})
  provide('car',car)

</script>

<style scoped>
  .father {
    background-color: rgb(165, 164, 164);
    padding: 20px;
    border-radius: 10px;
  }
</style>
Child.vue
这里之所以写一个子组件,是为了体现祖组件和孙组件使用 provide 和 inject 不需要通过中间组件逐层传递 props***。***
<template>
  <div class="child">
    <h3>我是子组件</h3>
    <GrandChild/>
  </div>
</template>

<script setup lang="ts" name="Child">
  import GrandChild from './GrandChild.vue'
</script>

<style scoped>
  .child {
    margin-top: 20px;
    background-color: skyblue;
    padding: 20px;
    border-radius: 10px;
    box-shadow: 0 0 10px black;
  }
</style>
GrandChild.vue
<template>
  <div class="grand-child">
    <h3>我是孙组件</h3>
    <h4>银子:{{ money }}</h4>
    <h4>车子:一辆{{car.brand}}车,价值{{car.price}}万元</h4>
    <button @click="updateMoney(6)">花爷爷的钱</button>
  </div>
</template>

<script setup lang="ts" name="GrandChild">
  import { inject } from "vue";

  let {money,updateMoney} = inject('moneyContext',{money:0,updateMoney:(param:number)=>{}})
  let car = inject('car',{brand:'未知',price:0})
</script>

<style scoped>
  .grand-child{
    background-color: orange;
    padding: 20px;
    border-radius: 10px;
    box-shadow: 0 0 10px black;
  }
</style>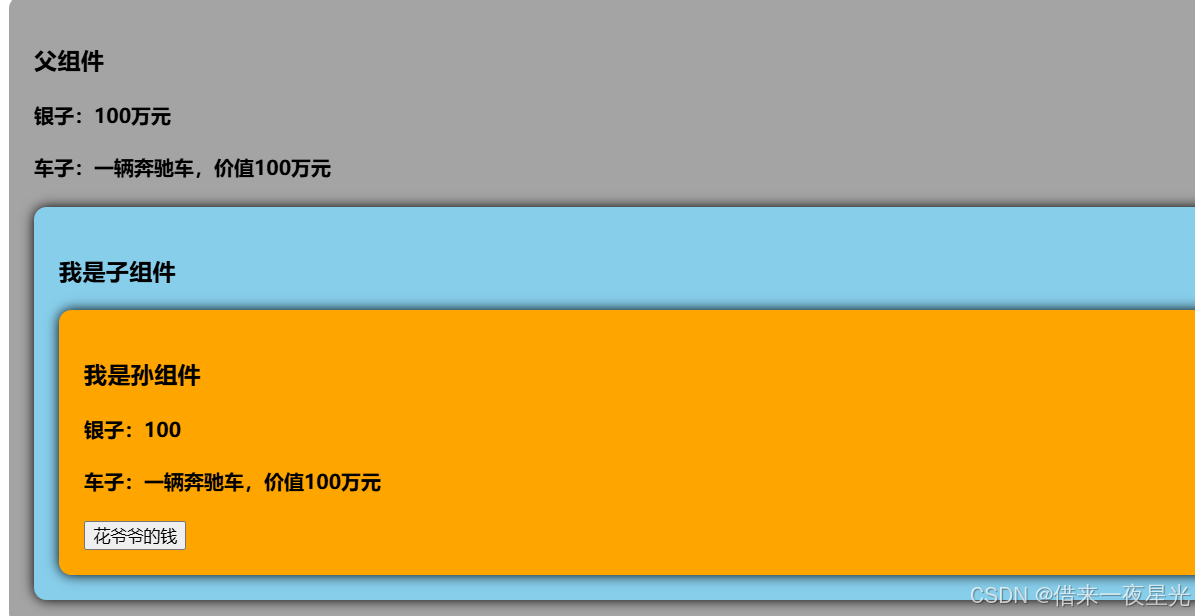
8. pinia
参考之前编写的文章👇 👇 👇
【Vue3 入门到实战】11. Pinia 状态管理-CSDN博客
9. slot 插槽
参考之前编写的文章👇 👇 👇
【Vue3 如门到实战】12. slot 插槽-CSDN博客
10. 总结
本文主要讲解Vue3中组件间的通信方式,包括props、customEvent、mitt、v-model、attrs、refs与$parent、provide与inject、pinia、slot插槽等9种方式,其中pinia和slot在前文已有说明,可查阅【Vu3 入门到实战】专栏中的相应部分,链接放在下面。
更多相关内容可点击下方链接 👇 👇 👇