组件化->封装性
React提供函数组件实现组件化
React和传统JS的区别就是JS需要手动管理DOM操作,React: 采用组件化开发,通过虚拟DOM提升性能。

MVC 是一种软件设计模式,全称为 Model-View-Controller(模型-视图-控制器)。它将应用程序的逻辑分为三个核心组件,以实现代码的分离和模块化


保证自己的node版本在14.18+、16+


main.jsx是主入口
vite构建的react和vue很像,但是npx构建的完全不像

可以用ESlint检测代码报错

有些错误想忽略,可以在这个位置把报的错误写上,例如:'no-empty':'off'

如果想常态化使用这个插件,可以输入这个命令下载,然后再引入
npm i vite-plugin-eslint
javascript
import { defineConfig } from 'vite'
import react from '@vitejs/plugin-react-swc'
import eslintPlugin from 'vite-plugin-eslint'//引入

// https://vite.dev/config/
export default defineConfig({
  plugins: [react(),
    eslintPlugin({
      include: ['src/*.jsx', 'src/**/*.jsx']//引入要管理的文件,src下的.jsx,*是通配符
    })
  ],

})
每次写完代码在浏览器刷新就会出现报错提示

格式化插件

React和React-dom模块分别起什么作用?

dom操作有两种操作方式:react-dom/client和react-dom/server,一种是对客户端,一种是对服务端,让后端进行操作

React的核心模块除了在浏览器端进行服务,也可以在其他环境使用,比如开发app
这样就不需要dom模块了👇

关于JSX的部分前一篇讲过就不赘述了,讲讲没讲过的
javascript
//main.jsx
import { StrictMode } from 'react'
import { createRoot } from 'react-dom/client'
import App from './01_了解JSX.jsx'
//import './index.css'//注释掉这个,用上面那个
//import App from './App.jsx'

createRoot(document.getElementById('root')).render(
  <StrictMode>
    <App />
  </StrictMode>,
)

//01_了解JSX.jsx
function App(){
    return (
        <div>
            Hello App
        </div>
    )
}
// 也可以这么写
// const App = () => {

// }

export default App

return后面最好加个小括号,防止后面的程序不执行
jsx的执行过程👇

JSX和HTML之间的写法区别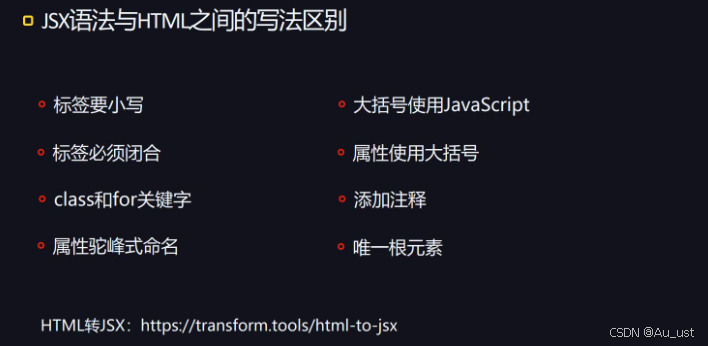
在 HTML 中,<label> 标签使用 for 属性来关联表单元素的 id,但是在 JSX 中,由于 for 是 JavaScript 的保留字(用于 for 循环),React 使用 htmlFor 来代替 for 属性。
htmlFor 的值 应该与目标表单元素的 id 相同。
两个单词的属性,例如tab-index必须使用驼峰式命名,写成tabIndex
javascript
function App(){
    return (
        <div>
            Hello App
            <label htmlFor="elem">用户名</label>
            <input type="text" id="elem" tabIndex='1'/>
        </div>
    )
}
export default App
但是自定义属性该怎么写就怎么写
javascript
<input type="text" id="elem" tabIndex='1' onClick={()=>{}} data-id='123'/>
//data-id不报错
大括号里可以写JavaScript,注释也是写在js里的,所以注释符号在大括号里{/*我是注释*/}
javascript
function App(){
    return (
        <div>
            Hello App
            <label htmlFor="elem">用户名</label>
            <input type="text" id="elem" tabIndex='1' onClick={()=>{}} data-id='123'/>
            <div>
                {1 + 1},{'foo'.toUpperCase()},{[1,2,3].reverse()}
        </div>
        </div>
    )
}
export default App
也可以使用声明的变量
javascript
function App() {
    const username='荷叶饭'
    return (
        <div>
            Hello App
            <label htmlFor="elem">用户名</label>
            <input type="text" id="elem" tabIndex='1' onClick={()=>{}} data-id='123'/>
            <div>
                {1 + 1},{'foo'.toUpperCase()},{[1, 2, 3].reverse()}
                <br />
                {username}
            </div>
        </div>
    )
}
export default App
对象和函数是不能直接放到JSX里的
javascript
function App() {
    const username = '荷叶饭'
    const obj = { user: '荷叶饭', age: '19' }
    const fn=()=>{}
    return (
        <div>
            Hello App
            <label htmlFor="elem">用户名</label>
            <input type="text" id="elem" tabIndex='1' onClick={()=>{}} data-id='123'/>
            <div>
                {1 + 1},{'foo'.toUpperCase()},{[1, 2, 3].reverse()}
                <br />
                {username}
                <br />
                {obj}//错
                <br />
                {fn}//错
            </div>
        </div>
    )
}
export default App
属性使用大括号

唯一根元素是指最外层只能有一个div,这样可以被脚手架转为对象
如果不想用多余的div包住,可以自己写一个容器
javascript
import { Fragment } from "react"//提供的容器,渲染时不会渲染


function App() {
    const username = '荷叶饭'
    const obj = { user: '荷叶饭', age: '19' }
    const fn=()=>{}
    return (
        <Fragment>
             <div>
            Hello App
            <label htmlFor="elem">用户名</label>
            <input type="text" id="elem" tabIndex='1' onClick={()=>{}} data-id='123'/>
            <div>
                {1 + 1},{'foo'.toUpperCase()},{[1, 2, 3].reverse()}
                <br />
                {username}
                <br />
                {obj}
                <br />
                {fn}
            </div>
        </div>
        <div>我是多出来的div</div>
        </Fragment>//容器
    )
}
export default App
Fragment是可以添加key属性的,这里不细讲
style的单位默认是px,不写也可以

说是这么说但是我打印出来的width和body一样宽了
三种样式
这是引入外部样式,效果是全局的,只要className叫box,效果都是一样的👇
javascript
import './04_全局样式.css'

function App() {
  // const myStyle = { width: '100px', height: '100px', background: 'red' }
  return <div className='box'>hello App</div>
}
export default App


//./04_全局样式.css
.box {
  width: 300px;
  height: 300px;
  background-color: rgba(94, 99, 173, 0.299);
}
局部样式这么写,名字后面加【.module.css】就是局部的写法

这个写法是错误的
局部样式应该这么写👇
javascript
import './04_全局样式.css'
import style from './05_局部样式.module.css'

function App() {
  // const myStyle = { width: '100px', height: '100px', background: 'red' }
  return (
    <>
      <div className='box'>hello App</div>
      <div className={style.box2}>aaaaaa</div>
    </>
  )
}
export default App
总结使用局部样式的步骤包括:写一个name.module.css命名规范的css->在其他要使用的jsx里导入,导入的时候要命名->使用对应的选择器给标签命名,例如这里是className={style.box2}
一个细节是在css里可以写短线【-】,在jsx里不能这么写,应该用中括号括起来加引号,这么写:
javascript
//03_style样式.jsx
import './04_全局样式.css'
import style from './05_局部样式.module.css'

function App() {
  // const myStyle = { width: '100px', height: '100px', background: 'red' }
  return (
    <>
      <div className='box'>hello App</div>
      <div className={style.box2}>aaaaaa</div>
      <div className={style['head-title']}>hahaha</div>
    </>
  )
}
export default App


//05_局部样式.module.css
.box2 {
  width: 300px;
  height: 300px;
  background-color: blue;
}
.head-title {
  width: 500px;
  height: 100px;
  background-color: chartreuse;
}
但是有的用点,有的用中括号,这很不好
react脚手架vite里提供了机制可以使用驼峰命名,这样就需要在vite.config.js修改配置
javascript
import { defineConfig } from 'vite'
import react from '@vitejs/plugin-react-swc'
import eslintPlugin from 'vite-plugin-eslint'

// https://vite.dev/config/
export default defineConfig({
  plugins: [
    react(),
    eslintPlugin({
      include: ['src/*.jsx', 'src/**/*.jsx'],
    }),
  ],
  css: {
    modules: { localsConvention: 'camelCase' },//在这里修改配置
  },
})
javascript
<div className={style.headTitle}>hahaha</div>sass的预处理
安装sass

写一个sass的文件:

引入并使用
javascript
import './06_sass.scss'//引入

function App() {
  return (
    <>
      <div className='box3'>aaa</div>//使用
    </>
  )
}
export default App
预处理器了解就好
sass也可以变成局部的,和局部style是一样的

classnames
可以管理类名
要安装
javascript
npm i classnames导入
javascript
import classNames from 'classnames'使用
javascript
import classNames from 'classnames'
import './04_全局样式.css'
import style from './05_局部样式.module.css'

function App() {
  const myClass = classNames({
    box1: true,
    box2: false,
    [style.headTittle]: true,
  })
  return (
    <>
      <div className={myClass}>hello App</div>
    </>
  )
}
export default App