本文主要介绍React18版本的初始化启动过程,包含ReactElement元素的创建,createRoot如何创建根节点,以及Fiber树的基本结构,算是揭秘React核心原理的前置知识总结。
本系列文章都基于此项目: GitHub - Gravity2333/My-React at learn
启动模式
在稳定版react@17.0.2后,React包含三种启动模式:
-
Legacy模式,也就是我们熟悉的使用ReactDOM.render(<App/>,container)来渲染组件,这种方式可能不支持最新的Concurrent并发渲染模式。
-
blocking模式,使用ReactDOM.createBlockingRoot(container).render(<App/>) 算是Legacy和Concurrent模式的中间模式,支持小部分并发功能,使用的比较少。
-
Concurrent并发模式,使用ReactDOM.createRoot(container).render(<App/>)开启并发渲染,这个模式开启了完整的并发渲染特性,我们的源码实现也给予这个模式。
React渲染基本原理
简单说一下React的渲染原理,传统命令式的渲染方式需要在数据变动时手动通过浏览器提供的DOM接口(如 documentElem.InnerText等)修改UI,无法做到数据UI同步,React的作用就是在数据变动时通过重新渲染的方式修改UI。
React在真实DOM和数据直接,加入了一层虚拟DOM层,在新版React架构中成为FIber,即纤维的意思,代表可最小范围的更新。
我们知道,对于真实DOM的操作是慢且低效的,而虚拟DOM的优势在于,其是存在内存中的对象。每次更新实际变动的是虚拟DOM对象,不是直接操作真实DOM。
在每次更新之后,React会通过Diff算法(也就是React Reconciler协调机制)对比新旧虚拟DOM对象的不同,仅对变动部分进行更新,以达到最小范围更新,提升更新效率。
ReactElement元素的创建 - createElement
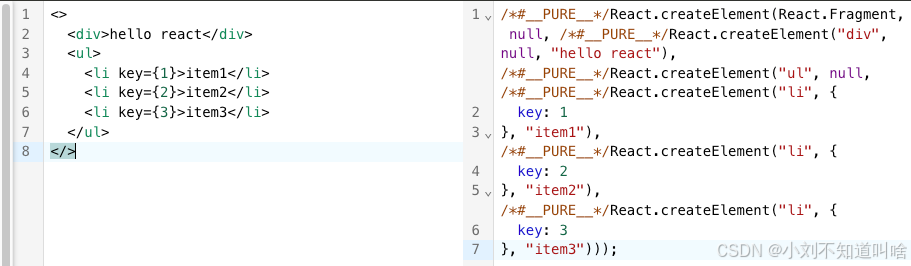
在使用React过程中,我们通常使用JSX语法来编写React组件,JSX会通过babel转换成createElement函数。可以把JSX理解成createElement的语法糖,其优势在于来类HTML标签的写法,很直观,容易理解。
你可以在babel的官网自己尝试一下:Babel · The compiler for next generation JavaScript
createElement函数用于创建ReactElement元素,我们刚说了,React在数据和真实DOM之间建立了一层虚拟DOM,也就是FIber。这里面的数据,就可以理解为ReactElement对象。
我们使用JSX语法编写 函数/类 组件时,本质上就是在调用createElement函数,React会在初次渲染及每次更新的时候重新调用函数或者类组件的render方法,从而获取最新的ReactElement对象,并且通过此创建出中间层Fiber对象,最后通过Diff对比增量修改真实DOM,即如下关系

createElement的调用参数如下:
createElement(type,props,children)
其中,type可能为字符串,函数/类,Memo,Suspense,Context等对象
如: createElement("div",{},\[\]) 创建一个div元素
createElement(App,{},\[\]) 创建App函数组件
props为属性,如style ref 等等,需要以对象的方式传入,对于style样式,属性的key需要以驼峰的方式传入 如: style: { backgroundColor: 'red' }
children为子ReactElement元素,需要是一个数组,其中可以传入ReactElement元素,也可以传入字符串/数字作为纯文本节点,或者是一个包含ReactElement元素的数组。
createElement定义在lib/react下,其实现也很简单,就是对传入的参数进行简单的封装,如下:
TypeScript
export type ReactElementType = any;
/** 属性类型 */
export type ReactElementProps = Record<string, any>;
/** key */
export type Key = string;
/** Ref */
export type Ref = { current: any } | ((current: any) => void);
/** children  */
export type ReactElementChildren =
  | ReactElement
  | string
  | Array<ReactElementChildren>;

/** Element元素类型 */
export interface ReactElement {
  $$typeof: Symbol | number;
  key: Key;
  ref?: Ref;
  type: ReactElementType;
  props: ReactElementProps;
}

/** 实现createElement方法 */
export function createElement(
  type: ReactElementType,
  props: ReactElementProps,
  ...children: ReactElementChildren[]
): ReactElement {
  return {
    $$typeof: REACT_ELEMENT_TYPE,
    type,
    ref: props.ref ? props.ref : null,
    key: props.key ? String(props.key) : null,
    props: {
      ...props,
      /** 源码这里做了处理 如果只有一个child 直接放到children 如果有多个 则children为一个数组 */
      children:
        children?.length === 1
          ? handleChildren(children[0])
          : children.map(handleChildren),
    },
  };
}
这里需要注意:
1.如果传入的children只有一个,ReactElement保存时会直接存储这个children的ReactElement对象
- 如果是多个children则存储一个ReactElement数组。
Fiber节点&Fiber树
为什么叫Fiber,Fiber即纤维的含义。当我们使用React渲染DOM结构时,虽然会通过虚拟DOM进行DIFF比较来做到增量修改,但是当DOM的结构复杂规模变大时,仍然会让对比更新的过程耗费很多时间。
传统的虚拟DOM创建和真实DOM更新是同步的,因为React采用了深度优先遍历的方式递归创建虚拟DOM树,其过程无法被打断,导致一次大的更新必须一次性完成,在其计算期间JS引擎占用主线程,导致渲染引擎无法介入,用户事件也无法处理,造成页面卡顿。
Fiber节点的引入就是为了解决递归遍历无法被"打断"的问题,新版本的React将递归优化成非递归的形式,使用workInProgress全局变量来记录当前深度优先遍历处理到的节点,DIFF的单位也从整颗虚拟DOM树变成了单个Fiber节点。
在遍历的过程中,如果有更高优先级的任务到达(如用户事件)或者需要渲染引擎介入(到达16.7ms 一帧结束)React会暂停FIber树的构建,让出主线程,当主线程空闲时继续处理,这样就保证了用户事件及时响应以及页面的流畅!
同时,Fiber节点作为ReactElement和真实DOM的中间层,需要记录节点之间的关联信息,以及组件本身的状态信息,当我们使用hooks记录管理状态时,其本质就是在Fiber节点上进行存储。
Fiber节点由FiberNode类创建,其定义如下:
TypeScript
/** Fiber节点类 */
export class FiberNode {
  // 唯一id
  key: Key;
  // fiber节点的类型
  tag: WorkTag;
  /** element对应的Type */
  type: ReactElementType;
  /** ref */
  ref: Ref;

  // 对应的dom节点 可能为null
  stateNode: any;
  // 记录状态信息
  memorizedState: any;
  // 记录的Props
  memorizedProps: ReactElementProps;

  // 表示fiber node之间的关系
  index: number; // diff比较的index
  sibling: FiberNode | null; // 兄弟节点
  return: FiberNode | null; //父节点
  child: FiberNode | null; // 子节点

  // flags 副作用
  flags: Flags; // 当前节点的flag
  subTreeFlags: Flags; // 当前节点为根的子树flag的merge
  pendingProps: ReactElementProps; // 待处理的props
  delections: FiberNode[];

  // 更新队列
  updateQueue: UpdateQueue<any> | null;

  // 双缓存
  alternate: FiberNode | null;

  /** lane相关 */
  /** 当前fiber上的更新lanes */
  lanes: Lanes;
  /** 当前fiber的子fiber树上的优先级 */
  childLanes: Lanes;

  constructor(tag: WorkTag, pendingProps: ReactElementProps, key: Key) {
    // 没传key的情况下 都是null 在Diff reconcileArray的时候 会使用index
    this.key = key || null;
    this.tag = tag;
    this.type = null;
    this.ref = null;

    this.stateNode = null;
    this.memorizedState = null;
    this.memorizedProps = null;

    this.index = 0;
    this.sibling = null;
    this.child = null;
    this.return = null;

    // 副作用
    this.flags = NoFlags;
    this.subTreeFlags = NoFlags;
    this.pendingProps = pendingProps;
    this.delections = null;

    this.updateQueue = null;
    this.alternate = null;

    /** lanes相关 */
    this.lanes = NoLanes;
    this.childLanes = NoLanes;
  }
}
Fiber节点的关系
React每次更新,都会生成一棵Fiber节点构成的Fiber树,其内部结构采用了 孩子兄弟表示法 ,对于上面的例子,其结构如下:
 每个Fiber节点包含以下几个指针:
- child指针,指向第一个孩子节点,如ul的child指向第一个li节点
- sibling指针,指向兄弟节点,如第一个li的sibling指向第二个li
- return指针,指向父节点,三个li的return都指向ul
使用这种数据结构存储Fiber节点的好处是,方便深度优先遍历整颗Fiber树,即从根节点的Fiber一只顺着.child向下找,找到child为null时回溯,如果回溯到的节点有sibling兄弟,则继续向下找,来模仿递归的过程。如下图

整个应用的根 - FiberRootNode
FiberRootNode和HostRootFiber是两个容易混淆的概念,前者为整个应用的根,在一个React应用中有且仅有一个,后者是Fiber树的根,由于React采用双缓冲树,HostRootFiber可能有两个。
Host即宿主的意思,我们一般称Fiber树的根节点为HostRoot 普通节点如 div span a等宿主浏览器提供的节点类型为HostComponent 文本节点为HostText。
FiberRootNode是整个应用的根,保存着一些全局的信息,其实现如下:
TypeScript
/** 只有一个 整个应用的根 */
export class FiberRootNode {
  current: FiberNode;
  container: Container;
  finishedWork: FiberNode | null;

  /** 表示commit阶段收集到的 等待被处理的被动Effect  被动Effect: 不会引起重新渲染的effect*/
  pendingPassiveEffects: PendingPassiveEffect;

  /** 和lane相关的属性 */
  /** 当前还未运行的任务的lane合集 */
  pendingLanes: Lanes;
  /** 已经完成运行的更新对应的lane 在render阶段结束之后设置,在commit阶段置空 类似于finishedWork */
  finishedLane: Lane;

  /** 需要传入container 和 第一个HostRootFiber */
  constructor(conatiner: Container, hostRootFiber: FiberNode) {
    /** 保存container */
    this.container = conatiner;
    this.finishedWork = null;
    /** 需要建立关系:
     *  FiberRootNode.current -> hostRootFiber
     *  hostRootFiber.stateNode -> FiberRootNode
     */
    this.current = hostRootFiber;
    hostRootFiber.stateNode = this;

    /** 初始化pendingPassiveEffect */
    this.pendingPassiveEffects = {
      unmount: [],
      update: [],
    };

    /** 初始化lane */
    this.pendingLanes = NoLanes;
    this.finishedLane = NoLane;
  }
}
需要关注其中几个比较重要的属性。
我们知道,React在工作初始化时,需要绑定一个挂载点,通常是一个真实DOM元素,在早起的legacy模式中,我们使用ReactDOM.render(<App/>,Container)来把Container容器绑定到React上。新版本中,我们通过ReactDOM.createRoot(Conatiner)创建根(也就是FiberRootNode节点)并且传入Container,这个Container就保存在FiberRootNode的container属性上。
同时,我们还需要传入初始化的Fiber树根,即HostRootFiber,其和FiberRootNode的关系如下:
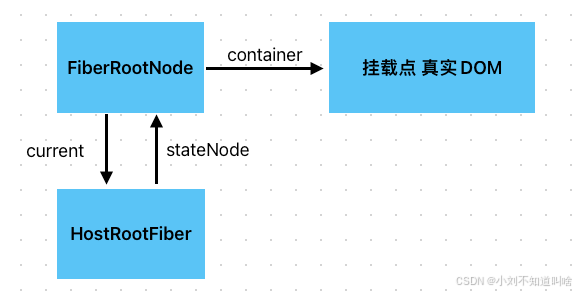
其中,HostRootFiber的stateNode节点指向FiberRootNode
FiberRootNode的current节点指向HostRootFiber
这样双向的指向方便互相查找。完善后的完整Fiber树结构如图所示:

根的创建
根的创建是由定义在ReactDOM中的createRoot函数完成,其实现如下:
TypeScript
/** 创建应用根节点FiberRootNode 以及第一个HostRoot节点 hostRootFiber */
const createContainer = (container: Container) => {
  // 第一个hostRoot节点
  const hostRootFiber = new FiberNode(HostRoot, {}, null);
  // 创建整个应用的根节点: FiberRootNode
  const root = new FiberRootNode(container, hostRootFiber);
  // 创建一个hostRootFiber的更新队列 (updateQueue) 存放的是新的root element
  hostRootFiber.updateQueue = new UpdateQueue<ReactElement>();
  return root;
};

/**
 * 更新container 需要传入
 * @param element 新的element节点
 * @param root APP根节点
 */
const updateContainer = (element: ReactElement, root: FiberRootNode) => {
  // 默认情况下 同步渲染
  scheduler.runWithPriority(PriorityLevel.IMMEDIATE_PRIORITY, () => {
    // 请求获得当前更新lane
    const lane = requestUpdateLane();
    // 获hostRootFiber
    const hostRootFiber = root.current;
    // 更新的Element元素入队
    hostRootFiber.updateQueue?.enqueue(
      new Update<ReactElement>(element, lane),
      hostRootFiber,
      lane
    );
    // scheduleUpdateOnFiber 调度更新
    scheduleUpdateOnFiber(root.current, lane);
  });
};

/** 创建根节点的入口 */
export function createRoot(container: Container) {
  // 创建FiberRootNode
  const root = createContainer(container);
  return {
    render(element: ReactElement) {
      // TODO
      // 初始化合成事件
      initEvent(container);
      // 更新contianer
      return updateContainer(element, root);
    },
  };
}
其中 createContainer函数根据createRoot传入的container容器节点,创建出FiberRootNode以及HostRootFiber 并且完成二者的关联以及container与FiberRootNode的绑定,并且返回根节点。
createRoot返回一个包含render方法的对象,调用者调用render函数并且传入要渲染的ReactElement对象,开启渲染流程。即如下调用
TypeScript
// index.ts
import { createElement } from "../lib/react";
import { createRoot } from "../lib/react-dom";
import App from "./App";

const root = createRoot(document.querySelector("#root-master"));
root.render(createElement(App, {}));
以上为React开启渲染流程的入口和前置知识。