揭秘命令模式:用C++实现智能家居的"万能遥控器"

一、从餐厅点餐看命令模式精髓
想象你坐在餐厅点餐时,服务员记录你的订单交给后厨,这个看似简单的过程蕴含着软件设计的智慧。命令模式(Command)正是将这种"请求封装为对象"的思想应用于软件设计,实现调用者与执行者的完美解耦。
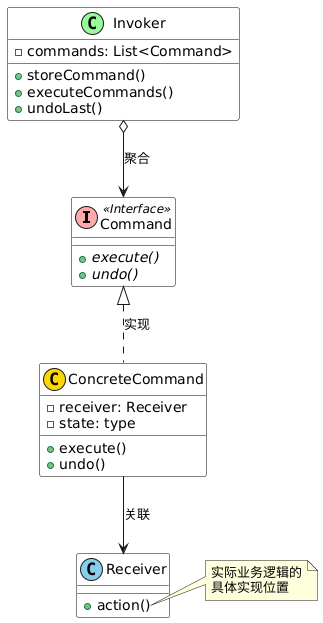
二、命令模式四大核心角色
-
Command(命令接口)
- 声明执行操作的接口(execute/undo)
-
ConcreteCommand(具体命令)
- 绑定接收者与动作的对应关系
- 实现execute和undo的具体逻辑
-
Invoker(调用者)
- 持有命令对象,触发命令执行
- 可扩展命令队列、撤销栈等高级功能
-
Receiver(接收者)
- 真正执行操作的对象,知道如何实现请求
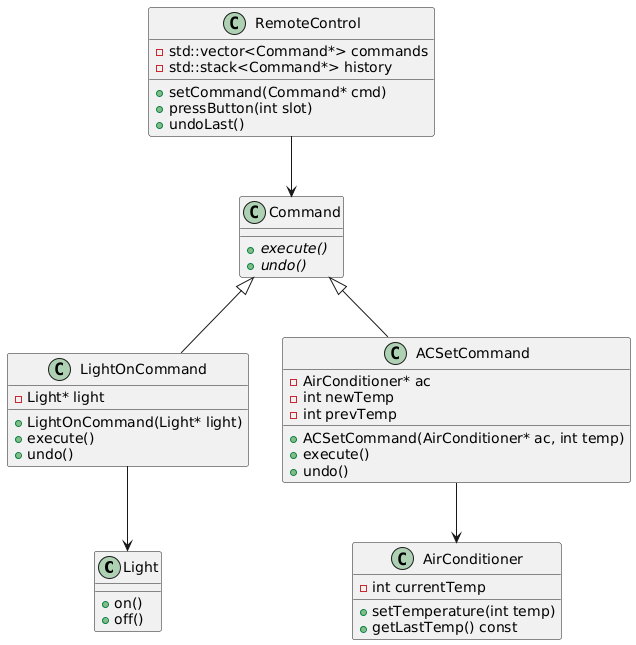
三、C++实战:智能家居控制系统
1.场景描述
开发支持多设备控制的智能家居系统,要求:
- 统一控制接口
- 支持操作撤销
- 方便扩展新设备
2.代码实现
cpp
#include <iostream>
#include <vector>
#include <memory>
#include <stack>
// 接收者:智能灯
class Light {
public:
    void on() { std::cout << "Light is ON" << std::endl; }
    void off() { std::cout << "Light is OFF" << std::endl; }
};

// 接收者:空调
class AirConditioner {
public:
    void setTemperature(int temp) {
        currentTemp = temp;
        std::cout << "AC set to " << temp << "℃" << std::endl;
    }

    int getLastTemp() const { return currentTemp; }
private:
    int currentTemp = 26;
};

// 命令接口
class Command {
public:
    virtual ~Command() = default;
    virtual void execute() = 0;
    virtual void undo() = 0;
};

// 具体命令:开灯命令
class LightOnCommand : public Command {
public:
    explicit LightOnCommand(Light* light) : light(light) {}

    void execute() override { light->on(); }
    void undo() override { light->off(); }

private:
    Light* light;
};

// 具体命令:空调温度设置命令
class ACSetCommand : public Command {
public:
    ACSetCommand(AirConditioner* ac, int temp)
        : ac(ac), newTemp(temp), prevTemp(ac->getLastTemp()) {}

    void execute() override {
        ac->setTemperature(newTemp);
    }

    void undo() override {
        ac->setTemperature(prevTemp);
    }

private:
    AirConditioner* ac;
    int newTemp;
    int prevTemp;
};

// 调用者:遥控器
class RemoteControl {
public:
    void setCommand(Command* cmd) {
        commands.push_back(cmd);
    }

    void pressButton(int slot) {
        if (slot < commands.size()) {
            commands[slot]->execute();
            history.push(commands[slot]);
        }
    }

    void undoLast() {
        if (!history.empty()) {
            history.top()->undo();
            history.pop();
        }
    }

private:
    std::vector<Command*> commands;
    std::stack<Command*> history;
};
cpp
// main.cc
#include "commond.h"
// 客户端使用示例
int main() {
    // 初始化设备
    Light livingRoomLight;
    AirConditioner bedroomAC;

    // 创建命令对象
    LightOnCommand lightOn(&livingRoomLight);
    ACSetCommand acSet(&bedroomAC, 22);

    // 配置遥控器
    RemoteControl remote;
    remote.setCommand(&lightOn);  // 0号按钮:开灯
    remote.setCommand(&acSet);    // 1号按钮:设置空调

    // 执行命令
    remote.pressButton(0);  // 开灯
    remote.pressButton(1);  // 设置空调温度
    remote.undoLast();       // 撤销空调设置

    return 0;
}
3.执行结果
Light is ON
AC set to 22℃
AC set to 26℃
四、命令模式优势与适用场景
1.核心优势:
- 彻底解耦调用者与接收者
- 支持操作队列、日志记录、撤销/重做等扩展
- 方便实现宏命令(命令组合)
2.典型应用场景:
- 需要回调机制的软件系统
- 需要实现操作撤销/重做功能
- 需要记录操作历史的系统
- 需要实现任务调度或延迟执行
五、模式延伸与思考
- 命令队列:将命令存入队列实现异步执行
- 宏命令:组合多个命令形成复合命令
- 事务处理:通过命令日志实现事务回滚
- 智能命令:命令对象可自主决定是否执行
思考题:在你的项目中,哪些场景可以用命令模式重构?欢迎在评论区分享你的见解!
通过本文,我们不仅掌握了命令模式的理论知识,还实现了一个功能完备的智能家居控制系统。这种模式在GUI事件处理、事务系统、工作流引擎等领域都有广泛应用。下次当你需要将"请求"抽象为对象时,不妨试试这个强大的模式。