前面几篇遇到updateQueue的时候,我们把它先简单的当成了一个队列处理,这篇我们来详细讨论一下这个更新队列。 有关updateQueue中的部分,可以见源码 UpdateQueue实现
Update对象
我们先来看一下UpdateQueue中的内容,Update对象,其实现如下:
TypeScript
/** 更新的Action 可以是State 也可以是函数 */
export type Action<State> = State | ((prevState: State) => State);
/** 定义Dispatch函数 */
export type Dispatch<State> = (action: Action<State>) => void;

/** 更新对象 */
export class Update<State> {
  next: Update<State>;
  action: Action<State>;
  lane: Lane; // 当前更新的优先级Lane
  constructor(action: Action<State>, lane: Lane) {
    this.action = action;
    this.next = null;
    this.lane = lane;
  }
}
其中,包含
- action: Action对象,可以是任意类型,对应的我们在setState中传入的参数,如果传入一个函数,对应的是函数类型action,则运行函数得到状态值。如果不是函数,则直接将其作为状态值。
- lane: 当前更新对应的优先级lane
- next: 涉及到updateQueue的数据结构,指向下一个Update对象
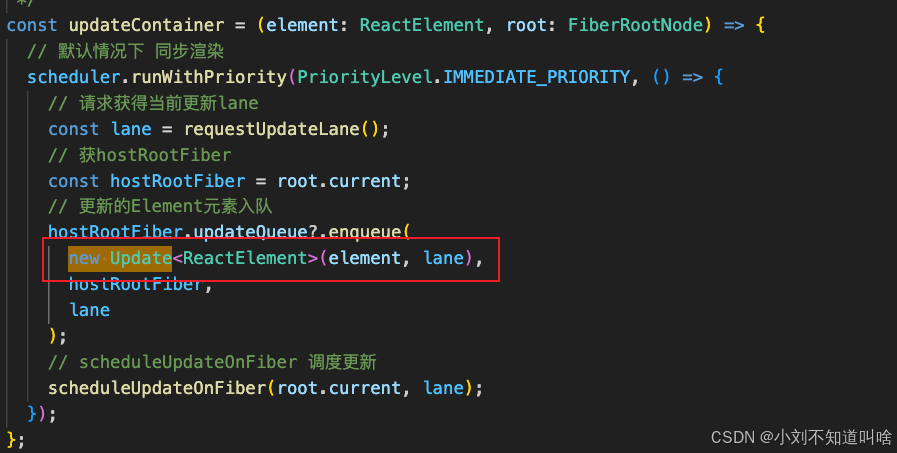
我们在很多地方都需要创建更新对象,比如dispatchSetState是,即你修改状态的时候
 初始化的时候,在updateContainer中,也会创建update对象
updateQueue - 环形链表
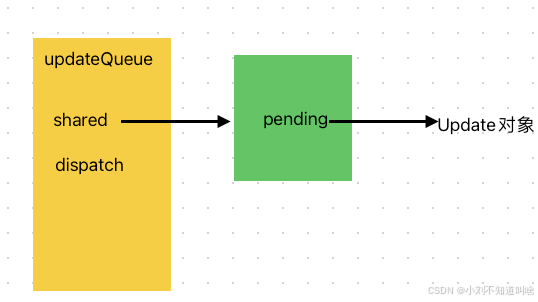
updateQueue本质上是一个存储Update对象的数据结构,但是其不是一个普通的数组,其内部实现了一个环形链表用来存储Update对象,其定义如下
TypeScript
export class UpdateQueue<State> {
  shared: {
    pending: Update<State> | null;
  };
  /** 派发函数 */
  dispatch: Dispatch<State>;
  /** 基础队列 */
  baseQueue: Update<State> | null;
  /** 基础state */
  baseState: State;
...
}
其内部包含shared属性,指向一个对象,对象中包含pending对象,指向Update对象,如下图所示
其中,Update对象的next指针指向下一个Update对象,其组成一个环形链表,如图所示:
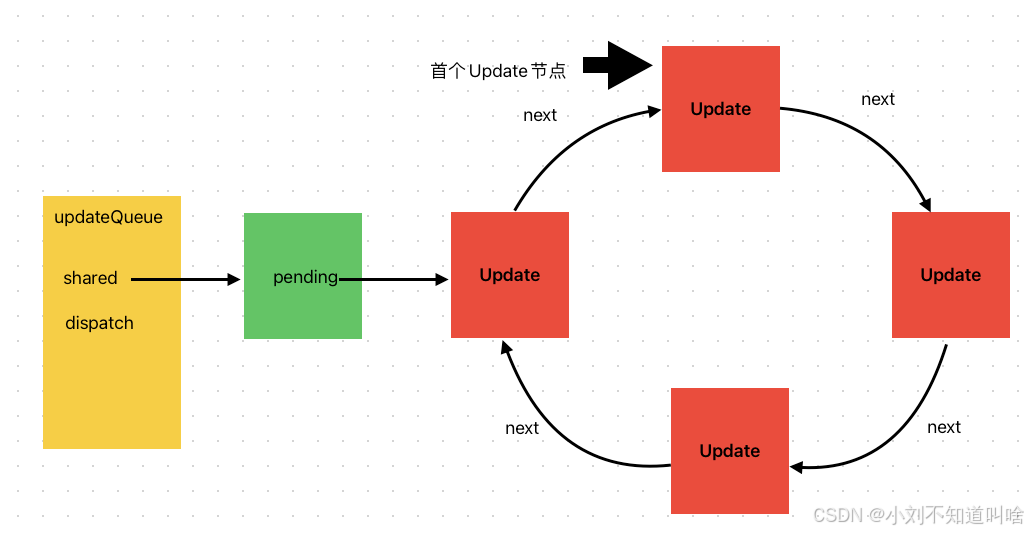
其中:
- updateQueue.shared.pending指向最后一个Update节点
- updateQueue.shared.pending.next 为第一个Update节点
为什么使用环形链表?
这里使用环形链表的一个好处是,其可以很方便的找到首位元素,可以方便的遍历链表,也可以方便的对两个链表进行拼接,这个在后面的baseQueue 和 baseState逻辑中会用到。
enqueue入队
enqueue为UpdateQueue的类方法,其作用就是给队列插入Update对象,其实现如下:
TypeScript
/** 入队,构造环状链表 */
enqueue(update: Update<State>, fiber: FiberNode, lane: Lane) {
if (this.shared.pending === null) {
// 插入第一个元素,此时的结构为
// shared.pending -> firstUpdate.next -> firstUpdate
update.next = update;
this.shared.pending = update;
} else {
// 插入第二个元素
update.next = this.shared.pending.next;
this.shared.pending.next = update;
this.shared.pending = update;
}
/** 在当前的fiber上设置lane */
fiber.lanes = mergeLane(fiber.lanes, lane);
/** 在current上也设置lane 因为在beginwork阶段 wip.lane = NoLane 如果bailout 需要从current恢复 */
const current = fiber.alternate;
if (current) {
current.lanes = mergeLane(current.lanes, lane);
}
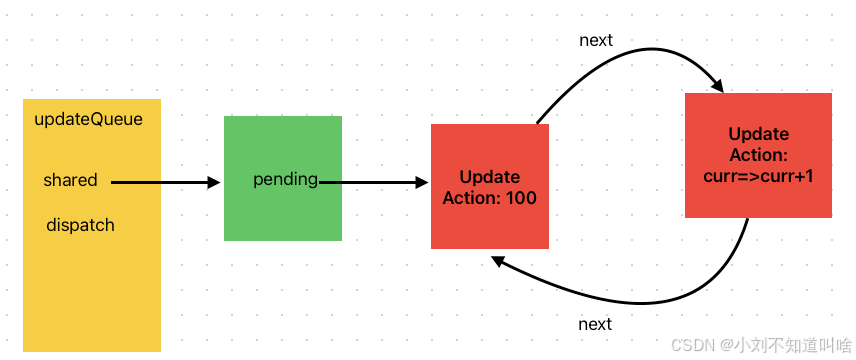
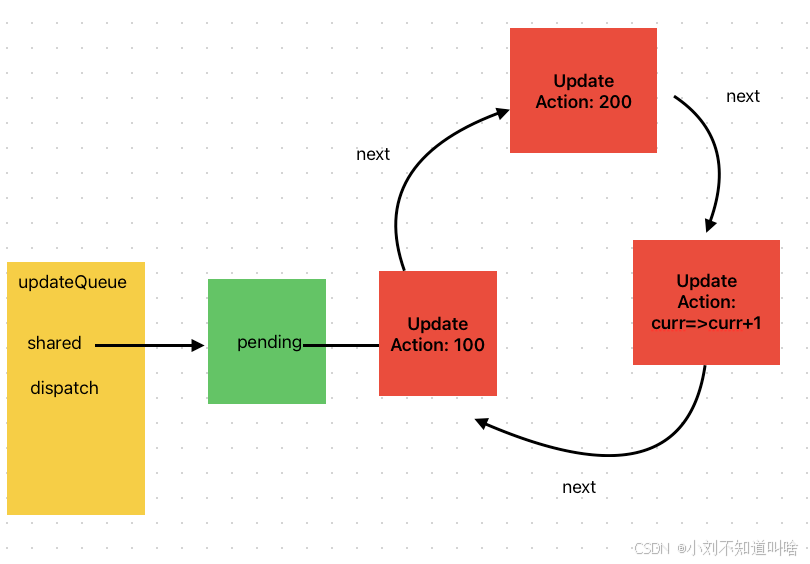
}我们用一个插入队列来演示插入过程:
TypeScript
// 假设有插入队列
enqueue(100)
enqueue(current => current + 1)
enqueue(200)
插入100, 100对应的pending.next指向自己,此时100对应的Update又是首节点也是尾节点
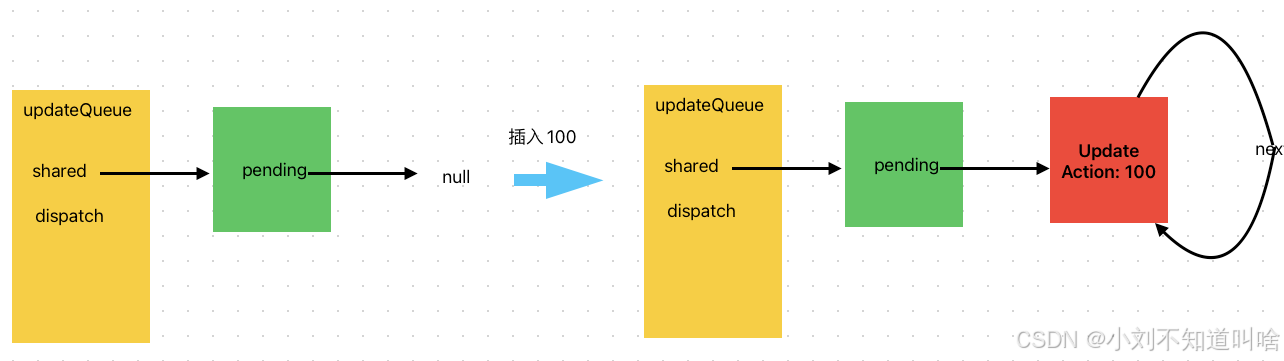
插入curr=>curr+1的update节点,此时首节点为pending.nexy也就是 curr=>curr+1 尾节点为100
插入200节点,此时首节点为200 尾节点为100 都是从pending.next的位置插入,如图
设置lane
enqueue方法除了传入更新对象,还需要传入更新所发生在的Fiber对象和对应的更新lane,其目的是在当前更新的Fiber上记录lane,其逻辑如下:
TypeScript
    /** 在当前的fiber上设置lane */
    fiber.lanes = mergeLane(fiber.lanes, lane);
    /** 在current上也设置lane 因为在beginwork阶段 wip.lane = NoLane 如果bailout 需要从current恢复 */
    const current = fiber.alternate;
    if (current) {
      current.lanes = mergeLane(current.lanes, lane);
    }
可以看到,当前更新的fiber节点的alternate节点的lanes也被设置了,这是为了先保存当前的lanes方便后面中短渲染 如bailout的时候能恢复当前fiber的lanes
processQueue - 处理更新
process函数的作用就是处理当前队列的所有更新,在不考虑优先级的情况下,其实现可以简化为如下代码:
TypeScript
  /** 处理任务 */
  process() {
    // 当前遍历到的update
    let memorizedState;
    let currentUpdate = this.baseQueue?.next;
    if (currentUpdate) {
      do {
         const currentAction = currentUpdate.action;
            if (currentAction instanceof Function) {
              /** Action是函数类型 运行返回newState */
              memorizedState = currentAction(memorizedState);
            } else {
              /** 非函数类型,直接赋给新的state */
              memorizedState = currentAction;
            }

        currentUpdate = currentUpdate.next;
      } while (currentUpdate !== this.baseQueue?.next);
    }
    return  memorizedState;
  }
即循环遍历整个环状链表,对action的类型进行检测,如果是函数则运行,如果是非函数直接把ation赋给memorizedState,最后将memorizedState返回即可!
引入优先级lane
如果加入优先级lane的处理逻辑,process的处理逻辑会稍微有些复杂,我们看个例子
TypeScript
onClick={()=>{
    // 同步更新Lane = 1
    setvariable(100)

    startTransition(()=>{
        // 可以理解为 创建一个优先级lane=8的Update
        setVariable(curr=>curr+100)
    })
   // 同步更新Lane = 1
    setVariable(curr => curr + 100)

}}
在一个onClick函数中,我们设置了三次setVariable函数,其中,第二次setter使用startTranstion包裹,这个函数由useTranstion hook提供,这个后面再讲,你可以先理解为,在这个startTransition包裹的setter对应的优先级都会被改成 8 即可 TransitionLane
此时,variable hook中的updateQueue对应的shared.pending队列如下:

由于队列中的优先级不同,我们一次只处理一个优先级的Update对象,对于其他优先级的对象需要进行跳过。
但是需要注意,被我们跳过的更新需要在后面的更新中被执行,并且,虽然我们通过优先级把一次更新拆分成了两次更新,但是最终的结果需要是一样的。
比如,第一次更新
执行 action 100
跳过 curr=>curr+100 并且记住此时的状态100
执行curr => curr + 200
此时的结果为 300
第二次更新,需要从上次执行到的位置重新执行
执行curr=>curr+100 结果为200
执行 curr=>curr+200 (虽然此Update执行过了,但是为了保证结果一致,还需执行)结果为400
注意,虽然拆成了两次更新,但是最终更新的结果一定是和不加startTranstion按顺序执行的结果一样的!
这样我们就可以把高耗时的更新操作设置低优先级,先处理低耗时的更新,同时保证最终结果不变。
实现这样逻辑的算法如下:
准备一个memorizedState,记录当前updateQueue的状态值
准备一个baseState 用来记录第一个 跳过第一个Update时的状态值
准备一个baseQueue,用来记录本次更新跳过的更新对象 和 跳过更新之后的更新对象, 下一次更新就用这个baseQueue中的Update
遍历队列元素,使用isSubsetOfLanes来判断当前Update.lane是不是等于当前正在更新的lane(wipRenderedLane)
如果是则看baseQueue队列
如果baseQueue队列为空, 则执行action,给memorizedState赋值
如果baseQueue队列不为空, 则说明当前更新前面,已经有跳过的Update被加入到baseQueue了,那么其后面所有的Update对象都要加入baseQueue,则把当前Update对象克隆一份,并且设置优先级为Nolanes,以保证下次更细当前Update一定能被执行,推入baseQueue
并且,由于当前Update的lane是满足的,需要执行action,更新memorizedState
如果不是, 看updateQueue队列
如果队列为空,此时为第一个跳过的Update对象,把当前的Update对象克隆一 份push到baseQueue中,并且把当前memorizedState赋给baseState,记录本次更新第一个跳过Update对应的状态,下次更新就从此开始
如果队列不为空,和上面一样,区别就是不赋baseState了,注意baseState只有第一次更新才设置
最后返回 memorizedState 并且把baseState baseQueue记录在当前updateQueue对象上,复习一下UpdateQueue的ts定义。
TypeScriptexport class UpdateQueue<State> { shared: { pending: Update<State> | null; }; /** 派发函数 */ dispatch: Dispatch<State>; /** 基础队列 */ baseQueue: Update<State> | null; /** 基础state */ baseState: State; ... }
下面我们画图来解释一下 Update队列如下:
TypeScript
Update List
[action: 100,lane: 1]
[action: curr => curr + 100, lane: 8]
[action: curr = curr+ 200,lane: 1]
此时的updateQueue和状态如下:
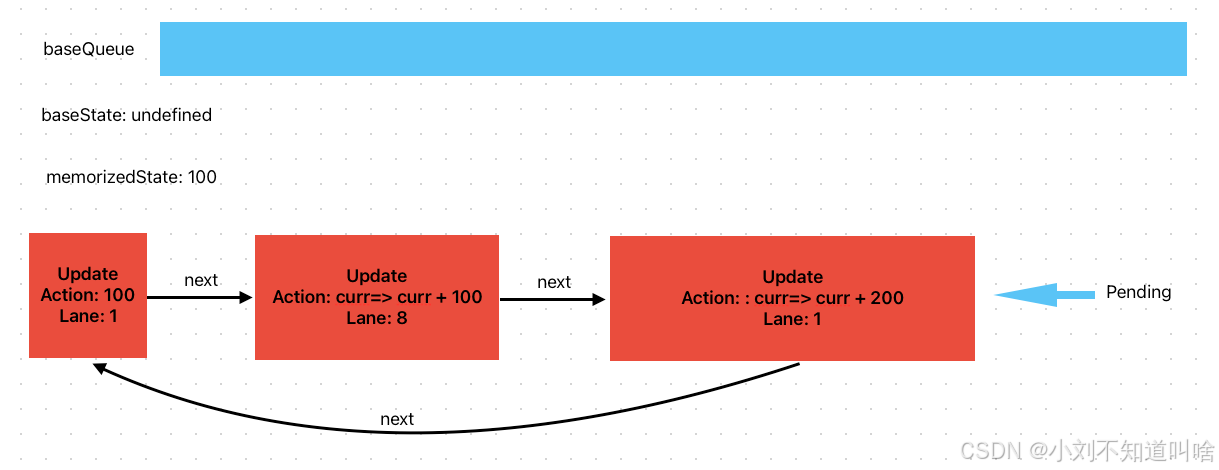
此时的root.pendinglanes 包含lane1 和 lane8 即SyncLane和TranstionLane
开始更新最高的优先级lane1 , 处理第一个Update,由于满足优先级,直接计算并且更新memorizedState = 100
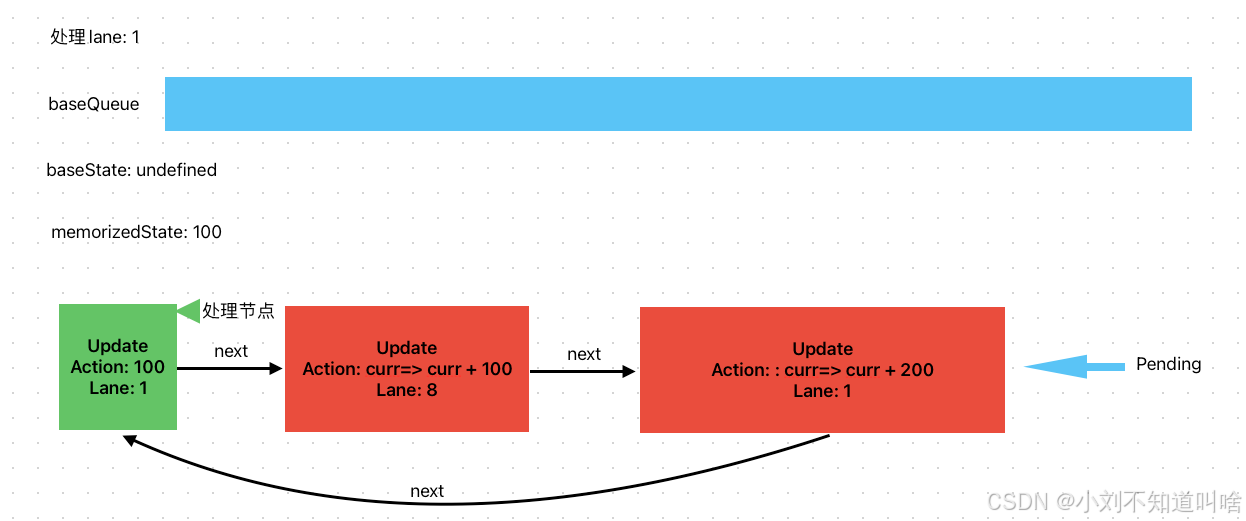
继续处理到curr=>curr+100 此时lane=8 需要跳过,但是此时baseQueue为空,为第一个跳过的更新,需要baseState记录跳过之前的memorizedState = 100,并且克隆一份Update 推入baseQueue
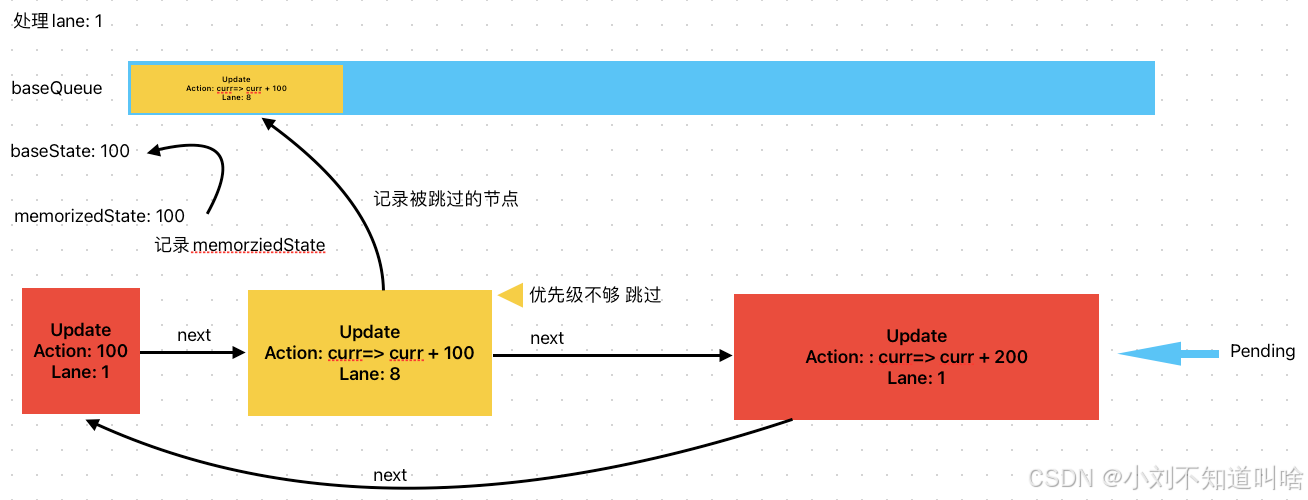
继续处理curr=>curr+200 此时满足lane=1 但是由于baseQueue已经不为空,则后面所有的Update无论什么优先级,都需要克隆一份Update对象并且设置lanes为NoLane 推入baseQueue
同时需要计算action更新memorizedState为300
第一轮更新结束,此时状态为300,保存baseState和baseQueue并且删除shared.pending队列,因为已经用不上了。
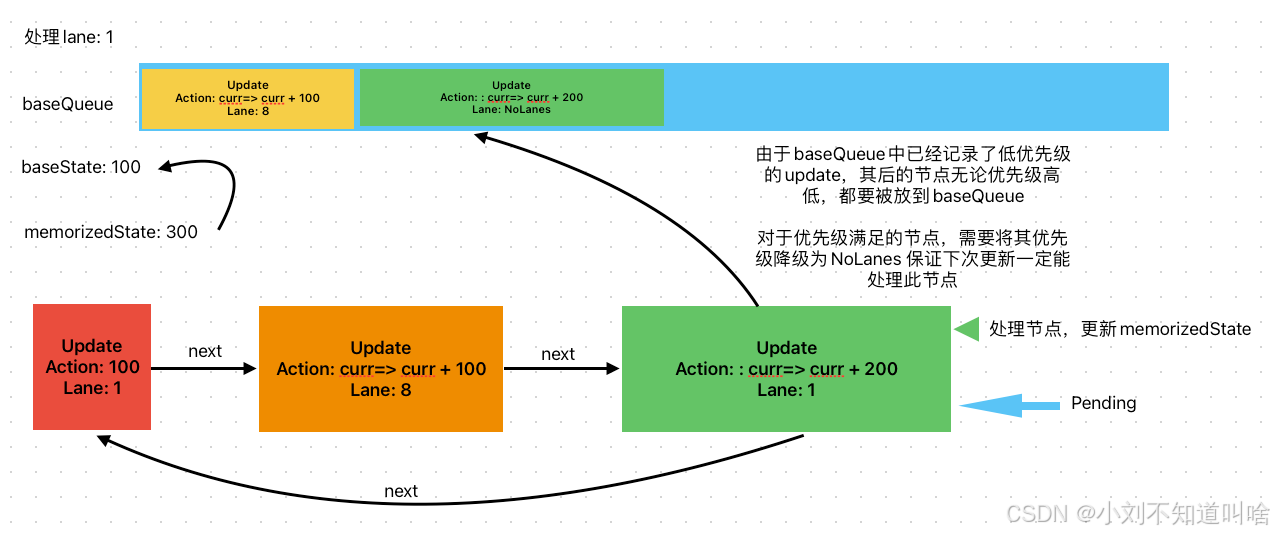
第二轮更新 lane=8 此时从baseQueue中取出上次跳过的更新,继续处理,此时memorizedState被baseState初始化为100
 处理第一个更新,此时memorizedState=200
处理第二个更新,由于是任意Lanes&NoLanes === NoLanes 所以第二个update也满足优先级,更新memorizedState=400 此时完成更新
 最终结果为400
两次更新,第一次更新值为300 第二次更新值为400 做到了过渡的作用
如果页面中包含逻辑,如果variable === 400 则渲染10000个li 此时如果不用startTranstion降低优先级,则更新variable到400的那次更新的优先级lane=1 那么此时如果有更高优先级任务来,则此次lane=1的更新无法被打断,导致页面卡住不动 影响用户体验。
如果更新到400的更新优先级为8 那么当更高优先级更新来的时候,此次大规模的更新会被打断,优先执行更高优先级更新(比如用户事件) 在高优先级任务执行完成之后,再执行这个大规模更新渲染,优化了用户体验!
连接baseQueue和pending
每一轮更新之后,pending对应的update环会被清空,但是当处理本次更新的时候,又有新的update被挂上,此时baseQueue和pending都有值
比如,在某次更新的useEffect中,设置了setVariable 此时的更新队列中又有新的更新了
此时就需要把baseQueue队列和pending队列连接,baseQueue队列在前
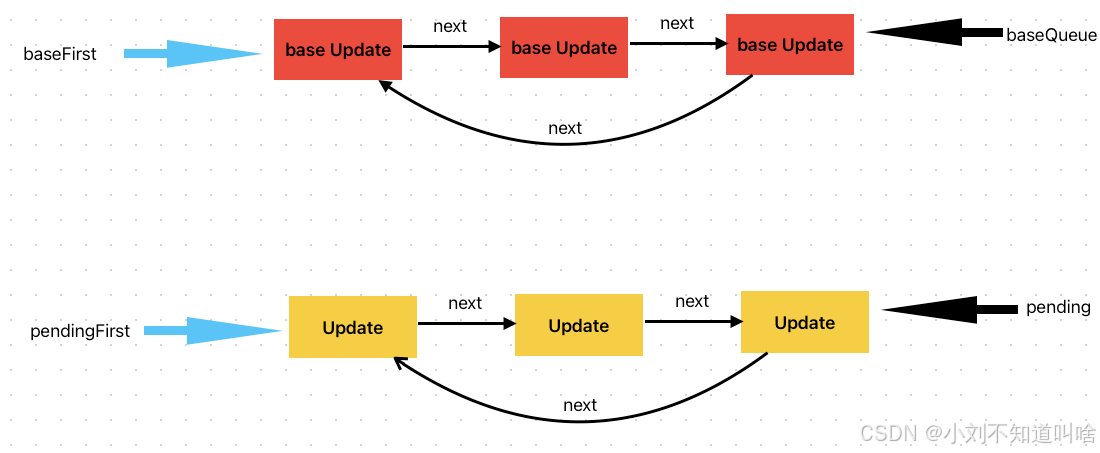
需要定义两个变量 baseFirst 和 pendingFirst 分别指向baseQueue和pending的对头,因为改变过pending/baseQueue.next 之后 就无法直接找到队头元素
第一步 设置baseQueue.next = pendingFirst 把baseQueue尾和pending头连接 如图
 第二步 Pending.next = baseFirst 此时pending队列的尾和baseQueue头连接 如图
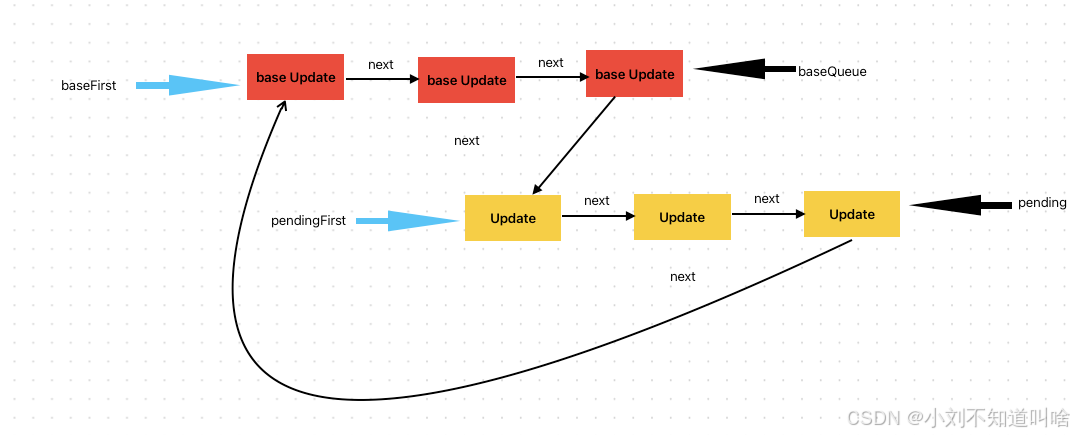
此时 baseFirst 就是整个队列的头部了
说完了原理,我们看一下process方法的完整实现:
TypeScript
  /** 处理任务 */
  process(renderLane: Lane, onSkipUpdate?: (update: Update<any>) => void) {
    /** 获取baseQueue pending 完成拼接 */
    let baseState = this.baseState;
    let baseQueue = this.baseQueue;
    const currentPending = this.shared.pending;

    // 生成新的baseQueue过程
    if (currentPending !== null) {
      if (baseQueue !== null) {
        // 拼接两个队列
        // pending -> p1 -> p2 -> p3
        const pendingFirst = currentPending.next; // p1
        // baseQueue -> b1->b2->b3
        const baseFirst = baseQueue.next; // b1
        // 拼接
        currentPending.next = baseFirst; // p1 -> p2 -> p3 -> pending -> b1 -> b2 -> b3
        baseQueue.next = pendingFirst; //b1-> b2 -> b3 -> baseQueue -> p1 -> p2 -> p3
        // p1 -> p2 -> p3 -> pending -> b1 -> b2 -> b3 baseQueue
      }
      // 合并 此时 baseQueue -> b1 -> b2 -> b3 -> p1 -> p2 -> p3
      baseQueue = currentPending;

      // 覆盖新的baseQueue
      this.baseQueue = baseQueue;

      // pending可以置空了
      this.shared.pending = null;
    }

    // 消费baseQueue过程
    // 设置新的basestate和basequeue
    let newBaseState: State = baseState;
    let newBaseQueueFirst: Update<State> | null = null;
    let newBaseQueueLast: Update<State> | null = null;
    // 新的计算值
    let memorizedState: State = baseState;

    // 当前遍历到的update
    let currentUpdate = this.baseQueue?.next;
    if (currentUpdate) {
      do {
        const currentUpdateLane = currentUpdate.lane;
        // 看是否有权限
        if (isSubsetOfLanes(renderLane, currentUpdateLane)) {
          // 有权限
          if (newBaseQueueFirst !== null) {
            // 已经存在newBaseFirst 则往后加此次的update 并且将此次update的lane设置为NoLane 保证下次一定能运行
            const clone = new Update(currentUpdate.action, NoLane);
            newBaseQueueLast = newBaseQueueLast.next = clone;
          }

          if (currentUpdate.hasEagerState) {
            memorizedState = currentUpdate.eagerState;
          } else {
            // 不论存不存在newBaseFirst 都要计算memorizedState
            const currentAction = currentUpdate.action;
            if (currentAction instanceof Function) {
              /** Action是函数类型 运行返回newState */
              memorizedState = currentAction(memorizedState);
            } else {
              /** 非函数类型,直接赋给新的state */
              memorizedState = currentAction;
            }
          }
        } else {
          // 无权限
          const clone = new Update(currentUpdate.action, currentUpdate.lane);
          if (onSkipUpdate) {
            onSkipUpdate(clone);
          }
          // 如果newBaseQueueFirst === null 则从第一个开始添加newbaseQueue队列
          if (newBaseQueueFirst === null) {
            newBaseQueueFirst = newBaseQueueLast = clone;
            // newBaseState到此 不在往后更新 下次从此开始
            newBaseState = memorizedState;
          } else {
            newBaseQueueLast = newBaseQueueLast.next = clone;
          }
        }

        currentUpdate = currentUpdate.next;
      } while (currentUpdate !== this.baseQueue?.next);
    }

    if (newBaseQueueFirst === null) {
      // 此次没有update被跳过,更新newBaseState
      newBaseState = memorizedState;
    } else {
      // newbaseState不变 newBaseQueueFirst newBaseQueueLast 成环
      newBaseQueueLast.next = newBaseQueueFirst;
    }

    // 保存baseState和BaseQueue
    this.baseQueue = newBaseQueueLast;
    this.baseState = newBaseState;
    return { memorizedState };
  }